element14 Community
element14 Community
    Register Log In
  • Site
  • Search
  • Log In Register
  • Community Hub
    Community Hub
    • What's New on element14
    • Feedback and Support
    • Benefits of Membership
    • Personal Blogs
    • Members Area
    • Achievement Levels
  • Learn
    Learn
    • Ask an Expert
    • eBooks
    • element14 presents
    • Learning Center
    • Tech Spotlight
    • STEM Academy
    • Webinars, Training and Events
    • Learning Groups
  • Technologies
    Technologies
    • 3D Printing
    • FPGA
    • Industrial Automation
    • Internet of Things
    • Power & Energy
    • Sensors
    • Technology Groups
  • Challenges & Projects
    Challenges & Projects
    • Design Challenges
    • element14 presents Projects
    • Project14
    • Arduino Projects
    • Raspberry Pi Projects
    • Project Groups
  • Products
    Products
    • Arduino
    • Avnet & Tria Boards Community
    • Dev Tools
    • Manufacturers
    • Multicomp Pro
    • Product Groups
    • Raspberry Pi
    • RoadTests & Reviews
  • About Us
  • Store
    Store
    • Visit Your Store
    • Choose another store...
      • Europe
      •  Austria (German)
      •  Belgium (Dutch, French)
      •  Bulgaria (Bulgarian)
      •  Czech Republic (Czech)
      •  Denmark (Danish)
      •  Estonia (Estonian)
      •  Finland (Finnish)
      •  France (French)
      •  Germany (German)
      •  Hungary (Hungarian)
      •  Ireland
      •  Israel
      •  Italy (Italian)
      •  Latvia (Latvian)
      •  
      •  Lithuania (Lithuanian)
      •  Netherlands (Dutch)
      •  Norway (Norwegian)
      •  Poland (Polish)
      •  Portugal (Portuguese)
      •  Romania (Romanian)
      •  Russia (Russian)
      •  Slovakia (Slovak)
      •  Slovenia (Slovenian)
      •  Spain (Spanish)
      •  Sweden (Swedish)
      •  Switzerland(German, French)
      •  Turkey (Turkish)
      •  United Kingdom
      • Asia Pacific
      •  Australia
      •  China
      •  Hong Kong
      •  India
      • Japan
      •  Korea (Korean)
      •  Malaysia
      •  New Zealand
      •  Philippines
      •  Singapore
      •  Taiwan
      •  Thailand (Thai)
      • Vietnam
      • Americas
      •  Brazil (Portuguese)
      •  Canada
      •  Mexico (Spanish)
      •  United States
      Can't find the country/region you're looking for? Visit our export site or find a local distributor.
  • Translate
  • Profile
  • Settings
Path to Programmable
  • Challenges & Projects
  • Design Challenges
  • Path to Programmable
  • More
  • Cancel
Path to Programmable
Blog Lab 3 - Bolting on a few more bits of hardware :)
  • Blog
  • Forum
  • Documents
  • Polls
  • Files
  • Events
  • Mentions
  • Sub-Groups
  • Tags
  • More
  • Cancel
  • New
  • Share
  • More
  • Cancel
Group Actions
  • Group RSS
  • More
  • Cancel
Engagement
  • Author Author: aspork42
  • Date Created: 31 Oct 2018 3:08 AM Date Created
  • Views 492 views
  • Likes 4 likes
  • Comments 0 comments
  • xilinx
  • fpga
  • vivado
  • doesanyonereadthese
  • minized
Related
Recommended

Lab 3 - Bolting on a few more bits of hardware :)

aspork42
aspork42
31 Oct 2018

About:

Through Avnet, Xilinx and Element14, a training program to learn about the Zynq 7000 platform which is System On Chip combining an FPGA with an ARM processor. This comes to the students as complete development board packed with goodies like a wireless chip from MuRata (BT/BTLE/WIFI), 8GB Flash memory, onboard RAM, USB to JTAG (JTAG programmable over USB), Arduino-style headers (3.3V compatible only), Microphone, Bi-Color LED, and two additional expansion ports.


See all blog posts for this training here.


On to the lab!

This lab is a follow-up to lab #2 in which we configured our DDR Ram to work with the Zync. This lab runs back through the configuration to add in the QSPI, Ethernet port, USB, and additional GPIO.


The lessons are stressing the importance of adding these in the correct order and early in the project as there is the potential of resource conflicts down the line.


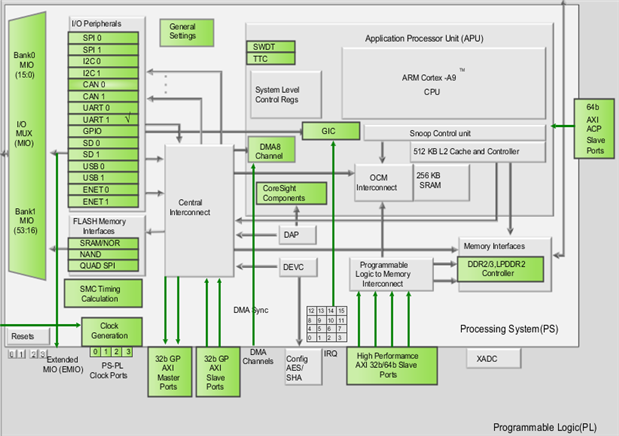
At the start of Lab #3, I only have the UART and DDR configured. I will be adding in additional peripherals.

image


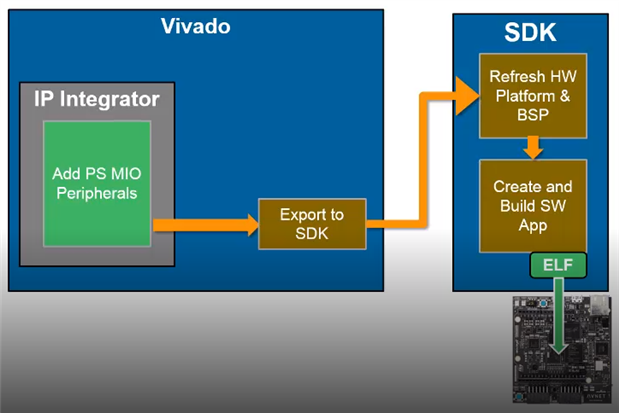
Here we can see the outline of the goals in this lab. We need to use Vivado to "bolt on" the additional options, export the VHDL file in the software development kit; where we 'refresh' what they call the "Board Support Package"; then run a few test programs to validate the new design.


image


Adding the hardware

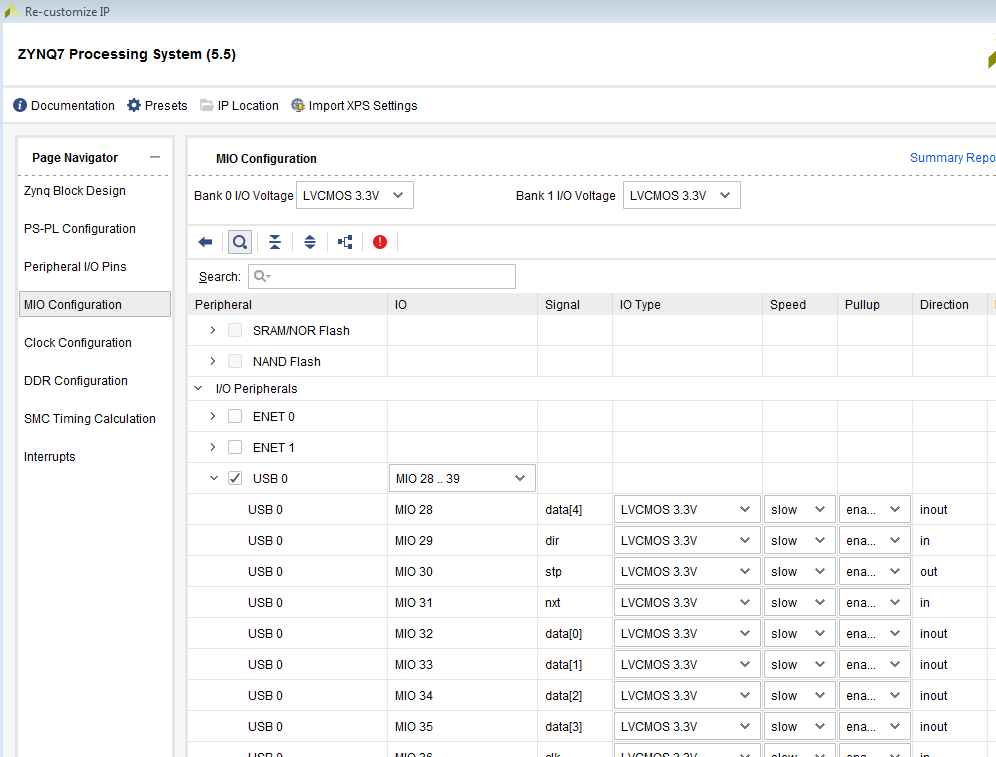
This was pretty straight forward. It did require careful following of the lab lessons to catch all the little portions that are required. Essentially, in Vivado I am going through the tool called "Re-Customize IP" to map the new devices. For example, with USB, I choose this from the MIO (Multiplexed IO) menu at the left, then check the box for "USB 0". Some options required customization of the options that are then available.

image


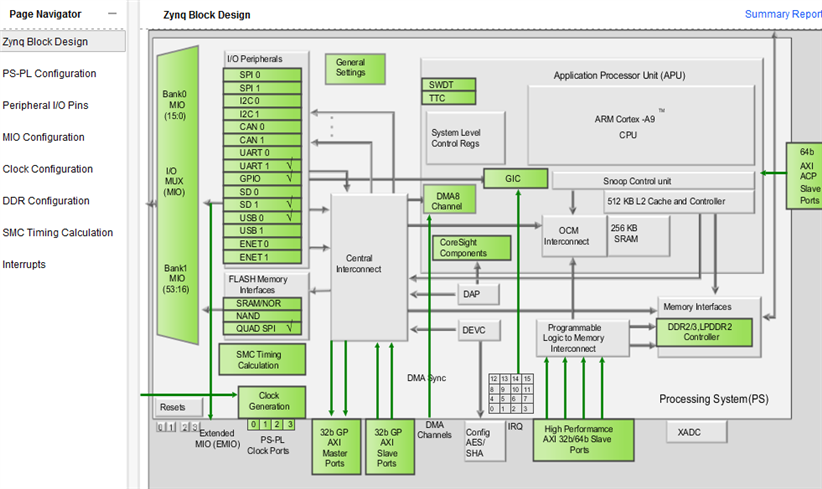
Once the new components were included, the Block Design looked like this which shows that everything is enabled.

image


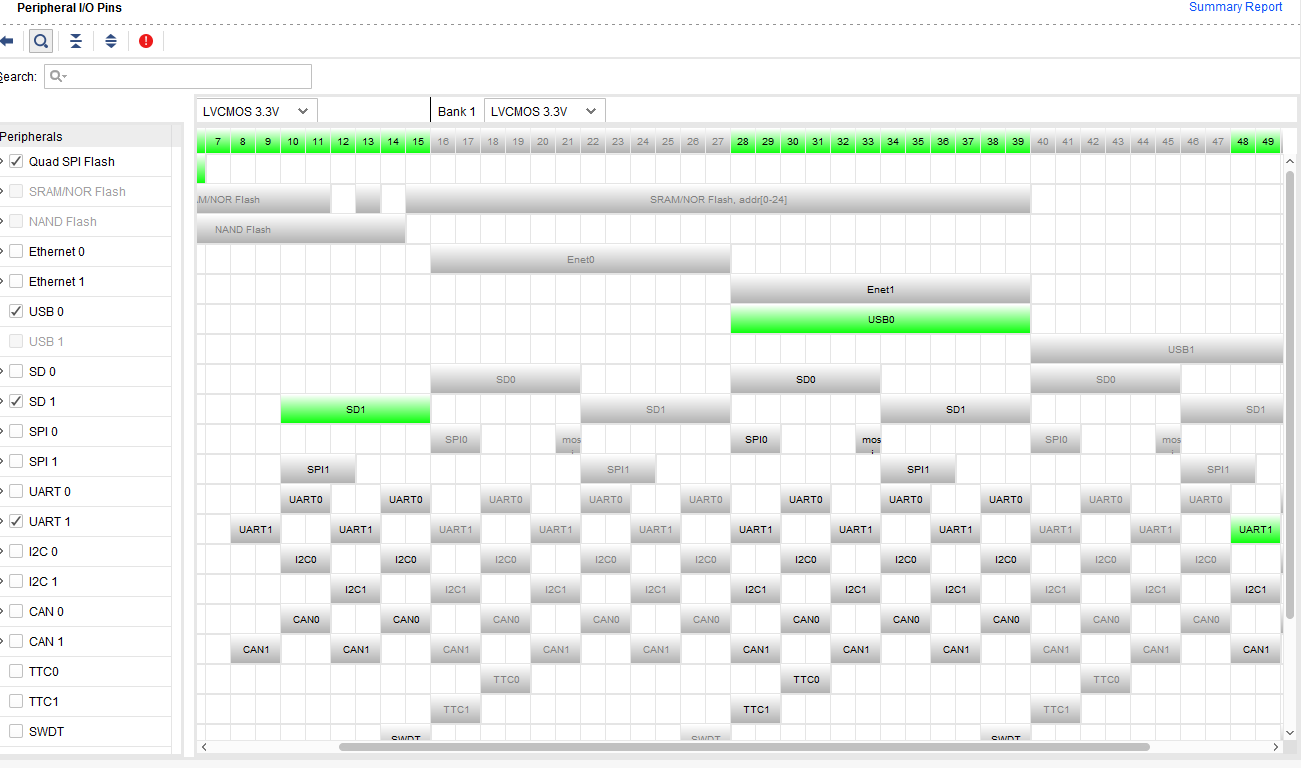
We also check the IO pins to be sure we haven't created any conflicts.

image


The next portion of the lesson has to do with setting custom clocks. I am still very new at a lot of this; so you will get to learn along with me! The Zync has a few (three ?) "PLL" devices - Phase Lock Loop. They are essentially master metronomes for the system; and subsequent systems can use this timing; or a divided-down version of any PLL source.

image


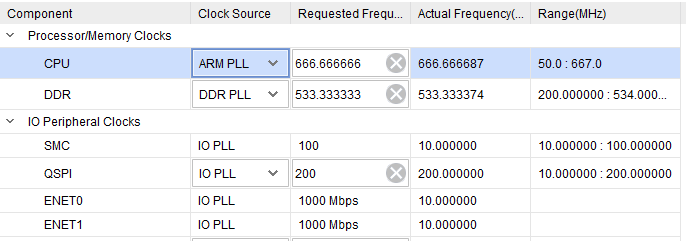
We can see the CPU is configured to listen to the "ARM PLL" at ~666. MHz. The DDR memory gets its own clock source from the "DDR PLL". The rest of the IO in this lesson is configured to use the dedicated "IO PLL". We can set different requested frequencies as long as they are integer divisors of the master PLL that they listen to.


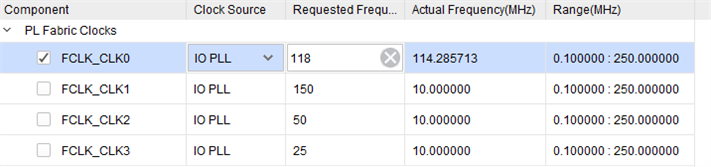
The program shows what happens when different requested frequencies are chosen. In this example, I requested 118 MHz; but Vivado shows that I'll actually see a different value since 118 doesn't go evenly into the master PLL.

image


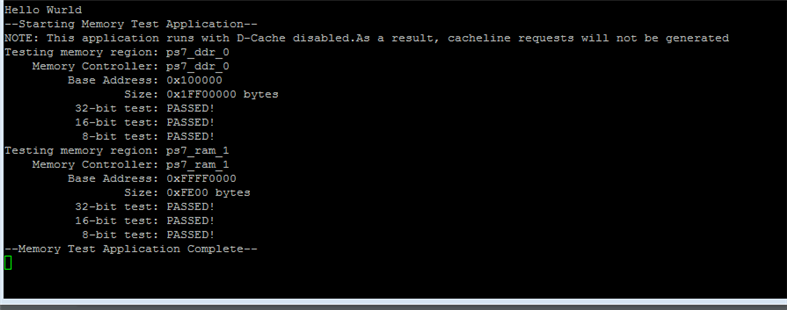
Once all the configuration changes are done, we validate & export the VHDL file and open the SDK for some memory tests.

image

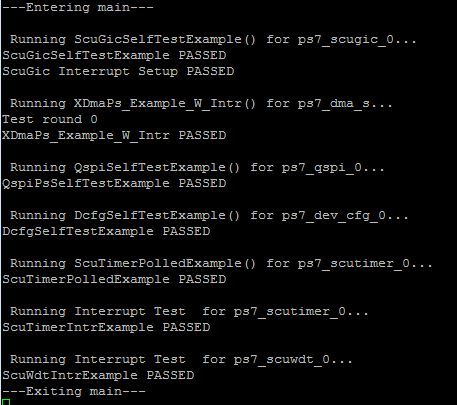
The memory and peripheral tests were canned but very useful to validate the design. I was able to run them both successfully; thus completing the lesson.

image


image


That's about it for this installment!

Looking forward to the next lesson to get further down the rabbit hole image

  • Sign in to reply
element14 Community

element14 is the first online community specifically for engineers. Connect with your peers and get expert answers to your questions.

  • Members
  • Learn
  • Technologies
  • Challenges & Projects
  • Products
  • Store
  • About Us
  • Feedback & Support
  • FAQs
  • Terms of Use
  • Privacy Policy
  • Legal and Copyright Notices
  • Sitemap
  • Cookies

An Avnet Company © 2025 Premier Farnell Limited. All Rights Reserved.

Premier Farnell Ltd, registered in England and Wales (no 00876412), registered office: Farnell House, Forge Lane, Leeds LS12 2NE.

ICP 备案号 10220084.

Follow element14

  • X
  • Facebook
  • linkedin
  • YouTube