element14 Community
element14 Community
    Register Log In
  • Site
  • Search
  • Log In Register
  • Community Hub
    Community Hub
    • What's New on element14
    • Feedback and Support
    • Benefits of Membership
    • Personal Blogs
    • Members Area
    • Achievement Levels
  • Learn
    Learn
    • Ask an Expert
    • eBooks
    • element14 presents
    • Learning Center
    • Tech Spotlight
    • STEM Academy
    • Webinars, Training and Events
    • Learning Groups
  • Technologies
    Technologies
    • 3D Printing
    • FPGA
    • Industrial Automation
    • Internet of Things
    • Power & Energy
    • Sensors
    • Technology Groups
  • Challenges & Projects
    Challenges & Projects
    • Design Challenges
    • element14 presents Projects
    • Project14
    • Arduino Projects
    • Raspberry Pi Projects
    • Project Groups
  • Products
    Products
    • Arduino
    • Avnet & Tria Boards Community
    • Dev Tools
    • Manufacturers
    • Multicomp Pro
    • Product Groups
    • Raspberry Pi
    • RoadTests & Reviews
  • About Us
  • Store
    Store
    • Visit Your Store
    • Choose another store...
      • Europe
      •  Austria (German)
      •  Belgium (Dutch, French)
      •  Bulgaria (Bulgarian)
      •  Czech Republic (Czech)
      •  Denmark (Danish)
      •  Estonia (Estonian)
      •  Finland (Finnish)
      •  France (French)
      •  Germany (German)
      •  Hungary (Hungarian)
      •  Ireland
      •  Israel
      •  Italy (Italian)
      •  Latvia (Latvian)
      •  
      •  Lithuania (Lithuanian)
      •  Netherlands (Dutch)
      •  Norway (Norwegian)
      •  Poland (Polish)
      •  Portugal (Portuguese)
      •  Romania (Romanian)
      •  Russia (Russian)
      •  Slovakia (Slovak)
      •  Slovenia (Slovenian)
      •  Spain (Spanish)
      •  Sweden (Swedish)
      •  Switzerland(German, French)
      •  Turkey (Turkish)
      •  United Kingdom
      • Asia Pacific
      •  Australia
      •  China
      •  Hong Kong
      •  India
      •  Korea (Korean)
      •  Malaysia
      •  New Zealand
      •  Philippines
      •  Singapore
      •  Taiwan
      •  Thailand (Thai)
      • Americas
      •  Brazil (Portuguese)
      •  Canada
      •  Mexico (Spanish)
      •  United States
      Can't find the country/region you're looking for? Visit our export site or find a local distributor.
  • Translate
  • Profile
  • Settings
Path to Programmable
  • Challenges & Projects
  • Design Challenges
  • Path to Programmable
  • More
  • Cancel
Path to Programmable
Blog Lab 7 - Creating Custom IP
  • Blog
  • Forum
  • Documents
  • Polls
  • Files
  • Events
  • Mentions
  • Sub-Groups
  • Tags
  • More
  • Cancel
  • New
  • Share
  • More
  • Cancel
Group Actions
  • Group RSS
  • More
  • Cancel
Engagement
  • Author Author: mconners
  • Date Created: 18 Nov 2018 4:38 PM Date Created
  • Views 405 views
  • Likes 7 likes
  • Comments 0 comments
Related
Recommended

Lab 7 - Creating Custom IP

mconners
mconners
18 Nov 2018

So far this has been the most challenging lab, mostly because of the amount of typing. We added a PWM module with an interrupt. If you've been following along, you'll see that during this lab we added the portion outlined in red.


image


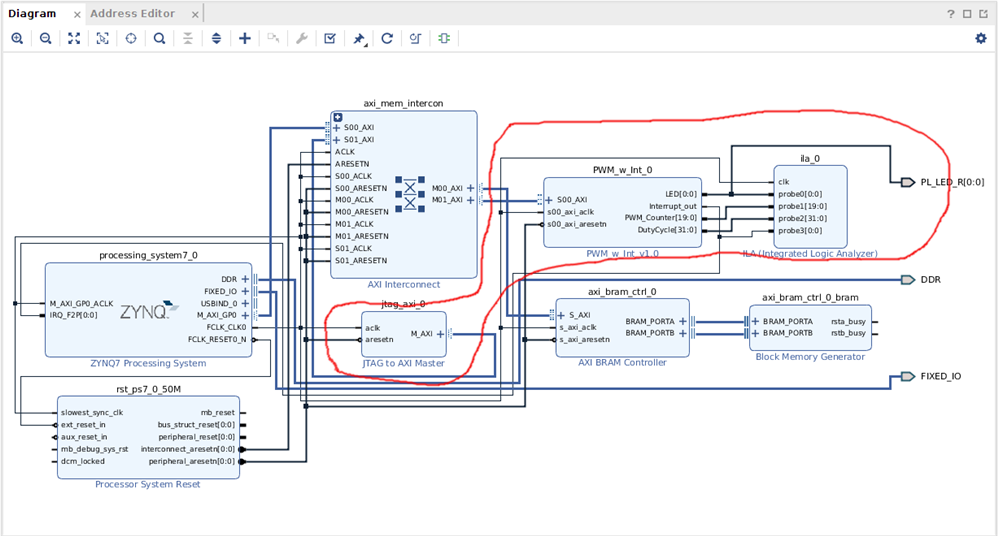
So we added the PWM module that we created, a Logic Analyzer from the built in IP, and a JTAG interface, also from the built in IP.


As you start to go through the process of creating the new IP, you are asked a few questions, and ultimately a new instance of the Vivado tool is opened.


This is a Block Diagram of what will be created:


image


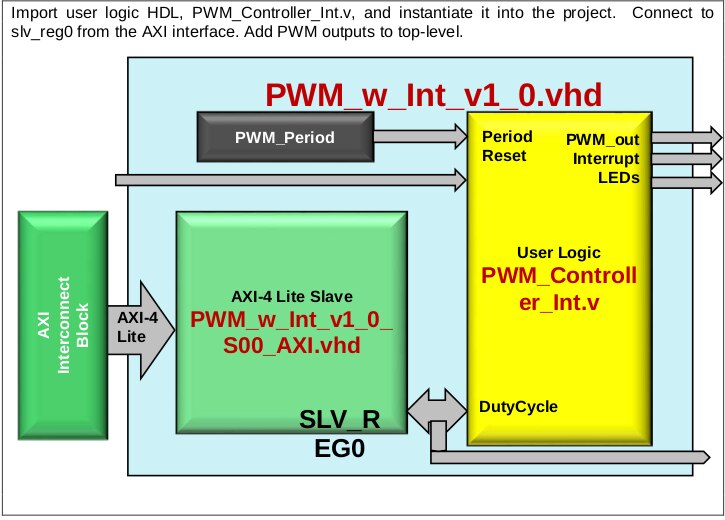
A basic VHDL file is created for you and at this point there are instructions to go in and edit these files.


image


So, as a Path to Programmable, teaching you how to use VHDL/HDL, I think it's a little short. There is not much of an explanation about what you are adding, and there are times that you will type in everything they give you, the editor will indicate that there is a syntax error, you go through and double and triple check that everything you typed is correct, only to find out that they will fill in the rest of the block later, and then the errors clear up.


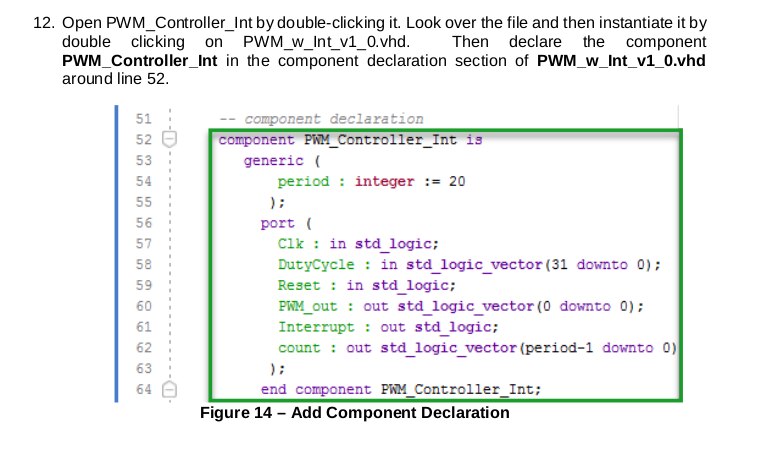
There are several more blocks similar to the above, where you are just typing in the editor.


Once you have completed the data entry, you are then able to synthesize the design. Once that is complete, you can package your custom IP, which involves reviewing a bunch of settings:


image


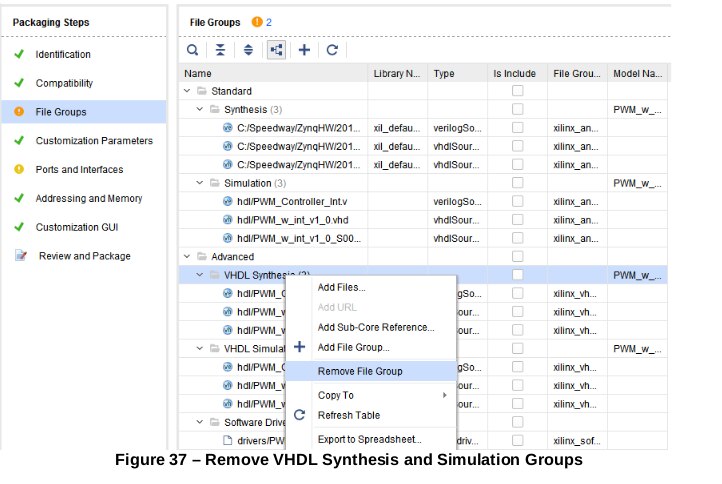
Essentially you need to make all the checkmarks green. Once that is complete, you close and save the project, then you are able to use the newly created IP in your main project.


That process was pretty straightforward and was reminiscent of the steps we followed earlier to add the BRAM.


This was the most time intensive lab so far, and probably the most complicated. There was a lot of typing, without much explanation. The other interesting thing was that at no time during this lab did I plug in the Mini Zed board.


I think the next lab will involve using the IP that we created to blink an LED, and perhaps to monitor for the interrupt that we created. The future lab will also hopefully reveal why we needed the JTAG interface as well as the logic analyzer.


Until then ....

  • Sign in to reply
element14 Community

element14 is the first online community specifically for engineers. Connect with your peers and get expert answers to your questions.

  • Members
  • Learn
  • Technologies
  • Challenges & Projects
  • Products
  • Store
  • About Us
  • Feedback & Support
  • FAQs
  • Terms of Use
  • Privacy Policy
  • Legal and Copyright Notices
  • Sitemap
  • Cookies

An Avnet Company © 2025 Premier Farnell Limited. All Rights Reserved.

Premier Farnell Ltd, registered in England and Wales (no 00876412), registered office: Farnell House, Forge Lane, Leeds LS12 2NE.

ICP 备案号 10220084.

Follow element14

  • X
  • Facebook
  • linkedin
  • YouTube