


As part of this blog post we are going to get the values of the EnOcean Temperature sensor and the Magnetic Contact switch which is attached to the door to check if the door is Open/Closed, to Home-Assistant which is installed on the Hub. The EnOcean module is connected to the Raspberry Pi B+ which we used to automate the blinds (,Pi Control Hub:Spoke2:Blinds Automationblog post) which shows you how to install FHEM home automation server and run the python program ,which takes advantage for the FHEM server telnet port, to rotate a gear motor that opens and closes the blinds
To send the EnOcean temperature and magnetic contact values to the Hub via MQTT, we will have to install a MQTT broker on the Hub's Pi 3, for which we will use Mosquitto(An Open Source MQTT v3.1 Broker ) and install a MQTT client on the Pi B+ which is attached to the EnOcean Module used for the blinds automation setup.

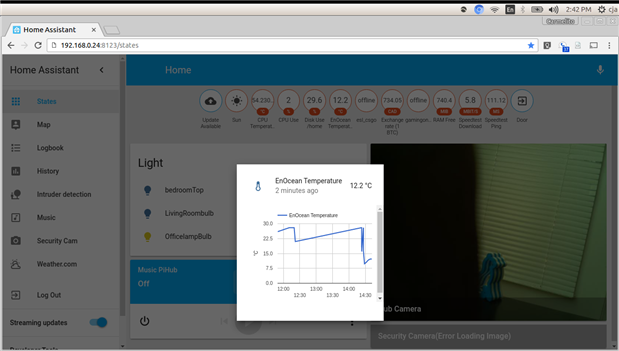
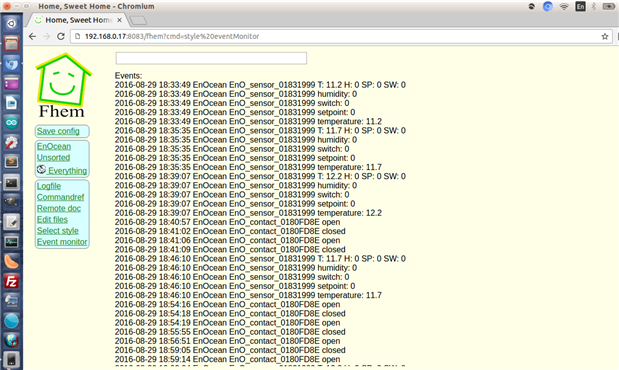
in the screen shot above , the left hand side is the terminal running the program to get the EnOcean Temperature and Magnetic Contact sensor values on Pi B+ connected to the EnOcean module + FHEM event monitor in the browser. And the right, is Home Assistant dashboard showing the two sensors EnOcean Temperature in circle in the middle and the Door represent the magnetic contact sensor, which is the last circle on the right, installed on Pi 3, aka the Hub.
| {gallery} Integrating EnOcean Temperature and Magnetic Contact sensor with Home-Assistant |
|---|
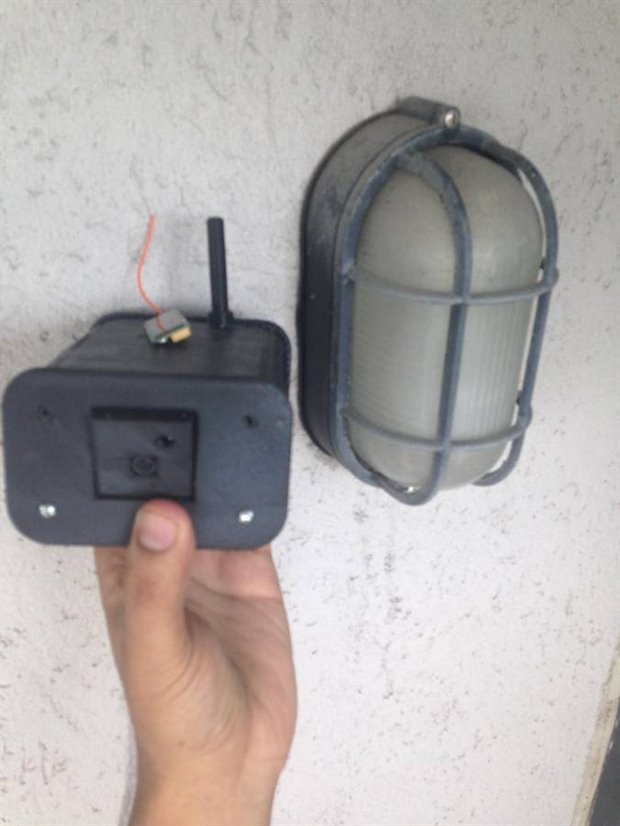
Magnetic Contact Transmitter Module connected to my front door, currently just using tape .. |
Magnetic Contact value which shows the Door Open/Closed , here red is corresponds to closed |
EnOcean Temperature Sensor module to be mounted on the Security camera, to get the outside temperature reading |
Temperature captured in Home-Assitant from the EnOcean module. |
Fhem Event monitor screenshot |


Here are the steps to follow
#1 Install Mosquitto on the Hub's Pi 3
to use the new repository, first import the repository package signing key using the commands below
wget http://repo.mosquitto.org/debian/mosquitto-repo.gpg.key
sudo apt-key add mosquitto-repo.gpg.key
Then make the repository available to apt
cd /etc/apt/sources.list.d/
sudo wget http://repo.mosquitto.org/debian/mosquitto-jessie.list
Now to install the mqtt mosquitto for the raspberry pi , run an update followed by an install
sudo apt-get update
sudo apt-get install mosquitto
#2 to test setup we will also install mosquitto-client
sudo apt-get install mosquitto-clients
#3 Run a quick test locally on the Pi 3
Open two terminal, in one window create a topic using the command
mosquitto_sub -d -t topic_tes
And in the second terminal window, send a message to the topic
mosquitto_pub -d -t topic_test -m "Hello Pi3"

#4 As part of the Home- Assistant add the following to the configuration.yaml file
To integrate MQTT into Home Assistant, add the following section
mqtt:
  broker: 192.168.0.24
  port: 1883
  client_id: home-assistant-1
  keepalive: 60
  protocol: 3.1
where the broker is the Ip Address of your pi
For more info check out - https://home-assistant.io/components/mqtt/
In addition, add the following to the configuration.yaml file as a door OPEN/CLOSE sensor
binary_sensor:
  platform: mqtt
  state_topic: "home/door"
  name: "Door"
  qos: 0
  payload_on: "ON"
  payload_off: "OFF"
  sensor_class: opening
And to get the value of the EnOcean Temperature sensor add following under the sensor section
sensor:
- platform: mqtt
  state_topic: "home/temperature"
  command_topic: "home/temperature"
  name: "EnOcean Temperature"
  qos: 0
  unit_of_measurement: "°C"
#5 on the Pi B+ install MQTT client paho
Paho makes communicating with an MQTT server installed on the Pi 3 very simple and can be easily used as part of python program, we will install paho-mqtt using pip ,
sudo apt-get install python-pip
sudo pip install paho-mqtt
#6 Lets run a simple python program on the Pi B+, to check if we are able to send data to the MQTT broker on the Pi3
Here is a sample python program , change the hostname value to Pi3 aka the Hub's ip address and the Topic values should match the values above that we entered in the configuration.yaml file.
import paho.mqtt.publish as publish
import time

print("Sending EnOcean Magnetic Contact value")
publish.single("home/door", "ON", hostname="192.168.0.24")
time.sleep(5)
print("Sending EnOcean Temperature value")
publish.single("home/temperature", "28", hostname="192.168.0.24")

print("Sending EnOcean Magnetic Contact value")
publish.single("home/door", "OFF", hostname="192.168.0.24")
time.sleep(5)
print("Sending EnOcean Magnetic Contact value")
publish.single("home/door", "ON", hostname="192.168.0.24")
time.sleep(5)

print("Sending EnOcean Temperature value")
publish.single("home/temperature", "26", hostname="192.168.0.24")
Now when you run the following program you should see sensor values for Enocean Temperature and Door on the home assistant dashboard update

#7 Run the program to update values from the EnOcean sensor from the Pi B+ to the Pi 3
import telnetlib
import paho.mqtt.publish as publish
import time


#Connection details to the fhem server installed on the same Pi
#For the telnet details check out URL - http://IpAddressOfPi:8083/fhem?detail=telnetPort
HOST = "127.0.0.1"
PORT = 7072
tell = telnetlib.Telnet()
#Connecting to the fhem server
tell.open(HOST,PORT)
#Send command to intiantiate fhem server to get the data
tell.write("inform on\n")


def string_after(s, delim):
    return s.partition(delim)[2]


while True:
        #get the value after the carriage return
        output = tell.read_until("\n")
        #Check the value of the Magnet Contact Transmitter module - Door open close
        if "contact" in output:
                print output
                if "closed" in output:
                        print "Mangentic contact closed"
                        print("Sending EnOcean Magnetic Contact value - ON")
                        #Sending data to door open/close value to topic, change Ip address to the Ip of the pi with broker
                        publish.single("home/door", "ON", hostname="192.168.0.24")
                else:
                        print("Sending EnOcean Magnetic Contact value - OFF")
                        publish.single("home/door", "ON", hostname="192.168.0.24")
        #Checking the temperature sensor
        #if you get the error-No EEP profile identifier and no Manufacturer ID -wait for the sensor to charge
        if "sensor" in output:
                        print output
                        delim ="temperature:"
                        print string_after(output, delim)
                        print("Sending EnOcean Temperature value")
                        publish.single("home/temperature", string_after(output, delim), hostname="192.168.0.24")
once your done with testing set the program up in the crontab to run continuously

in the screen shot above , the left hand side is the terminal running the program above on Pi B+ connected to the EnOcean module, and the right is Home Assistant installed on Pi 3 aka the Hub.