element14 Community
element14 Community
    Register Log In
  • Site
  • Search
  • Log In Register
  • About Us
  • Community Hub
    Community Hub
    • What's New on element14
    • Feedback and Support
    • Benefits of Membership
    • Personal Blogs
    • Members Area
    • Achievement Levels
  • Learn
    Learn
    • Ask an Expert
    • eBooks
    • element14 presents
    • Learning Center
    • Tech Spotlight
    • STEM Academy
    • Webinars, Training and Events
    • Learning Groups
  • Technologies
    Technologies
    • 3D Printing
    • FPGA
    • Industrial Automation
    • Internet of Things
    • Power & Energy
    • Sensors
    • Technology Groups
  • Challenges & Projects
    Challenges & Projects
    • Design Challenges
    • element14 presents Projects
    • Project14
    • Arduino Projects
    • Raspberry Pi Projects
    • Project Groups
  • Products
    Products
    • Arduino
    • Avnet Boards Community
    • Dev Tools
    • Manufacturers
    • Multicomp Pro
    • Product Groups
    • Raspberry Pi
    • RoadTests & Reviews
  • Store
    Store
    • Visit Your Store
    • Choose another store...
      • Europe
      •  Austria (German)
      •  Belgium (Dutch, French)
      •  Bulgaria (Bulgarian)
      •  Czech Republic (Czech)
      •  Denmark (Danish)
      •  Estonia (Estonian)
      •  Finland (Finnish)
      •  France (French)
      •  Germany (German)
      •  Hungary (Hungarian)
      •  Ireland
      •  Israel
      •  Italy (Italian)
      •  Latvia (Latvian)
      •  
      •  Lithuania (Lithuanian)
      •  Netherlands (Dutch)
      •  Norway (Norwegian)
      •  Poland (Polish)
      •  Portugal (Portuguese)
      •  Romania (Romanian)
      •  Russia (Russian)
      •  Slovakia (Slovak)
      •  Slovenia (Slovenian)
      •  Spain (Spanish)
      •  Sweden (Swedish)
      •  Switzerland(German, French)
      •  Turkey (Turkish)
      •  United Kingdom
      • Asia Pacific
      •  Australia
      •  China
      •  Hong Kong
      •  India
      •  Korea (Korean)
      •  Malaysia
      •  New Zealand
      •  Philippines
      •  Singapore
      •  Taiwan
      •  Thailand (Thai)
      • Americas
      •  Brazil (Portuguese)
      •  Canada
      •  Mexico (Spanish)
      •  United States
      Can't find the country/region you're looking for? Visit our export site or find a local distributor.
  • Translate
  • Profile
  • Settings
Pi IoT
  • Challenges & Projects
  • Design Challenges
  • Pi IoT
  • More
  • Cancel
Pi IoT
Blog Pi Control Hub: Spoke 1 :Security Camera - setting up Motion to stream video
  • Blog
  • Forum
  • Documents
  • Polls
  • Files
  • Events
  • Mentions
  • Sub-Groups
  • Tags
  • More
  • Cancel
  • New
  • Share
  • More
  • Cancel
Group Actions
  • Group RSS
  • More
  • Cancel
Engagement
  • Author Author: carmelito
  • Date Created: 26 Jul 2016 3:43 AM Date Created
  • Views 1155 views
  • Likes 2 likes
  • Comments 5 comments
  • picontrolhub
  • piiot
  • raspberry pi
  • piiot challenge
Related
Recommended

Pi Control Hub: Spoke 1 :Security Camera - setting up Motion to stream video

carmelito
carmelito
26 Jul 2016

After testing most of the components that came as part of the kit, and doing some re-planing of which components to use as part of Hub, and which ones to go with for the spokes, here is a blog post that show how to setup motion on the Pi to stream video to browser on you Computer/Tablet/Phone. The plan for the Security camera spoke, is to use a Raspberry Pi zero with the NoIR camera  to stream video and detect movement.


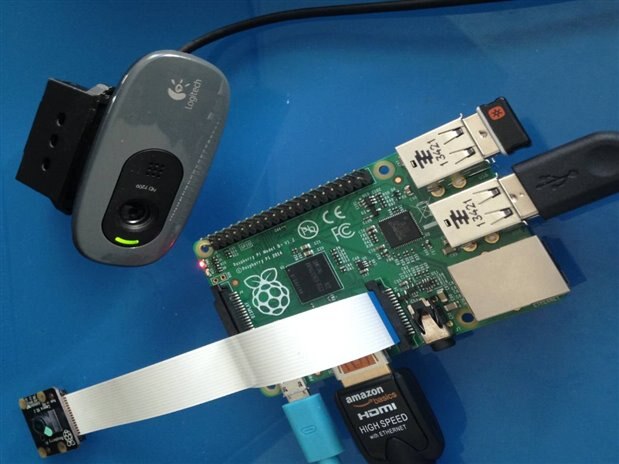
For testing the setup I am using the Raspberry Pi B+ as you see in the picture below, as I realized after buying the Pi zero that you need a special HDMI connector to the connect to a screen image  and in addition you  cannot use a console cable as the headers pins are not soldered to the Pi zero image ..


As part of the setup you can either use a USB webcam or a Pi Camera.

image

<the screenshot above show video stream from a Logitech USB camera connected to the Pi . Note: at this point in time the Pi NoIR Cam is not in use>


For more info on motion refer to - http://www.lavrsen.dk/foswiki/bin/view/Motion/MotionGuideOneLargeDocument#What_is_Motion_63


Here are the steps/list of commands to follow to setup motion to stream video  on your Raspberry Pi via a browser to  your laptop.


#1 Once you downloaded the latest version of Rasbian from the  Raspberry Pi website (https://www.raspberrypi.org/downloads/raspbian/ ) and burn it to the SD card (Note : the name of zip file I used at the time of writing this post -2016-05-27-raspbian-jessie.zip ), and also connect your USB webcam or Pi camera to the Pi.

image


#2 Now run the following commands to update Rasbian packages

        sudo apt-get update

        sudo apt-get upgrade


#3 Install motion using the command

        sudo apt-get install motion


#4 To enable motion to start at every boot of the Pi, change the value of the start_motion_daemon from no to yes

      sudo nano /etc/default/motion

image

#5 Now setup ownership to the target directory where the images/videos get stored using

      sudo chown motion /var/lib/motion


#6  Once done, reboot your Pi using

       sudo reboot


#7  Once you pi is back up and if you have a monitor connected to the HDMI port ,go to the web browser and type the following url you should see a preview of your camera

       http://127.0.0.1:8081

      Note: if you try the url http://ipaddressofPi:8081 on a browser on you laptop , you will just get "page not displayed", we will resolve this in the next step by modifying the           

                motion.conf file


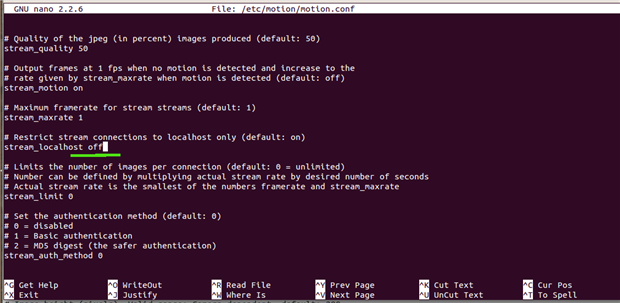
#8 But if you are running you Pi headless, dont worry we will modify the motion.conf file to turn off the following two parameter -- webcontrol_localhost and stream_localhost

         sudo nano /etc/motion/motion.conf

image


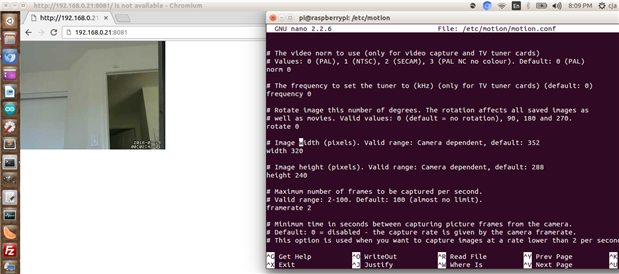
#9 In addition also modify the width and height in the motion.conf

       width 640

       height 480


Video stream before changing the width and height

image


#10  Once you made the changes to the .conf file stop and start motion using

    sudo service motion stop

    sudo service motion start


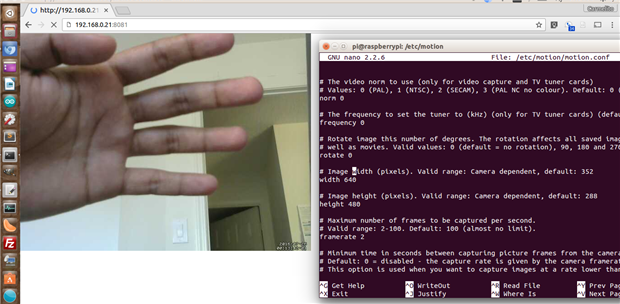
Here is the video stream after changing width 640 and  height 480 and starting motion

image


Note: if you are using the Pi cam instead of the USB Camera you will have to enable the Pi Cam driver with the commands in step below for the video steam to work.

In addition there are lot of other parameter that you can modify, and experiment with as part of the motion.conf file, like changing the framerate from 2 to 4, if you think the rendering of the video is slow, this is idea if you are using a Raspberry Pi 3 , but I would not suggest this parameter on a Pi zero or B+


#11 Set for the Pi Cam  - enable the Pi Cam driver

  Now if you plan on using Pi camera , and if you have not enable the drivers , using the command below , you will see the following error  in your browser "UNABLE TO OPEN VIDEO DEVICE",

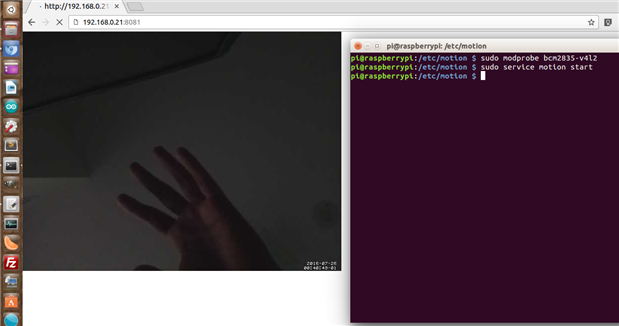
  to resolve this stop the motion service  and activate the Pi cam driver

    sudo service motion stop

    sudo modprobe bcm2835-v4l2

    sudo service motion start

  you should now see the video stream as shown in the screenshot below, in my case i am using Pi NoIR camera V2

image

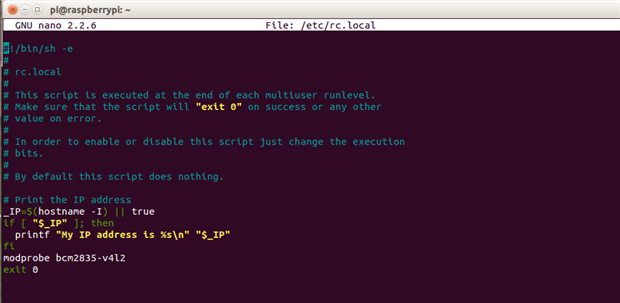
now to step the driver for every boot modify the  rc.local file as shown the screenshot below

  sudo nano /etc/rc.local

add the following line just above exit="0"

  modprobe bcm2835-v4l2

image

once done you can reboot your pi to test it out using

    sudo reboot


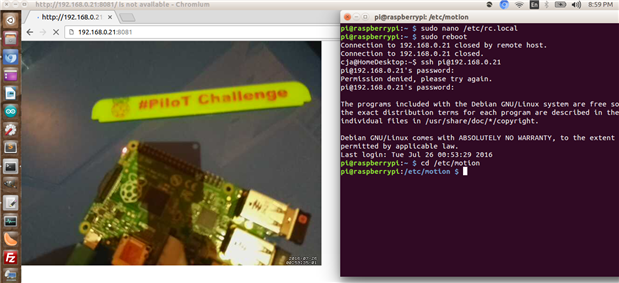
Here is a screenshot with the Pi NoIR camera streaming video to my computer, late in the evening with a table lamp on top of the camera.

image


As part of this week, I am going to test out how this setup behaves with the Pi zero and if all is well ,design a 3D printed case to house the Pi Zero and Pi Cam..

  • Sign in to reply

Top Comments

  • carmelito
    carmelito over 9 years ago in reply to DAB +1
    Thanks for the comment, my personal suggestion would be to go with the Raspberry Pi camera give that the new version 2 ones are 8MP. For my setup i am planing to use Pi NoIR Version 2 camera, since i plan…
  • clem57
    clem57 over 9 years ago +1
    Getting interesting. Keep up the great work. Clem
Parents
  • DAB
    DAB over 9 years ago

    Nice post.


    Do you think that the RPI camera was better for this purpose over the webcam?


    DAB

    • Cancel
    • Vote Up 0 Vote Down
    • Sign in to reply
    • More
    • Cancel
  • carmelito
    carmelito over 9 years ago in reply to DAB

    Thanks for the comment, my personal suggestion would be to go with the Raspberry Pi camera give that the new version 2 ones are 8MP. For my setup i am planing to use Pi NoIR Version 2 camera, since i plan to use in the night, currently I have street lights not to far from my front door, so i am hoping i don't have to buy one of those infrared night leds/lamp . Hoping to catch some raccoons over turning the trash bin  image..

    • Cancel
    • Vote Up +1 Vote Down
    • Sign in to reply
    • More
    • Cancel
  • fvan
    fvan over 9 years ago in reply to carmelito

    Considering the fact that the image is resized to 640x480, does the difference of 8MP vs 5MP really matter?

    What kind of frame rate and latency are you getting using motion?


    Good first post image

    • Cancel
    • Vote Up 0 Vote Down
    • Sign in to reply
    • More
    • Cancel
Comment
  • fvan
    fvan over 9 years ago in reply to carmelito

    Considering the fact that the image is resized to 640x480, does the difference of 8MP vs 5MP really matter?

    What kind of frame rate and latency are you getting using motion?


    Good first post image

    • Cancel
    • Vote Up 0 Vote Down
    • Sign in to reply
    • More
    • Cancel
Children
  • carmelito
    carmelito over 9 years ago in reply to fvan

    Thanks for the comment fvan ..Agreed if the image size is  set to 640x480, it wont make much of a difference ..

    I have the set the frame rate to 2 as part of the motion config file with a B+ which the minimum value you can set and this is just enough to detect movement(the jpg images are stored at /var/lib/motion), but having said that this parameter is configurable in the motion.config file. In addition, while setting it up, I did set the parameter to 30 fps, but as soon as i opened the URL in the browser the service crashed and  felt the Pi was heating up , which means i am going to stick to 2 or may be 4 image  ..

    With respect to latency there is noticeable amount of latency, i would say about 2 or 3 second..


    Also, I enjoyed your post on setting up the EnOcean sensors on the Pi 3 and your old post on the Forget-Me-Not Design Challenge, i had some trouble setting it up on the Pi 3 but managed to setup the sensor on the B+ using fhem, will have to give it another try on Pi 3 with your instructions..  ..

    Best wishes - Carmelito


    • Cancel
    • Vote Up 0 Vote Down
    • Sign in to reply
    • More
    • Cancel
element14 Community

element14 is the first online community specifically for engineers. Connect with your peers and get expert answers to your questions.

  • Members
  • Learn
  • Technologies
  • Challenges & Projects
  • Products
  • Store
  • About Us
  • Feedback & Support
  • FAQs
  • Terms of Use
  • Privacy Policy
  • Legal and Copyright Notices
  • Sitemap
  • Cookies

An Avnet Company © 2025 Premier Farnell Limited. All Rights Reserved.

Premier Farnell Ltd, registered in England and Wales (no 00876412), registered office: Farnell House, Forge Lane, Leeds LS12 2NE.

ICP 备案号 10220084.

Follow element14

  • X
  • Facebook
  • linkedin
  • YouTube