


This blog post is a prerequisite for the Blinds Automation spoke. As part of this spoke we will automate the opening and closing of the blinds using the EnOcean Push button switch module connected to the Raspberry Pi B+.In this blog post we will attach EnOcean module to the Raspberry Pi B+ and create a simple circuit to light up LEDs as shown in the video below, when a energy harvesting sensor are used, that is PushButton switch(PTM210) ,Magnet Contact Transmitter(STM329) and the Temperature sensor(STM332). We will also have to install FHEM home automation server and run the python program below,which takes advantage for the FHEM server telnet port.
Here are are the steps you will need to follow to blink the LEDs when you click the Push button/Magnetic Contact sensor and when temperature is detected by the temperature sensor.
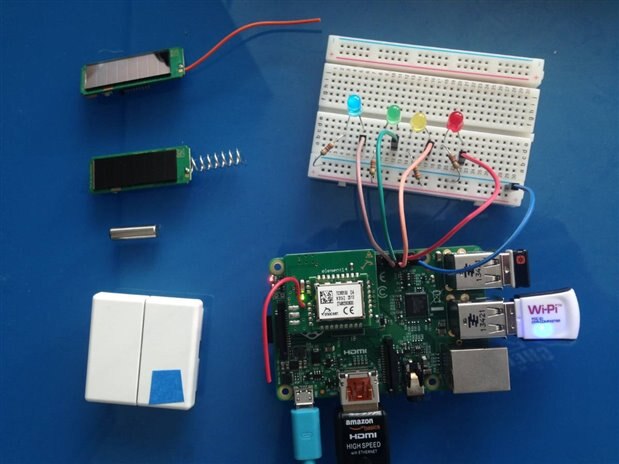
#1 Create a simple cuircuit
Connect the EnOcean module to the Raspberry Pi B+
And then connect the LEDs to the following pin on the Pi B+, you will also need a 330 ohms resistor
- Blue LED to pin 6 on the Pi B+ , this corresponds to the one side of the push button switch, basically the side on which you see a small piece of blue tape in the picture below,basically when you click on the blue tape the LED is turned on and when you click on the opposite site the LED is turned off
- Green LED to pin 12 which corresponds to the other side of the button
- Yellow LED to pin 13, this LED goes on when the magnet is in contact with the Magnetic Contact sensor
- Red LED to pin 16, this LED is turned on when temperature reading is received by the FHEM server
#2 Installing FHEM
To install FHEM start of by updating the software and firmware on the latest version of Raspbian (the latest version of Raspbain when writing this blog is 2016-05-27-raspbian-jessie.img)
sudo apt-get update
sudo apt-get upgrade
Remove the references to /dev/ttyAMA0 from the /boot/cmdline.txt file
sudo nano /boot/cmdline.txt
Comment out the top line and add line
dwc_otg.lpm_enable=0 console=tty1 root=/dev/mmcblk0p2 rootfstype=ext4 elevator=deadline fsck.repair=yes rootwait

Install the dependencies for FHEM
sudo apt-get install perl libdevice-serialport-perl libio-socket-ssl-perl libwww-perl
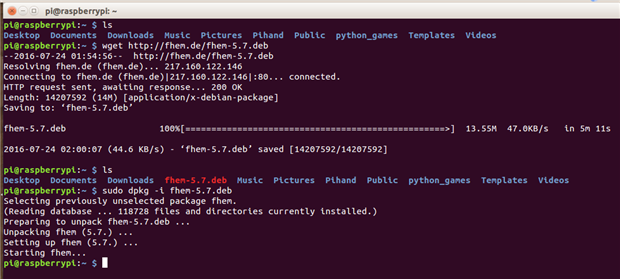
Get the latest deb from the fhem.de website
wget http://fhem.de/fhem-5.7.deb
Install the deb
sudo dpkg -i fhem-5.7.deb
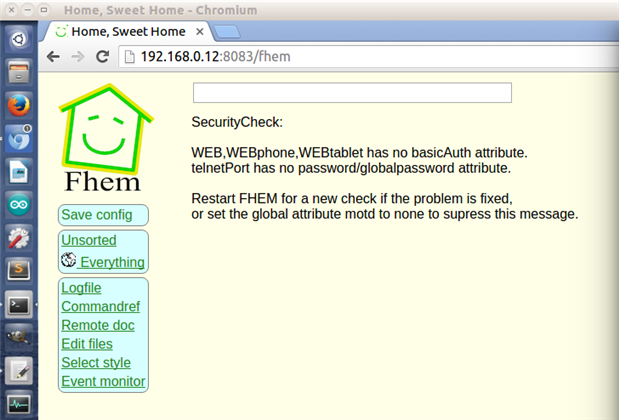
Get the IP address of the Pi using the ifconfig command and check if FHEM server is up and running
#3 Check out the Event Monitor of FHEM server webpage above, to check if the sensors are detected when you click the push button and the other sensor
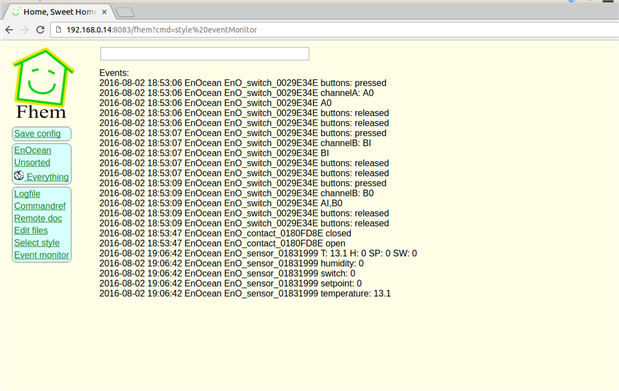
In addition check out EnOcean Tab, where you should see all your sensor detected.
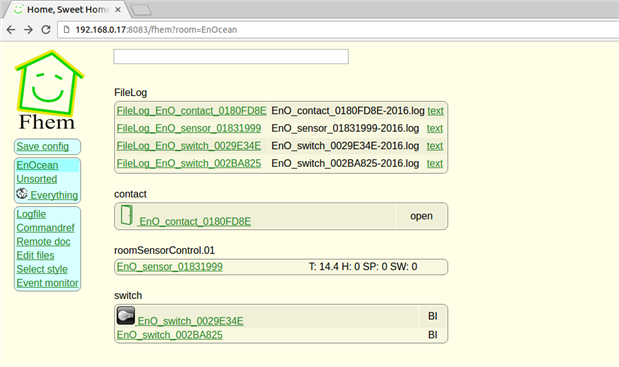
Note: In the screen shot ignore the second record under the Switch section, this is an extra push button switch, which I received in another kit .
In addition , if you receive the following when you press the button on the temperature sensor ""No EEP profile identifier and no Manufacturer ID"-wait for the sensor to charge, it took the sensor about 4-5 mins before it returned a reading.Also this is my first time using the enocean kit , so do leave a comment if there is way to resolve this  ..
..
For more info refer to the pdf at - http://www.enocean.com/fileadmin/redaktion/pdf/white_paper/wp_Raspberry_talks_EnOcean.pdf
#4 Run the program below to light up the LEDs as shown in the video above
Copy paste the code below to you Pi using nano
sudo nano LedButtonMagnetTemp.py
run the python program using
sudo python LedButtonMagnetTemp.py
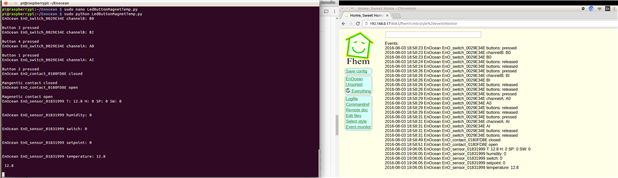
Here is output once the PushButton switch(PTM210) pressed at all the 4 ends,and the magnet is brought close to Magnet Contact Transmitter(STM329) and the Temperature sensor(STM332)
File name : LedButtonMagnetTemp.py
import telnetlib
import RPi.GPIO as GPIO
import time
#Connection details to the fhem server installed on the same Pi
#For the telnet details check out URL - http://IpAddressOfPi:8083/fhem?detail=telnetPort
HOST = "127.0.0.1"
PORT = 7072
tell = telnetlib.Telnet()
#Connecting to the fhem server
tell.open(HOST,PORT)
#Send command to intiantiate fhem server to get the data
tell.write("inform on\n")


def string_after(s, delim):
    return s.partition(delim)[2]
#LEDs connected to the following pins on the Pi, in addtion to the Enocean module
fullBlindLedPin = 12
halfBlindLedPin = 6
doorLedPin = 13
isTempLedPin = 16
GPIO.setmode(GPIO.BCM)
GPIO.setup(fullBlindLedPin,GPIO.OUT) #Green LED
GPIO.setup(halfBlindLedPin,GPIO.OUT) #Blue
GPIO.setup(doorLedPin,GPIO.OUT) #Yellow
GPIO.setup(isTempLedPin,GPIO.OUT) #Red


try:
 while True:
        #get the value after the carriage return
  output = tell.read_until("\n")
  #Check the value of the button press of the Pushbutton Transmitter switch module - blinds open close
        if "channel" in output:
  print output
  if "A0" in output:
  GPIO.output(fullBlindLedPin,GPIO.HIGH)
  print "Button 1 pressed"
  if "AI" in output:
  GPIO.output(fullBlindLedPin,GPIO.LOW)
  print "Button 2 pressed"
  if "B0" in output:
  GPIO.output(halfBlindLedPin,GPIO.HIGH)
  print "Button 3 pressed"
  if "BI" in output:
  GPIO.output(halfBlindLedPin,GPIO.LOW)
  GPIO.output(isTempLedPin,GPIO.LOW) # Also reset the Temperature LED.
  print "Button 4 pressed"
        #Check the value of the Magnet Contact Transmitter module - Door open close
  if "contact" in output:
  print output
  if "closed" in output:
  GPIO.output(doorLedPin,GPIO.HIGH)
  print "Mangentic contact closed"
  else:
  GPIO.output(doorLedPin,GPIO.LOW)
  print "Magenetic contact open"
        #Checking the temperature sensor
  #if you get the error-No EEP profile identifier and no Manufacturer ID -wait for the sensor to charge
  if "sensor" in output:
  print output
  GPIO.output(isTempLedPin,GPIO.HIGH)
  delim = "temperature:"
  print string_after(output, delim)
#clean up GPIO when exiting out of the program using ctrl+C
except KeyboardInterrupt:
  GPIO.cleanup()
And for more cool projects/blog post using the EnOcean Sensor Kit refer to the Forget Me Not Design challenge at - Forget Me Not Design Challenge
-

balearicdynamics
-
Cancel
-
Vote Up
0
Vote Down
-
-
Sign in to reply
-
More
-
Cancel
-

fvan
in reply to balearicdynamics
-
Cancel
-
Vote Up
0
Vote Down
-
-
Sign in to reply
-
More
-
Cancel
Comment-

fvan
in reply to balearicdynamics
-
Cancel
-
Vote Up
0
Vote Down
-
-
Sign in to reply
-
More
-
Cancel
Children