element14 Community
element14 Community
    Register Log In
  • Site
  • Search
  • Log In Register
  • About Us
  • Community Hub
    Community Hub
    • What's New on element14
    • Feedback and Support
    • Benefits of Membership
    • Personal Blogs
    • Members Area
    • Achievement Levels
  • Learn
    Learn
    • Ask an Expert
    • eBooks
    • element14 presents
    • Learning Center
    • Tech Spotlight
    • STEM Academy
    • Webinars, Training and Events
    • Learning Groups
  • Technologies
    Technologies
    • 3D Printing
    • FPGA
    • Industrial Automation
    • Internet of Things
    • Power & Energy
    • Sensors
    • Technology Groups
  • Challenges & Projects
    Challenges & Projects
    • Design Challenges
    • element14 presents Projects
    • Project14
    • Arduino Projects
    • Raspberry Pi Projects
    • Project Groups
  • Products
    Products
    • Arduino
    • Avnet Boards Community
    • Dev Tools
    • Manufacturers
    • Multicomp Pro
    • Product Groups
    • Raspberry Pi
    • RoadTests & Reviews
  • Store
    Store
    • Visit Your Store
    • Choose another store...
      • Europe
      •  Austria (German)
      •  Belgium (Dutch, French)
      •  Bulgaria (Bulgarian)
      •  Czech Republic (Czech)
      •  Denmark (Danish)
      •  Estonia (Estonian)
      •  Finland (Finnish)
      •  France (French)
      •  Germany (German)
      •  Hungary (Hungarian)
      •  Ireland
      •  Israel
      •  Italy (Italian)
      •  Latvia (Latvian)
      •  
      •  Lithuania (Lithuanian)
      •  Netherlands (Dutch)
      •  Norway (Norwegian)
      •  Poland (Polish)
      •  Portugal (Portuguese)
      •  Romania (Romanian)
      •  Russia (Russian)
      •  Slovakia (Slovak)
      •  Slovenia (Slovenian)
      •  Spain (Spanish)
      •  Sweden (Swedish)
      •  Switzerland(German, French)
      •  Turkey (Turkish)
      •  United Kingdom
      • Asia Pacific
      •  Australia
      •  China
      •  Hong Kong
      •  India
      •  Korea (Korean)
      •  Malaysia
      •  New Zealand
      •  Philippines
      •  Singapore
      •  Taiwan
      •  Thailand (Thai)
      • Americas
      •  Brazil (Portuguese)
      •  Canada
      •  Mexico (Spanish)
      •  United States
      Can't find the country/region you're looking for? Visit our export site or find a local distributor.
  • Translate
  • Profile
  • Settings
Pi IoT
  • Challenges & Projects
  • Design Challenges
  • Pi IoT
  • More
  • Cancel
Pi IoT
Blog [Pi IoT] Alarm Clock #22: Key Holder
  • Blog
  • Forum
  • Documents
  • Polls
  • Files
  • Events
  • Mentions
  • Sub-Groups
  • Tags
  • More
  • Cancel
  • New
  • Share
  • More
  • Cancel
Group Actions
  • Group RSS
  • More
  • Cancel
Engagement
  • Author Author: fvan
  • Date Created: 29 Aug 2016 12:52 PM Date Created
  • Views 2430 views
  • Likes 4 likes
  • Comments 5 comments
  • fvan_piiot
  • mqtt
  • piiot
  • blinkt
Related
Recommended

[Pi IoT] Alarm Clock #22: Key Holder

fvan
fvan
29 Aug 2016

  • Mechanism
  • Code
  • Gallery


This post is about a mini project that I suddenly thought of during the challenge and thought would fit well as part of the larger project image The idea was to make a key holder allowing up to four different (sets of) keys. It serves two purposes: a fixed place to hang our keys (we tend to misplace them a lot!) and assuming proper use, could be used as an alternative/additional presence check.


Mechanism


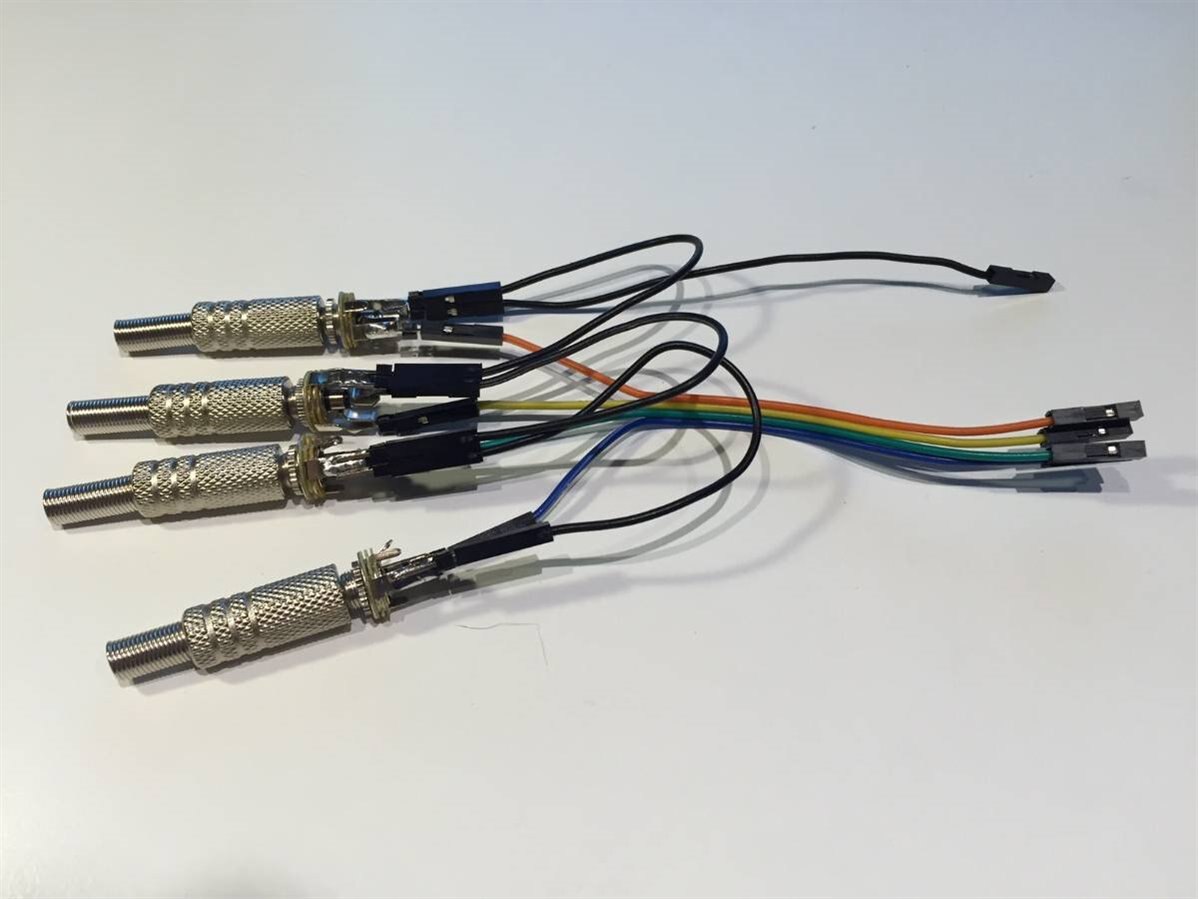
For the key holders, I decided to use stereo jacks and panel mount connectors. By shorting the left and right channel in the jack, a loop is created. On the connector, the left channel connects to ground, the right channel connects to a GPIO pin with internal pull-up resistor. When the jack is not inserted the GPIO is HIGH, when inserted, LOW. There is no differentiator per key at the moment, but could be achieved in a future version in different ways:

  • Rather than just pulling to GND, resistors could be used, resulting in different analog values, each unique per key This will require the use of an ADC.
  • Use a different connector set per key, making it impossible to connect in any other slot.


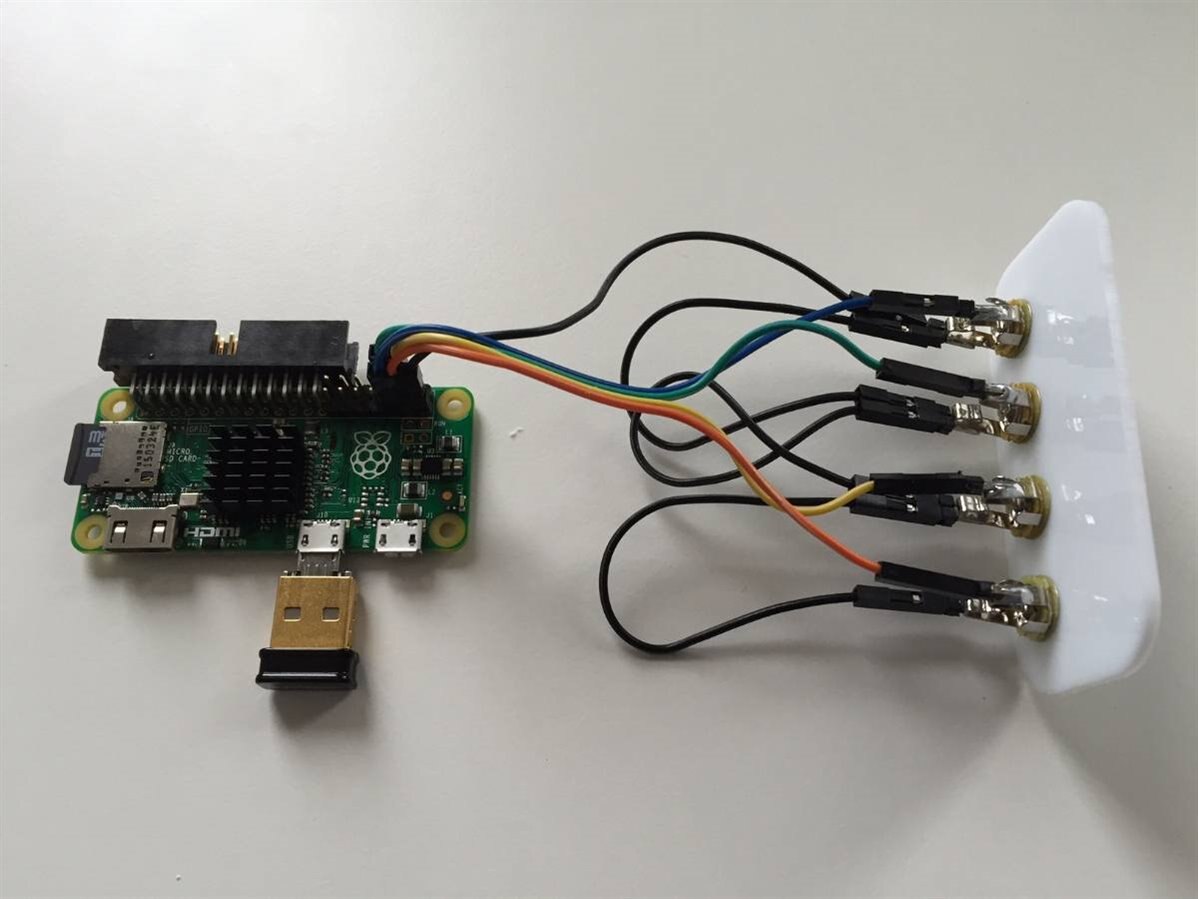
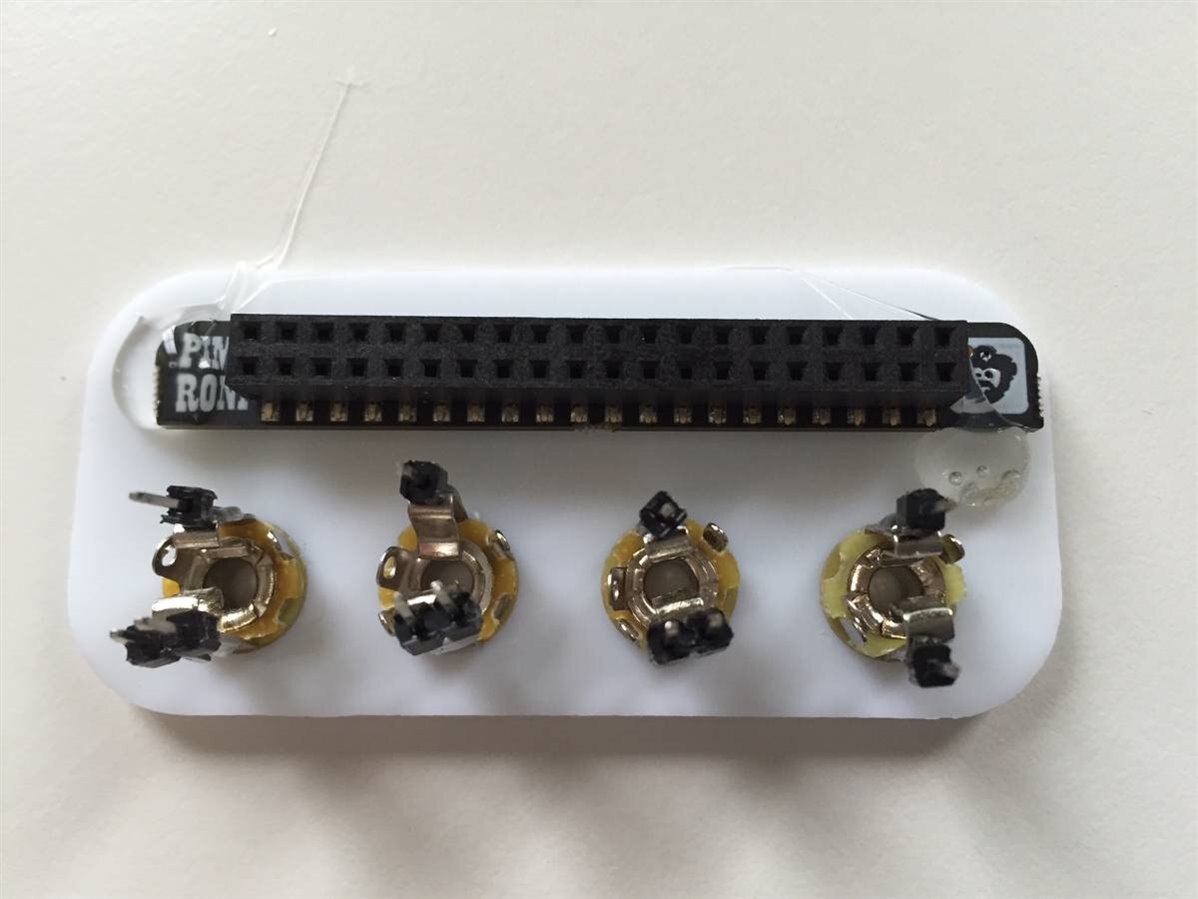
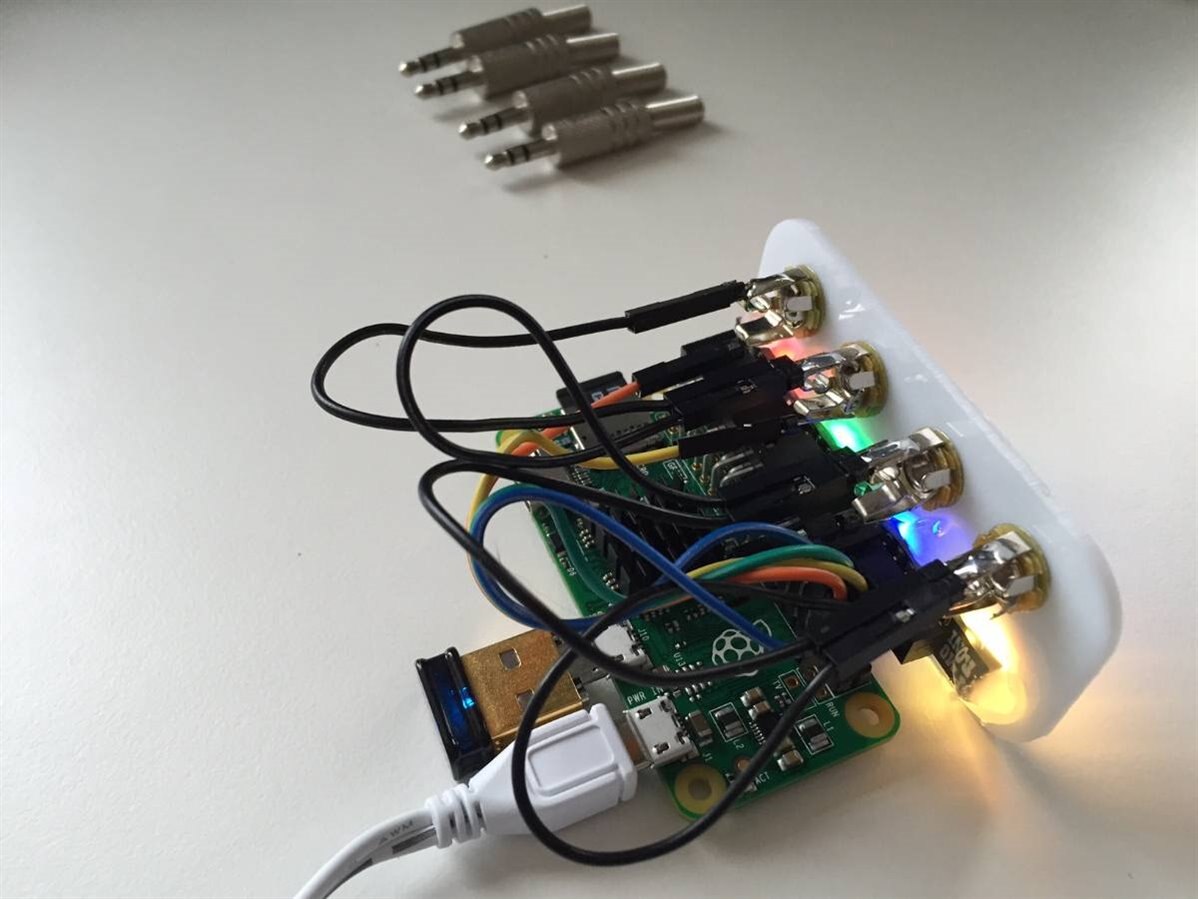
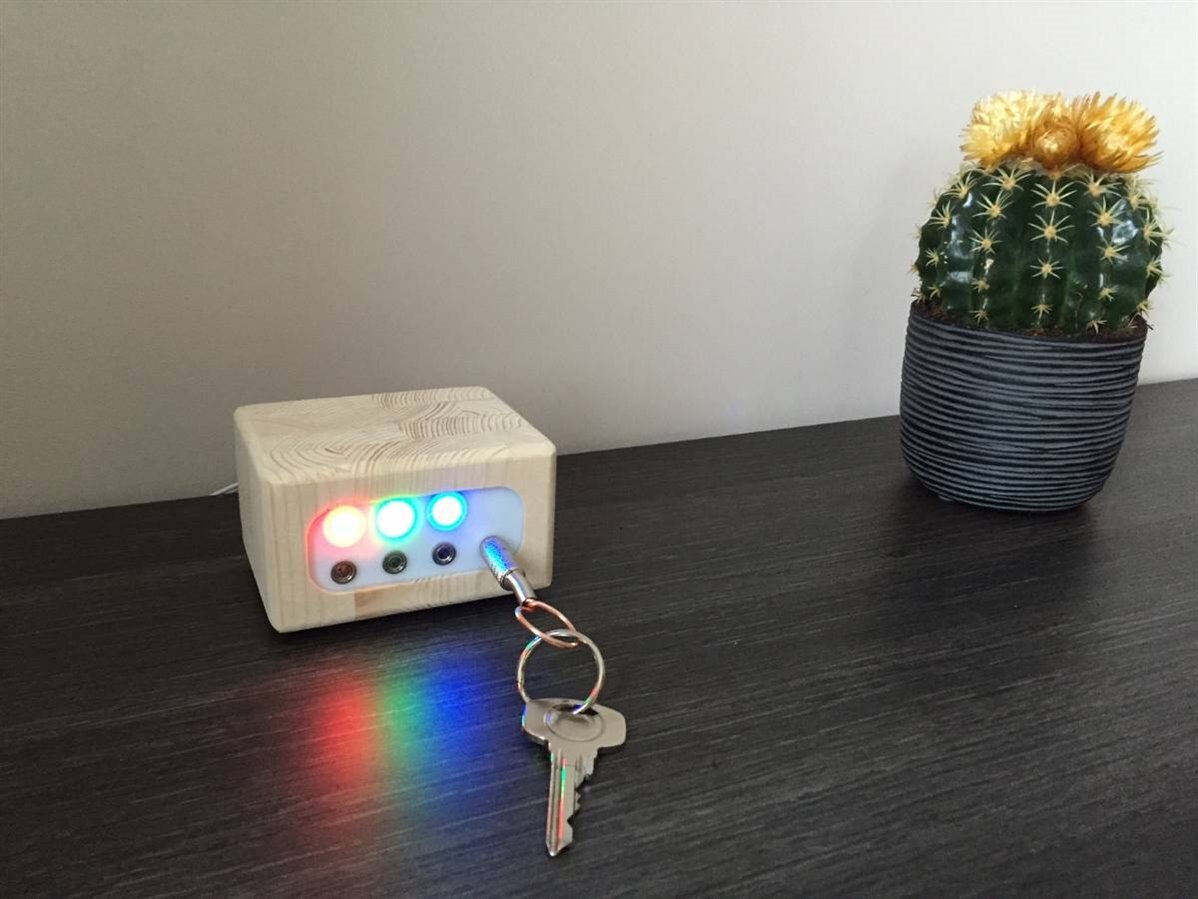
To have everything removable/replaceable, I used male header pins on the connectors and Dupont wires. The ground wire is daisy-chained across all four connectors. This results in a total of five connections to the Raspberry Pi's GPIO header: four GPIO pins and one ground. As a visual aid and indication, every connector is associated to an LED of a certain colour. When the jack is plugged in, the LED is turned off, when removed, turned on. The LEDs are located on a small board which fits straight on the GPIO header, called Blinkt!. Using the python library, the individual LEDs can be controlled.


Finally, to turn this key holder in an IoT device, whenever a jack is inserted or removed, an MQTT message is published to the control unit, which can then visualise the status in OpenHAB. From there, rules can be associated to these events. What if the shed was opened while the key was still in place??


Enjoy the gallery illustrating the build process and final result, just after a quick explanation of the code!


Code


The code is straightforward, and using the GPIOZero library for the first time, made it even more simple! But basically, the four GPIO pins are checked in an infinite loop. Depending on the state, the matching LED is set or cleared, and an MQTT message is sent.


Gallery


{gallery} Key Holder

image

Connectors: Four sets of connectors are used to connect the keys

image

Headers: Using male headers, all pieces can be connected/disconnected easily

image

Wiring: Testing the wiring. Ground is daisy-chained to all connectors

image

Pi Zero: A Raspberry Pi Zero is used to keep everything compact

image

Panel: Mounting the connectors and LEDs to an acrylic panel

image

Assembled: The fully assembled electronics

image

Hook: Twisting copper wire in a nice loop

image

Soldering: Soldering the loop onto the connector

image

Enclosure: Stacking and glueing pieces of wood to form an enclosure

image

Finish: A bit of sanding and rounding of the edges

image

Tadaaaa: The finished result on the cabinet

image

Tadaaaa #2: The finished result on the cabinet


image


Navigate to the next or previous post using the arrows.

image
  • Sign in to reply

Top Comments

  • mcb1
    mcb1 over 9 years ago +3
    Great idea. You could use a one wire device since they have unique serial numbers. Mark
  • fvan
    fvan over 9 years ago in reply to rhe123 +2
    Thanks rhe123 ! You and mg.sergio already covered two different methods for presence monitoring, so rather than repeat it, I thought I'd pick something that it could be combined with We're nearly there…
  • fvan
    fvan over 9 years ago in reply to mcb1 +2
    Thanks for the suggestion!, that is indeed something I hadn't considered! And has the advantage of being compatible with the PiZero, without the need of an additional ADC.
  • fvan
    fvan over 9 years ago in reply to mcb1

    Thanks for the suggestion!, that is indeed something I hadn't considered!

    And has the advantage of being compatible with the PiZero, without the need of an additional ADC.

    • Cancel
    • Vote Up +2 Vote Down
    • Sign in to reply
    • More
    • Cancel
  • mcb1
    mcb1 over 9 years ago

    Great idea.

    You could use a one wire device since they have unique serial numbers.


    Mark

    • Cancel
    • Vote Up +3 Vote Down
    • Sign in to reply
    • More
    • Cancel
  • fvan
    fvan over 9 years ago

    My little wooden key holder made it on Pimoroni's Bilge Tank! (@2:45)


    You don't have permission to edit metadata of this video.
    Edit media
    x
    image
    Upload Preview
    image

    • Cancel
    • Vote Up 0 Vote Down
    • Sign in to reply
    • More
    • Cancel
  • fvan
    fvan over 9 years ago in reply to rhe123

    Thanks rhe123! You and mg.sergio  already covered two different methods for presence monitoring, so rather than repeat it, I thought I'd pick something that it could be combined with image


    We're nearly there ...

    • Cancel
    • Vote Up +2 Vote Down
    • Sign in to reply
    • More
    • Cancel
  • rhe123
    rhe123 over 9 years ago

    Great idea and original usage of jacks image

    • Cancel
    • Vote Up +1 Vote Down
    • Sign in to reply
    • More
    • Cancel
element14 Community

element14 is the first online community specifically for engineers. Connect with your peers and get expert answers to your questions.

  • Members
  • Learn
  • Technologies
  • Challenges & Projects
  • Products
  • Store
  • About Us
  • Feedback & Support
  • FAQs
  • Terms of Use
  • Privacy Policy
  • Legal and Copyright Notices
  • Sitemap
  • Cookies

An Avnet Company © 2025 Premier Farnell Limited. All Rights Reserved.

Premier Farnell Ltd, registered in England and Wales (no 00876412), registered office: Farnell House, Forge Lane, Leeds LS12 2NE.

ICP 备案号 10220084.

Follow element14

  • X
  • Facebook
  • linkedin
  • YouTube