


Since quite some time my home automation is build around a core app made in Java EE. As part of this challenge I'm improving the core and integrating it more tightly through MQTT. The core is responsible for coordinating all nodes and enforcing the business rules for our home.
Introduction
The Thuis core runs on the Raspberry Pi 3 in a WildFly container. Like all nodes it's connected to the MQTT broker for communication with the rest of the system. It also takes care of communication with some external applications, like Plex (media server) and Netatmo (weather station). In this blog I'll focus on the integration of MQTT, Z-Way devices and the rules.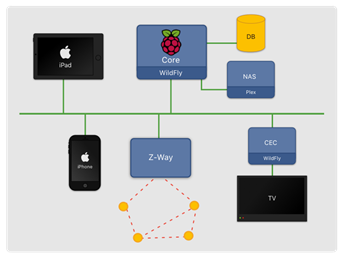
The building blocks of the application are as follows:
- Model:
- Devices
- Rooms
- Scenes
- Rules
- Commands
- Controller
- MQTT-CDI
Each of these will be described in this blog. Currently all models and rules are defined as static objects in Java code, the goal is to put this in the database at some point and make it editable through a UI, that will however be after the challenge ends.
Device Model
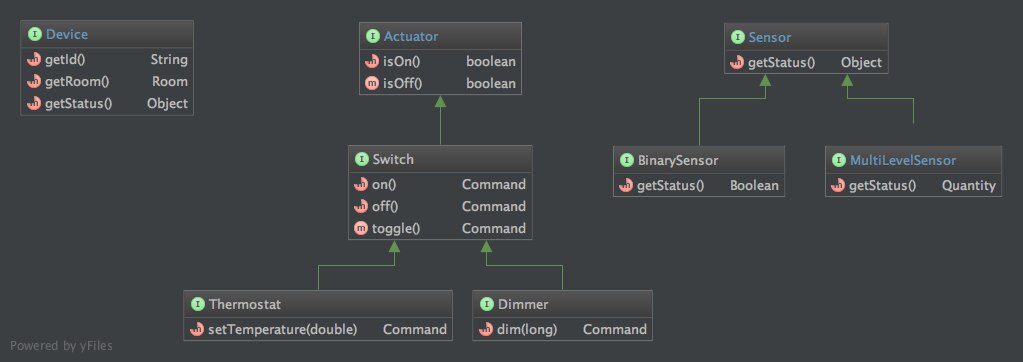
The two base models are Device and Room. To be combined with Device there are different types of Actuator and Sensor. The following image and table show the interfaces. There are several implementations, for example there is MqttSwitch which implements Device and Switch and defines a switch which can be controlled through MQTT.
| Interface | Description |
|---|---|
| Device | General definition of a (virtual) device: an identifier and it's status (type will be overridden by more specific interfaces) |
| Actuator | A device with controls |
| Switch extends Actuator | A switch with on/off and toggle features |
| Dimmer extends Switch | A switch which also has can have values between 0 and 100, where 0 is off |
| Thermostat extends Switch | A thermostat supporting a set point for the temperature. It can be turned on/off, which will put it on predefined on and off temperatures |
| Sensor | A device that provides a (single) value of a sensor |
| BinarySensor extends Sensor | A sensor with a value that can be true or false |
| MultilevelSensor extends Sensor | A sensor with an arbitrary value and a configurable unit of measurement |
All devices are virtual devices, each with a single function. For example a sensor that can measure both temperature and trigger on movement will be implemented as two sensors: a MultilevelSensor and a BinarySensor.
In this blog post we'll describe two of our rooms: the living room and the kitchen. This gives us the following definitions:
package nl.edubits.thuis.server.devices;

public class Rooms {
  public static Room living = new Room("living");
  public static Room office = new Room("office");
  public static Room kitchen = new Room("kitchen");
}
package nl.edubits.thuis.server.devices;

import static nl.edubits.thuis.server.devices.Rooms.living;
import static nl.edubits.thuis.server.devices.Rooms.kitchen;
/* other imports */

public class Devices {
  public static MqttSwitch livingMoodTop = new MqttSwitch(living, "moodTop");
  public static MqttSwitch livingMoodBottom = new MqttSwitch(living, "moodBottom");
  public static MqttSwitch livingMoodChristmas = new MqttSwitch(living, "moodChristmas");
  public static MqttDimmer livingMain = new MqttDimmer(living, "main");

  public static MqttBinarySensor kitchenMovement = new MqttBinarySensor(kitchen, "movement");
  public static MqttMultiLevelSensor kitchenTemperature = new MqttMultiLevelSensor(kitchen, "temperature", Units.CELSIUS);
  public static MqttMultiLevelSensor kitchenIlluminance = new MqttMultiLevelSensor(kitchen, "illuminance", Units.LUX);
  public static MqttSwitch kitchenMicrowave = new MqttSwitch(kitchen, "microwave");
  public static MqttSwitch kitchenCounter = new MqttSwitch(kitchen, "counter");
  public static MqttDimmer kitchenMain = new MqttDimmer(kitchen, "main");
}
Command Model
As you might have noticed in the interfaces above, several methods return Command. A command is a runnable class that can be executed to fulfill a task, for example turning on a Switch with Switch.on(). For each type of command there is an implementation. The one used most by the devices defined above is the MqttCommand which publishes a MQTT message, so for example Z-Way will receive it and take action. The implementation is quite straight forward:
package nl.edubits.thuis.server.automation.commands;

/* imports */

public class MqttCommand implements Command {
  String topic;
  String content;

  public MqttCommand(String topic, String content) {
    this.topic = topic;
    this.content = content;
  }

  @Override
  public void runSingle() {
    MqttService mqttService = CDI.current().select(MqttService.class).get();
    mqttService.publishMessage(topic, content);
  }
}
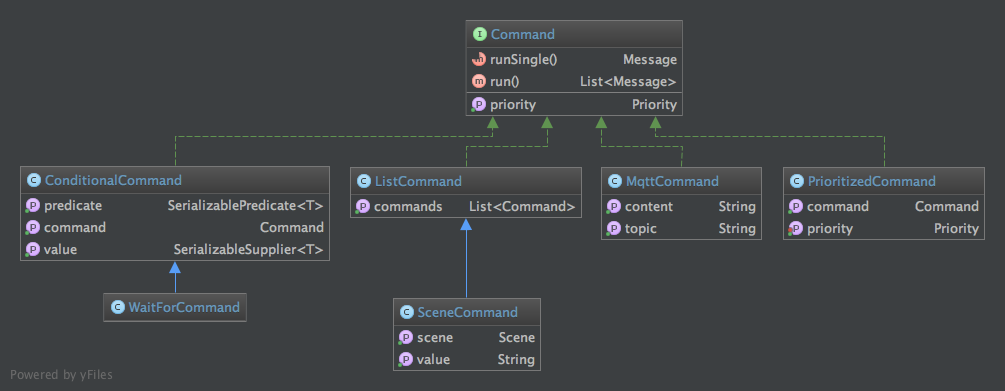
Commands can be encapsulated in other commands. By encapsulating you can either compose several commands into a single one, or add a condition to the command. The following commands of this type exist:
| Command | Description |
|---|---|
| ConditionalCommand | A command that executes the encapsulated command when a certain condition is met. The condition is defined using a Predicate lambda. Three default conditions are available:
|
| ListCommand | Execute several commands in order |
| PrioritizedCommand | Execute a command with a different priority, for example USER_INITIATED: the highest priority which will let the command jump in front of the execution queue |
| WaitForCommand | Wait for a condition to be true before executing another command. Two default conditions are available: waitForOn and waitForOff which wait for the status of a device to turn on or off before executing another command |
Another way of combining commands is using a Scene. This is an object that contains two ListCommand, one for activating the scene and one for deactivating it. A scene for turning on and off the mood lighting in the living room is defined like:
package nl.edubits.thuis.server.devices;

import static nl.edubits.thuis.server.devices.Devices.livingMoodBottom;
import static nl.edubits.thuis.server.devices.Devices.livingMoodChristmas;
import static nl.edubits.thuis.server.devices.Devices.livingMoodTop;
/* other imports */

public class Scenes {
  public static Scene mood = new Scene("mood",
    asList(
      livingMoodTop.on(),
      livingMoodBottom.on(),
      livingMoodChristmas.on()
    ),
    asList(
      livingMoodTop.off(),
      livingMoodBottom.off(),
      livingMoodChristmas.off()
    )
  );
}
Observing MQTT messages
The Core observes MQTT messages arriving on basically any topic. It then checks if there are any devices (or better ObserveMqttStatus implementations) matching this topic. The status of these devices is then updated. When a sensor gets a new value an event is emitted. These events (and individual MQTT messages) can triggered rules. This all happens in the MqttObserverBean. This bean also takes care of updating the status of any scenes or rooms including this device.
The connection with the MQTT broker is handled by the MQTT-CDI extension made by Alexis Hassler, to which I contributed some improvements in the past. This CDI extension abstracts the actual connection away. When MQTT messages arrive on a subscribed topic they are fired as CDI events which can be observed using the @MqttTopic annotation. This way you can very easily observe any messages arriving:
public void onMessageLivingMain(@Observes @MqttTopic("Thuis/device/living/main") MqttMessage message) {
  logger.log("Light in the living was turned "+message.asText());
}
For publishing messages a service method is available.
Rules
To enable sensors (or other events) to trigger commands there are rules. A rule is an Observer of either an MQTT topic or a SensorChanged event. As result one or more commands are executed. An example of a rule is the following:
package nl.edubits.thuis.server.automation;

/* imports */

@ApplicationScoped
public class Rules {

  @Inject
  private Controller controller;

  public void onKitchenMovement(@Observes @SensorChange("kitchen/movement") BinarySensor sensor) {
    LocalTime now = LocalTime.now();

    if (sensor.getStatus() && Devices.kitchenIlluminance.isLowerOrEqual(80)) {
      if (TimeUtils.isBetween(now, LocalTime.of(6, 0), LocalTime.of(10, 0))
          || TimeUtils.isBetween(now, LocalTime.of(12, 30), LocalTime.of(13, 30))
          || TimeUtils.isBetween(now, LocalTime.of(20, 30), LocalTime.of(21, 30))) {
        // Breakfast/Lunch/After dinner
        controller.run(userInitiatedPriority(Devices.kitchenMicrowave.on()));
        controller.run(userInitiatedPriority(Devices.kitchenCounter.on()));
      } else if (TimeUtils.isBetween(now, LocalTime.of(17, 30), LocalTime.of(20, 30))) {
        // Dinner
        controller.run(userInitiatedPriority(Devices.kitchenMicrowave.on()));
        controller.run(userInitiatedPriority(Devices.kitchenCounter.on()));
        controller.run(userInitiatedPriority(Devices.kitchenMain.on()));
      } else {
        controller.run(userInitiatedPriority(Devices.kitchenMicrowave.on()));
      }
    } else {
      controller.run(Devices.kitchenMicrowave.off());
      controller.run(Devices.kitchenCounter.off());
      controller.run(Devices.kitchenMain.off());
    }
  }
}
This example covers most of the basic options. It observes the movement sensor in the kitchen. When it's status becomes true and it's not very light it will check 3 timeframes. Depending in which timeframe the current time fits a combination of lights is turned on. This way you always have the most useful lights for the task ahead. The timing might need some optimization, but this is a good start.
Controller
Taking care of the actual execution of commands and scenes are the Controller and the CommandExecutor. Take the example rule above: it triggers several lights to be turned on or off. These commands are passed on to the controller. The controller takes the command, determines it's priority and then puts it on a JMS queue:
package nl.edubits.thuis.server.controller;

/* imports */

@Stateless
public class Controller {

  @Inject
  private JMSContext context;

  @Resource(mappedName = Resources.COMMAND_QUEUE)
  private Queue commandQueue;

  public void run(Command command) {
    run(command, 0);
  }

  public void run(Command command, long deliveryDelay) {
    context.createProducer()
           .setPriority(command.getPriority().getValue())
           .setDeliveryDelay(deliveryDelay)
           .send(commandQueue, command);
  }
}
(for the purpose of this blogpost the code is simplified a bit)
A JMS MessageListener, the CommandExecutor, is used to listen to the commands which are added to the queue and execute them. Because of the way the JMS queue works, commands are executed in chronological order while respecting the priorities. This means that all commands with the same priority are executed exactly in order they were added (FIFO), but when a command of a higher priority is added to the queue it's moved in front. This is used for situations where for example the home theater is starting up (which takes a few minutes in total) and someone triggers a motion sensor. This command gets the USER_INITIATED priority and is therefore executed at the first possible moment, in front of all other steps of starting up the home theater. Something that's not time sensitive (for example automatically turning off the heating at night) gets a LOW priority and will therefore never block any more important commands.
Some commands can take a long time and you don't want them to block the queue. For example a WaitForCommand takes until the condition becomes true. In this case the condition is tested once and when the result isn't true yet the command is added to the queue again with a small timeout.
Concluding
The most important part of the Core is now done, but most rules still have to be implemented. In a later stage some more external systems will be added to the core, for example for controlling the Home Theatre. I'm also aware that, to keep this blog post from growing too much, I have simplified some code samples and didn't cover every detail. If you're interested in a certain detail, please let me know and I'll explain it more!