


Bake Mate - Pi Chef Blog #11 - Stretch goal 1: A visual indicator using Sense HAT's RGB LED Matrix - Part 1
With most of the work that was required for the 'core' of Bake Mate complete, it's time to move onto something that I've been really looking forward to: using the Sense HAT's RGB LED matrix as a visual indicator!
At the time of the application I had added this as 'stretch goal' 1 because I wasn't too sure whether I'll manage to finish working on the core application of Bake Mate. I had used Python and tkinter in the past, but I had never built something this complex, and would be interfacing devices with the Raspberry Pi for the first time (though I have played around with various other microcontrollers).
The schematic for the Sense HAT is here. I've attached screenshots of the most relevant parts (which are used to control the LED matrix).

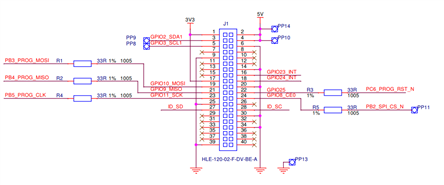
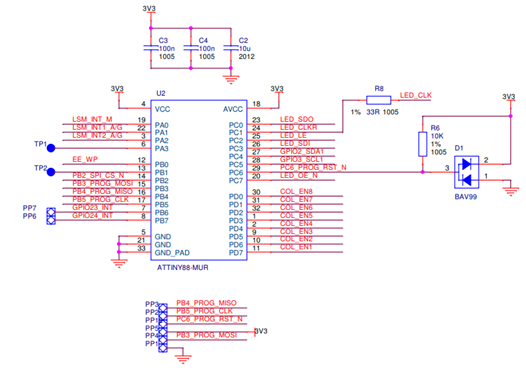
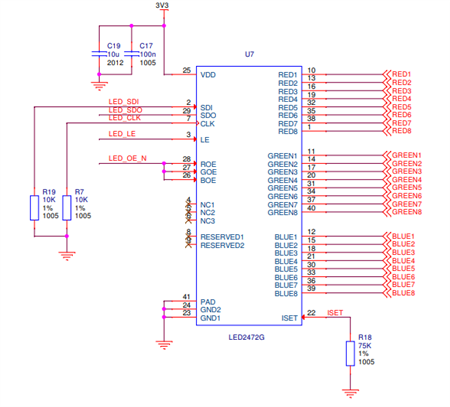
All the sensors on the board are connected using I2C. The LED matrix is driven using a STMicroelectronics LED2472G '24-channels LED driver with error detection and gain control', which is controlled by the ATtiny (which in turn is controlled by the Pi over I2C)
A couple of complications:
- The Sense HAT and 4DPi (2.4" Display HAT) are both meant to be stacked on top of the Pi 3, so they cannot be used simultaneously.
- It is not possible to stack HATs on the Raspberry Pi because of the EEPROM that is used to identify the HAT. From what I understand, the kernel/Linux needs to know what HAT is presently connected in order to load the appropriate driver, which is done by reading the EEPROM on the HAT. The EEPROM is connected to the second I2C bus - pins ID_SD & ID_SC. Stacking 2 HATs simultaneously won't work because 2 identification EEPROMs will be detected at the same address - even if the 2 HATs have no other overlapping pins and could be used simultaneously (in theory).
- In this case, both, the Sense HAT and 2.4" display HAT use the other (main) I2C bus (pins SDA1 & SCL1). The Sense HAT uses I2C to drive the LED matrix (via an ATtiny88) and connect all the environmental sensors (natively I2C). The 4 DPi HAT uses I2C for the touchscreen controller. This shouldn't be too much of a problem because I2C supports multiple slaves, but I have seen implementations where the touchscreen controller is the I2C master (which would mean the Pi 3 would be the slave). Using the Sense HAT would require the Pi 3 to be the master, and the ATtiny88 the slave.
Possible solutions:
- To complicate matters further, the Sense HAT library doesn't work unless it detects the HAT's EEPROM. It might have been possible to modify the library to force it to work, but I didn't understand the low level details of the framebuffer well enough, so I looked elsewhere.
- The next option would be use bitbanged I2C to control the ATtiny88. To do this, I would first need to know the communication protocol that is used by the Pi 3 to talk to the ATtiny88. The only documentation I could find was at the rpi-sense GitHub repository: one was a C file, and the other was assembly, though it seemed that they were incomplete. I opened up the manual of the ATtiny88, but decided to do another quick search.
- I happened to find 'John Doe's' (whoever he is
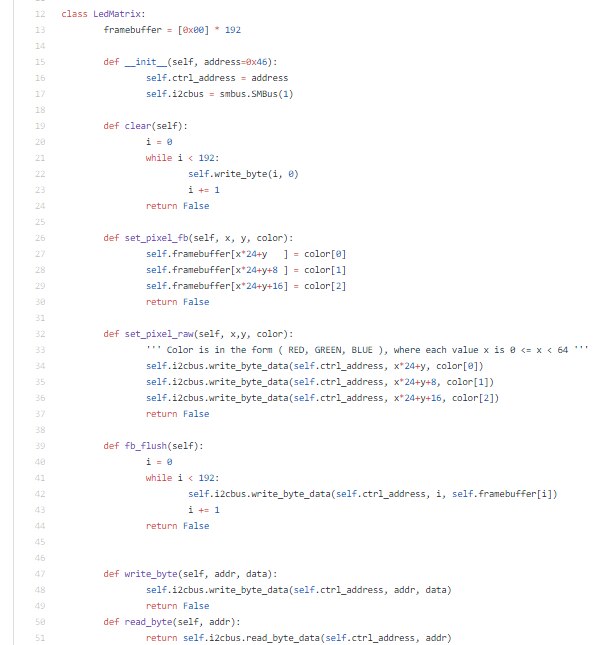
 ) code for 'Game of Life' for the Sense HAT. Luckily, it used a custom driver to control the Sense HAT: using smbus instead of the official Sense HAT library.

Testing:

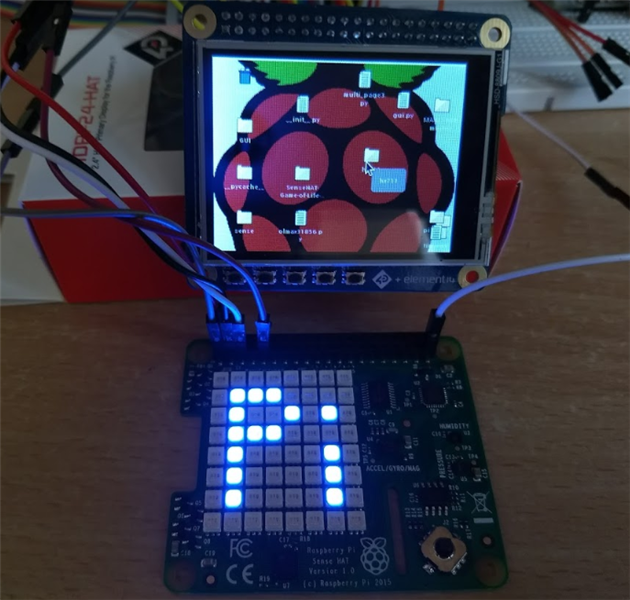
I connected the Sense HAT to the Pi 3 using jumpers. The only pins connected were the 5V, 3.3V, GND, SDA & SCL (the main I2C lines); keeping the EEPROM I2C disconnected. The Pi booted up and the touchscreen on the display HAT worked correctly. I ran i2cdetect to test whether the i2c devices were getting detected, and it showed me that all the addresses were populated. This meant that something was pulling down the SDA pin, so I reconnected the HAT and checked once again.
The screenshot on the right shows the output of i2cdetect: 'UU' is the address reserved for the touchscreen controller, and 0x46 is the address of the ATtiny88. The other devices are environmental sensors & IMU on the Sense HAT, which I won't be using.
I ran the 'Game of Life' code, and the LED matrix lit up (as it should), and the joystick worked fine too.
I had a quick look at the Python library to determine the functions that I would need to call in order to control the LED matrix:
To set a pixel, call set_pixel_raw with the x,y coordinates of the the pixel (in the matrix) and the RGB value - that simple!
The function first writes the value of R, then G and B to the ATtiny88 over I2C.
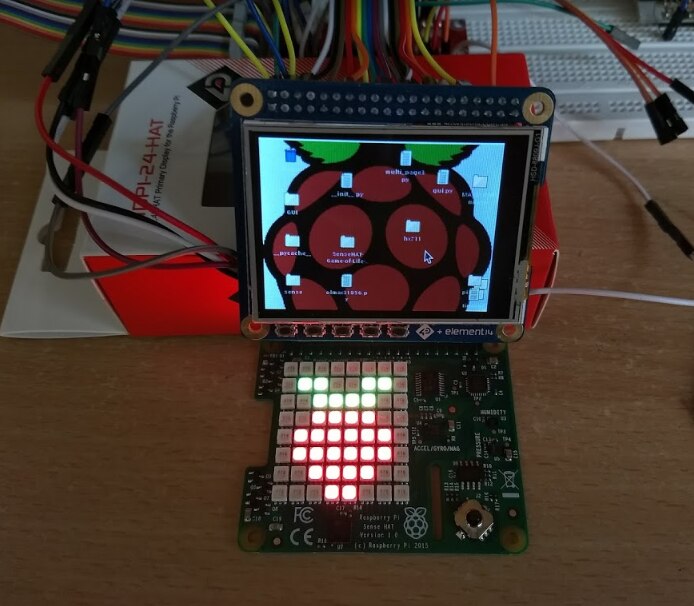
I did two quick tests:
Next on the list:
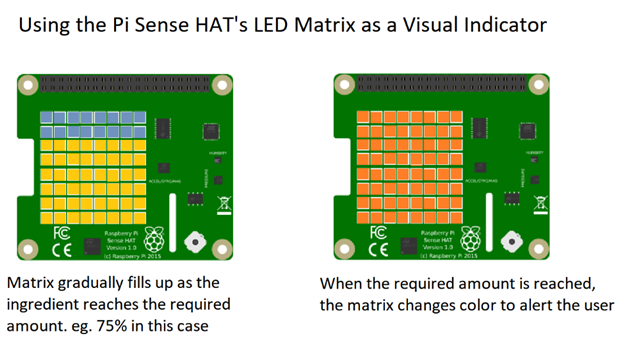
- I'll start working on the code that does what I had originally proposed: filling up the matrix on the Sense HAT a pixel at a time. This would work in conjunction with the bar graph on the LCD.
- Since I managed to get the joystick on the Sense HAT to work too, I'm thinking of using it for navigation within the main app. I increased the size of the buttons to make it easy to use, but it's a resistive touchscreen that tends to miss touches. The joystick will make navigation easier. Well, to think of it I could add bigger 'dedicated' buttons which will be definitely easier to use - but I'll keep that for later. I think this would be nice to have once I get a 'fancy' weighing scale built with proper materials - the display could be swapped out for something a little bigger, and I could place it in a nice enclosure.
Top Comments