


Part 01: Arduino Nicla Vision Module
Arduino Nicla Vision module is a fun breakout board. I really appreciated that Element 14 gave me an opportunity to evaluate this module during the ZinnBee project. You might read all the features about the breakout board from Arduino website if you like. I will focus on the machine vision for ZinnBee project first.
- Time-of-Flight sensor, which is a good trouble-shoot application to recovery my bricked Arudino Nicla module. Sometimes, if I updated the OpenMV firmware/library, especially if I need more RAM/flash for bigger dataset, unexpectedly “bricked Nicla Vision” error message might be happening. I am still in the middle of trouble-shooting why I got “bricked Nicla Vision” status as below.
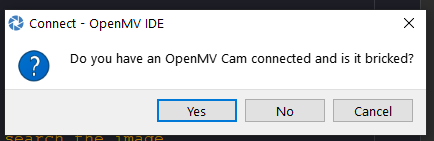
Fig 1. Bricked Arduino Nicla Vision Module (Really?!)
I did not have such issues until I started to select bigger size images under Edge Impulse image training flow last week.
There are two methods to avoid such show-stopper while you exploring the features of ML algorithm on Arduino Nicla Vision module.
Method A: Running Arduino Time-of-Flight sensor application to flash out all the previous contents on the flash. Then start the ML flow on OpenMV IDE.
Method B: Don’t update OpenMV Cam’s firmware after flashing bootloader as below:
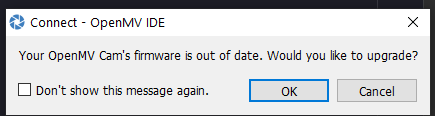
Fig 2. Upgrade OpenMV Cam’s Firmware or Not ?
I found that sometime I did need both method A and B to overcome Bricked Nicla Vision Cam issue. I still don’t know the root cause of that at this moment.
2. More out-of-box examples from OpenMV IDE for Arduino Nicla Vision module are presented as below:
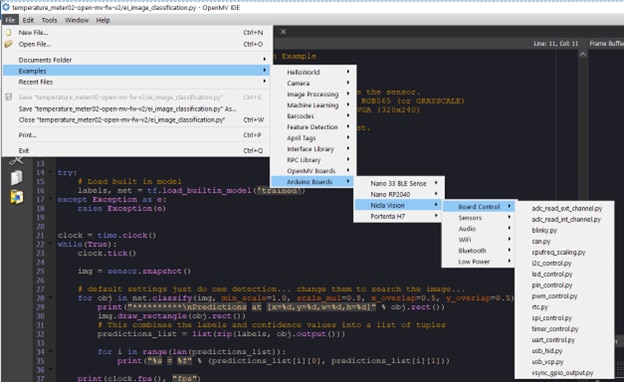
Fig 3: OOB Examples of Arduino Nicla Vision from OpenMV IDE
I planed to use i2c_control.py/spi_control.py/timer_control.py for ZinnBee project if I need.
Part 02: Edge Impulse ML Flow
There are many features from Edge Impulse tool. The easiest way to understand Edge Impulse is to reproduce a project from Edge Impulse website. There is a simple demonstration of Analog Meter Reading project on Arduino Nicla Vision (Ref[2]). The greatest value I learned from the reproduction of Analog Meter Reading experiment is how to tune the dataset of images for ML on Edge Impulse tool chain and use Zinne Analog Meter Reading experiment to calibrate ML Edge Impulse flow or troubleshoot the unexpected issues, such as Bricked Nicla Vision module.
Here is the process of ZinnBee Analog Meter Reading experiment.
- Setup the bench testing equipment and collect images for the dataset.
I used a 3D printer to print an enclosure for Arduino Nicla Vision module. Here is my small bench studio:
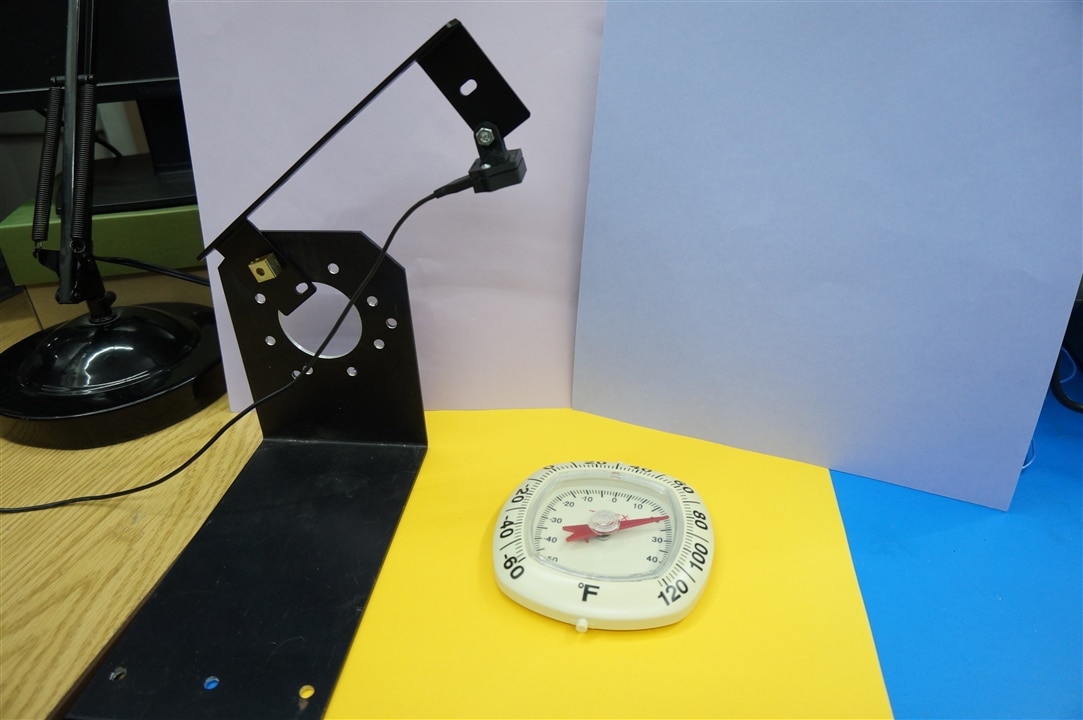
Fig 4: ZinnBee Bench Photo Studio
2. Image processing of the dataset
I used Python3 to process the temperature meter photos, which were used for the dataset at Edge Impulse ML flow. You might find the source codes from Ref[2], which used Python Jupyter Notebook. The post-process images as the dataset for Edge Impulse are presented in the video.
Here is the updated Python code to post-image dataset processing.
import os
import numpy as np
#import pandas as pd
import matplotlib

import matplotlib.pyplot as plt

from PIL import Image

#matplotlib inline

import matplotlib.pyplot as plt
import matplotlib.image as mpimg


# Declare variables
#NEEDLE = './Meter_images/meter_needle08.jpg'
NEEDLE = './Meter_images/needle01.png'  # front
GAUGE = './Meter_images/meter_03_try02.jpg'


image = Image.open(NEEDLE).convert('RGBA')
image_rot_0 = image.rotate(0, expand=False, resample=Image.BICUBIC) # adjust this value to rotate the needle to the starting (zero) position
image_rot_0.save('./Meter_images/needles/needle_rot_0.png')
plt.imshow(image_rot_0)
plt.show()


# Gauge background
image = Image.open(GAUGE).convert('RGBA')
gauge_zero = image.copy()
gauge_zero.paste(image_rot_0.convert('L'), (0, 0), image_rot_0.convert('RGBA'))

plt.imshow(gauge_zero)
plt.show()

PATH = "./Meter_images/needles/needle_rot_{0}.png"
def make_needles(angle):
    img = Image.open('./Meter_images/needles/needle_rot_0.png')
    x = img.rotate(-angle, expand=True, resample=Image.BICUBIC)
    # crop the rotated image to the size of the original image
    x = x.crop(box=(x.size[0]/2 - img.size[0]/2,
               x.size[1]/2 - img.size[1]/2,
               x.size[0]/2 + img.size[0]/2,
               x.size[1]/2 + img.size[1]/2))

    dash = str(angle).replace(".","-")
    filename = PATH.format(dash)

    x.save(filename)

for angle in np.arange(0, 360.0,4.5):
    make_needles(angle)


NEEDLES_PATH = "./Meter_images/needles/needle_rot_{0}.png"
EDA_GAUGES = "./Meter_images/gauges/{0}"

def save_gauge(item, num):
    img_gauge = Image.open(GAUGE, 'r')

    filename = NEEDLES_PATH.format(str(item).replace(".","-"))
    img_needle = Image.open(filename, 'r')
    img_copy = img_gauge.copy()

    img_copy.paste(img_needle.convert('L'), (0, 0), img_needle.convert('RGBA'))

    # Save the synthetic image to the class folder
    string_num = str(num)
    dash = string_num.replace(".","-")

    # Save PNG for EDA
    eda_name = "gauge_{0}.png".format(dash)
    img_copy.save( EDA_GAUGES.format(eda_name) )

def iterate_gauge(mapping):
    for idx, item in enumerate(mapping):
        save_gauge(mapping[item], item)


# Define a mapping between degrees in circle and gauge readings

# adjust this according to your gauge (value:angle)
gaugeDegreeMap = {
    0.0:0.0, 0.1:4.5, 0.2:9.0, 0.3:13.5, 0.4:18.0, 0.5:22.5, 0.6:27.0, 0.7:31.5, 0.8:36.0, 0.9:40.5,
    1.0:45.0, 1.1:49.5, 1.2:54.0, 1.3:58.5, 1.4:63.0, 1.5:67.5, 1.6:72.0, 1.7:76.5, 1.8:81.0, 1.9:85.5,
    2.0:90.0, 2.1:94.5, 2.2:99.0, 2.3:103.5, 2.4:108.0, 2.5:112.5, 2.6:117.0, 2.7:121.5, 2.8:126.0, 2.9:130.5,
    3.0:135.0, 3.1:139.5, 3.2:144.0, 3.3:148.5, 3.4:153.0, 3.5:157.5, 3.6:162.0, 3.7:166.5, 3.8:171.0, 3.9:175.5,
    4.0:180.0, 4.1:184.5, 4.2:189.0, 4.3:193.5, 4.4:198.0, 4.5:202.5, 4.6:207.0, 4.7:211.5, 4.8:216.0, 4.9:220.5,
    5.0:225.0, 5.1:229.5, 5.2:234.0, 5.3:238.5, 5.4:243.0, 5.5:247.5, 5.6:252.0, 5.7:256.5, 5.8:261.0, 5.9:265.5,
    6.0:270.0, 6.1:274.5, 6.2:279.0, 6.3:283.5, 6.4:288.0, 6.5:292.5, 6.6:297.0, 6.7:301.5, 6.8:306.0, 6.9:310.5,
    7.0:315.0, 7.1:319.5, 7.2:324.0, 7.3:328.5, 7.4:333.0, 7.5:337.5, 7.6:342.0, 7.7:346.5, 7.8:351.0, 7.9:355.5,
    8.0:360.0
}

# Iterate through the lookup map
iterate_gauge(gaugeDegreeMap)
You might watch the video for the final image candidates for Edge Impulse.
3. Performance evaluation of Edge Impulse
I did multiple iterations to get a good ML result on the bench testing. I selected 3 Edge Impulse training cases for this blog.
Edge Impulse training case 01: exact procedure as Ref[3]. The training accuracy is about 81.8% for my dataset.
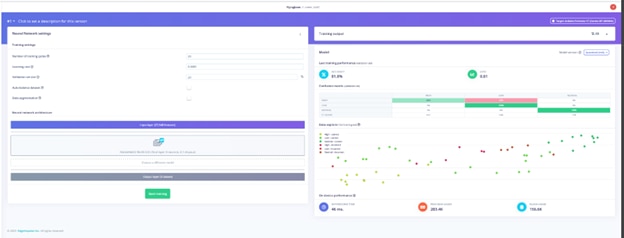
Fig 5: Edge Impulse training case 01: RGB Image + 20 Training Cycles
Edge Impulse training case 02: updated the image from RGB to grayscale. The accuracy of the training model is 90.9%.
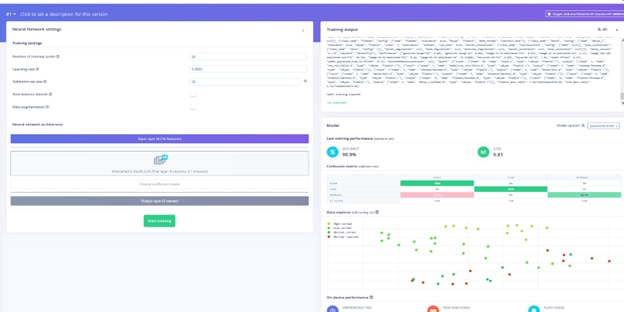
Fig 6: Edge Impulse training case 02: Graycale Image + 20 Training Cycles
Edge Impulse training case 03: the image is set as grayscale and upgrade the number of training cycles from 20(default) to 40. The accuracy of ML training model is 100%.
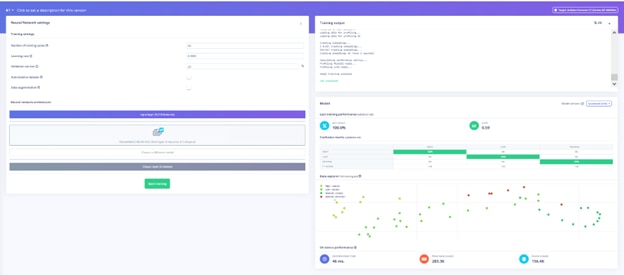
Fig 7: Edge Impulse training case 03: Graycale Image + 40 Training Cycles
I took a short video for the bench testing of the deployed case 03.Edge Impulse training case 03
Part 03: ZinnBee Analog Meter Reading Experiment Summary
I reviewed the dataset I uploaded into Edge Impulse and the corresponding labeled images as below:
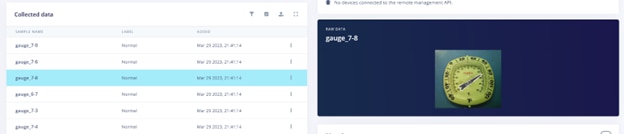
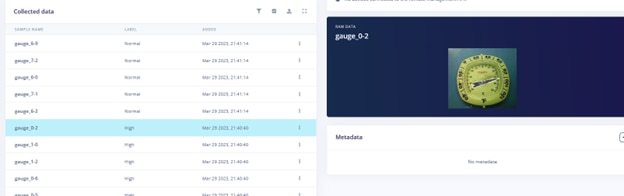
Fig 8: Images Labeled Normal and High (no other image between these two)
These two images are at the edge for the classification between High and Normal. I did give Edge Impulse ML flow a challenge for the classification of the experiment. The bench testing on case 03 shew that Arduino Nicla Vision module thought the temperature was constant high from all the angle of the camera view. More work will be needed for ML flow on my next blog.
Part 04: Kick off ZinnBee Lego-lab ML Experiment
I kicked off ZinnBee Lego-lab ML experiment last week. However, there were some interested results from the Edge Impulse ML flow I could not understand well. So I came back to finish the blog on ZinnBee Temperature Meter experiment, which could be an aid to guide me to finish ZinnBee Lego-lab ML experiment. Here is my ZinnBee Lego-lab content.
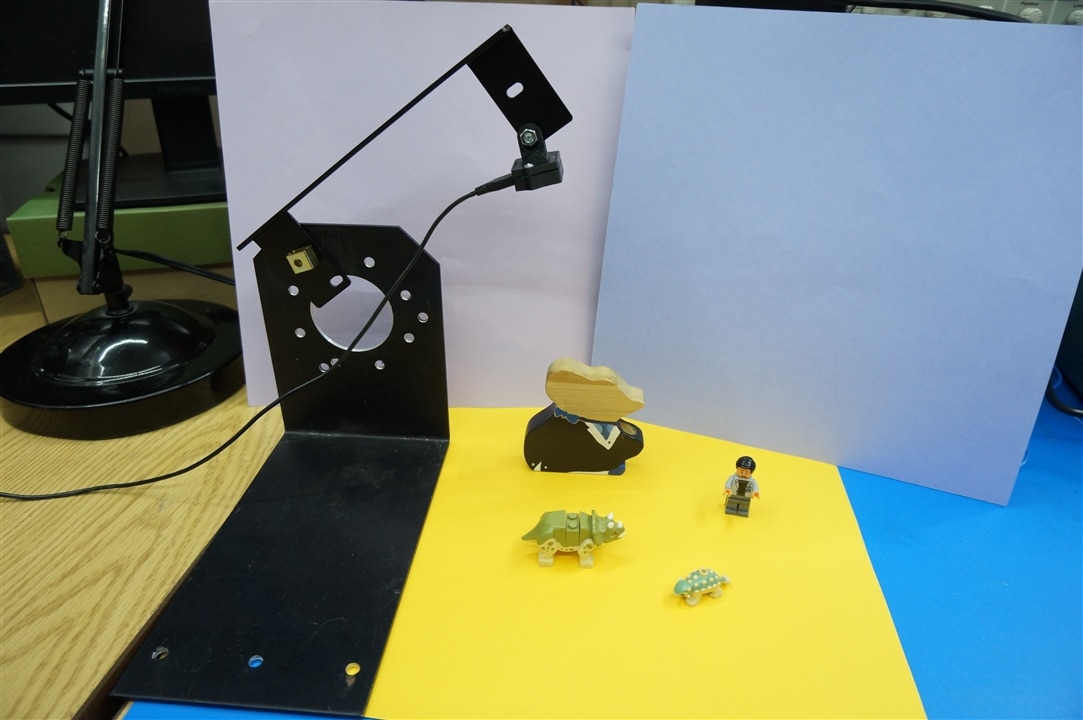
Fig 9: ZinnBee Lego-Lab ML Experiment Setup
There are 4 objects: boy, mice, big dinosaur and tiny dinosaur. ZinnBee Lego-lab experiment need to identify 4 different objects properly. I will describe the process of the experiment on my next blog.
References:
ZinnBee Blogs as below:
ZinnBee Blog#01: Introduction of the Project