


Introduction
In the last post, I described the hardware part for our robot which uses the Seeed Studios GrovePi+ since I am yet to receive my kit. In this post, I talk about the software part and making the robot move. Lets see what we can do.
Setting up the RPi
I have already mentioned that there are lots of posts on how to install Raspbian and my tweets on the install are available at https://embeddedcode.wordpress.com/2013/07/10/the-geek-getting-started-guide-to-the-raspberry-pi/ . Lets move onto the more difficult stuff.
Python
Python is a general purpose interpreted, interactive, object-oriented, high-level programming language that was created by Guido van Rossum in the late eighties. Python allows users to write code with clear, readable syntax with a growing number of support libraries for various tasks that is open source and has a community based around its development. I did a related post on writing python scripts at http://www.element14.com/community/groups/arduino/blog/2015/01/22/dynamic-living-room-lights-paho-for-python--writing-better-code
It usually comes preinstalled with Raspbian and you can verify it by typing
python —version
at the terminal.
Unlike my previous tutorials, we will work in the GUI and create a little guy of our own. Lets setup remote access to the RPi’s Windows env.
GUI over the local network.
VNC (Virtual Network Computing) is one way we can control and monitor a computers desktop from another computer over a network. Which in our case is going to be useful for wireless remote teleoperation of the robot and basic control of Raspberry Pi. I am assuming that we have setup a static IP for the RPi and it is connected to our local network. On the RPi we need to install tightvnc by running the command
sudo apt-get install tightvncserver
once it is done, we move on to starting a server by issuing the command
vncserver :1 -geometry 1280x800 -depth 16 -pixelformat rgb565
It should ask you to enter a password which will be used for remote access. If not then run the following command
vncpasswd
After the password is set its time to login to the sever from another computer.
On the Remote Machine
If you are running windows or linux, then download the appropriate version of ultravnc.
On a Mac OS, use the screen sharing app.
The next thing to do is connect to the RPi and start writing some python scripts.
Grove Pi+ or else
There are a number of ways you can control motors from an RPi but I have chosen to use the seeedstudios grove Pi + for this particular bot. In order to use it, we need to download some ready made scripts to test things out. Go to https://github.com/DexterInd/GrovePi and download the zip file.
There is a software folder which not only has python but also nodejs and C and Shell example code. Now you may choose to employ and arduino or even connect a motor driver directly for which you will have to write your own functions for movement. In another post, I will be using the gert board to control some stepper/servo motors but this time its gonna be the Grove Pi+ and friends.
Getting started.
I am not providing a tutorial but instead a step by step description of what I did and usually do when I come across a new platform. This should help you understand things a bit better.
Enabling I2C and SPI on the RPI
By default the I2C and SPI interfaces on the RPi are no enabled. We need to make some changes.
First type the following command in your command prompt
sudo raspi-config
This will start the utility as shown below
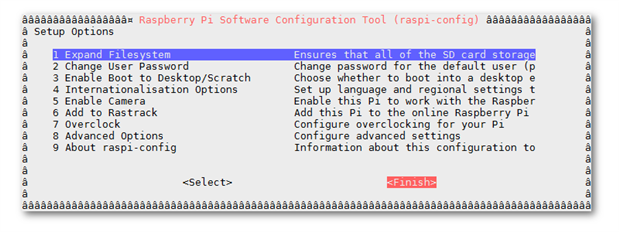
Go to Advanced Options -> I2C -> Yes
The screen will ask if you want the interface to be enabled :
Select “Yes”
Select “Ok”
The screen will ask if you want the module to be loaded by default : Select “Yes”
Repeat the same for the SPI module.
In addition to this, we need to edit the modules file. Execute the command
sudo nano /etc/modules
and it will open the modules file in the editor. Add the following line to the end.
i2c-bcm2708
i2c-dev
Use Ctrl-X, Y and enter to save the file and exit.
Reboot. You should have the modules enabled and to check run the following command
lsmod | grep i2c_
This should list out i2c modules and the presence of i2c_bcm2708 in the list will indicate that all is as it should be.
Great so now we have the I2C and SPI all setup and we can move to testing out the motors
I2C tests
For details on I2C refer to https://learn.sparkfun.com/tutorials/i2c The first thing I need to
The motor driver in question looks something like the image shown below. In this case, we want to test out the motors first and for that the python script is as follows
#!/usr/bin/env python

# Description:    Grove Motor Drive via I2C
# Author :        Inderpreet Singh
import smbus
import time
import RPi.GPIO as GPIO


# Global Stuff Here


DRIVER_ADDR = 0x0f
MOTOR_SPEED_SET = 0x82
PWM_FREQUENCE_SET = 0x84
DIRECTION_SET = 0xaa
MOTOR_SET_A = 0xa1
MOTOR_SET_B = 0xa5
NOTHING = 0x01
ENABLE_STEPPER = 0x1a
UNENABLE_STEPPER = 0x1b
STEPERNU = 0x1c


# The Once Code Here
# Check what revions for SMBus ID
rev = GPIO.RPI_REVISION
if rev==2 or rev ==3:
    bus = smbus.SMBus(1)
else:
    bus = smbus.SMBus(0)


# Function Defs here
def MotorSpeedSetAB(SpeedA, SpeedB):
    bus.write_i2c_block_data(DRIVER_ADDR, MOTOR_SPEED_SET, [SpeedA, SpeedB])


def MotorPWMFrequencySet(Freq):
    bus.write_i2c_block_data(DRIVER_ADDR, PWM_FREQUENCE_SET, [Freq, NOTHING])


def MotorDirectionSet(Dir):
    bus.write_i2c_block_data(DRIVER_ADDR, DIRECTION_SET, [Dir,NOTHING])


# Things to do once
time.sleep(1.0)
        MotorSpeedSetAB(250, 250)
        time.sleep(1)


# The Looping Code Here
try:
    while True:
        # Loop Things here
        MotorDirectionSet(0b00001010)
        time.sleep(5)


        MotorDirectionSet(0b00000000)
        time.sleep(2)


        MotorDirectionSet(0b00000101)
        time.sleep(5)


        MotorDirectionSet(0b00000000)
        time.sleep(2)
except:
    print 'Somthing went wrong or you pressed Ctrl+C'


finally:
    print 'Cleaning up Things...'
    GPIO.cleanup()
This works for me and the motors move forward and then backwards as they should. I need a better battery though.
You can replace the functions with your own to control the speed and direction control.
I wanted to upload a video but unable to… yet.
Lets have some fun with this one...
A Little Tinkering
The world of windows has shiny buttons and stuff and you can use the mouse to interact with objects. We need a Graphical User Interface albeit a simple one here as well. Hence we start with TkInter.
Tkinter is the standard GUI library for Python. Python when combined with Tkinter provides a fast and easy way to create GUI applications.
This link is a lot of help. http://www.tutorialspoint.com/python/python_gui_programming.htm
I created a new script as follows:
# Description: Grove Motor Drive via I2C
# Author : Inderpreet Singh
import smbus
import time
import RPi.GPIO as GPIO
import Tkinter
# Global Stuff Here
DRIVER_ADDR = 0x0f
MOTOR_SPEED_SET = 0x82
PWM_FREQUENCE_SET = 0x84
DIRECTION_SET = 0xaa
MOTOR_SET_A = 0xa1
MOTOR_SET_B = 0xa5
NOTHING = 0x01
ENABLE_STEPPER = 0x1a
UNENABLE_STEPPER = 0x1b
STEPERNU = 0x1c
# The Once Code Here
# Check what revions for SMBus ID
rev = GPIO.RPI_REVISION
if rev==2 or rev ==3:
bus = smbus.SMBus(1)
else:
bus = smbus.SMBus(0)
# Function Defs here
def MotorSpeedSetAB(SpeedA, SpeedB):
bus.write_i2c_block_data(DRIVER_ADDR, MOTOR_SPEED_SET, [SpeedA, SpeedB])
def MotorPWMFrequencySet(Freq):
bus.write_i2c_block_data(DRIVER_ADDR, PWM_FREQUENCE_SET, [Freq, NOTHING])
def MotorDirectionSet(Dir):
bus.write_i2c_block_data(DRIVER_ADDR, DIRECTION_SET, [Dir,NOTHING])
def quit():
global TkTop
TkTop.destroy()
def Forward():
MotorSpeedSetAB(250, 250)
MotorDirectionSet(0b00000101)
def Backward():
MotorSpeedSetAB(250, 250)
MotorDirectionSet(0b00001010)
def Right():
MotorSpeedSetAB(250, 250)
MotorDirectionSet(0b00000110)
def Left():
MotorSpeedSetAB(250, 250)
MotorDirectionSet(0b00001001)
def Stop():
MotorSpeedSetAB(0, 0)
MotorDirectionSet(0b00000000)
# Things to do once
time.sleep(1.0)
MotorSpeedSetAB(250, 250)
time.sleep(1)
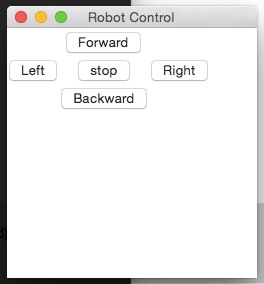
GUI = Tk()
GUI.geometry(“250x250”)
GUI.title(“Robot Control”)
B1=Button(text=“Forward”, command=Forward)
B2=Button(text=“Backward”, command=Backward)
B3=Button(text=“Right”, command=Right)
B4=Button(text=“Left”, command=Left)
B5=Button(text=“Stop”, command=Stop)
B1.grid(row=0, column=1)
B4.grid(row=1, column=0)
B5.grid(row=1, column=1)
B3.grid(row=1, column=2)
B2.grid(row=2, column=1)
mainloop()
This code creates a window as shown below and allows easy control of our robot using a simple GUI
So now we have a little robot control and we should be able to use VNC to connect to it remotely.
More on this next time… Stay tuned 
Top Comments
-

DAB
-
Cancel
-
Vote Up
+1
Vote Down
-
-
Sign in to reply
-
More
-
Cancel
Comment-

DAB
-
Cancel
-
Vote Up
+1
Vote Down
-
-
Sign in to reply
-
More
-
Cancel
Children