element14 Community
element14 Community
    Register Log In
  • Site
  • Search
  • Log In Register
  • About Us
  • Community Hub
    Community Hub
    • What's New on element14
    • Feedback and Support
    • Benefits of Membership
    • Personal Blogs
    • Members Area
    • Achievement Levels
  • Learn
    Learn
    • Ask an Expert
    • eBooks
    • element14 presents
    • Learning Center
    • Tech Spotlight
    • STEM Academy
    • Webinars, Training and Events
    • Learning Groups
  • Technologies
    Technologies
    • 3D Printing
    • FPGA
    • Industrial Automation
    • Internet of Things
    • Power & Energy
    • Sensors
    • Technology Groups
  • Challenges & Projects
    Challenges & Projects
    • Design Challenges
    • element14 presents Projects
    • Project14
    • Arduino Projects
    • Raspberry Pi Projects
    • Project Groups
  • Products
    Products
    • Arduino
    • Avnet Boards Community
    • Dev Tools
    • Manufacturers
    • Multicomp Pro
    • Product Groups
    • Raspberry Pi
    • RoadTests & Reviews
  • Store
    Store
    • Visit Your Store
    • Choose another store...
      • Europe
      •  Austria (German)
      •  Belgium (Dutch, French)
      •  Bulgaria (Bulgarian)
      •  Czech Republic (Czech)
      •  Denmark (Danish)
      •  Estonia (Estonian)
      •  Finland (Finnish)
      •  France (French)
      •  Germany (German)
      •  Hungary (Hungarian)
      •  Ireland
      •  Israel
      •  Italy (Italian)
      •  Latvia (Latvian)
      •  
      •  Lithuania (Lithuanian)
      •  Netherlands (Dutch)
      •  Norway (Norwegian)
      •  Poland (Polish)
      •  Portugal (Portuguese)
      •  Romania (Romanian)
      •  Russia (Russian)
      •  Slovakia (Slovak)
      •  Slovenia (Slovenian)
      •  Spain (Spanish)
      •  Sweden (Swedish)
      •  Switzerland(German, French)
      •  Turkey (Turkish)
      •  United Kingdom
      • Asia Pacific
      •  Australia
      •  China
      •  Hong Kong
      •  India
      •  Korea (Korean)
      •  Malaysia
      •  New Zealand
      •  Philippines
      •  Singapore
      •  Taiwan
      •  Thailand (Thai)
      • Americas
      •  Brazil (Portuguese)
      •  Canada
      •  Mexico (Spanish)
      •  United States
      Can't find the country/region you're looking for? Visit our export site or find a local distributor.
  • Translate
  • Profile
  • Settings
Sci Fi Your Pi
  • Challenges & Projects
  • Design Challenges
  • Sci Fi Your Pi
  • More
  • Cancel
Sci Fi Your Pi
Blog Sci Fi Your Pi: PiDesk - Guide: Controlling NeoPixels with the Raspberry Pi A+/B+
  • Blog
  • Forum
  • Documents
  • Files
  • Mentions
  • Sub-Groups
  • Tags
  • More
  • Cancel
  • New
  • Share
  • More
  • Cancel
Group Actions
  • Group RSS
  • More
  • Cancel
Engagement
  • Author Author: fvan
  • Date Created: 20 May 2015 10:46 AM Date Created
  • Views 2247 views
  • Likes 4 likes
  • Comments 15 comments
  • design_challenge
  • touch_motion_controls
  • touch_motion_control
  • sci_fi_your_pi
Related
Recommended

Sci Fi Your Pi: PiDesk - Guide: Controlling NeoPixels with the Raspberry Pi A+/B+

fvan
fvan
20 May 2015

  • Introduction
  • Software
  • Hardware
  • Demo


Introduction


Addressable LEDs or NeoPixels are typically used in combination with an Arduino or similar microcontroller, due to the timing critical signal required to control them. An SBC such as the Raspberry Pi is not suited for such realtime GPIO activities, as the Linux operating system runs other tasks in parallel. Or at least that was the case until Jeremy Garff found a way to use the DMA (Direct Memory Access) module to transfer bytes of memory between different parts of the processor, without using the CPU and thus not being interrupted by the Pi's OS.


image This procedure works for all Raspberry Pi models except version 2!


Software


Jeremy Garff has written a library called "rpi_ws281x", which can be found on his GitHub page: https://github.com/jgarff/rpi_ws281x. It makes use of the Pi's BCM2835's PWM module to drive the controllable WS281X LEDs found in NeoPixel strips and rings. The folks at Adafruit have created a Python wrapper for the library along with some Python example scripts, making it look and feel like the Arduino NeoPixels library. So if you're familiar with NeoPixels on the Arduino, you should be up and running with this version in no time.


To compile and install the library, follow the steps below.


First, install the dependencies required to download and install the library:

sudo apt-get update
sudo apt-get install build-essential python-dev git scons swig


Next, download the files and build the library:

git clone https://github.com/jgarff/rpi_ws281x.git
cd rpi_ws281x
scons


Finally, install the Python wrapper:

cd python
sudo python setup.py install


As you can see, these steps are very straightforward.


Hardware


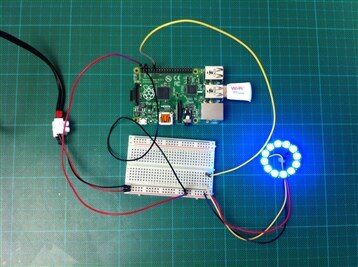
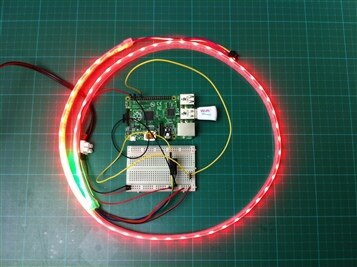
Hooking up the NeoPixels to the Raspberry Pi is extremely easy, just make sure the power supply used is properly rated for the number of NeoPixels you intend to use. For testing, I used a 5V/4A power supply to power the Pi and the NeoPixels (12 and 60 LEDs).


image

Make sure the ground signals of the NeoPixel strip/ring and the Raspberry Pi are connected. If they are not, the LEDs won't function properly and will light up in unpredictable patterns.


Even though the LED strip/ring operates at 5V and the Pi's GPIO at 3.3V, it appears that it is possible to drive the LEDs without having to use logic level conversion.


Demo


I tested two components:

  • an Adafruit NeoPixel ring with 12 LEDs
  • an addressable WS2811 60 LED strip from eBay


Both performed as expected using the sample script (strandtest.py), which I edited to configure the correct number of LEDs:


# LED strip configuration:
LED_COUNT      = 60      # Number of LED pixels.
LED_PIN        = 18      # GPIO pin connected to the pixels (must support PWM!).
LED_FREQ_HZ    = 800000  # LED signal frequency in hertz (usually 800khz)
LED_DMA        = 5       # DMA channel to use for generating signal (try 5)
LED_BRIGHTNESS = 255     # Set to 0 for darkest and 255 for brightest
LED_INVERT     = False   # True to invert the signal (when using NPN transistor level shift)


As you can see, it is also possible to edit other parameters to match the LEDs used, but also parameters such as brightness.

imageimage


You don't have permission to edit metadata of this video.
Edit media
x
image
Upload Preview
image

  • Sign in to reply

Top Comments

  • balearicdynamics
    balearicdynamics over 10 years ago +1
    Great work!
  • DAB
    DAB over 10 years ago +1
    Great blog. You have given me some ideas for a project I have. Thanks DAB
  • fvan
    fvan over 10 years ago in reply to balearicdynamics +1
    Hi Enrico, I believe I bought this one from Pimoroni in the UK: http://shop.pimoroni.com/products/adafruit-neopixel-ring-24-x-rgb-led-w-integrated-drivers You can choose between 24, 16 and 12 LEDs. They…
Parents
  • screamingtiger
    screamingtiger over 10 years ago

    Couple questions:

    Where did you get the strip of LEDs that can be controlled like that?  I have a tape of LEDS but they are all on or all off at once.  The addressable strip I assume is neat and I would like to maybe try some for my arcade I built.  I just purchased a bunch of mosfets to power some LEDs I have but this may provide a shortcut for some parts.


    In your picture, you have an external power and then you also have the raspberry pi power connected in parallel to that power.  Are you also powering up the pi through the 5V input pin?  If so I'm sorry if you know this, but this bypasses power and fuse protection.  I looked into powering it this way for my quadcopter and its not safe.   Just FYI and if you are aware of that my apologies.  Any short will blow up the Pi.  Would hate to see a good pi go to waste image


    • Cancel
    • Vote Up 0 Vote Down
    • Sign in to reply
    • More
    • Cancel
  • balearicdynamics
    balearicdynamics over 10 years ago in reply to screamingtiger

    Joey,


    I have not yet investigated in depth (but I have received just not the news that my order has been shipped from UK of one of these stuff). One of the "secrects" is that these strips are controlled by one side by a specific chip that is I suppose the one that manage the entire lighting system. This implies also that these are not only a LEDs strip like the Christmas tree lights but something more sophisticated with signals on a flat circuit and some resistore here and there image

    • Cancel
    • Vote Up 0 Vote Down
    • Sign in to reply
    • More
    • Cancel
  • screamingtiger
    screamingtiger over 10 years ago in reply to balearicdynamics

    I finally got my whole kit, all I am missing is the A+ which we wont be getting, but I guess we are supposed to get an Eagle license, I hope they send that out I really need some good software.


    I got 4 packages total to get the whole kit. 

    • Cancel
    • Vote Up 0 Vote Down
    • Sign in to reply
    • More
    • Cancel
  • mcb1
    mcb1 over 10 years ago in reply to balearicdynamics

    Dig out the datasheets for WS2812 or just the driver chip WS2811.

    They are a RGB driver that features a 'pass thru' for the data.


    Reminds me of some clever strobe based devices years ago that did a similar thing.

    The first one takes the first chunk of data, and passes the rest on, the next takes the first chunk it sees ....etc.


    Mark

    • Cancel
    • Vote Up 0 Vote Down
    • Sign in to reply
    • More
    • Cancel
Comment
  • mcb1
    mcb1 over 10 years ago in reply to balearicdynamics

    Dig out the datasheets for WS2812 or just the driver chip WS2811.

    They are a RGB driver that features a 'pass thru' for the data.


    Reminds me of some clever strobe based devices years ago that did a similar thing.

    The first one takes the first chunk of data, and passes the rest on, the next takes the first chunk it sees ....etc.


    Mark

    • Cancel
    • Vote Up 0 Vote Down
    • Sign in to reply
    • More
    • Cancel
Children
No Data
element14 Community

element14 is the first online community specifically for engineers. Connect with your peers and get expert answers to your questions.

  • Members
  • Learn
  • Technologies
  • Challenges & Projects
  • Products
  • Store
  • About Us
  • Feedback & Support
  • FAQs
  • Terms of Use
  • Privacy Policy
  • Legal and Copyright Notices
  • Sitemap
  • Cookies

An Avnet Company © 2025 Premier Farnell Limited. All Rights Reserved.

Premier Farnell Ltd, registered in England and Wales (no 00876412), registered office: Farnell House, Forge Lane, Leeds LS12 2NE.

ICP 备案号 10220084.

Follow element14

  • X
  • Facebook
  • linkedin
  • YouTube