


If you like my project vote for "A Smarter Tricopter - Yuri Tikhonov" 
Good day comrades!
Let's talk today about the next stage on the road to success, namely about the EEPROM emulation.
You're probably thinking, why is this guy spending so much time working on software changing almost nothing in the hardware?
The answer is simple: I still have not received a parcel from HobbyKing and not only that, they even didn't give me the track number!
But we will not dwell on this, because I believe that tricopter will be built in time 
So let's go! An important part of the software for a tri or quadcopters is the non-volatile memory for storage of configuration. In the AVR-based MultiWii we use EEPROM as the most suitab.PSoC has the ability to emulate EEPROM memory, for this purpose there is a special unit which is a nothing else but the API to access the flash memory of the controller, which, like the EEPROM is non-volatile.
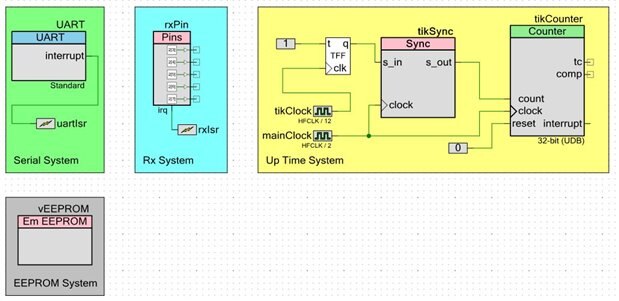
Today PSoC's schematics look like this:
Like the last time, here is a piece of code that I use to work with virtual EEPROM:
1. Copying data from one memory area to another (I wrote this function with the use of "volatile uint8", as recommended by Cypress):
void toMem(void *des, const void *src, uint8_t size)
{
    uint8_t i;
    uint8_t *cdes = (uint8_t *) des;
    for (i=0; i<size; i++) *cdes++ = *((volatile uint8_t *) src + i);
}
2. Read data from EEPROM to RAM (for more details see original MultiWii source code). "static const uint8_t eep_array[64]" variable locate in flash memory (it's a virtual EEPROM):
void readEEPROM(void)
{
  uint8_t i, _address = eep_entry[0].size;
  for(i=1; i<EEBLOCK_SIZE; i++)
  {
    toMem(eep_entry[i].var, &eep_array[_address], eep_entry[i].size);
    _address += eep_entry[i].size;
  }
  for(i=0;i<7;i++) lookupRX[i] = (2500+rcExpo8*(i*i-25))*i*(int32_t)rcRate8/1250;
}
3. Write data from RAM to EERPOM:
void writeParams(void)
{
    uint8_t d = EEBLOCK_SIZE;
    uint8_t i, _address = 0, data_array[64];
    for(i=0; i<EEBLOCK_SIZE; i++)
    {
        toMem(&data_array[_address], eep_entry[i].var, eep_entry[i].size);
        _address += eep_entry[i].size;
    }

    d = sizeof(data_array);
    vEEPROM_Write(data_array,eep_array,sizeof(data_array));
    readEEPROM();
}
4. "after first turn on" function:
void checkFirstTime(void)
{
    uint8_t i, test_val = *(volatile uint8_t *) eep_array;
    if (test_val == checkNewConf) return;

    P8[ROLL]      = 40; I8[ROLL]    = 30; D8[ROLL]    = 23;
    P8[PITCH]    = 40; I8[PITCH]    = 30; D8[PITCH]    = 23;
    P8[YAW]      = 85; I8[YAW]      =  0;  D8[YAW]    =  0;
    P8[PIDALT]    = 16; I8[PIDALT]  = 15;  D8[PIDALT]  =  7;
    P8[PIDGPS]    = 50; I8[PIDGPS]  =  0;  D8[PIDGPS]  = 15;
    P8[PIDVEL]    =  0; I8[PIDVEL]  =  0;  D8[PIDVEL]  =  0;
    P8[PIDLEVEL]  = 90; I8[PIDLEVEL] = 45; D8[PIDLEVEL] = 100;
    P8[PIDMAG]    = 40; rcRate8      = 45; rcExpo8      = 65;
    rollPitchRate =  0; yawRate      =  0; dynThrPID    =  0;
    for(i=0;i<CHECKBOXITEMS;i++)
    {
        activate1[i] = 0;
        activate2[i] = 0;
    }
    accTrim[0] = 0; accTrim[1] = 0; powerTrigger1 = 0;
    writeParams();
}
And lastly, the main function (for a better understanding of each of it's functions, I recommend you read my previous posts in this blog):
void main()
{
    tikInit();
    eepromInit();
    checkFirstTime();
    SerialOpen(0,115200);
    readEEPROM();
    configureReceiver();
    CyGlobalIntEnable;

    for(;;)
    {
        computeRC();
        serialCom();
    }
}
So, let us examine the steps, how our software is working at the moment:
- The configuration of all the systems (UpTime, EEPROM, Serial, RX);
- After initialization of the EEPROM we test the "is it a first running of the system?" if Yes, the defaulte date is recorded in the EEPROM;
- After configuration we turn on the global interrupts;
- In the main loop we read the data from RX and trying to communicate PSoC with PC-program;
- If PC-program requests the data - we try to transmitt it via UART;
- If PC-program suggests to write the data to EEPROM, the PSoC tryint to get it and write it to EEPROM via writeParams() function
Below you can see the animation of the work with EEPROM you can review the content of every slide:
- Loading firmware to PSoC;
- Launching the PC-program;
- Connecting to the PSoC via UART
- Correction of the data (RC RATE and EXPO by this example)
- Writing data to the EEPROM (WRITE button)
- Turning off the PSoC development board (COM7 is escaped)
- Turning on the PSoC back (COM7 is come back)
- Connecting to PSoC...
- ...and reading the data
As you can see, the data was successfully wrote to EEPROM and read back again after voltage brownout!
Next week I plan to realise motor's control function and this means that the moment of the first field trials is coming soon!
See you next week!
| # | link | description |
|---|---|---|
| 1 | PSoC 4 Tricopter Part #1 | Introduction |
| 2 | PSoC 4 Tricopter Part #2 | Purchase of components from Farnell and HobbyKing |
| 3 | PSoC 4 Tricopter Part #3 | PSoC firmware: upTime & Rx |
| 4 | PSoC 4 Tricopter Part #4 | PSoC firmware: UART & MultiWii GUI |
| 5 | PSoC 4 Tricopter Part #5 | PSoC firmware: EEPROM emulation |
| 6 | PSoC 4 Tricopter Part #6 | PSoC firmware: Servo & ESC control |
| 7 | PSoC 4 Tricopter Part #7 | PSoC firmware: IMU, LED's & PID |
| 8 | PSoC 4 Tricopter Part #8 | Hardware: PCB |
| 9 | PSoC 4 Tricopter Part #9 | Hardware: tricopter's frame |
| 10 | PSoC 4 Tricopter Part #10 | Hardware: YAW mechanics & motors |
| 11 | PSoC 4 Tricopter Part #11 | Hardware: ESC's, wires & misc |
| 12 | PSoC 4 Tricopter Part #12 | Final: The first fly |
If you like my project vote for "A Smarter Tricopter - Yuri Tikhonov"
-

DAB
-
Cancel
-
Vote Up
0
Vote Down
-
-
Sign in to reply
-
More
-
Cancel
-

yuritikhonov
in reply to DAB
-
Cancel
-
Vote Up
0
Vote Down
-
-
Sign in to reply
-
More
-
Cancel
Comment-

yuritikhonov
in reply to DAB
-
Cancel
-
Vote Up
0
Vote Down
-
-
Sign in to reply
-
More
-
Cancel
Children