element14 Community
element14 Community
    Register Log In
  • Site
  • Search
  • Log In Register
  • About Us
  • Community Hub
    Community Hub
    • What's New on element14
    • Feedback and Support
    • Benefits of Membership
    • Personal Blogs
    • Members Area
    • Achievement Levels
  • Learn
    Learn
    • Ask an Expert
    • eBooks
    • element14 presents
    • Learning Center
    • Tech Spotlight
    • STEM Academy
    • Webinars, Training and Events
    • Learning Groups
  • Technologies
    Technologies
    • 3D Printing
    • FPGA
    • Industrial Automation
    • Internet of Things
    • Power & Energy
    • Sensors
    • Technology Groups
  • Challenges & Projects
    Challenges & Projects
    • Design Challenges
    • element14 presents Projects
    • Project14
    • Arduino Projects
    • Raspberry Pi Projects
    • Project Groups
  • Products
    Products
    • Arduino
    • Avnet Boards Community
    • Dev Tools
    • Manufacturers
    • Multicomp Pro
    • Product Groups
    • Raspberry Pi
    • RoadTests & Reviews
  • Store
    Store
    • Visit Your Store
    • Choose another store...
      • Europe
      •  Austria (German)
      •  Belgium (Dutch, French)
      •  Bulgaria (Bulgarian)
      •  Czech Republic (Czech)
      •  Denmark (Danish)
      •  Estonia (Estonian)
      •  Finland (Finnish)
      •  France (French)
      •  Germany (German)
      •  Hungary (Hungarian)
      •  Ireland
      •  Israel
      •  Italy (Italian)
      •  Latvia (Latvian)
      •  
      •  Lithuania (Lithuanian)
      •  Netherlands (Dutch)
      •  Norway (Norwegian)
      •  Poland (Polish)
      •  Portugal (Portuguese)
      •  Romania (Romanian)
      •  Russia (Russian)
      •  Slovakia (Slovak)
      •  Slovenia (Slovenian)
      •  Spain (Spanish)
      •  Sweden (Swedish)
      •  Switzerland(German, French)
      •  Turkey (Turkish)
      •  United Kingdom
      • Asia Pacific
      •  Australia
      •  China
      •  Hong Kong
      •  India
      •  Korea (Korean)
      •  Malaysia
      •  New Zealand
      •  Philippines
      •  Singapore
      •  Taiwan
      •  Thailand (Thai)
      • Americas
      •  Brazil (Portuguese)
      •  Canada
      •  Mexico (Spanish)
      •  United States
      Can't find the country/region you're looking for? Visit our export site or find a local distributor.
  • Translate
  • Profile
  • Settings
Start a Movement Challenge
  • Challenges & Projects
  • Design Challenges
  • Start a Movement Challenge
  • More
  • Cancel
Start a Movement Challenge
Forum Integrating motor control in Octoprint
  • Blog
  • Forum
  • Projects
  • DC
  • Leaderboard
  • Files
  • Members
  • More
  • Cancel
  • New
Join Start a Movement Challenge to participate - click to join for free!
Actions
  • Share
  • More
  • Cancel
Forum Thread Details
  • Replies 1 reply
  • Subscribers 46 subscribers
  • Views 276 views
  • Users 0 members are here
  • raspberry pi
  • tmc5272-eval-kit
  • tmc5272
  • octoscope
  • start a movement
  • tmc5272 evaluation kit
Related

Integrating motor control in Octoprint

amgalbu
amgalbu 8 months ago

After I discovered how to control motor velocity, I integrated the Python scripts I developed in OctoPi. 

Installing OctoPi on a Raspberry Pi board is quite straightforward: you can burn the image on an SD card using the Raspberry Pi Imager. You then have to choose the OctoPi image under “Choose OS”, by selecting “Other Specific Purpose OS” > “3D printing” > “OctoPi” and then the “stable” version. Before proceeding, it's a good idea to enable SSH server and configure Wifi SSID and password

When the image has been written, you can insert the SD card in the Raspberry Pi's SD slot and power up the system. You should be able to access OctoPi's web interface at the URL https://<Raspberry Pi's IP>/. You can login using the username "admin" and the default password "admin".

My initial thought was to develop a plugin with a frontend and some new REST endpoints to control the motor. However, after some researches, I found a better way to control the camera. There is a configuration file (.octoprint/config.yaml), which has a section called "controls" where you can add custom controls that will appera in the "Control" tab of the web interface, just below the live stream of the webcam. I changed the config.yaml file as shown in the snippet below (more details about the supported entries can be found in the official Octoprint documentation)

controls:
  layout: vertical
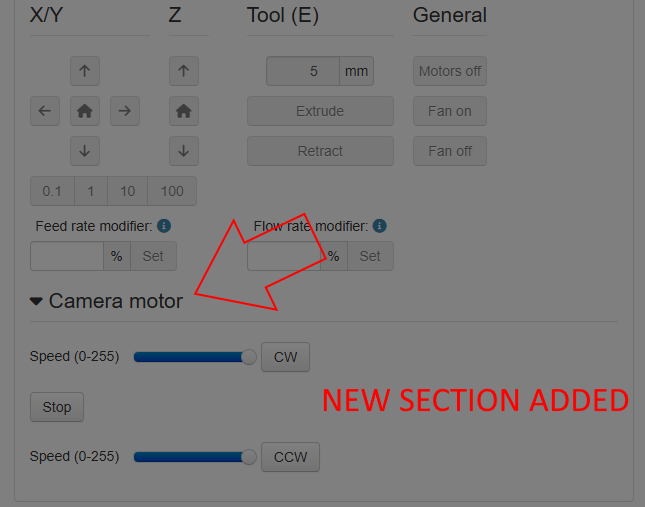
  name: Camera motor- children:
  - name: CW
    command: OCTO901 %(speed)
    enabled: true
    input:
    - default: 255
      name: Speed (0-255)
      parameter: speed
      slider:
        max: 255
        min: 0
  - command: OCTO900
    enabled: true
    name: Stop
  - name: CCW
    command: OCTO902 %(speed)
    enabled: true
    input:
    - default: 255
      name: Speed (0-255)
      parameter: speed
      slider:
        max: 255
        min: 0
 

 This will result in the new section shown in screenshot below

image

As you can see in the config.yaml file, the new buttons are associated with a custom G-Code instruction (namely OCTO900, OCTO901, OCTO902 - see the "command" field). This commands are handled by a plugin called "GCode System commands". This plugin can be installed from the Octoprint's Plugin manager

image

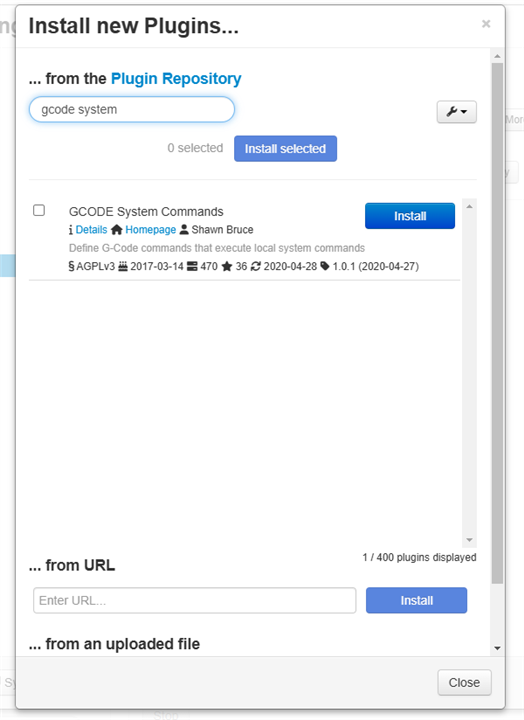
This plugin invokes a system command (for example, a shell script) when a specific GCode command is executed

image

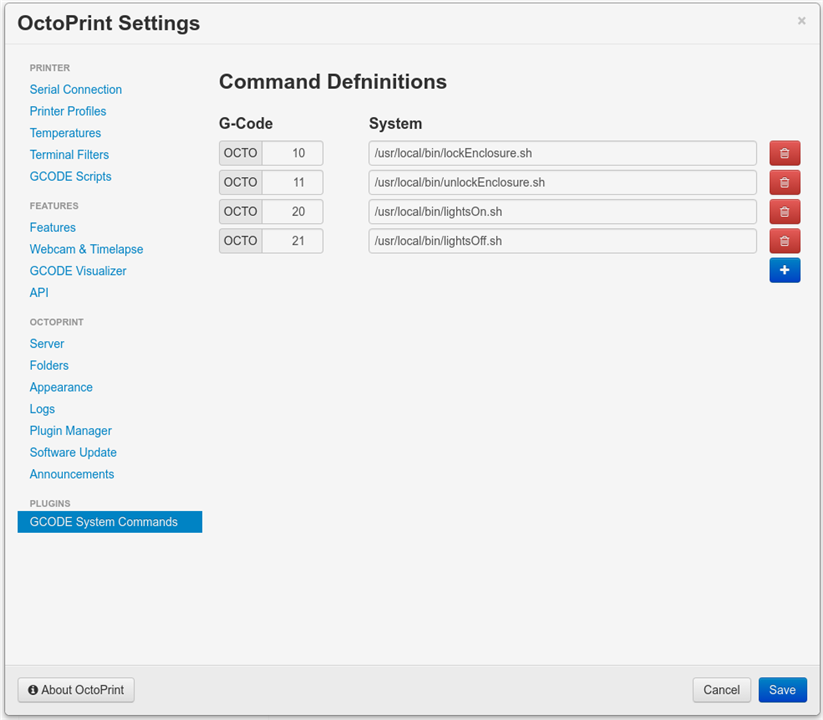
In this case, I will create three new GCode commands

  • OCTO900: calls /home/pi/move_stop.sh
  • OCTO901: calls /home/pi/move_cw.sh
  • OCTO902: calls /home/pi/move_ccw.sh

Scripts can access the command line parameters and other useful information by means of three environment variables

  • OCTOPRINT_GCODESYSTEMCOMMAND_ID: this is the GCode command (for example OCTO900)
  • OCTOPRINT_GCODESYSTEMCOMMAND_ARGS: this variables store the command arguments. For example, the OCTO901 and OCTO902 commands will be called with 1 parameter, as per config.yaml

command: OCTO902 %(speed)

In this case, OCTOPRINT_GCODESYSTEMCOMMAND_ARGS will contain the value of the speed parameter, which can be changed through the slider control

  • OCTOPRINT_GCODESYSTEMCOMMAND_LINE: stores the command (for example, /home/pi/move_cw.sh)


  • Sign in to reply
  • Cancel

Top Replies

  • DAB
    DAB 8 months ago +1
    Nice update.
Parents
  • DAB
    DAB 8 months ago

    Nice update.

    • Cancel
    • Vote Up +1 Vote Down
    • Sign in to reply
    • Cancel
Reply
  • DAB
    DAB 8 months ago

    Nice update.

    • Cancel
    • Vote Up +1 Vote Down
    • Sign in to reply
    • Cancel
Children
No Data
element14 Community

element14 is the first online community specifically for engineers. Connect with your peers and get expert answers to your questions.

  • Members
  • Learn
  • Technologies
  • Challenges & Projects
  • Products
  • Store
  • About Us
  • Feedback & Support
  • FAQs
  • Terms of Use
  • Privacy Policy
  • Legal and Copyright Notices
  • Sitemap
  • Cookies

An Avnet Company © 2025 Premier Farnell Limited. All Rights Reserved.

Premier Farnell Ltd, registered in England and Wales (no 00876412), registered office: Farnell House, Forge Lane, Leeds LS12 2NE.

ICP 备案号 10220084.

Follow element14

  • X
  • Facebook
  • linkedin
  • YouTube