For the project I have in mind, the camera must be able to rotate continuously. For this reason, a USB webcam is not suitable and I will make camera from a Raspberry Pi Zero W board and a Raspberry Pi camera module.
To integrate the camera in Octoprint, I am going to install mjpg-streamer package, which can stream JPEG frames from various sources to various possible outputs.
To install mjpg-streamer, I will start from the dietpi distro. Here is a brief tutorial of the setup process
Step 1: Prepare the Raspberry Pi Zero W
-
Download DietPi Image:
- Visit the DietPi website.
- Navigate to the "Download" section and select the appropriate image for Raspberry Pi.
-
Flash the DietPi Image to MicroSD Card:
- Download and install a tool like balenaEtcher or Raspberry Pi Imager.
- Insert the microSD card into your computer.
- Use the tool to flash the downloaded DietPi image onto the microSD card.
-
Configure Wi-Fi (Optional):
- After flashing, you can enable Wi-Fi by editing the
dietpi-wifi.txtfile located in the boot partition of the microSD card. - Enter your Wi-Fi credentials in the format provided in the file:
- After flashing, you can enable Wi-Fi by editing the
-
Insert and Boot:
- Insert the microSD card into your Raspberry Pi Zero W.
- Power on the Raspberry Pi.
Step 2: Enable the camera module
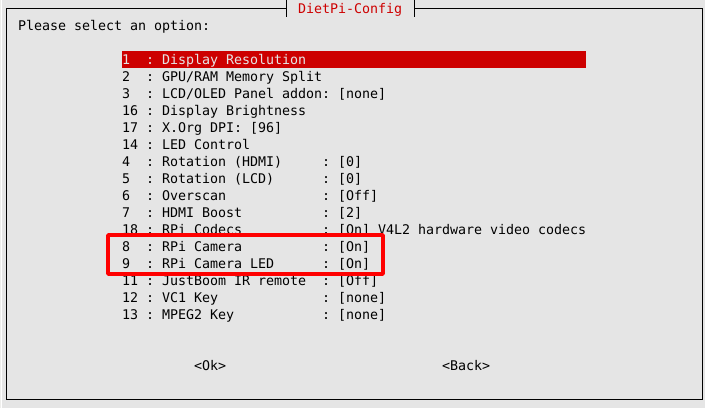
The official Raspberry Pi camera module, it can be enabled via dietpi-config > Display Options > RPi Camera to show [On].
Additionally, the behaviour of the cameras LED can be set in the same dialog via RPi Camera LED.
Remark: After changing the camera activation you need to reboot and/or sometimes power cycle the SBC incl. camera.

Step 3: Configure MJPEG-Streamer
You can now configure MJPEG-Streamer. Run the following command:
This will open the DietPi software management tool.
- Scroll through the available software or use the search function (press
/and typemjpeg). - Locate MJPEG-Streamer and select it by pressing the space bar. A
[X]will appear next to it. - After selecting MJPEG-Streamer, press Enter to proceed to the next step.
- DietPi-Software will prompt you to confirm the installation. Confirm and begin the installation process. DietPi will automatically handle the download, compilation, and installation of MJPEG-Streamer.
- After the build and installation process completes, edit the file /etc/systemd/system/mjpg-streamer.service and replace mjpeg_streamer's commandline parameter "'input_raspicam.so" with "input_uvc.so"
- Restart the board to apply changes
Step 4: Configure Octoprint
The final step is to configure the URL in Octoprint. From the Octoprint-s web interface, navigate to "Options", then select "Webcam classic" and enter the following URLs
- Streaming URL: http://<OctoPi_IP>/stream
- Snapshot URL: http://<PiZeroW_IP>:8082/?action=snapshot
- Path to FFMPEG: This is required for features like time-lapse rendering. The typical path is: /usr/bin/ffmpeg
Note that the Streaming URL points to the IP of the Raspberry Pi running the Octopi software, not to the Raspberry Pi Zero W with the MJPEG Streamer. This is because modern browsers tend to block mixed contents (served via HTTPS and HTTP).To make the stream work, I changed the configuration of the haproxy. HAProxy (High Availability Proxy) is an open-source software solution that provides load balancing, reverse proxying, and high availability for TCP and HTTP-based applications. I edited file /etc/haproxy/haproxy.cfg and added a new backend in the frontend public section
frontend public
        bind :::80 v4v6
        bind :::443 v4v6 ssl crt /etc/ssl/snakeoil.pem
        option forwardfor except 127.0.0.1
        use_backend webcam if { path_beg /webcam/ }
        use_backend webcam_hls if { path_beg /hls/ }
        use_backend webcam_hls if { path_beg /jpeg/ }
        ########### NEW LINE ADDED ###########
        use_backend webcam_stream if { path_beg /stream }
        ######################################
        default_backend octoprint
The new backend has been added at the end of the same file. I simply replaced the /stream URL with the URL requested by MJPEG streamer, and added the IP address of the Raspberry Pi Zero W that runs MJPEG streamer application (192.168.118.100)
backend webcam_stream
        http-request replace-path /stream /?action=stream
        server webcam_stream1 192.168.118.100:8082
