element14 Community
element14 Community
    Register Log In
  • Site
  • Search
  • Log In Register
  • About Us
  • Community Hub
    Community Hub
    • What's New on element14
    • Feedback and Support
    • Benefits of Membership
    • Personal Blogs
    • Members Area
    • Achievement Levels
  • Learn
    Learn
    • Ask an Expert
    • eBooks
    • element14 presents
    • Learning Center
    • Tech Spotlight
    • STEM Academy
    • Webinars, Training and Events
    • Learning Groups
  • Technologies
    Technologies
    • 3D Printing
    • FPGA
    • Industrial Automation
    • Internet of Things
    • Power & Energy
    • Sensors
    • Technology Groups
  • Challenges & Projects
    Challenges & Projects
    • Design Challenges
    • element14 presents Projects
    • Project14
    • Arduino Projects
    • Raspberry Pi Projects
    • Project Groups
  • Products
    Products
    • Arduino
    • Avnet Boards Community
    • Dev Tools
    • Manufacturers
    • Multicomp Pro
    • Product Groups
    • Raspberry Pi
    • RoadTests & Reviews
  • Store
    Store
    • Visit Your Store
    • Choose another store...
      • Europe
      •  Austria (German)
      •  Belgium (Dutch, French)
      •  Bulgaria (Bulgarian)
      •  Czech Republic (Czech)
      •  Denmark (Danish)
      •  Estonia (Estonian)
      •  Finland (Finnish)
      •  France (French)
      •  Germany (German)
      •  Hungary (Hungarian)
      •  Ireland
      •  Israel
      •  Italy (Italian)
      •  Latvia (Latvian)
      •  
      •  Lithuania (Lithuanian)
      •  Netherlands (Dutch)
      •  Norway (Norwegian)
      •  Poland (Polish)
      •  Portugal (Portuguese)
      •  Romania (Romanian)
      •  Russia (Russian)
      •  Slovakia (Slovak)
      •  Slovenia (Slovenian)
      •  Spain (Spanish)
      •  Sweden (Swedish)
      •  Switzerland(German, French)
      •  Turkey (Turkish)
      •  United Kingdom
      • Asia Pacific
      •  Australia
      •  China
      •  Hong Kong
      •  India
      •  Korea (Korean)
      •  Malaysia
      •  New Zealand
      •  Philippines
      •  Singapore
      •  Taiwan
      •  Thailand (Thai)
      • Americas
      •  Brazil (Portuguese)
      •  Canada
      •  Mexico (Spanish)
      •  United States
      Can't find the country/region you're looking for? Visit our export site or find a local distributor.
  • Translate
  • Profile
  • Settings
Sudden Impact Wearables Design Challenge
  • Challenges & Projects
  • Design Challenges
  • Sudden Impact Wearables Design Challenge
  • More
  • Cancel
Sudden Impact Wearables Design Challenge
Blog Part3.1 - Head Impact Detection [ADXL377]
  • Blog
  • Forum
  • Documents
  • Polls
  • Files
  • Events
  • Mentions
  • Sub-Groups
  • Tags
  • More
  • Cancel
  • New
  • Share
  • More
  • Cancel
Group Actions
  • Group RSS
  • More
  • Cancel
Engagement
  • Author Author: sunnyiut
  • Date Created: 5 May 2015 4:56 PM Date Created
  • Views 1759 views
  • Likes 1 like
  • Comments 11 comments
  • adxl377
  • sudden_impact
  • total_player
Related
Recommended

Part3.1 - Head Impact Detection [ADXL377]

sunnyiut
sunnyiut
5 May 2015

Title: Total Player Monitoring

By: Md. Kamrul Hussain

Project Category: Design Challenge

Project Name: Sudden Impact Wearables Design Challenge

Blog post: 08


Intro:


This is a short update on detecting head impact injury using ADXL377 3 axis accelerometer. The goal is to detect potential concussion type collisions during a game.


Components:


image


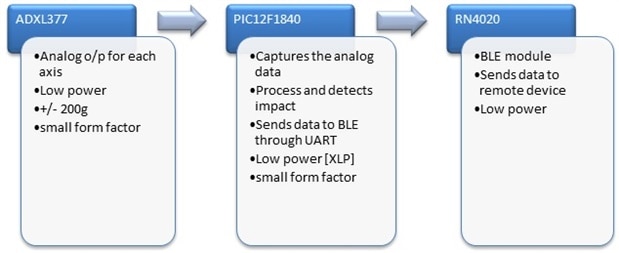
The sensor provides analog outputs for individual 3-axis which can be processed by PIC12F1840 microcontroller to detect the impact due to collisions. PIC12F1840 is a small [8 pins only], cost effective and low power Microcontroller with all the functions needed for this design. It has 4 channel 10 bit ADC for capturing analog data from ADXL377. The UART module is used to communicate with the BLE [RN4020]. It has internal oscillator up to 32MHz and XLP version ensures low power consumption [34uA @ 1MHz]. So, the full impact detection module can be constructed in a small circuit board and can be powered for long time without changing the Battery. This is necessary because I am going to mount it on a HEAD BAND, so it should be small and have long battery support.


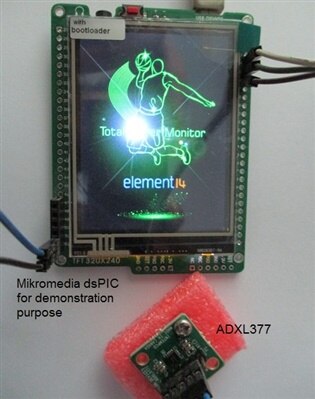
In this short blog post I am just uploading the images of experimenting with the ADXL377 module. For demonstration purpose I am using Mikromedia dsPIC board from Mikroelektronika, to display the output of the ADXL377.


Setup:

imageimage

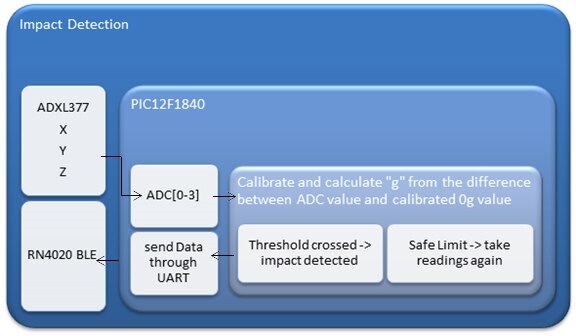
This setup is pretty straight forward. If the ADC reading exceeds a certain value then send impact data through BLE. Here, I'll just display the data on the TFT screen for demonstration.


Calibration:

After powering up the ADXL377 sensor, it has to be calibrated for 0g in each of the axis. In general, it produces around Vs/2 at 0g and varies up Vs and down to 0v respectively for positive and negative variation of acceleration value. It means, for 3.3v supply the 0g value would be around 1.65v or 512 ADC value. So, before taking actual measurements the controller takes 20 readings for each axis and averages the readings to get the ADC value for 0g state.

image


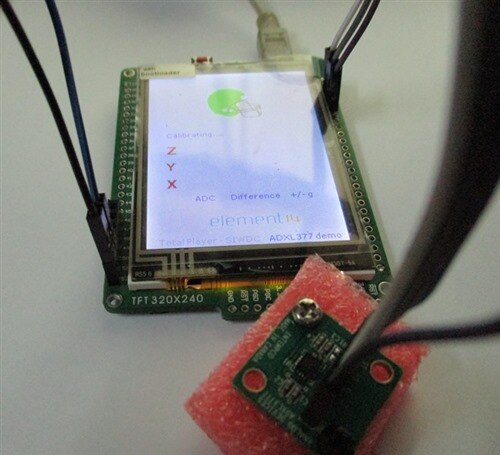
Output at stationary condition:


The calibrated values for each axis slightly vary from expected value [512]. It depends on the position of the sensor and the surface flatness where the sensor is placed.

For calculating the g value, I am simply counting the half value of the difference between ADC and calibrated value.

Vs = 3.3v

ADC resolution = 10bit -> 1024

So, each step = 3.2226 mV

Therefore, 2 steps = 6.445 mV ~= typical output voltage change of ADXL377 for per g variation.

image


Output at low impact:

image

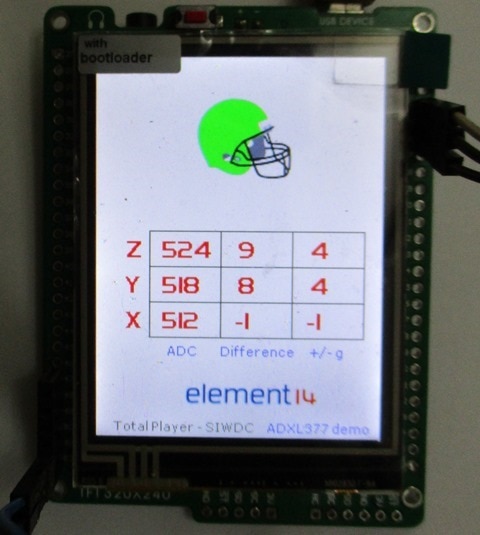
By shaking the sensor with hand or hitting with a rubber pad it gives a low impact and the output stays below 10g. The helmet icon stays in green [lime green indeed]. But if the sensor experiences a free fall or hit by the rubber pad directly on to the sensor surface, the z-axis shows huge variation !!!!


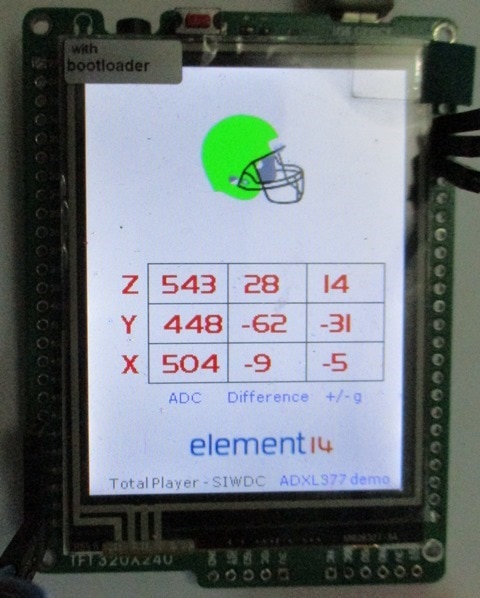
Output at high impact:

image

For higher impact the helmet has changed its color into RED, which indicates an impact detection. I have placed a threshold value of 12g just for demonstration purpose.


But I have got unexpected output / behavior couple of times, where I hit the sensor not so hard but it showed higher values [no way I can produce -31g with that weak hit] image and still the helmet didn't change the color [stays green]!!!

It's weird.... I think it's a bug in my coding, but it's a simple code and if the sensor somehow shows higher values, the helmet has to change its color???? So, I'll try to figure it out later on. Hopefully it's a silly mistake image

image


Circuit Diagram:

image


next step - I'll make the board and mount it into a Head Band to check out the performance.

  • Sign in to reply

Top Comments

  • DAB
    DAB over 10 years ago +1
    Good post. I look forward to seeing your sensor in action. DAB
  • hlipka
    hlipka over 9 years ago in reply to Former Member +1
    Something in you numbers is wrong. The Z voltage is way off with 2V 8this would correspond to about 60g. And then you say the ADC result is the same as the others. Regarding the calibration: the sum of…
Parents
  • Former Member
    Former Member over 9 years ago

    Hello,
    I am using this ADXL377 to detect some high rotational motion. I used the following code  from Sparkfun
    https://github.com/sparkfun/ADXL377_Breakout/blob/master/firmware/ADXL377_example/ADXL377_example.ino


    However my OUTPUT in the normal scenario (Sensor  resting on a table flat on surface) is as follows


    X: 367

    Y: 367

    Z: 369


    X: 8.74 g

    Y: 8.74 g

    Z: 9.33 g


    X: 367

    Y: 367

    Z: 369


    X: 8.74 g

    Y: 8.74 g

    Z: 9.33 g


    I am using Arduino Mega and selected  boolean micro_is_5V = true;

        scaledX = mapf(rawX, 0, 675, -scale, scale); // 3.3/5 * 1023 =~ 675

        scaledY = mapf(rawY, 0, 675, -scale, scale);

        scaledZ = mapf(rawZ, 0, 675, -scale, scale);


    Can you please tell, What is going wrong here? How can i calibrate it to get  nearly (0.0.1)G values in standstill condition?


    Thanks

    • Cancel
    • Vote Up 0 Vote Down
    • Sign in to reply
    • More
    • Cancel
  • hlipka
    hlipka over 9 years ago in reply to Former Member

    If you could elaborate a little bit more what your values mean this would help. The ADXL377 outputs a voltage of about 6.5mV/g, with a bias of about 1.5V (the sensitivity can be between 5.8 and 7.2 mV/g, and the zero-G bias 1.4-1.6V).

    I don't even know what your numbers mean. What is 675? What is the unit of your numbers? What is your ADC reference voltage? When did you convert the ADC reading to mV? Where do you correct for the zero-G bias voltage?

    To correct for zero-G, add a function to your code that you run when your system is in a zero-G situation. Then you can do some ADC readings, store their results and use them to correct further readings.

    Btw: an accelerometer is not really suited to measure rotational forces, a gyroscope would be much better.

    • Cancel
    • Vote Up 0 Vote Down
    • Sign in to reply
    • More
    • Cancel
  • Former Member
    Former Member over 9 years ago in reply to hlipka

    My code is here :  https://www.dropbox.com/s/ivdus3843ga02lq/code.txt?dl=0


    As the tutorial here says, https://learn.sparkfun.com/tutorials/adxl337-and-adxl377-accelerometer-hookup-guide?_ga=1.48641120.711058906.1436800294


    The ADXL377 are 3.3V devices, so  analog to digital (ADC) readings will vary depending on whether we’re using a 5V or 3.3V micro! As i am using Arduino Mega and hence a 5Volt microcontroller, In the code 675 came from the fact that a 5V Arduino will measure 3.3V as 675, while a 3.3V Arduino will measure 3.3V as 1023.  (As mentioned in the tutorial)

    Now we are converting to g values using this mapf function;


    float mapf(float x, float in_min, float in_max, float out_min, float out_max)

    {

      return (x - in_min) * (out_max - out_min) / (in_max - in_min) + out_min;

    }


    In the output: I am getting the Raw vaues which are directly being read from Analog pins of arduino Mega  A0, A1, A2 as

    X: 367

    Y: 367

    Z: 369


    and after converting to g values , i am getting here

    X: 8.74 g

    Y: 8.74 g

    Z: 9.33 g


    Yes, you are right, I am also using a Gyroscope , but for a sensor fusion using kalman filter i would need this Accelerometer as well. But this is not showing correect reading at all at the stationary state even?


    Should i just substarct these offset values to get 0,0,1 g in the stationary state? Or i need to change somethingelse in the code?

    Do you have some snnippet of your calibration method, May be it will be helpful to understand the process. Thank you

    • Cancel
    • Vote Up 0 Vote Down
    • Sign in to reply
    • More
    • Cancel
  • sunnyiut
    sunnyiut over 9 years ago in reply to Former Member

    Hello Nayak,

    I am not that much familiar with the Arduino library, sorry image.

    However, I can give my opinion from the point of common ADC measuring technique.

    As you said that you are using a 5v supply for the microcontroller, I assume that your ADC  reference is AVCC ~= 5v. In that case the output you are getting is fairly close enough. But there are some small issues I think.


    First of all, your are right that the ADC value can be upto 675 for about 3.3v output from the sensor [assuming that you have exact 5v ADC reference].

         Now, the sensor produces around Vs/2 at 0g and varies up to Vs and down to 0v respectively for positive and negative variation of acceleration value. It means, for 3.3v supply the 0g value would be around 1.65v .

         For 5v ADC reference, 1.65v will give an ADC value of 338. What you are getting is about 367, which is close enough to prove that your sensor is functioning properly. You can be sure by measuring the output voltage of the sensor using a digital multimeter to check whether it is around 1.65v or not.

         Now, if you look at my ADC data for 0g, it varies from 510 to 515, where the typical value should be 512.  The deviation is not that high. So, your ADC values are not close enough to precise output. Why is it? I don't know.... But what I can assume is that, you are not having exact 5v at your AVCC [may be you are powering your board with USB]. So, may be your ADC reference is less than 5v and that's why you are getting higher values for 0g.[I am not sure though]

    If it is so, then what you can do is to -

         1. ensure that you have exact 5v at your ADC reference or

         2. measure the reference voltage using a multimeter [at AVCC pin] and change your code according to that [in my calculation, I think you have an ADC reference voltage of about 4.6v instead of 5v. So, 3.3v span for 4.6v ADC reference will produce 734 instead of 675] or

         3. you can use internal reference 2.56v as ADC reference. But in that case, ADC output [ 3.3v > sensor output >2.56v ] will not change for extreme high +ve g values.


    Secondly, for calibration, you just need to set the values you are getting at 0g as reference and then measure the difference. remember, sensor output voltage will change typically +/- 6.5mv for every single change in +/- g.

    Let me know, if you have any query.

    • Cancel
    • Vote Up 0 Vote Down
    • Sign in to reply
    • More
    • Cancel
  • Former Member
    Former Member over 9 years ago in reply to sunnyiut

    Hallo Md. Kamrul,


    Thank you very much. I have now a clear Idea of this operating voltage and would try to play with changing the code and give a try as per your suggestion. Yes, I am using Mega which is operating at 5 Volt although it is getting 4.7 (you are right) volt as i just checked. The arduino has two pins for 5V and 3.3 V and i have connected sensor it to 3.3 Volt.


    The ADXL377 breakout board (Sparkfun) I am using is operating at 3.3 Volts. Yes, I am using the Arduino from USB Port of my Laptop (USB2). I also checked with the Multimeter at the following point and the datas i got are as follows; (Stationary case)


    1) VCC = 3.332 Volt
    2) X      = 1.659 Volt
    3) Y      = 1.631 Volt
    4) Z      = 2.012 Volt


    so i calculates for 4,7 volt it should be approximately 718 instead of 675. After changing it i get the following raw datas

    X: 352

    Y: 352

    Z: 354


    X: 352

    Y: 351

    Z: 353


    X: 351

    Y: 351

    Z: 353


    X: 352

    Y: 352

    Z: 353

    If I take Offset_X = 352 , Offset_Y = 352 , Offset_Z = 353  then i get 0, 0, 0. I am not sure if you mean I should substract the 352 from each and then it is 0, 0, 1 and afterwards for each 6.5 mv i should change 1g ?


    Can you please tell me Which offset would be substracted at Z axis? How we convert it to g values?

    I am relaxed to know this sensor is working correctly image.  Thank you very much for the support. I am really glad that this post has been very very helpful to me. image

    • Cancel
    • Vote Up 0 Vote Down
    • Sign in to reply
    • More
    • Cancel
Comment
  • Former Member
    Former Member over 9 years ago in reply to sunnyiut

    Hallo Md. Kamrul,


    Thank you very much. I have now a clear Idea of this operating voltage and would try to play with changing the code and give a try as per your suggestion. Yes, I am using Mega which is operating at 5 Volt although it is getting 4.7 (you are right) volt as i just checked. The arduino has two pins for 5V and 3.3 V and i have connected sensor it to 3.3 Volt.


    The ADXL377 breakout board (Sparkfun) I am using is operating at 3.3 Volts. Yes, I am using the Arduino from USB Port of my Laptop (USB2). I also checked with the Multimeter at the following point and the datas i got are as follows; (Stationary case)


    1) VCC = 3.332 Volt
    2) X      = 1.659 Volt
    3) Y      = 1.631 Volt
    4) Z      = 2.012 Volt


    so i calculates for 4,7 volt it should be approximately 718 instead of 675. After changing it i get the following raw datas

    X: 352

    Y: 352

    Z: 354


    X: 352

    Y: 351

    Z: 353


    X: 351

    Y: 351

    Z: 353


    X: 352

    Y: 352

    Z: 353

    If I take Offset_X = 352 , Offset_Y = 352 , Offset_Z = 353  then i get 0, 0, 0. I am not sure if you mean I should substract the 352 from each and then it is 0, 0, 1 and afterwards for each 6.5 mv i should change 1g ?


    Can you please tell me Which offset would be substracted at Z axis? How we convert it to g values?

    I am relaxed to know this sensor is working correctly image.  Thank you very much for the support. I am really glad that this post has been very very helpful to me. image

    • Cancel
    • Vote Up 0 Vote Down
    • Sign in to reply
    • More
    • Cancel
Children
  • hlipka
    hlipka over 9 years ago in reply to Former Member

    Something in you numbers is wrong. The Z voltage is way off with 2V 8this would correspond to about 60g. And then you say the ADC result is the same as the others.

    Regarding the calibration: the sum of 1024 values of 352 is not 352, its 360448, so the result of your calibration reading should be around that mark. Take the sum of 1024 values! Then divide by 1024 to get the average.

    (But even here your numbers are off: when the values are {352, 352, 353} then a division by 1024 cannot result in {0.350, 0.349, 0.351} - the first two numbers must be equal. Something in your code is wrong.) Whether you want to calibrate so that you readings end up with 1g for the z axis depends on what you are doing - in my case I was interested only in the resulting acceleration, so I removed the Z axis force of 1g out of my data (this also meant that my system is not depending on its orientation).

    You calculate the resulting G force like this: (assuming that you are using calibrated values, so they should be in the range of about -350 to +350): ADC_result*(4.7/1024)/0.0065. The part 4.7/1024 calculates how many mV one LSB represents, multiplying this with the ADC result gives you the reading in mV. Then you divide this by 6.5 to convert mV into g, as per the ADXL377 data sheet.

    • Cancel
    • Vote Up +1 Vote Down
    • Sign in to reply
    • More
    • Cancel
element14 Community

element14 is the first online community specifically for engineers. Connect with your peers and get expert answers to your questions.

  • Members
  • Learn
  • Technologies
  • Challenges & Projects
  • Products
  • Store
  • About Us
  • Feedback & Support
  • FAQs
  • Terms of Use
  • Privacy Policy
  • Legal and Copyright Notices
  • Sitemap
  • Cookies

An Avnet Company © 2025 Premier Farnell Limited. All Rights Reserved.

Premier Farnell Ltd, registered in England and Wales (no 00876412), registered office: Farnell House, Forge Lane, Leeds LS12 2NE.

ICP 备案号 10220084.

Follow element14

  • X
  • Facebook
  • linkedin
  • YouTube