


Hello everyone. I welcome you to my 5th blog as part of my serie about ZMOD4510 Outdoor Air Quality sensor as part of Summer of Sensors Design Challenge and category In the Air Tonight category. In my first blog I described my plans as part of competition. In second blog I described kit which I use as part of competition. In third blog post I shown my first experiences with the sensor and first measured data. In previous, fourth, blog I implemented first part of firmware which interfaced with Renesas ZMOD4510 Outdoor Air Quality sensor and provided me a data. I write it as a very detailed tutorial. Since posting my previous blog post long time passed but I am working intensively on it. This time I will describe Wi-Fi module which I chosen for connecting to Wi-Fi and how did I connected it to the network. I spend a quite a lot of time with it (several days) because I had no experiences with this platform and it took me a lot of time until I get into it. At the time of writing this blog I have almost completed my project and started measuring real data form sensor placed outside. But this will be described in next blogs.
Renesas DA16600 Wi-Fi Module
For connectivity to the internet, I chosen Renesas DA16600 Wi-Fi + BLE Module. This module originally come from Dialog Semiconductor but since Dialog was acquired by Renesas, this module is offered by Renesas now. I chosen this module for several reasons:
- Contest in this category is sponsored by Renesas. So, I decided to prefer Renesas as much as possible. For this reason, in previous part, I selected Renesas RA2L1 platform and for connectivity I chosen Renesas DA16600 Wi-Fi Module.
- Module is also mentioned in Renesas Quick Connect, so I thought it would be easy to integrate it within e2-studio.
- I attended Renesas webinar about this module, so I was interested in trying it.
For testing module, I decided to order it on PMOD compatible board because RA2L1 have two PMODs. This board do not expose many pins of module but for simple connectivity it is sufficient. Board is referred as US159-DA16600EVZ.

DA16600 vs DA16200
There are two similar modules. First one is DA16200 and second option is DA16600. Both contains the same chip DA16200. But DA16600 adds DA14531 Bluetooth capable chip. So DA16600 is SoM containing two chips (+ some supporting chips like QSPI FLASH).
Integrating Wi-Fi Module to the project
After I received module I started integrating it to my project. I originally thought that it would be as simple as adding block in e2 studio like it was in case of ZMOD4510 because it is mentioned in Rensas Quick Connect ecosystem. But opposite is true. While it look that Renesas do some preparation works for integrating Wi-Fi modules to their ecosystem currently there are no block with this support. There several demo projects and all integrates module differently. At beginning it would be nice to mention some approaches of using module.
DA16600 Modes of Integration
Developers using module can use it in multiple ways. Generally, developers can:
- Download SDK with RTOS from Renesas website, develop application running directly on DA16200 and flash it to the module. Two RTOSes are available: FreeRTOS and ThreadX.
- Download prebuild firmware from Renesas and communicate with module using AT commands.
- Download prebuild firmware from Renesas containing some added application and otherwise use AT commands.
Almost all demos use second and third approach. First approach allows you to make single-chip device, but it is quite hard. SDK is quite a complex and large. Integrates many libraries and stacks.
Because I use RA2L1 microcontroller I decided to use firmware with AT commands.
Firmware
It took me very long time until I realised that I had to manually flash firmware to the device. I connected UART converter to it, but no communication occurred on UART lines. For a long time, I thought that my module is dead or bricked. But I always double checked all connections, measured voltages before connection and did not realize any mistake. Because I did not want to break my module, I spend several days with thinking about it. Later I checked schematics for searching for purpose of debugging pin headers because I noticed (using continuity mode of multimeter) that pins which I thought that are used for debugging UART communication were not connected to pins of PMOD connector. In schematics I realized that there are two UARTs. One of them is connected to PMOD and second UART is connected to debugging pin header. I also most of time ignored reset pin and later realized that my module was all the time held in reset state because initial GPIO setting of PMOD reset pin is logic low by default in Renesas FSP configuration. But even after I properly reset the module it did not respond to AT commands on PMOD interface. But with logic analyser noticed that some signals occur on debugging pin headers. Later I found that signals on the debugging UART are boot logs and are transmitted at baudrate of 230400 bauds which is not a very common default baudrate.
Downloading firmware
Firmware is available on Renesas website. It was hard to find it at first attempt because there are lot of other resources. I recommend using search field in Software Downloads section and search for “image”. On DA16600 page it will list two firmwares:
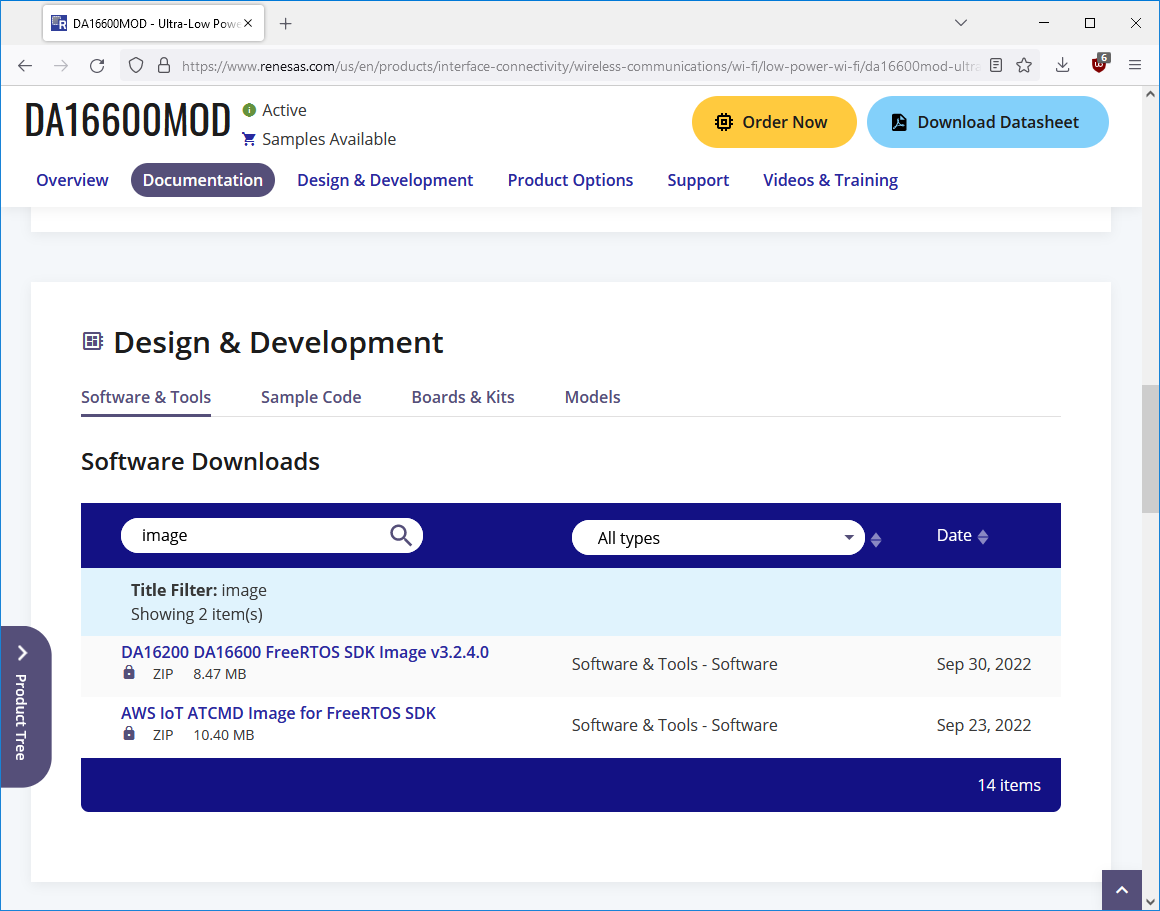
The first image is pure firmware with AT commands support. The second download has firmware with integrated application for connecting to AWS cloud. There is also image with integrated application for connecting to Azure. But for some reason Renesas provided it only for DA16200 module (module without additional BLE chip).

Flashing firmware
After downloading and extracting there is Readme and basic PDF manual showing how to flash firmware to the device. It requires using secondary UART which is exposed on debugging pin headers. After connecting with terraterm and sending enter you will enter interesting terminal with some commands. Flashing firmware is assured by terra term macro which will transmit all data in proper format. You only need to specify which type of external FLASH memory is used on the module. It looks that there are two types of external FLASH memory used (from Macronix and Atmel/Microchip) in module and tutorial gives you hint how to determine what memory is under the shield.
Provisioning
Credentials for Wi-Fi network (network name and password) can be passed to the firmware using AT commands, or you can use automatic configuration utility as part of secondary UART. Settings are then fixed in flash memory of Wi-Fi module and you do not need to configure any settings as part of your (RA2L1) MCU firmware because module will connect to preconfigured network automatically on power up.
After connecting to debugging UART with badurate 230400 (twice the 115200), you can execute “setup” command and follow wizard steps:
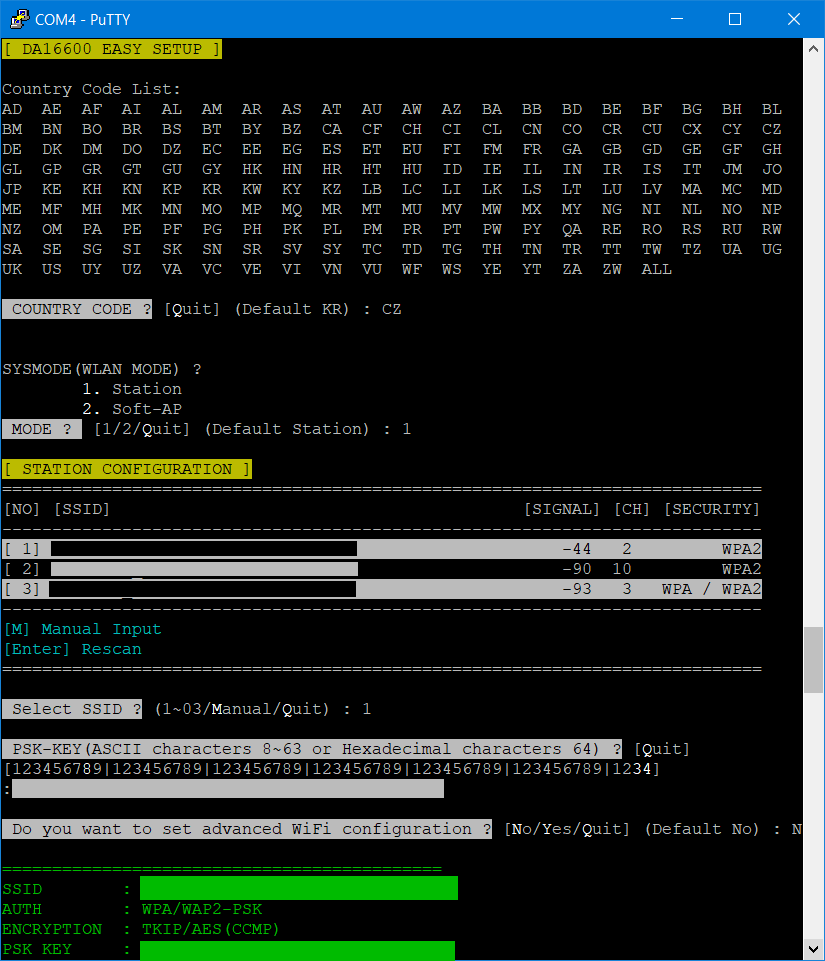
Now, module will automatically connect to configured network on boot and you do not need to connect by sending AT commands from RA2L1 MCU.
Integrating AT communication to the project
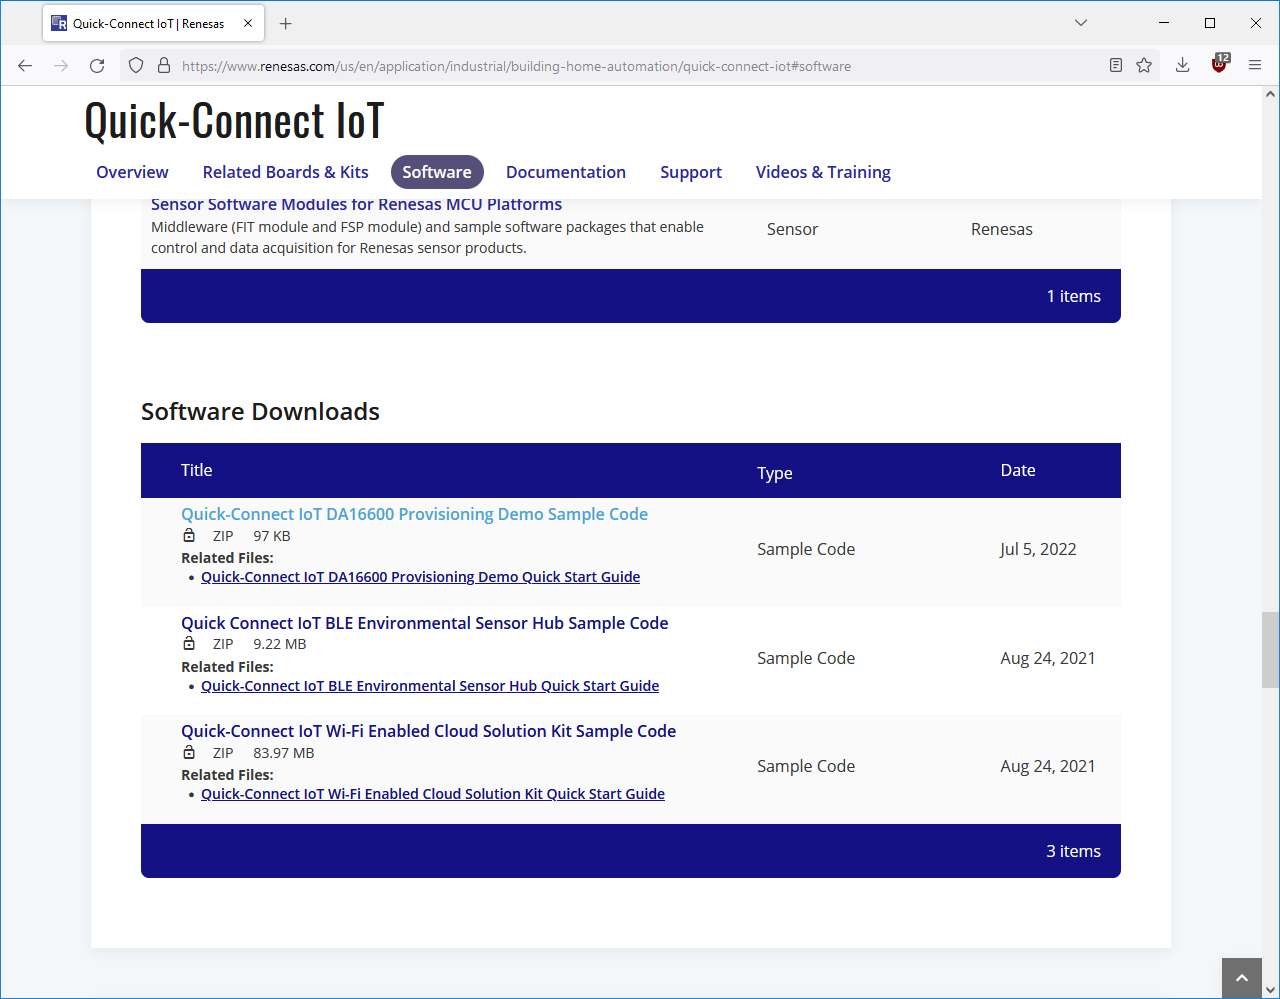
The next step is integrated communication with module using DA interface. Sending commands is easy but reception requires parsing responses, and this is not very trivial. After research I decided to use library which Renesas use in one of their examples. They use different libraries in every example project they provide, so it was not easy decision, but library which I chosen looked as the most robust. The library come from Quick-Connect IoT DA16600 Provisioning Demo Sample Code:
Even it looks most advanced it still do not support sending all AT commands and processing their outputs. Instead, it support very minimalistic subset of commands and I had to implement other commands which I needed.
Redesigning project
Because complexity of project grows when processing communication Wi-Fi module, I decided to redesign project first. I converted it to the FreeRTOS project and separated logic to two tasks:
- One for handling ZMOD4510 sensor operation
- Second thread is used for handling communication with Wi-Fi module and cloud
Editing library
Example project from Renesas implements state machine for handling connectivity events properly. This state machine was designed for targeting needs of example project and for example include states and handlers for TCP server. I do not need to use TCP server, so I had to clean the code a lot and redesign state machine and actions.
Connecting to cloud
Originally, I thought that I will use MQTT client for connecting to Azure IoT Hub and using this service forward data to further processing. Renesas firmware has AT commands for full-featured MQTT client with SSL support and support almost everything I need. I decided to add support for sending required AT commands to the library. But after I did it and polished some early bugs, I noted that it still did not work and even more it gave me ERROR reply on command specifying credentials. After further analysis I found that it is because credentials are very long and it is not possible to pass them. In case of Azure IoT HuB MQTT credentials contains whole connection string which is string containing many delimited fields and is longer than AT commands interface at DA16600 module allows. This was sad because this was barrier which limited me to complete task, and I had to redesign whole solution and throw lot of code away.
I did not give up idea about using MQTT and Azure IoT Hub at this moment. The second option was using different firmware with included application which allows connecting to Azure IoT Hub. Client will run on chip and thus can pass longer credentials than AT interface allows. But there was other issue. You maybe remember that firmware with Azure Iot Hub Client application is available only for DA16200 module and I have DA16600…. I was analysing if I can flash firmware deigned for DA16200 to DA16600. Both modules have the same Wi-Fi Chip (DA16200) so it should be possible, but later I noticed that prebuild firmware supports only modules with different external flash memories (Macronix) than my module had (Atmel/Microchip) and because I was not sure if I can safely flash this firmware to the device targeting different flash memory, I decided to do not do this.
As a replacement solution I decided to go less advanced way. Using Azure IoT Hub is generally good option, but for my experiments I did not need so advanced solution. I decided to send data to cloud using HTTPS client instead. HTTPS assure similar level of security like MQTT client do (both use SSL), but I had to implement more things from scratch (for example authentication). I had to implement HTTPS server with API which will my device later use for sending data. This was quite easy for me. I used ASP.NET Core. At device side sending is simple because there is AT command for sending data using HTTP requests (note that command support SSL naturally). Command support both GET and POST requests which is nice.
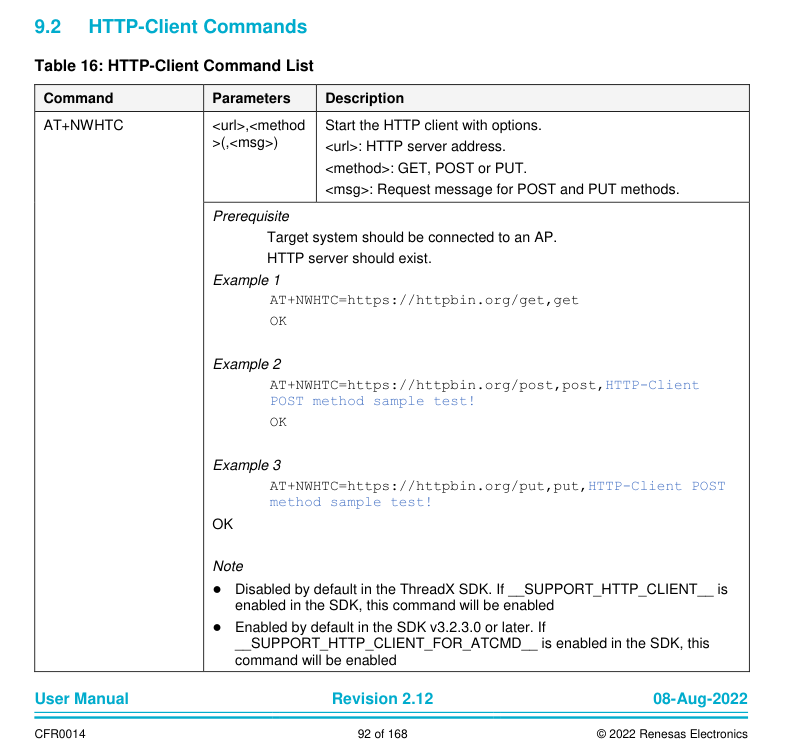
Command generally looks easy, but processing answer was more complicated. I had to implement lot of processing stuff manually and it took me additional time.
Sending JSON or not?
For development I was trying to send data in JSON format but very soon I faced the similar issue which I was facing with MQTT credentials setting AT command. It crashed with error because my command containing JSON payload was too long. So, I had to redesign solution again, but now it was easier. Because I send very few data, I decided to send them in binary. Because AT interface is naturally ASCII, I decided to encode data in base64 which will still result much shorter payload than JSON. After I implemented all these, I successfully transferred data to my cloud application written in ASP.NET Core and this application save them to the Azure Cosmos DB.
Summary
This is all from this blog post. In this blog I described over month-long journey of integrating Renesas Wi-Fi module to the project for sending data to the cloud. For summary I had to:
- Learn DA16600 basics about Wi-Fi module
- Flash firmware to the DA16600 Wi-Fi module
- Migrate my project to FreeRTOS
- Integrate DA16600 AT library to the project
- Add HTTP(S) client AT command functionality to the library
- Implement Base64 encoding
- Develop web API for retrieving data
It was nice journey but cost me lot of time. I wrote lot of code which I later thrown away. Even more it was not very related to ZMOD4510 (and this design challenge is about ZMOD5410). But at the end I have Renesas only solution which works nice and after first hours of running looks reliable. In the next blog post I will show my DIY box which I will use for basic protection of my experimental setup outside. Thank you for reading this blog post and stay tuned to my next blog posts. If you have any questions about DA16600, ZMOD4510, my project or something else, then feel free to ask in comments below.
Next blog: Blog #6: Building Box for ZMOD4510 Outdoor Air Quality Monitor and Going Outside
-

dougw
-
Cancel
-
Vote Up
0
Vote Down
-
-
Sign in to reply
-
More
-
Cancel
-

beacon_dave
in reply to dougw
-
Cancel
-
Vote Up
0
Vote Down
-
-
Sign in to reply
-
More
-
Cancel
-

dougw
in reply to beacon_dave
-
Cancel
-
Vote Up
0
Vote Down
-
-
Sign in to reply
-
More
-
Cancel
-

misaz
in reply to beacon_dave
-
Cancel
-
Vote Up
0
Vote Down
-
-
Sign in to reply
-
More
-
Cancel
Comment-

misaz
in reply to beacon_dave
-
Cancel
-
Vote Up
0
Vote Down
-
-
Sign in to reply
-
More
-
Cancel
Children