


HMS - System Design
Table of Contents
 1. Introduction
Hi! This will be my second blog for the Summer of Sensors Design Challenge. In the last blog, I went over the idea for my project and went through the starter kit that I received as one of the challengers for this design challenge. I also did a simple test with one of the provided sensors. You can check that blog here: Blog 1 - HMS Introduction. Since writing the first blog, I had a bit of time to work through some ideas and generally get a good picture of what I want to do for this project. In this blog, I will lay out my design and development plan for this project and showcase a test for one of the modules that will be implemented in the final build. Before I get into the details about the project itself, some good news first, one of the pressure sensors I ordered arrived incredibly quickly, so I will be working on that part of the project as well in the background!
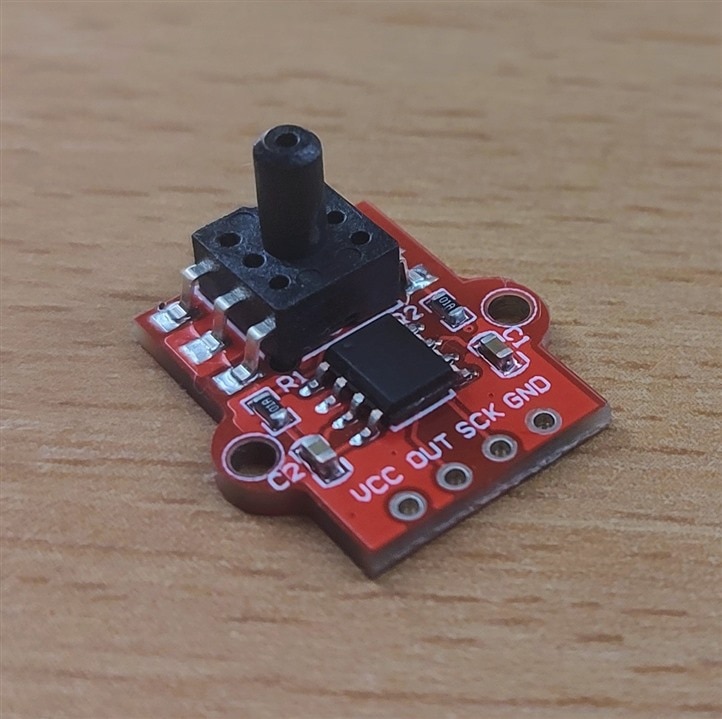
I'll be dedicating a whole blog to working with this sensor. Hopefully, I'll be successful with it, but I'll post all of the data I record with it as well if anyone else is keen on trying to read the blood pressure from the pressure sensor readings.
2. Mechanical design
I'll begin by going through the mechanical design first. To summarize the first blog, I want to make a small, simple-to-use device that can enable easier health monitoring for elderly people, in my case, that would be my grandma. The thing she needs to keep track of the most is her blood pressure, hence the talk about a pressure sensor above. I want this device to have a manual data entry backup since this isn't a medical-grade device, and I just want to experiment with reading the pressure data. To achieve that, I thought the easiest solution would be to enter the 3 needed values by simply turning 3 potentiometers. The values we need are the systolic and diastolic pressure as well as the heart rate. Into this device, there will be an integrated Heart Click that was a part of the starter kit. Besides that, a power ON/OFF switch and 2 buttons, one to confirm that the measurement is put in and that it can be uploaded and the other one to delete the wrongly entered measurement.
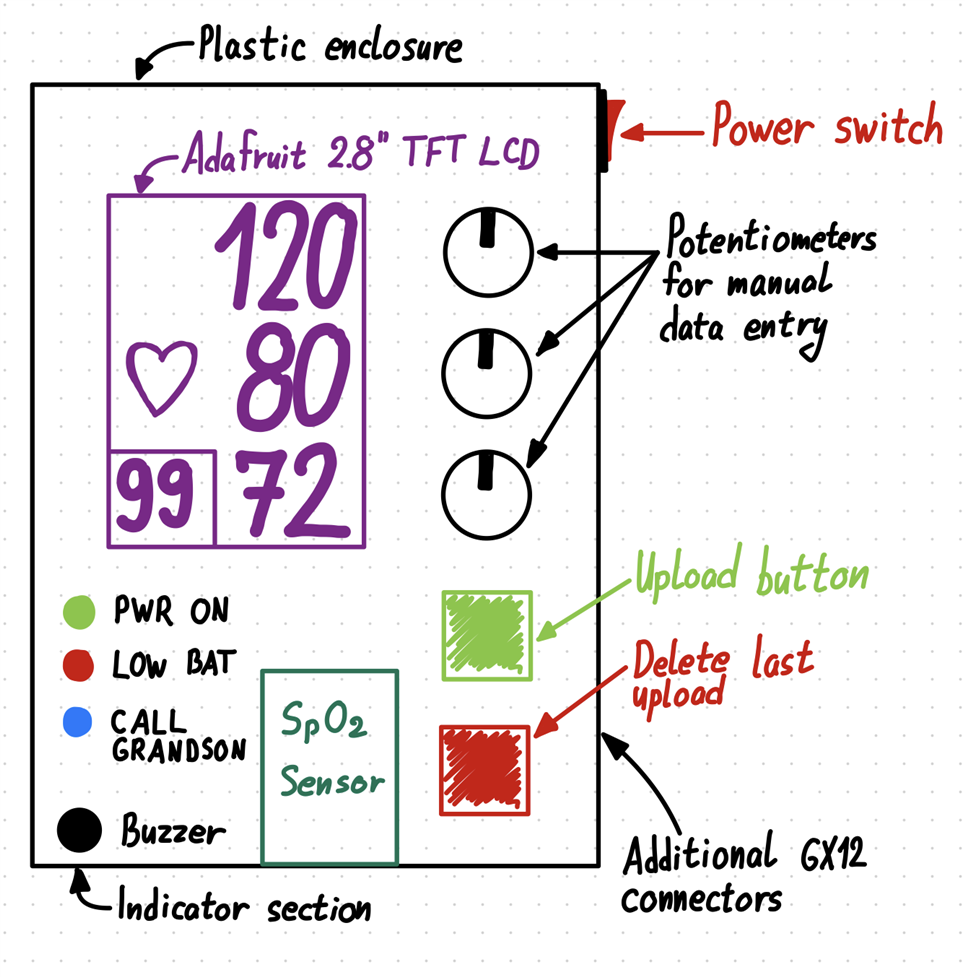
The goal with this is to make it as simple as it can possibly be, it only has 2 buttons and 3 potentiometers, if we don't count the power ON/OFF switch. My grandma loves watching recipes on YouTube on her phone, so she won't have any problems with something like this. To make it easier for her, I put 3 LED indicators to help her out, if everything is good, the green one is turned on, if the red is turned on, that means that the battery is low, and if the blue is on, as it says on the drawing, it's time to give me a call since there was some kind of bug and she should just ignore the device. The main focus of the whole device is of course the LCD screen from Adafruit.
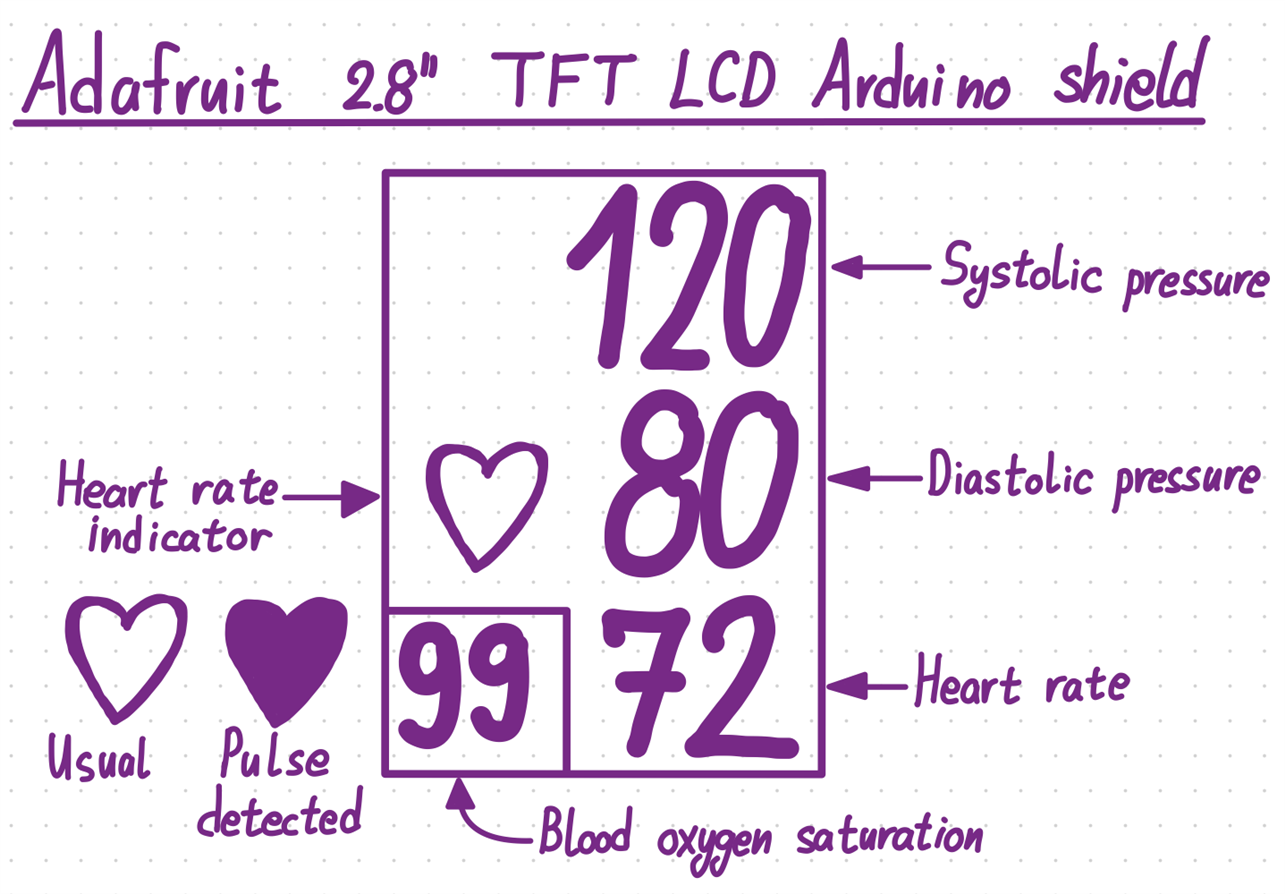
The interface looks exactly like the one on the commercial blood pressure monitor, just maybe simplified a bit, less random icons and an addition of a blood oxygen saturation number, and this screen is a lot brighter, so it will be easier to see things on it. Here is a short video of a demo running on the Adafruit LCD.
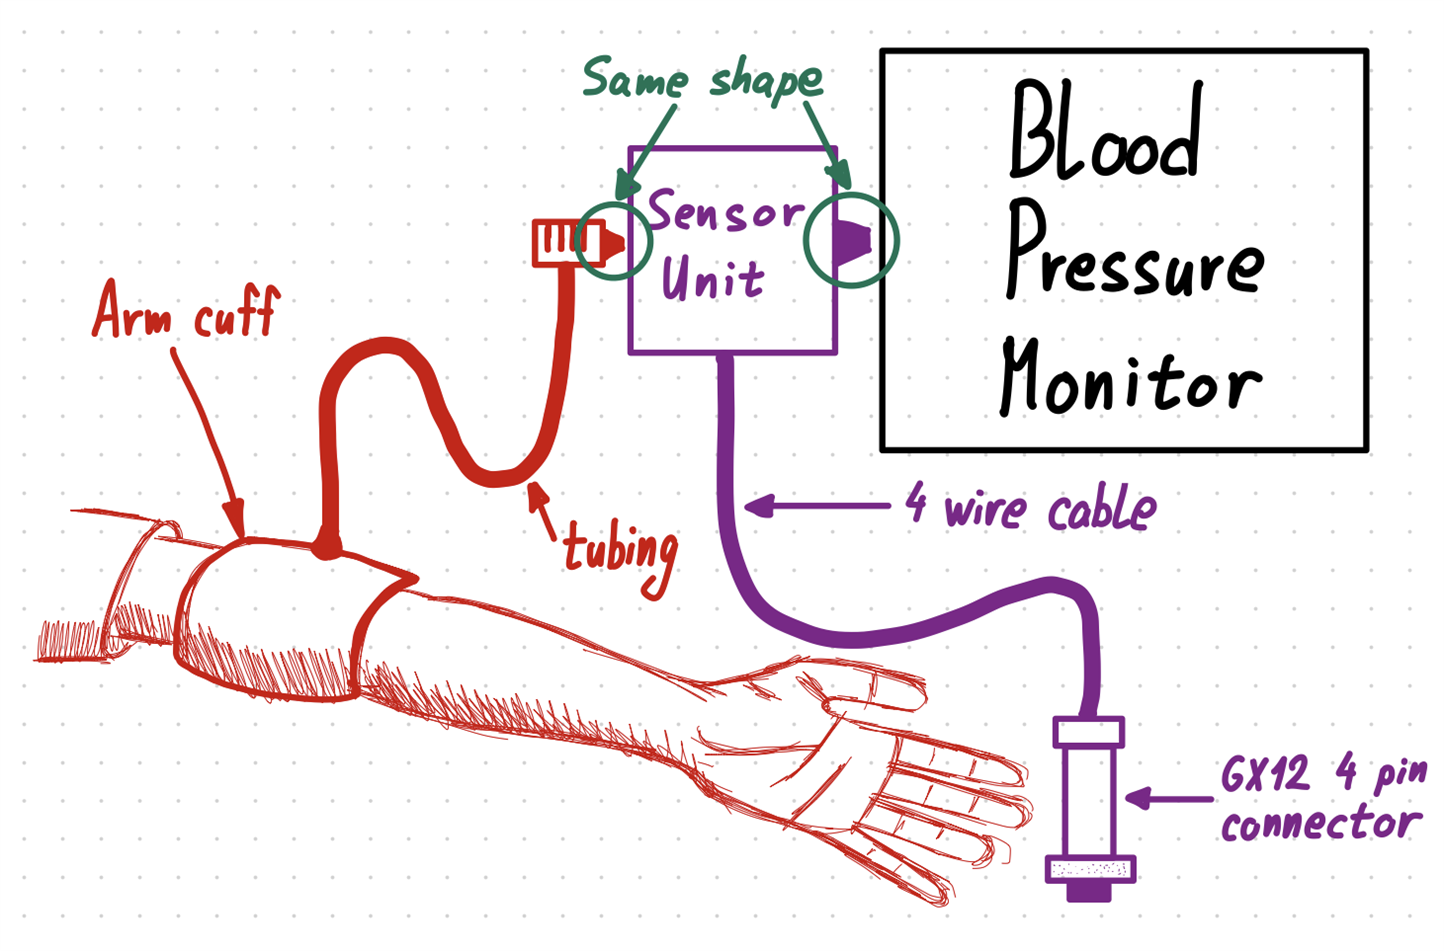
The display is extremely easy to use with the Adafruit library, but this is something I will get into more detail about in one of the next blogs. On the picture with the whole device drawn, in the bottom-right corner, you can notice "Additional GX12 connectors". My idea is to have at least 2 connectors on the side that can be used or not, one would be used for a pressure sensor unit and the other one would be used for a clamp-style oximeter using the other click board. Using a clamp instead of just placing a finger on top can have some benefits like ambient light shielding and a person not being able to press on the sensor too hard/soft which can give faulty readings. As for the pressure sensor unit, this is my idea.
That would be the mechanical design idea for now. I will be looking around for a suitable plastic enclosure, while I will adapt most of the parts to it, like the screen using PLA and 3D printing. I'll be posting all of the CAD models once I finish them online so they can be free to download!
3. Electronics design
The next topic is electronics. I wanted to get the mechanical design out of the way first, so it can give us an idea of what things we will need for sure when it comes to electronics. To begin, the heart of the whole thing will be an Arduino UNO that will be connected to the potentiometers, LED-s, the LCD, MikroE Clicks, and a few other things. For power, my decision is to go with a single 2000mAh LION cell, which means I'll need a charging circuit, a boost converter, and of course, a power ON/OFF switch. Since this device will be used inside grandma's home which has WiFi, I want to add a small ESP8266 board to function as a WiFi module for the Arduino, so I can upload all of the data to the cloud. Besides that, I want to have an RTC module for keeping the time when the device is turned off. Here is a sketch of how I imagine all of that looking.
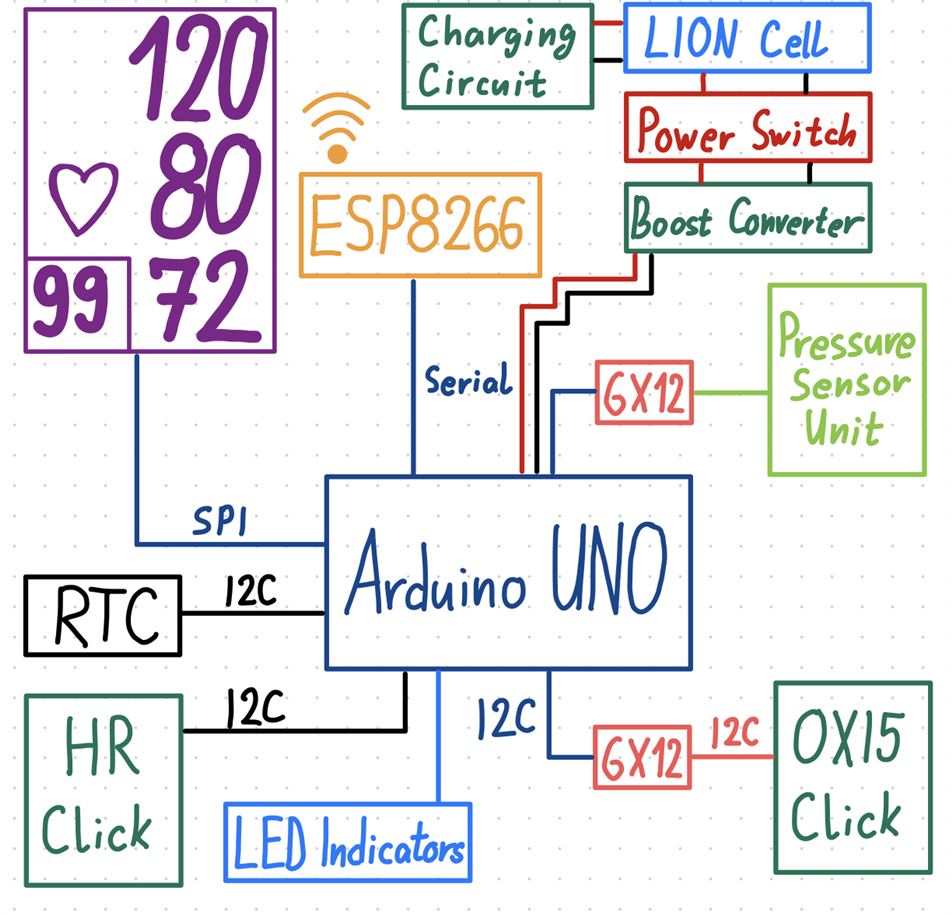
I forgot to add the buzzer module and the potentiometers on the sketch, but besides that, the only thing I'm thinking about if I should add or not to the device would be a microSD module. This would allow me to save the raw data from all of the sensors and do additional data analysis later on.
4. Software design
The last thing left to discuss is the software for the whole project. Most of the software will of course be for the Arduino, but, in the last section, I mentioned using an ESP8266 as a WiFi module. My goal with this would be that every time my grandma takes her measurement and enters the values into the device and presses the green button, the data would be uploaded to some sort of cloud service that would then push notifications to my mom's and mine phone so we can see the blood pressure readings. And when she needs to go to the doctor and needs to take all of the measurements she took during that time period. I could simply run a Python script that would go and plot all of the needed data. I haven't yet decided on the route to follow, whether to use AWS, Google, or something completely different for this, but if you have any suggestions please let me know! This is something I plan on figuring out as I go along with the project.
5. Summary
This was a shorter blog where I wanted to present the plan I developed for this project based on the idea and backstory from the first blog. I came up with some ideas along the way as I was working through different concepts and I really like where it is at this moment. One thing hasn't changed, and that is that I don't want this to be a hassle for grandma, she just needs to turn 3 knobs to match the values and press a button without even looking at the date or time, and has the ability to get another reading that she couldn't earlier. While this might not change much for her, it could really relax the rest of us if we can have insight into her readings quickly.
One thing I'm still trying to figure out is how could we check for irregularities when we're not at home, and without just using an algorithm to detect that. While an algorithm for detecting irregularities is something I will be looking into for sure, I would really like to find a way to easily send an audio file of the heartbeat that I could also listen to on my phone, if there is nobody home to sit with her while she takes her blood pressure measurement. She's naturally curious, so she's pretty excited to test out the stuff I make!
Thanks for reading the blog, hope you liked it!
Milos


