


This week I decided to take time to sort out some of the software resources that I will need to complete my project. The main one was deciding whether or to use Code Composer Studio v7 or v6 as well as MSPWare v2.x or 3.x. I plan to use a BOOSTXL-K350QVG-S1 with the MSP432 so ensuring it will work with TI-RTOS was important. There were no examples that I found for using the BOOSTXL-K350QVG-S1 with the MSP432 LaunchPad and TI-RTOS so I borrowed the MSP432 and Sharp LCD example with TI-RTOS that Jan Cumps made as a starting point.
MSP432 and TI-RTOS: Sharp LCD BoosterPack
The tools that I used for this example:
Hardware:
https://www.element14.com/community/view-product.jspa?fsku=2484564&nsku=45Y0904&COM=noscriptBOOSTXL-K350QVG-S1
https://www.element14.com/community/view-product.jspa?fsku=2473128&nsku=41Y9541&COM=noscriptMSP432P401R LaunchPad (Black)
Software:
Code Composer Studio 7.0.0.00042
MSPWare - Version v3.60.00.10
MSP-EXP432P401RGrLibExample
TI-RTOS for MSP43x v:2.20.00.06
To start, follow Jan's MSP432 and TI-RTOS: Sharp LCD BoosterPack example, which would be the best place to start since I do not plan to repeat the steps here.
Once the grlib and LcdDriver folders from John Pocreva's example have been copied to the MSP432 TI-RTOS empty project, import the MSP-EXP432P401RGrLibExample MSPWare example into to CCS7 and verify that the code works with the MSP432 and BOOSTXL-K350QVG-S1.
Then copy the following files from the MSP-EXP432P401RGrLibExample MSPWare LcdDriver->LcdDriver folder to the TI-RTOS empty project John Pocreva's LcdDriver folder.
From:
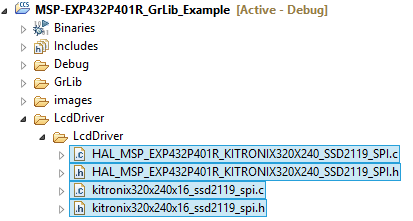
To:
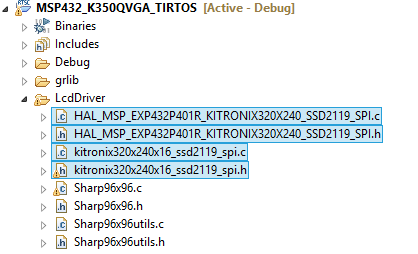
You should be able to remove the Sharp LCD files since they are not used. or just copy the whole LcdDriver folder over instead.
In the empty.c (or whatever you name it), add the following includes and function declarations for the Kentec QVGA LCD from the MSP-EXP432P401RGrLibExample MSPWare example.
/* DriverLib Includes */
#include "driverlib.h"

/* Board Header file */
#include "Board.h"
#include <lcddriver/sharp96x96.h.>
#include "LcdDriver/kitronix320x240x16_ssd2119_spi.h"
Graphics_Context g_sContext;


void drawMainMenu(void);
void boardInit(void);
void clockInit(void);


#define TASKSTACKSIZE   512
Then change the heartBeatFxn function to the following:
Void heartBeatFxn(UArg arg0, UArg arg1)
{
    //Sharp96x96_LCDInit();
    Kitronix320x240x16_SSD2119Init();
    GrContextInit(&g_sContext, &g_sKitronix320x240x16_SSD2119);
    //GrContextInit(&g_sContext, &g_sharp96x96LCD);
    //GrContextForegroundSet(&g_sContext, ClrBlack);
    //GrContextForegroundSet(&g_sContext, ClrWhite);
    GrContextBackgroundSet(&g_sContext, ClrBlack);


    GrClearDisplay(&g_sContext);
    //GrContextFontSet(&g_sContext, &g_sFontCm20b);
    Graphics_setFont(&g_sContext, &g_sFontCmss20b);


    GPIO_toggle(Board_LED0);
    drawMainMenu();
    //GrStringDraw(&g_sContext, "Hello, ", -1, 10, 15, 0);
    //GrStringDraw(&g_sContext, "world!", -1, 22, 60, 0);


    GrFlush(&g_sContext);
In the main function , add the boardInit() and clockInit() functions to kit start the LCD.
  /* Call board init functions */
    Board_initGeneral();
    Board_initGPIO();
    boardInit();
    clockInit();
Add the drawMainMenu funtion to setup the Main menu. NOTE: I have commented out the Banner display since I just wanted a simple heading at this time.
void drawMainMenu(void)
{
    Graphics_setForegroundColor(&g_sContext, GRAPHICS_COLOR_RED);
    Graphics_setBackgroundColor(&g_sContext, GRAPHICS_COLOR_BLACK);
    Graphics_clearDisplay(&g_sContext);
    Graphics_drawStringCentered(&g_sContext, "HEARING GUARD SYSTEM v1.0",
                                AUTO_STRING_LENGTH,
                                159,
                                15,
                                TRANSPARENT_TEXT);


    // Draw TI banner at the bottom of screnn
    /*
    Graphics_drawImage(&g_sContext,
                       &TI_platform_bar_red4BPP_UNCOMP,
                       0,
                       Graphics_getDisplayHeight(
                           &g_sContext) - TI_platform_bar_red4BPP_UNCOMP.ySize);
    */
    // Draw Primitives image button
    //Graphics_drawImageButton(&g_sContext, &primitiveButton);


    // Draw Images image button
    //Graphics_drawImageButton(&g_sContext, &imageButton);
}
Bring in the boardInit function. This enables the Floating Point Unit on the MSP432 and required the driverlib.h include.
void boardInit()
{
    FPU_enableModule();
}
And then add in the clockInit to set the clock accordingly
void clockInit(void)
{
    /* 2 flash wait states, VCORE = 1, running off DC-DC, 48 MHz */
    FlashCtl_setWaitState(FLASH_BANK0, 2);
    FlashCtl_setWaitState(FLASH_BANK1, 2);
    PCM_setPowerState(PCM_AM_DCDC_VCORE1);
    CS_setDCOCenteredFrequency(CS_DCO_FREQUENCY_48);
    CS_setDCOFrequency(48000000);
    CS_initClockSignal(CS_MCLK, CS_DCOCLK_SELECT, 1);
    CS_initClockSignal(CS_SMCLK, CS_DCOCLK_SELECT, 1);
    CS_initClockSignal(CS_HSMCLK, CS_DCOCLK_SELECT, 1);


    return;
}
Once all this was in place, the code compiled without issue in CCS v7 and I was able to load the code on the MSP432 and run it with the Kentec QVGA LCD.
This is the result I got which is a bit basic but it is a start.