


This code is a slight update of the last one, updated:
>Better Uptime Counter
>LCD Shield
>New Pin out Diagram
>Restart Protected Calibration Details
>EU and US Plug Calibrated Probe
Also a quick update to the code so the calibration value will survive a power cut, we are storing the cell constant K [a float] in EEPROM as a scaled int, so there may be a slight change in the value following a reboot [but that small it wont make much difference].
Cell Constants
I Recommend Calibrating your probe but if that is not an option at this time the following cell constants [K] will give a good estimated readout:
EU plug: K= 1.76
US Plug K= 2.88
Calibration
If it needs instructions to be operated someone engineered it wrong, the lcd should explain itself to you at start up. If you are still stuck watch the youtube video to see how I calibrate it.
Calibrate with an EC of about 50% your maximum expected reading for best results.
The NEW Pinout:
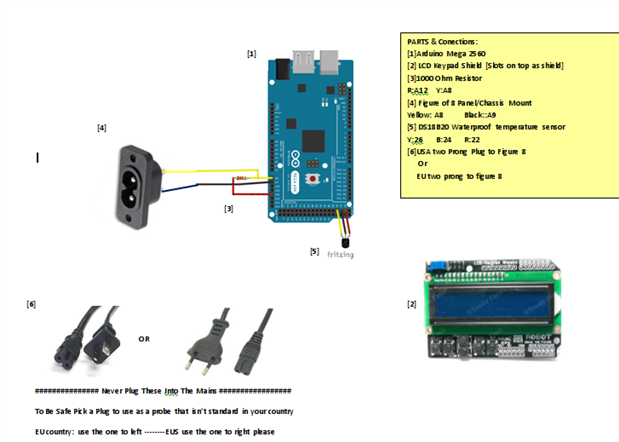
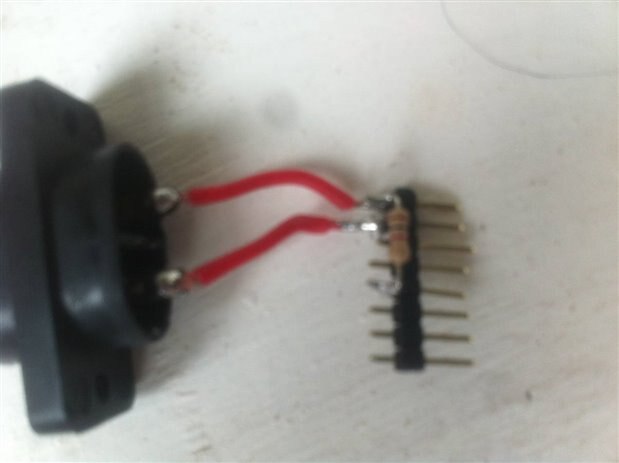
Save some wire and solder the divider onto a pin header
The new Code:
| Header 1 |
|---|
/* ElCheapo Arduino EC-PPM measurments
This scrip uses a common USA two prong plug and a 47Kohm Resistor to measure the EC/PPM of a Aquaponics/Hydroponics Sytem. You could modift this code to Measure other liquids if you change the resitor and values at the top of the code.
This Program will give you a temperature based feed controller. See Read me in download file for more info.
28/8/2015 Michael Ratcliffe Mike@MichaelRatcliffe.com
This program is free software: you can redistribute it and/or modify it under the terms of the GNU General Public License as published by the Free Software Foundation, either version 3 of the License, or (at your option) any later version.
This program is distributed in the hope that it will be useful, but WITHOUT ANY WARRANTY; without even the implied warranty of MERCHANTABILITY or FITNESS FOR A PARTICULAR PURPOSE. See the GNU General Public License for more details.
You should have received a copy of the GNU General Public License along with this program. If not, see <http://www.gnu.org/licenses/>.
Parts: -Arduino - Uno/Mega -Standard American two prong plug -1 kohm resistor -DS18B20 Waterproof Temperature Sensor
Limitations: -Cell Constant [K] must be less than 5.0 or it will Mess with the way we save values in EEPROM -A reset will change your kell constant slightly, but not to a great extent -EEPROM seems to survive a reflash, so changing values in the code will not change them in the flashed software. you will need to do it via the LCD
See www.MichaelRatcliffe.com/Projects for a Pinout and user guide or consult the Zip you got this code from
*/
//************************** Libraries Needed To Compile The Script [See Read me In Download] ***************// // Both below Library are custom ones [ SEE READ ME In Downloaded Zip If You Dont Know how To install] Use them or add a pull up resistor to the temp probe
#include <OneWire.h> #include <DallasTemperature.h> #include <LiquidCrystal.h> //Standard LCD Lbrary #include <EEPROM.h> //Standard EEPROM Library
//************************* User Defined Variables ********************************************************//
//################################################################################## //----------- Do not Replace R1 with a resistor lower than 300 ohms ------------ //##################################################################################
int R1= 1000; int Ra=25; //Resitance of Digital Pin, 25 ohms for mega/uno int ECPin= A8; int ECGround=A9; int ECPower =A12;
//************************* User Defined Variables ********************************************************//
float CalibrationEC=1.38; //EC value of Calibration solution is s/cm
//*********** Converting to ppm [Learn to use EC it is much better**************// // Hana [USA] PPMconverion: 0.5 // Eutech [EU] PPMconversion: 0.64 //Tranchen [Australia] PPMconversion: 0.7 // Why didnt anyone standardise this?
float PPMconversion=0.5;
//*************Compensating for temperature ************************************// //The value below will change depending on what chemical solution we are measuring //0.019 is generaly considered the standard for plant nutrients [google "Temperature compensation EC" for more info float TemperatureCoef = 0.019; //this changes depending on what chemical we are measuring
//********************** Cell Constant For Ec Measurements *********************// //Mine was around 2.9 with plugs being a standard size they should all be around the same //But If you get bad readings you can use the calibration script and fluid to get a better estimate for K //I Recommend Calibrating your probe but if that is not an option at this time the following cell constants [K] will give a good estimated readout: //EU plug: K= 1.76 //US Plug K= 2.88
float K=2.88;
//************ Temp Probe Related *********************************************// #define ONE_WIRE_BUS 26 // Data wire For Temp Probe is plugged into pin 10 on the Arduino const int TempProbePossitive =22; //Temp Probe power connected to pin 9 const int TempProbeNegative=24; //Temp Probe Negative connected to pin 8
//***************************** END Of Recomended User Inputs *****************************************************************//
//********************************************************//
// select the pins used on the LCD panel LiquidCrystal lcd(8, 9, 4, 5, 6, 7);
// define some values used by the panel and buttons int lcd_key = 0; int adc_key_in = 0; int button =0; #define btnRIGHT 1 #define btnUP 2 #define btnDOWN 3 #define btnLEFT 4 #define btnSELECT 5 #define btnNONE 6
int Screen =1;
OneWire oneWire(ONE_WIRE_BUS);// Setup a oneWire instance to communicate with any OneWire devices DallasTemperature sensors(&oneWire);// Pass our oneWire reference to Dallas Temperature.
float Temperature=10; float EC=0; float EC25 =0; int ppm =0;
float raw= 0; float Vin= 5; float Vdrop= 0; float Rc= 0; int Readings=0;
//********************** Some Variables For Loging Min/Max Values ********************************// float MinEC=100; float MaxEC=0; float MinT=100; float MaxT=0;
//************************** Just Some basic Definitions used for the Up Time LOgger ************// long Day=0; int Hour =0; int Minute=0; int Second=0; int SecondStamp=0; int Once=0;
//**************************Some Stuff For Calibration ******************************************// float TemperatureFinish=0; float TemperatureStart=0; int i=0; float buffer=0; float Kt=0;
//*********************** EPROM Stuff [So SetPoint and Cal Survive a reboot] ******************// int value; int addresCalibration=0;
//**********************Some Stuff For Uptime **************************************************// long Rollover=0; int HighMillis=0;
//*********************************Setup - runs Once and sets pins etc ******************************************************// void setup() { Serial.begin(9600); pinMode(TempProbeNegative , OUTPUT ); //seting ground pin as output for tmp probe digitalWrite(TempProbeNegative , LOW );//Seting it to ground so it can sink current pinMode(TempProbePossitive , OUTPUT );//ditto but for positive digitalWrite(TempProbePossitive , HIGH ); pinMode(ECPin,INPUT); pinMode(ECPower,OUTPUT);//Setting pin for sourcing current pinMode(ECGround,OUTPUT);//setting pin for sinking current digitalWrite(ECGround,LOW);//We can leave the ground connected permanantly
delay(100);// gives sensor time to settle sensors.begin(); delay(100); //** Adding Digital Pin Resistance to [25 ohm] to the static Resistor *********// // Consult Read-Me for Why, or just accept it as true R1=(R1+Ra);
//************** Restart Protection Stuff ********************// //Setpoint value = EEPROM.read(addresCalibration); if (value <=254) K=value*0.02;
Serial.println("ElCheapo Arduino EC-PPM measurments"); Serial.println("By: Michael Ratcliffe Mike@MichaelRatcliffe.com"); Serial.println("Free software: you can redistribute it and/or modify it under GNU "); Serial.println(""); Serial.println("Make sure Probe and Temp Sensor are in Solution and solution is well mixed"); Serial.println(""); Serial.println("Measurments at 5's Second intervals [Dont read Ec morre than once every 5 seconds]:");
lcd.begin(16, 2); // start the library lcd.setCursor(0,0); delay(1000); lcd.print("Arduino EC-PPM"); lcd.setCursor(0,1); delay(1000); lcd.print("Mike Ratcliffe"); lcd.setCursor(0,1); delay(1000); lcd.setCursor(0,1); lcd.print("Free Software "); delay(1000); lcd.setCursor(0,1); lcd.print("Mike Ratcliffe"); delay(1000); lcd.setCursor(0,1); lcd.print("Free Software "); delay(1000); lcd.setCursor(0,0); lcd.print("To Calibrate "); lcd.setCursor(0,1); lcd.print("Hold Select "); delay(3000); lcd.setCursor(0,0); lcd.print("To Navigate "); lcd.setCursor(0,1); lcd.print("Use Up-Down "); delay(3000);
GetEC(); //gets first reading for LCD and then resets max/min MinEC=100; MaxEC=0; MinT=100; MaxT=0; };
//******************************************* End of Setup **********************************************************************//
//************************************* Main Loop - Runs Forever ***************************************************************// //Moved Heavy Work To subroutines so you can call them from main loop without cluttering the main loop void loop() {
if((millis()%10000)<=100){ GetEC(); //Calls Code to Go into GetEC() Loop [Below Main Loop] dont call this more that 1/5 hhz [once every five seconds] or you will polarise the water }; LogEC(); read_LCD_buttons(); Calibration(); PrintReadings(); // Cals Print routine [below main loop] delay(100); //Stops us entering the GETEC loop twice
} //************************************** End Of Main Loop **********************************************************************//
//************ This Loop Is called From Main Loop************************// void GetEC(){ Readings=1; //makes note of new readings avliable //*********Reading Temperature Of Solution *******************//
sensors.requestTemperatures();// Send the command to get temperatures Temperature=sensors.getTempCByIndex(0); //Stores Value in Variable
//************Estimates Resistance of Liquid ****************// digitalWrite(ECPower,HIGH); raw= analogRead(ECPin); digitalWrite(ECPower,LOW);
//***************** Converts to EC **************************// Vdrop= (Vin*raw)/1024.0; Rc=(Vdrop*R1)/(Vin-Vdrop); Rc=Rc-Ra; EC = 1000/(Rc*K);
//*************Compensating For Temperaure********************// EC25 = EC/ (1+ TemperatureCoef*(Temperature-25.0)); ppm=(EC25)*(PPMconversion*1000);
;} //************************** End OF EC Function ***************************//
//***This Loop Is called From Main Loop- Prints to serial usefull info ***// void PrintReadings(){ Serial.print("Rc: "); Serial.print(Rc); Serial.print(" EC: "); Serial.print(EC25); Serial.print(" Simens "); Serial.print(ppm); Serial.print(" ppm "); Serial.print(Temperature); Serial.println(" *C ");
if (button>=1||Readings==1) { Readings=0;
if(Screen==1){ lcd.setCursor(0,0); lcd.print("Arduino EC-PPM "); lcd.setCursor(0,1); lcd.print("EC: "); lcd.setCursor(3,1); lcd.print(EC25); lcd.setCursor(9,1); lcd.print(Temperature); lcd.print("'C"); }
else if(Screen==2){ lcd.setCursor(0,0); lcd.print("Arduino EC-PPM "); lcd.setCursor(0,1); lcd.print("PPM: "); lcd.setCursor(4,1); lcd.print(ppm); lcd.setCursor(9,1); lcd.print(Temperature); lcd.print("'C");
} else if(Screen==3){ lcd.setCursor(0,0); lcd.print("Min: "); lcd.setCursor(4,0); lcd.print(MinEC); lcd.setCursor(9,0); lcd.print(MinT); lcd.print("'C"); lcd.setCursor(0,1); lcd.print("Max: "); lcd.setCursor(4,1); lcd.print(MaxEC); lcd.setCursor(9,1); lcd.print(MaxT); lcd.print("'C");
} else if(Screen==4){
lcd.setCursor(0,0); lcd.print("Uptime Counter: ");
lcd.setCursor(0,1); lcd.print(" ");//Clearing LCD lcd.setCursor(0,1); lcd.print(Day); lcd.setCursor(3,1); lcd.print("Day"); lcd.setCursor(8,1); lcd.print(Hour); lcd.setCursor(10,1); lcd.print(":"); lcd.setCursor(11,1); lcd.print(Minute); lcd.setCursor(13,1); lcd.print(":"); lcd.setCursor(14,1); lcd.print(Second);
}
else if(Screen==5){
lcd.setCursor(0,0); lcd.print("Factors "); lcd.setCursor(8,0); lcd.print("PPMC:"); lcd.setCursor(13,0); lcd.print(PPMconversion);
lcd.setCursor(0,1); lcd.print("K: "); lcd.setCursor(2,1); lcd.print(K); lcd.setCursor(9,1); lcd.print("a:"); lcd.setCursor(11,1); lcd.print(TemperatureCoef); };
};
/* //********** Usued for Debugging ************ Serial.print("Vdrop: "); Serial.println(Vdrop); Serial.print("Rc: "); Serial.println(Rc); Serial.print(EC); Serial.println("Siemens"); //********** end of Debugging Prints ********* */ };
void read_LCD_buttons(){ adc_key_in = analogRead(0); // read the value from the sensor // my buttons when read are centered at these valies: 0, 144, 329, 504, 741 // we add approx 50 to those values and check to see if we are close if (adc_key_in > 1000) button =0;
else if (adc_key_in < 50) button =1; else if (adc_key_in < 250) button =2; else if (adc_key_in < 450) button =3; else if (adc_key_in < 650) button =4; else if (adc_key_in < 850) button =5;
if(button==2){ Screen++;
} else if (button==3){ Screen--; };
if (Screen>=6) Screen=5; if(Screen<=1) Screen=1; };
//******************************* LOGS Min/MAX Values and Uptime Counter*******************************// void LogEC(){
if(EC25>=MaxEC) MaxEC=EC25; if(EC25<=MinEC) MinEC=EC25;
if(Temperature>=MaxT) MaxT=Temperature; if(Temperature<=MinT) MinT=Temperature;
//** Checks For a Second Change *****// if((millis()%1000)<=500&&Once==0){ SecondStamp=1; Once=1; }; //** Making Note of an expected rollover *****// if(millis()>=3000000000){ HighMillis=1;
} //** Making note of actual rollover **// if(millis()<=100000&&HighMillis==1){ Rollover++; HighMillis=0; }
long secsUp = millis()/1000;
Second = secsUp%60;
Minute = (secsUp/60)%60;
Hour = (secsUp/(60*60))%24;
Day = (Rollover*50)+(secsUp/(60*60*24)); //First portion takes care of a rollover [around 50 days]
};
//******************************* Checks if Select button is held down and enters Calibration routine if it is ************************************// void Calibration(){
if(button!=5) return; else delay(1000); read_LCD_buttons(); if(button!=5) return;
while(1){ read_LCD_buttons(); lcd.setCursor(0,0); lcd.print("Set Calibration EC "); lcd.setCursor(0,1); lcd.print("EC: "); lcd.setCursor(3,1); lcd.print(CalibrationEC);
if (button==2) CalibrationEC=CalibrationEC+0.01 ; if(button==3) CalibrationEC=CalibrationEC-0.01; if(button==1) break; delay(100); };
lcd.setCursor(0,0); lcd.print("Calibrating "); lcd.setCursor(0,1); lcd.print("EC: "); lcd.setCursor(3,1); lcd.print(CalibrationEC);
i=1; buffer=0; sensors.requestTemperatures();// Send the command to get temperatures TemperatureStart=sensors.getTempCByIndex(0); //Stores Value in Variable
//************Estimates Resistance of Liquid ****************// while(i<=10){
digitalWrite(ECPower,HIGH); raw= analogRead(ECPin);
digitalWrite(ECPower,LOW); buffer=buffer+raw; i++; delay(5000); };
raw=(buffer/10); sensors.requestTemperatures();// Send the command to get temperatures TemperatureFinish=sensors.getTempCByIndex(0); //Stores Value in Variable
//*************Compensating For Temperaure********************// EC =CalibrationEC*(1+(TemperatureCoef*(TemperatureFinish-25.0))) ;
//***************** Calculates R relating to Calibration fluid **************************// Vdrop= (((Vin)*(raw))/1024.0); Rc=(Vdrop*R1)/(Vin-Vdrop); Rc=Rc-Ra; //Taking into account pin resistance Kt= 1000/(Rc*EC);
if (TemperatureStart==TemperatureFinish){ Serial.println(" Results are Trustworthy"); Serial.print("Calibration Fluid EC: "); Serial.print(CalibrationEC); Serial.print(" S "); //add units here Serial.print("Cell Constant K"); Serial.print(K);
lcd.setCursor(0,0); lcd.print("GoodResults ");
lcd.setCursor(0,1); lcd.print("EC: "); lcd.setCursor(3,1); lcd.print(CalibrationEC); lcd.setCursor(9,1); lcd.print("K:"); lcd.setCursor(11,1); lcd.print(Kt);
while (1) { // wee need to keep this function running until user opts out with return function
read_LCD_buttons(); if(button==4) return; //exits the loop without saving becauser user asked so if (button==5){
K=Kt; //saving the new cell constant
//********Saving the new value to EEprom**********// value=K/0.02; EEPROM.write(addresCalibration, value);
lcd.setCursor(0,0); lcd.print("Saved Calibration ");
lcd.setCursor(0,1); lcd.print("K: "); lcd.setCursor(3,1); lcd.print(Kt); delay(2000); return; }
if(millis()%4000>=2000){ lcd.setCursor(0,0); lcd.print("GoodResults ");
lcd.setCursor(0,1); lcd.print("EC: "); lcd.setCursor(2,1); lcd.print(CalibrationEC); lcd.setCursor(9,1); lcd.print("K:"); lcd.setCursor(11,1); lcd.print(Kt);
} else{
lcd.setCursor(0,0); lcd.print("Select To Save ");
lcd.setCursor(0,1); lcd.print("Down to Exit "); };
}
}
else{ Serial.println(" Error Wait For Temperature To settle");
while (1) { read_LCD_buttons(); if(button==2) Calibration(); if(button==3) return;
lcd.setCursor(0,0); lcd.print("Bad Results "); lcd.setCursor(0,1); lcd.print("Press Up Exit ");
}
}
};
|
Alternative download it at: www.MichaelRatcliffe.com/projects
Top Comments