


A Updated PH Probe, Now gives A Readout For Probe Life and a time alarm for when to Calibrate.
DFRobot were nice enough to send me one of their pH pro MCU probes [Longer lasting] but this tutorial and code will work for any analog pH MCU meter [ebay special etc] these are coming down in price rapidly but I recommend calibrating often.
The Analog pH breakout boards often have a little pot for adjusting during calibration, this is a pain in the ass at calibration time. This new code uses a different method and is all code based.

[Turn Pot on PH meter fully anticlockwise, we are now using a better Calibration method]
GUI
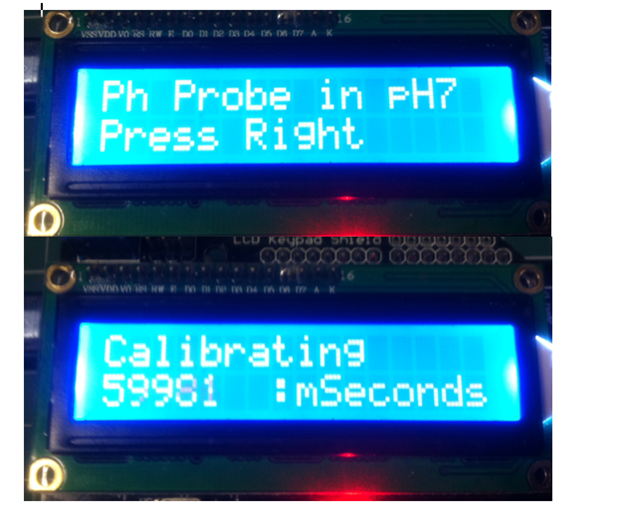
The LCD has a few useful Screens

How It works:
pH Measurement and Calibration
pH probes output a small voltage change [from-170mv to 170mv, for ph 4-10], the breakout board is essentially a op amp with an offset. So it now outputs a 0-5v signal.
These boards are made with a potentiometer to change the gain of the amplifier to calibrate, good idea but very awkward, we instead will be giving it a set gain and calibrating in the code.
So what are the steps if you have a different board:
>Turn Pot fully clockwise
>Short BNC connector together and read mv [from serial] This is your Ideal pH reading, the DF robot is 1.96v
>Connect probe and read mv [from serial] when in pH4 and pH7, The probe change will be 170mv, you now have a way to work out the gain of the amp.
pH = 7 -(Ph_Calibration_mv - measured_mv)*gain // Simple?
Doing it this way we can read pH and calibrate without messing with that pot ever again, by taking three readings 1:Ideal pH 7 mv , 2:Actual pH7 mv , 3: pH4mv
The LCD GUI will guide you thru a Calibration process:
Probe Life
The LCD screen with Probe life should have all readings above 50% to be considered a probe in good health, if ones lower I recommend cleaning it or ordering a replacement [It will fail soon].
There are three indicators of probe life when we calibrate.
http://reagecon.com/pdf/technicalpapers/Electrode_CM_v5_TSP-02_Issue_4.pdf
In the Code these are showed as:
H1: pH7 offset [pH7 should output the ideal voltage of 1.96, as they age they get an offset
H2 Slope, change in mv between pH4 calibration and pH7
H3:Drift , Healthy probes should have reached a s.s value after 60 seconds, this one checks for a difference between a reading at 60 seconds and 120
A more Technical Explanation of the health checks:
//there are three ways we can measure a proble life during calibration:
//1:Asymmetry potential (Eo), the Millivoltes at pH7 [mV reading in pH 7.00 buffer ± 25 mV]
//2:Slope, mv per Ph change [mV reading in pH 7.00 buffer - mV reading in pH 4.00 buffer 160 – 180 mV]
//3:Drift mV reading in pH 4.00 buffer (1 min) – mV reading in pH 4.00 buffer (2 min) ± 1.5 mV [we are checking for stable readings]
I have tested this code with good probes, failed probes and aged b probes and it works very well at identifying them.
Got a probe with a low Health indicator one or three? check out the blog on reviving a probe:
Blog:13.9 - PH Probe Revival: Ultrasonic Cleaning
The Code
This reads the ph probes shield [its an analog value] averages ten readings to reduce any noise and converts the ADC reading into a ph value. outputting the reading to serial.
The code works and it works great, I did however group into one variable the gain and slope, this means the health check values are only valid for analog probes, there will be an updated I2C version soon.
| Header 1 |
|---|
/* Script to print PH to serial
* Turn Pot fully counter clockwise[All the way it should take multiple turns], we arnt ussing it anymore for calibration
28/8/2015 Michael Ratcliffe Mike@MichaelRatcliffe.com
This program is free software: you can redistribute it and/or modify it under the terms of the GNU General Public License as published by the Free Software Foundation, either version 3 of the License, or (at your option) any later version.
This program is distributed in the hope that it will be useful, but WITHOUT ANY WARRANTY; without even the implied warranty of MERCHANTABILITY or FITNESS FOR A PARTICULAR PURPOSE. See the GNU General Public License for more details.
You should have received a copy of the GNU General Public License along with this program. If not, see <http://www.gnu.org/licenses/>.
Parts: -Arduino - Uno/Mega -df Robot Ph Probe Kit [SKU:SEN0169] This is a great PH sensor compared to the ones ive had in the past
See www.MichaelRatcliffe.com/Projects for a Pinout and user guide or consult the Zip you got this code from
*/
//************************** Libraries Needed To Compile The Script [See Read me In Download] ***************// // Both below Library are custom ones [ SEE READ ME In Downloaded Zip If You Dont Know how To install] Use them or add a pull up resistor to the temp probe
#include "OneWire.h" #include "DallasTemperature.h" #include "LiquidCrystal.h" //Standard LCD Lbrary #include "EEPROM.h" //Standard EEPROM Library
//*********************** User defined variables ****************************// //The Number of Days before the LCD will tell you its time to Calibrate int Cal_Period_Warining=30; //pH meter Analog output to Arduino Analog Input 0 int PHPin =A15; //I got this from shorting the nbc's cnetre pin to outer pin [simulated the perfect probe] open serial and its the mv reading that you want to put here float Healthy1_mv=1.96;
//************ Temp Probe Related *********************************************// #define ONE_WIRE_BUS 26 // Data wire For Temp Probe is plugged into pin 10 on the Arduino const int TempProbePossitive =22; //Temp Probe power connected to pin 9 const int TempProbeNegative=24; //Temp Probe Negative connected to pin 8 float Temperature=0.0; float MinT=100; float MaxT=0;
//********************** End Of Recomended User Variables ******************//
//************** Some values for working out the ph*****************//
float mvReading=0; float Vs=5; float phValue=0; int i=0; long reading=0; unsigned long sum=0; float average=0; //used for min/max logs float MinPH=10; float MaxPH=0;
//************** Variables used to determin probe health **********// //there are three ways we can measure a proble life during calibration: //1:Asymmetry potential (Eo), the Millivoltes at pH7 [mV reading in pH 7.00 buffer ± 25 mV] //2:Slope, mv per Ph change [mV reading in pH 7.00 buffer - mV reading in pH 4.00 buffer 160 – 180 mV] //3:Drift mV reading in pH 4.00 buffer (1 min) – mV reading in pH 4.00 buffer (2 min) ± 1.5 mV [we are checking for stable readings] int ProbeLife1=0; float mvReading_7=0;
//Some major brands will have this set at 35mv, we have a gain of around 8 in our op amp float Health1_range =0.28; float Healthy1_mv2=1.96;
//I got these from a healthy probe and extrapolating the slope deviation int ProbeLife2=0; float Slope=0; float mvReading_4=0; float Healthy2_Slope=2.15; float Healthy2_range=0.25;
int ProbeLife3=0; float Drift=0; float mvReading_4_Delayed=0; float Healthy3_Drift=0; float Healthy3_range=0.02;
//some Variables for Probe Calibration Time int Last_Day=0; int Days_Since_Calibration=0; int CalibrationWarning=0;
float offset=0;
// select the pins used on the LCD panel LiquidCrystal lcd(8, 9, 4, 5, 6, 7);
// define some values used by the panel and buttons int lcd_key = 0; int adc_key_in = 0; int button =0; #define btnRIGHT 1 #define btnUP 2 #define btnDOWN 3 #define btnLEFT 4 #define btnSELECT 5 #define btnNONE 6
int Screen =1; //Max number of screens on lcd const int Last_Screen_no =6; //used to debounce input button int buttonLast=0;
OneWire oneWire(ONE_WIRE_BUS);// Setup a oneWire instance to communicate with any OneWire devices DallasTemperature sensors(&oneWire);// Pass our oneWire reference to Dallas Temperature.
//************************** Just Some basic Definitions used for the Up Time LOgger ************// long Day=0; int Hour =0; int Minute=0; int Second=0; int HighMillis=0; int Rollover=0;
//Used For Calibration timing unsigned long StartCalibration1=0;
//***************** Specifying where to sotre the calibration value [non volatile memory **// int value=0; //we use this to check if memory has been writen or not int addresCalibrationPH4=0; int addresCalibrationPH7=50; int addresProbleLife1=100; int addresProbleLife2=150; int addresProbleLife3=200; int addresseCalibrationDays=250;
//************************************** Setup Loop Runs Once ****************// void setup() { Serial.begin(9600); pinMode(TempProbeNegative , OUTPUT ); //seting ground pin as output for tmp probe digitalWrite(TempProbeNegative , LOW );//Seting it to ground so it can sink current pinMode(TempProbePossitive , OUTPUT );//ditto but for positive digitalWrite(TempProbePossitive , HIGH ); read_Temp();// getting rid of the first bad reading Read_Eprom(); Slope_calc(); Splash_Screen();
if(Days_Since_Calibration>=Cal_Period_Warining) CalibrationWarning=1;
//Adjusting some values for use later in map function Healthy1_mv2=Healthy1_mv*1000; Health1_range =Health1_range*1000;
Healthy2_Slope=Healthy2_Slope*1000; Healthy2_range=Healthy2_range*1000;
Healthy3_Drift=Healthy3_Drift*1000; Healthy3_range=Healthy3_range*1000;
} //******************************** End Of Setup **********************************//
//******************** Main Loops runs Forver ************************************// void loop() {
//All these functions are put below the main loop, keeps the loop logic easy to see read_LCD_buttons(); read_Temp(); Log_Min_MaxTemp(); ReadPH(); Log_Min_MaxPH(); uptime(); //Used to see hoe many days ago the probe was calibrated Day_Change(); CalibratePH(); PrintReadings(); delay(100); };
//************************** End Of Main Loop ***********************************//
//*************************Print Some useful startup info **************************// void startupinfo(){ Serial.println("pH Probe Script for arduino"); Serial.println("Released under GNU by Michael Ratcliffe"); Serial.println("www.MichaelRatcliffe.com"); Serial.println("Element14 'Adapted_Greenhouse'"); Serial.println("Using DFRobot PH Probe Pro "); Serial.println("How to Use:"); Serial.println("1:Place Probe into pH7 calibration fluid, open serial "); Serial.println("2:Take Recomened cell constand and change it in the top of code"); Serial.println("3:Rinse Probe and place in pH4 calibration fluid"); Serial.println("4:Adjust potentiometer on pH meter shield until ph reading in serial is 4"); Serial.println(" "); Serial.println("Thats it your calibrated and your readings are accurate!");
}
//***************************** Function to read temperature ********************************// void read_Temp(){ sensors.requestTemperatures();// Send the command to get temperatures Temperature=sensors.getTempCByIndex(0); //Stores Value in Variable
}
//*************************Take Ten Readings And Average ****************************// void ReadPH(){ i=0; sum=0; while(i<=20){ reading=analogRead(PHPin); sum=sum+reading; delay(10); i++; } average=sum/i;
//Converting to mV reading and then to pH mvReading=average*Vs/1024; //phValue=mvReading*K_PH; phValue=(7-((mvReading_7-mvReading)*Slope));
}
//****************************** Reading LCd Buttons ****************************// void read_LCD_buttons(){ adc_key_in = analogRead(0); // read the value from the sensor // my buttons when read are centered at these valies: 0, 144, 329, 504, 741 // we add approx 50 to those values and check to see if we are close if (adc_key_in > 1000) button =0;
else if (adc_key_in < 50) button =1; else if (adc_key_in < 250) button =2; else if (adc_key_in < 450) button =3; else if (adc_key_in < 650) button =4; else if (adc_key_in < 850) button =5;
//Second bit stops us changing screen multiple times per input if(button==2&&buttonLast!=button){ Screen++;
} else if (button==3&&buttonLast!=button){ Screen--; };
if (Screen>=Last_Screen_no) Screen=Last_Screen_no; if(Screen<=1) Screen=1;
buttonLast=button; };
//************************ Uptime Code - Makes a count of the total up time since last start ****************//
void uptime(){ //** Making Note of an expected rollover *****// if(Day>=30){ HighMillis=1;
} //** Making note of actual rollover **// if(millis()<=100000&&HighMillis==1){ Rollover++; HighMillis=0; } //Calculating the uptime long secsUp = millis()/1000;
Second = secsUp%60;
Minute = (secsUp/60)%60;
Hour = (secsUp/(60*60))%24;
Day = (Rollover*50)+(secsUp/(60*60*24)); //First portion takes care of a rollover [around 50 days]
};
//************************** Printing somthing useful to LCd on start up **************************// void Splash_Screen(){
lcd.begin(16, 2); // start the library lcd.setCursor(0,0); delay(1000); lcd.print("PH meter "); lcd.setCursor(0,1); delay(1000); lcd.print("Mike Ratcliffe"); lcd.setCursor(0,1); delay(1000); lcd.setCursor(0,1); lcd.print("Free Software "); delay(1000); lcd.setCursor(0,1); lcd.print("Mike Ratcliffe"); delay(1000); lcd.setCursor(0,1); lcd.print("Free Software "); delay(1000); lcd.setCursor(0,0); lcd.print("To Navigate "); lcd.setCursor(0,1); lcd.print("Use Up-Down "); delay(3000); lcd.setCursor(0,0); lcd.print("To Calibrate "); lcd.setCursor(0,1); lcd.print("Hold Select "); delay(3000);
};
//******************** calculating the PhMeter Parameters ***************************************// void Slope_calc(){
offset=Healthy1_mv-mvReading_7; Slope=3/(Healthy1_mv-mvReading_4-offset);
}
//*************************** Checking what we stored in non volatile memory last time ************// void Read_Eprom(){
//************** Restart Protection Stuff ********************// //the 254 bit checks that the adress has something stored to read [we dont want noise do we?] value = EEPROM.read(addresCalibrationPH7); mvReading_7=value*Vs/256; delay(10);
value = EEPROM.read(addresCalibrationPH4); mvReading_4=value*Vs/256; delay(10); //Checking for Probe Life 1 Indicator value = EEPROM.read(addresProbleLife1); ProbeLife1=value; delay(10); //Probe:ife 2 saved value = EEPROM.read(addresProbleLife2); ProbeLife2=value; delay(10); //Probe:ife 3 saved value = EEPROM.read(addresProbleLife3); ProbeLife3=value; delay(10);
//Checking memory slot for probe calibration time Days_Since_Calibration = EEPROM.read(addresseCalibrationDays);
};
//******************************* Checks if Select button is held down and enters Calibration routine if it is ************************************// void CalibratePH(){
//we check if we are on ph screen and the select button is held if(Screen!=4) return; if(button!=5) return; else delay(1000); read_LCD_buttons(); if(button!=5) return;
//we need to stop in this loop while the user calibrates while(1){ read_LCD_buttons(); lcd.setCursor(0,0); lcd.print("Ph Probe in pH7 "); lcd.setCursor(0,1); lcd.print("Press Right "); //user pressed right? if(button==1) break; delay(100); }; StartCalibration1=millis();
//We are giving the probe 1 minute to settle while(millis()<StartCalibration1+60000){ lcd.setCursor(0,0); lcd.print("Calibrating "); lcd.setCursor(0,1); lcd.print(" "); lcd.setCursor(0,1); lcd.print(StartCalibration1+60000-millis()); lcd.setCursor(7,1); lcd.print(":mSeconds"); delay(1000); }; ReadPH(); delay(100); ReadPH();
//*******Saving the new value to EEprom**********// mvReading_7=mvReading;
while (1) { // wee need to keep this function running until user opts out with return function
read_LCD_buttons(); if(button==3) return; //exits the loop without saving becauser user asked so
if(millis()%4000>=2000){
lcd.setCursor(0,0); lcd.print("Calibrated "); lcd.setCursor(0,1); lcd.print("Select To Save ");
} else{
lcd.setCursor(0,1); lcd.print("Down to Exit "); };
if (button==5) break; } //read the ph probe
//Saving the value steight from ADC, removes conversion errors value= average/4; EEPROM.write(addresCalibrationPH7,value); //Resetting the days sinc calibration Days_Since_Calibration=0; CalibrationWarning=0; Slope_calc(); ProbeLife_Check_1(); EEPROM.write(addresseCalibrationDays,Days_Since_Calibration);
//Displaying the new offset lcd.setCursor(0,0); lcd.print("Saved Calibration ");
lcd.setCursor(0,1); lcd.print("Offset "); lcd.setCursor(3,1); lcd.print(offset); delay(2000); //move onto pH4 Calibration
lcd.setCursor(0,0); lcd.print("Rinse and ");
lcd.setCursor(0,1); lcd.print("Placein pH4 ");
delay(4000);
while(1){ lcd.setCursor(0,0); lcd.print("Press Right ");
lcd.setCursor(0,1); lcd.print("If Probe in 4 "); //move onto next stage if select is held read_LCD_buttons(); if (button==1) break; } StartCalibration1=millis();
//We are giving the probe 1 minute to settle while(millis()<StartCalibration1+60000){ lcd.setCursor(0,0); lcd.print("Calibrating "); lcd.setCursor(0,1); lcd.print(" "); lcd.setCursor(0,1); lcd.print(StartCalibration1+60000-millis()); lcd.setCursor(7,1); lcd.print(":mSeconds"); delay(1000); }; ReadPH(); delay(100); ReadPH();
mvReading_4=mvReading;
//We are giving the probe 1 minute to settle StartCalibration1=millis(); while(millis()<=StartCalibration1+60000){ lcd.setCursor(0,0); lcd.print("Health Check "); lcd.setCursor(0,1); lcd.print(" "); lcd.setCursor(0,1); lcd.print(StartCalibration1+60000-millis()); lcd.setCursor(7,1); lcd.print(":mSeconds"); delay(1000); }; ReadPH(); delay(100); ReadPH(); mvReading_4_Delayed=mvReading; //Saving ADc readout, to remove conversion errors value= average/4; EEPROM.write(addresCalibrationPH4,value); Slope_calc(); ProbeLife_Check_2(); ProbeLife_Check_3();
//Put back to main screen and exit calibration lcd.setCursor(0,0); lcd.print("Saved Calibration ");
delay(1000); //Informing the use about the probe life while(1){ read_LCD_buttons();
if(ProbeLife2>=50 && ProbeLife2>=50 &&ProbeLife3>=50){ lcd.setCursor(0,0); lcd.print("Probe Condition "); lcd.setCursor(0,1); lcd.print("Good "); }
if(ProbeLife2<50 || ProbeLife2<50 || ProbeLife3<50){ lcd.setCursor(0,0); lcd.print("Probe Condition "); lcd.setCursor(0,1); lcd.print("Faulty "); }
if(millis()%6000 <=3000){ lcd.setCursor(0,0); lcd.print("Press Right ");
lcd.setCursor(0,1); lcd.print("To exit "); };
//user pressed right? if(button==1) break; delay(100); }; Screen=1; return;
};
//******************************* LOGS Min/MAX Values*******************************// void Log_Min_MaxTemp(){
if(Temperature>=MaxT) MaxT=Temperature; if(Temperature<=MinT) MinT=Temperature;
};
//******************************* LOGS Min/MAX Values*******************************// void Log_Min_MaxPH(){
if(phValue>=MaxPH) MaxPH=phValue; if(phValue<=MinPH) MinPH=phValue;
};
void PrintReadings(){
Serial.print("pH: "); Serial.print(phValue); Serial.print(Temperature); Serial.println(" *C "); Serial.print("mv: "); Serial.print(mvReading); Serial.print(" mvPh7: "); Serial.print(mvReading_7); Serial.print(" mvPh4: "); Serial.println(mvReading_4); Serial.print("H1: "); Serial.print(ProbeLife1); Serial.print(" H2: "); Serial.print(ProbeLife2); Serial.print("H3: "); Serial.println(ProbeLife3);
Serial.print("Slope "); Serial.print(Slope);
//** First Screen Shows Temp and EC **// if(Screen==1){ lcd.setCursor(0,0); lcd.print("Arduino pH "); lcd.setCursor(0,1); lcd.print("pH: "); lcd.setCursor(3,1); lcd.print(phValue); lcd.setCursor(9,1); lcd.print(Temperature); lcd.print("'C"); }
//**Third Screen Shows Min and Max **// else if(Screen==2){ lcd.setCursor(0,0); lcd.print("Min: "); lcd.setCursor(4,0); lcd.print(MinPH); lcd.setCursor(9,0); lcd.print(MinT); lcd.print("'C"); lcd.setCursor(0,1); lcd.print("Max: "); lcd.setCursor(4,1); lcd.print(MaxPH); lcd.setCursor(9,1); lcd.print(MaxT); lcd.print("'C"); }
else if(Screen==6){
lcd.setCursor(0,0); lcd.print("Uptime Counter: ");
lcd.setCursor(0,1); lcd.print(" ");//Clearing LCD lcd.setCursor(0,1); lcd.print(Day); lcd.setCursor(3,1); lcd.print("Day"); lcd.setCursor(8,1); lcd.print(Hour); lcd.setCursor(10,1); lcd.print(":"); lcd.setCursor(11,1); lcd.print(Minute); lcd.setCursor(13,1); lcd.print(":"); lcd.setCursor(14,1); lcd.print(Second);
}
else if(Screen==4){
lcd.setCursor(0,0); lcd.print("Calibrate pH ");
lcd.setCursor(0,1); lcd.print("Hold Select ");
} else if(Screen==3){
lcd.setCursor(0,0); lcd.print("Probe Health % ");
lcd.setCursor(0,1); lcd.print("H1: "); lcd.setCursor(3,1); lcd.print(ProbeLife1); lcd.setCursor(9,1); lcd.print("H2:"); lcd.setCursor(12,1); lcd.print(ProbeLife2); if(millis()%6000<3000){ lcd.setCursor(0,1); lcd.print("H3: "); lcd.setCursor(3,1); lcd.print(ProbeLife3); } }
else if(Screen==5){
lcd.setCursor(0,0); lcd.print("Days Since Cal ");
lcd.setCursor(0,1); lcd.print(" "); lcd.setCursor(0,1); lcd.print(Days_Since_Calibration);
}
if((millis()%10000<=2000) && (CalibrationWarning==1)){
lcd.setCursor(0,0); lcd.print("Calibrate the "); lcd.setCursor(0,1); lcd.print("Probe ");
};
};
//************************************* Used For Probe time Since Last Calibration *************************************// //This wont keep counting if unit has been powered off, so it is only really useful for use when in permanant use void Day_Change(){ if(Day!=Last_Day){ Last_Day=Day; Days_Since_Calibration++; EEPROM.write(addresseCalibrationDays,Days_Since_Calibration); if(Days_Since_Calibration>=Cal_Period_Warining) CalibrationWarning=1; };
};
//********************** The Section Below will give you a read out of probe Life ****************************************// //there are three ways we can measure a proble life during calibration: //1:Asymmetry potential (Eo), the Millivoltes at pH7 [mV reading in pH 7.00 buffer ± 25 mV] //2:Slope, mv per Ph change [mV reading in pH 7.00 buffer - mV reading in pH 4.00 buffer 160 – 180 mV] //3:Drift mV reading in pH 4.00 buffer (1 min) – mV reading in pH 4.00 buffer (2 min) ± 1.5 mV [we are checking for stable readings]
void ProbeLife_Check_1(){ //Structure, get pH7 mv reading and map life vs mv reading , variables Good value, band for bad reading //We already just got the mvReading int he calibration function //map(value, fromLow, fromHigh, toLow, toHigh);
value=mvReading_7*1000; if (value>=Healthy1_mv2) ProbeLife1=map(value, Healthy1_mv2, (Healthy1_mv2+Health1_range), 100, 0); if (value<Healthy1_mv2) ProbeLife1=map(value, Healthy1_mv2, (Healthy1_mv2-Health1_range), 100, 0); if (ProbeLife1<=1) ProbeLife1=0; EEPROM.write(addresProbleLife1,ProbeLife1); };
void ProbeLife_Check_2(){ //structure compare ph7 mv to ph4 mv , variables Good value Band for bad reading
value=Slope*1000; if (value>=Healthy2_Slope) ProbeLife2=map(value, Healthy2_Slope,(Healthy2_Slope+ Healthy2_range), 100, 0); if (value<Healthy2_Slope) ProbeLife2=map(value, Healthy2_Slope,(Healthy2_Slope-Healthy2_range), 100, 0); if (ProbeLife2<=1) ProbeLife2=0; EEPROM.write(addresProbleLife2,ProbeLife2); };
void ProbeLife_Check_3(){ //structure, leave probe in ph 4 for 1 minute and then take another average at 2 mins map from 0 drift to 5mv for probe life Drift=(mvReading_4-mvReading_4_Delayed); value=Drift*1000; if (value>=Healthy3_Drift) ProbeLife3=map(value, Healthy3_Drift,(Healthy3_Drift+ Healthy3_range), 100, 0); if (value<Healthy3_Drift) ProbeLife3=map(value, Healthy3_Drift,(Healthy3_Drift- Healthy3_range), 100, 0); if (ProbeLife3<=1) ProbeLife3=0; EEPROM.write(addresProbleLife3,ProbeLife3); }; |
Top Comments