element14 Community
element14 Community
    Register Log In
  • Site
  • Search
  • Log In Register
  • Community Hub
    Community Hub
    • What's New on element14
    • Feedback and Support
    • Benefits of Membership
    • Personal Blogs
    • Members Area
    • Achievement Levels
  • Learn
    Learn
    • Ask an Expert
    • eBooks
    • element14 presents
    • Learning Center
    • Tech Spotlight
    • STEM Academy
    • Webinars, Training and Events
    • Learning Groups
  • Technologies
    Technologies
    • 3D Printing
    • FPGA
    • Industrial Automation
    • Internet of Things
    • Power & Energy
    • Sensors
    • Technology Groups
  • Challenges & Projects
    Challenges & Projects
    • Design Challenges
    • element14 presents Projects
    • Project14
    • Arduino Projects
    • Raspberry Pi Projects
    • Project Groups
  • Products
    Products
    • Arduino
    • Avnet & Tria Boards Community
    • Dev Tools
    • Manufacturers
    • Multicomp Pro
    • Product Groups
    • Raspberry Pi
    • RoadTests & Reviews
  • About Us
  • Store
    Store
    • Visit Your Store
    • Choose another store...
      • Europe
      •  Austria (German)
      •  Belgium (Dutch, French)
      •  Bulgaria (Bulgarian)
      •  Czech Republic (Czech)
      •  Denmark (Danish)
      •  Estonia (Estonian)
      •  Finland (Finnish)
      •  France (French)
      •  Germany (German)
      •  Hungary (Hungarian)
      •  Ireland
      •  Israel
      •  Italy (Italian)
      •  Latvia (Latvian)
      •  
      •  Lithuania (Lithuanian)
      •  Netherlands (Dutch)
      •  Norway (Norwegian)
      •  Poland (Polish)
      •  Portugal (Portuguese)
      •  Romania (Romanian)
      •  Russia (Russian)
      •  Slovakia (Slovak)
      •  Slovenia (Slovenian)
      •  Spain (Spanish)
      •  Sweden (Swedish)
      •  Switzerland(German, French)
      •  Turkey (Turkish)
      •  United Kingdom
      • Asia Pacific
      •  Australia
      •  China
      •  Hong Kong
      •  India
      •  Korea (Korean)
      •  Malaysia
      •  New Zealand
      •  Philippines
      •  Singapore
      •  Taiwan
      •  Thailand (Thai)
      • Americas
      •  Brazil (Portuguese)
      •  Canada
      •  Mexico (Spanish)
      •  United States
      Can't find the country/region you're looking for? Visit our export site or find a local distributor.
  • Translate
  • Profile
  • Settings
Vertical Farming
  • Challenges & Projects
  • Design Challenges
  • Vertical Farming
  • More
  • Cancel
Vertical Farming
Blog Modular Farm Blog: Post 6 - Image Acquisition System
  • Blog
  • Forum
  • Documents
  • Polls
  • Files
  • Events
  • Mentions
  • Sub-Groups
  • Tags
  • More
  • Cancel
  • New
  • Share
  • More
  • Cancel
Group Actions
  • Group RSS
  • More
  • Cancel
Engagement
  • Author Author: jmbranco76
  • Date Created: 9 Sep 2015 11:18 PM Date Created
  • Views 582 views
  • Likes 4 likes
  • Comments 3 comments
  • modular_farm
  • hydroponic
  • net_zero_energy_farming
  • grow_sharp
  • image_acquisition_system
Related
Recommended

Modular Farm Blog: Post 6 - Image Acquisition System

jmbranco76
jmbranco76
9 Sep 2015

Hi vertical farmers,


In the previous post we presented the key issues related to our Artificial LED lighting system.

In this post we will talk about our image acquisition system to monitor and control plant growth, introducing the image acquisition management. This system is of particular importance because it will be the base of our artificial intelligence system.

In the next post, we will proceed explaining the artificial intelligence tasks of reasoning and decision.


Hardware

Our initial prototype is composed by the following components (also depicted on figure 1):

  • Logitech C170 webcam — It’s a 5 megapixels camera with a maximum resolution of 1024x768. For this particular webcam, the necessary drivers are available almost out of the box.
  • Raspberry Pi 2 — It’s a single-board computer with 900 MHz quad-core ARM Cortex-A7 CPU, 1 GB RAM and running the Raspbian Linux distribution.


image

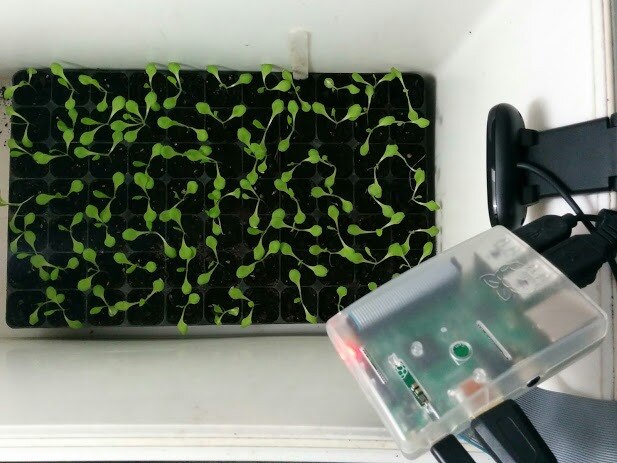
Figure 1. Prototype of image acquisition system.


We selected these components because were available in-house, allowing us to economize and deploy faster but there are better solutions in the market, especially cameras. To be fair, this is a complete shot in the dark concerning webcam image quality in the long run of the project. We took initial shots from lettuces germinated for system testing purposes (figure 2) and they showed acceptable image quality, but changes in lighting will degrade the quality of the samples. For now, and considering the deadline of the project, we will keep the webcam and we can easily upgrade it later.

The Raspberry Pi 2 will be used for image acquisition, post-processing and communication with external servers (e.g. MySQL and FTP).


image

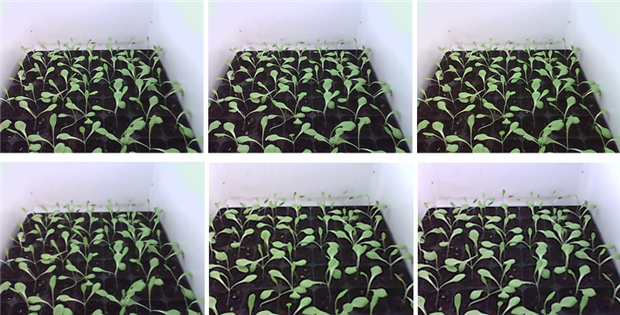
Figure 2. Samples taken with the prototype.


Architecture

image

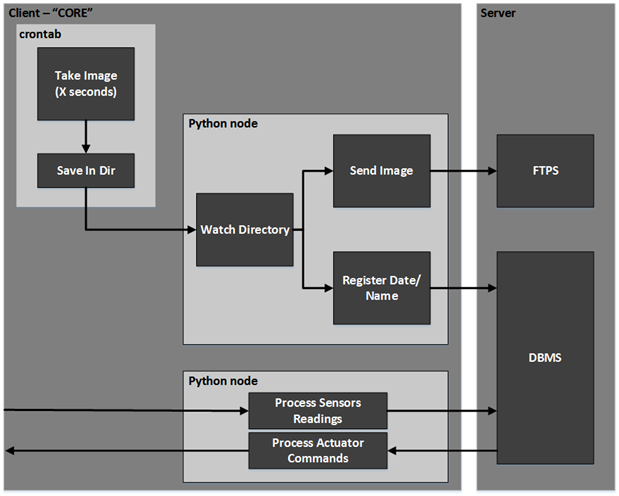
Figure 3. General overview of the image acquisition system.


In this stage, and after a few general discussions, it was defined that the majority of software (for the high-level features of our project) will be developed in Python. This choice was made to provide a fast and modular approach to our problems and to take advantage of the available open-source libraries for most of the important external modules of our project (e.g. connection, MySQL and FTP).

The acquisition process (figure 3) follows the following steps divided in two stages:

  • 1. Configuration
    • Bash script with image acquisition — A script is designed to change the directory and take a sample based on the fswebcam command line interface(cli) app.
    • Crontab job registration — Using the command ‘crontab -e’ a new job is scheduled containing the desired trigger and the corresponding script.
  • 2. Automation
    • Image acquisition triggered by crontab — At a defined rate, an image is captured by the webcam and stored in a predefined directory.
    • File watcher — In the Python node, an event is triggered based on the watchdog library for a new file on the watched directory.
    • FTP server integration — FTPlib library is used to connect to a FTP server and store the detected image.
    • MySQL database integration — Using the MySQLdb library, INSERT statements are performed to store the image path and capture date.
    • Error handling — In cases where either the FTP or the MySQL transaction fail, a queue is maintained until the connection is reestablished or the problem solved.


To avoid naming collisions, each lot and each sensor have unique identifiers (keys) and the image stored in the FTP server contains a merged name (AllotmentKey + SensorKey + datetime + . + format).


In the following video we have an initial time-lapse from images acquired by our prototype.  Each image was taken hourly in the course of one day and it’s possible to see clearly the plants moving and growing.


You don't have permission to edit metadata of this video.
Edit media
x
image
Upload Preview
image


On our next post we will be describing in depth our database and the technical decisions made to provide a solid storage to our information. We will explain entity and relationship identifiers of database. We also plan to define the base communication frame, encryption and related topics. Also we will analyze the acquired images to extract useful information.


As always if you have any questions or comments please feel free to reply to this post.


Thanks for following and keep connected!

  • Sign in to reply

Top Comments

  • DAB
    DAB over 10 years ago +1
    Great time-lapse sequence. Your sprouts look good and your video monitoring will help you spot any issues early. Are you planning to do any spectral analysis on the images? DAB
  • RWReynolds
    RWReynolds over 10 years ago

    Looks great Jose.


    The time lapse sequence is very nice. The capabilities of the little Raspberry Pi 2 never ceases to amaze me. We now use them at work on several commercial products.


    Looks like a great set up. Can't wait to see it in action.


    Cheers,

    Rick

    • Cancel
    • Vote Up 0 Vote Down
    • Sign in to reply
    • More
    • Cancel
  • jmbranco76
    jmbranco76 over 10 years ago in reply to DAB

    Hi DAB,


    Yes, on the final stages of the project, we intend to at least test spectral features, Our initial plan is to create a model using Appearance-based features, then explore separately a new model with spectral features for texture analysis.
    Cheers,
    José


    • Cancel
    • Vote Up 0 Vote Down
    • Sign in to reply
    • More
    • Cancel
  • DAB
    DAB over 10 years ago

    Great time-lapse sequence.


    Your sprouts look good and your video monitoring will help you spot any issues early.


    Are you planning to do any spectral analysis on the images?


    DAB

    • Cancel
    • Vote Up +1 Vote Down
    • Sign in to reply
    • More
    • Cancel
element14 Community

element14 is the first online community specifically for engineers. Connect with your peers and get expert answers to your questions.

  • Members
  • Learn
  • Technologies
  • Challenges & Projects
  • Products
  • Store
  • About Us
  • Feedback & Support
  • FAQs
  • Terms of Use
  • Privacy Policy
  • Legal and Copyright Notices
  • Sitemap
  • Cookies

An Avnet Company © 2025 Premier Farnell Limited. All Rights Reserved.

Premier Farnell Ltd, registered in England and Wales (no 00876412), registered office: Farnell House, Forge Lane, Leeds LS12 2NE.

ICP 备案号 10220084.

Follow element14

  • X
  • Facebook
  • linkedin
  • YouTube