


Hello again!
Welcome to the second installment of my challenge blog. 
Please bear with me on the formatting of these posts. These online editors often present me with problems.
Keeping with the structure I set forth in my last blog post, here we go!
Section 1 : Recap - Ok, in my last blog post I talked about choosing and acquiring planting containers.
My original intent was to use a type of square, tapered Styrofoam containers I'd seen in my Internet research. In fact the systems that I saw that used these containers were the inspiration for my cultivator unit.
As it turns out these containers are not easily obtained in small quantities. The manufacturers of the containers tend to, understandably, cater to large buyers. The square tapered containers come from Verti-Gro. The minimum quantity is 10 containers at a cost of $90.00. I only needed 4 to 6 containers. I couldn't see my way clear to spend the extra money as I'm on a budget here. I attempted to contact Verti-Gro to see if they could see their way clear to sell me a lesser quantity just for this project. They never returned my email.
Another Styrofoam container, the Hydro-Stacker, was only available in minimum quantities of 300. Again, I need 4 to 6. I contacted the company that makes them but they could not see their way clear to sell me a small quantity. Hydro-Stacker containers are uniquely shaped and more suited for growing than the Verti-Gro containers, in my opinion. I contacted Hydro-Stacker and they did return my email but explained that they could not sell a smaller quantity either. They were not very helpful or congenial in their correspondence.
The price of both these units is around $10.00 each. I was able to locate both of them on Ebay and in the quantity I required. But, they both wanted what I considered to be outrageous shipping costs. 5 or 6 units would have cost close to $75.00. I believe the Verti-Gro were a bit less expensive but I'd already decided I didn't like the shape of these containers. I don't believe they are particularly efficient. They offer a relatively small growing area and are too deep and would require excessive planting medium.
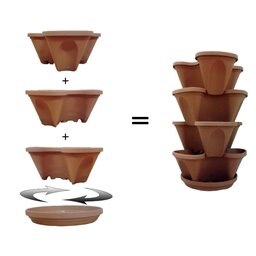
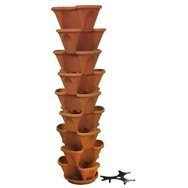
All that said, I did locate a container that is perfectly suited for my purposes. This is a plastic consumer product, available in small quantities and costing around $10.00 per container. And they are available from Amazon.com with free shipping. Win! I purchased 6 containers for around $60.00. I have received the containers and I believe they offer the perfect solution in several important areas. Although each container has only three growing areas they are larger than either of the Styrofoam units offer. So, I can get two plantings per growing area as opposed to one. So each container supports 6 plantings as opposed to 4. Another Win! These containers also provide a patented self-watering system. T shape, drainage system, and a small reservoir offer a very efficient system for drainage based watering and feeding. They are made to be stacked and lock together to form a very stable stacked planting container. They also provide a drip pan that the bottom container locks into. This all works together to create a perfect stacked growing tower. The maker of these containers is, don't laugh, Nancy Jane's Stacking Planters. They can be purchased in any quantity either online at Amazon or in stores that sell home and garden supplies. Who knew?
Section 2 : New Business - I have quite a bit to report here. Acquiring lots of pieces and parts and working out some mechanical and automation design issues.
I have acquired the following materials for the cultivation system:
- 6 stackable planting containers. Here's a small image gallery of the containers I'm using.
| {gallery} Nancy Jane Stacking Planters |
|---|
|
|
|
|

- 1 5-gallon plastic nutrient reservoir, a medium sized Tupperware storage tub. from a previous project.
- All materials required to construct the cultivator base. This is basically a couple of cinder block and some pieces of scrap lumber. This forms a very stable base that fits over the reservoir perfectly. I will provide images of the reservoir and base and when it's completed.
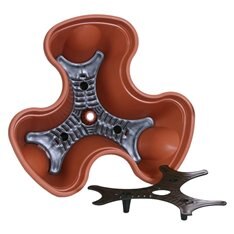
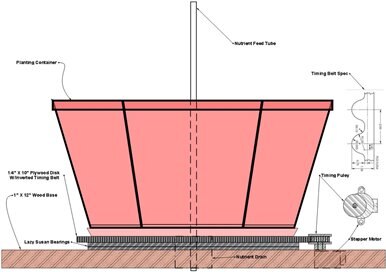
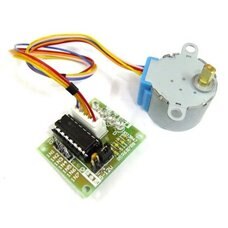
- A 9" diameter Lazy Susan style bearing, a 10" diameter Masonite disk, a 36 tooth GT2 2mm pitch timing pulley, a 45" length of GT2 2mm pitch timing belt and a stepper motor and control board. The Masonite disk and base will have a hole cut in them o allow nutrient drainage back into the reservoir. These parts will be assembled to form the cultivator rotator unit. See image below.
Here's a small image gallery of the parts I'll be using for this assembly.
| {gallery} Cultivator Rotator Parts |
|---|
|
|
|
|


I believe I have this system worked out quite well. It works as follows:
The timing motor, USPRO model 28byj-48-5V, I'm using is geared and requires 4096 pulses per revolution. The gearing provides greater control and assures that when power is removed the motor will remain stationary. The timing belt will be inverted and attached to the edge of the Masonite disk. This will form a turntable/timing gear assembly. The stepper motor will be mounted so as to place the timing pulley in direct contact with the timing gear. This forms a push drive for the turntable. I am looking at rotating the cultivator unit 4 complete revolutions per day, this might change. This requires aprox. 160,000 pulses per day or two pulses per second. I intend to operate the EZR32 MCU in low power mode most of the time. It will be programmed to wake up periodically, every 1 to several seconds. The MCU will perform any required control functions including pulsing the stepper motor, read all sensors and log this data back to the central control/monitoring system.
Also, I have attached a new version of the Detailed Design Document. it is incomplete, but I have begun working on the automation sections. I will provide a complete and correct version of the document when the challenge is completed. I hope that it will serve as a document that can be used to easily duplicate my design.
As everyone knows by now the Element 14 kits should be on the way this week. I know i can't wait to work with the Silicon Labs MCUs and Sensor-Puck. Thanks Dave!
All in all, I'm pleased with my progress so far.
Section 3 : The Stormy Mind
Certainly, one aspect of the stormy mind is the constant need to learn and create. So in this post I would like to point everyone to a FB page I created so that my friends can follow along with the project. I am also posting all the interesting vertical gardening and farming links I find on this page. I'm proud to say that The Association of Vertical Farming has liked the page and you will find some very interesting posts from their page also on mine. Thanks for the like AVF!
And a thought... Humans, the only creature that I know of on the planet who can know, beyond a shadow of a doubt, a given truth and yet still fully convince them self of the opposite of that truth. We are a strange and wondrous critter.
Section 4 : The New Farm Alamanc
OK, here's a few interesting, some a little whacky, new farm relevant links.
Here's a couple of links concerning NASA and the ISS' new on-board garden. This is too cool and very exciting for anyone who thinks about off-planet farming.
Video 1. - One small head of lettuce: NASA crew to eat space-grown veggies for the first time
One small head of lettuce: NASA crew to eat space-grown veggies for the first time | Ars Technica
Same video from NASA's site.
Video 2. - Meals Ready to Eat: Expedition 44 Crew Members Sample Leafy Greens Grown on Space Station
Crew Members Sample Leafy Greens Grown on Space Station | NASA
Here's a unique and clever take on vertical gardening and recycling.
Video 3. - The New Gardening Wall
And here's one just for fun!
Video 4. - Vertical Farming On The Move, Literally!
https://www.facebook.com/3dfirstaid/photos/pcb.1069171019760005/1069170823093358/?type=1&theater
Well, that's about all I have for this weeks post. Please take a minute to check out the attached detailrd design document. It's a little chaotic right now but it's a work in progress and will shape up over the course of the challenge.
Cheers, good luck on the challenge and happy farming!
Rick
Top Comments