element14 Community
element14 Community
    Register Log In
  • Site
  • Search
  • Log In Register
  • About Us
  • Community Hub
    Community Hub
    • What's New on element14
    • Feedback and Support
    • Benefits of Membership
    • Personal Blogs
    • Members Area
    • Achievement Levels
  • Learn
    Learn
    • Ask an Expert
    • eBooks
    • element14 presents
    • Learning Center
    • Tech Spotlight
    • STEM Academy
    • Webinars, Training and Events
    • Learning Groups
  • Technologies
    Technologies
    • 3D Printing
    • FPGA
    • Industrial Automation
    • Internet of Things
    • Power & Energy
    • Sensors
    • Technology Groups
  • Challenges & Projects
    Challenges & Projects
    • Design Challenges
    • element14 presents Projects
    • Project14
    • Arduino Projects
    • Raspberry Pi Projects
    • Project Groups
  • Products
    Products
    • Arduino
    • Avnet Boards Community
    • Dev Tools
    • Manufacturers
    • Multicomp Pro
    • Product Groups
    • Raspberry Pi
    • RoadTests & Reviews
  • Store
    Store
    • Visit Your Store
    • Choose another store...
      • Europe
      •  Austria (German)
      •  Belgium (Dutch, French)
      •  Bulgaria (Bulgarian)
      •  Czech Republic (Czech)
      •  Denmark (Danish)
      •  Estonia (Estonian)
      •  Finland (Finnish)
      •  France (French)
      •  Germany (German)
      •  Hungary (Hungarian)
      •  Ireland
      •  Israel
      •  Italy (Italian)
      •  Latvia (Latvian)
      •  
      •  Lithuania (Lithuanian)
      •  Netherlands (Dutch)
      •  Norway (Norwegian)
      •  Poland (Polish)
      •  Portugal (Portuguese)
      •  Romania (Romanian)
      •  Russia (Russian)
      •  Slovakia (Slovak)
      •  Slovenia (Slovenian)
      •  Spain (Spanish)
      •  Sweden (Swedish)
      •  Switzerland(German, French)
      •  Turkey (Turkish)
      •  United Kingdom
      • Asia Pacific
      •  Australia
      •  China
      •  Hong Kong
      •  India
      •  Korea (Korean)
      •  Malaysia
      •  New Zealand
      •  Philippines
      •  Singapore
      •  Taiwan
      •  Thailand (Thai)
      • Americas
      •  Brazil (Portuguese)
      •  Canada
      •  Mexico (Spanish)
      •  United States
      Can't find the country/region you're looking for? Visit our export site or find a local distributor.
  • Translate
  • Profile
  • Settings
Imagine a World Without Cords
  • Challenges & Projects
  • Design Challenges
  • Imagine a World Without Cords
  • More
  • Cancel
Imagine a World Without Cords
Blog Qi in toys: the results!
  • Blog
  • Forum
  • Documents
  • Files
  • Mentions
  • Sub-Groups
  • Tags
  • More
  • Cancel
  • New
  • Share
  • More
  • Cancel
Group Actions
  • Group RSS
  • More
  • Cancel
Engagement
  • Author Author: vsluiter
  • Date Created: 1 Dec 2012 6:31 PM Date Created
  • Views 1667 views
  • Likes 2 likes
  • Comments 6 comments
  • charging
  • wireless_power
  • wireless_power_home
  • wireless_power_charging
  • qi_standard
  • powermat
  • qi
  • wireless
  • wp_challenge_one
  • wireless_power_consortium
Related
Recommended

Qi in toys: the results!

vsluiter
vsluiter
1 Dec 2012

Hello all,


I've got very good news, all the toys I built the Qi into work! These are the results so far, some mor info will follow:


Qi LEGO Power Functions Battery Brick

I'm very proud of this one; the Qi technology is completely embedded in the original LEGO power functions battery brick, from the exterior you can't see the difference. I had to sacrifice AA batteries to AAA batteries to make some room, but It's worth it, the solution is very elegant. The receiving coil is placed on one side of the brick, glued in the lid. The other side houses the electronics. All wiring is internal to the battery pack, I had to take it apart to get to the battery contacts without impairing the original circuitry. My greatest pleasure of this design is that the battery pack is COMPLETELY THE SAME from the outside!

Now I can drain the batteries, and just lay the brick on the charger to get a new charge instead of taking all the batteries out....


Fullscreen 1050.contentimage_52214.html Download
<html><head><title>Jive SBS</title></head>
<body><font face="arial,helvetica,sans-serif">
<b>Error</b><br><font size="-1">
An general error occurred while processing your request.
</font></font></body></html>

Disassembled pack

Fullscreen 8816.contentimage_52215.html Download
<html><head><title>Jive SBS</title></head>
<body><font face="arial,helvetica,sans-serif">
<b>Error</b><br><font size="-1">
An general error occurred while processing your request.
</font></font></body></html>

First test of wiring; wiring is too thick.

Fullscreen 6763.contentimage_52216.html Download
<html><head><title>Jive SBS</title></head>
<body><font face="arial,helvetica,sans-serif">
<b>Error</b><br><font size="-1">
An general error occurred while processing your request.
</font></font></body></html>

Wiring between battery terminals and charger board

Fullscreen 3618.contentimage_52217.html Download
<html><head><title>Jive SBS</title></head>
<body><font face="arial,helvetica,sans-serif">
<b>Error</b><br><font size="-1">
An general error occurred while processing your request.
</font></font></body></html>

Assembled! still need to solder Qi coil terminals

Qi Commander

The fun part of this design is that it charges 4 AA batteries! My design was meant to be charging 6 AA's, but by changing one resistor (voltage divider to bq2002) I was able to charge 4 AA's. So now my son's power hungry robot is Qi compliant! The battery compartment's lid had to be changed a little (2 small ribs removed), but then the complete design fit into it.

One thing I found out is that I get a higher charging current with this setup. I've looked into that fenomenon, and found an unexpected feature in my circuit. I guess I'll write a small article on that somewhere next week. For now: enjoy the pictures:

image

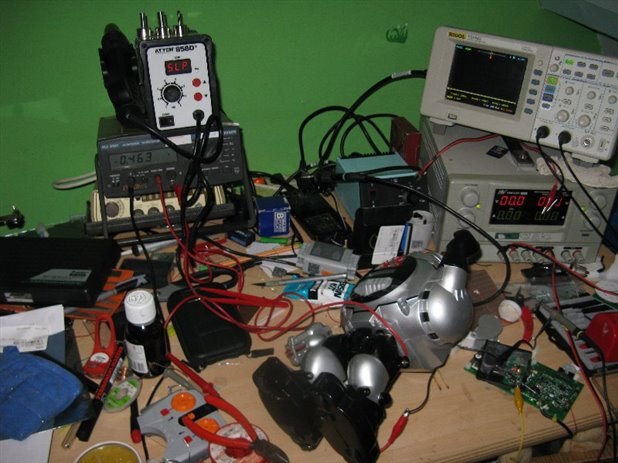
First charging test: 463mA.

image

Mounting of charging circuit in robot


The disadvantage of the current battery hatch is that it has all kinds of bulging structures (pretending to be sci-fi / high tech things as air ducts or control panels) that make it harder to get it to work on the charging pad. However, in DOES work, and WHEN the connection is made, it charges reliably.


Qi LEGO Train

Now this is the part of the project that I was hoping to be able to finish when I started: making a Qi-charging LEGO train!

My purpose was to make a train that was able to charge itself when its batteries run low. When I was sure my LEGO charging circuit was working, I started combining it with my OpenPowerFunctions infrared receiver.

On this receiver I already had a microcontroller and motor control. In its original functionality, this infrared receiver just responds to commands sent by LEGO remotes, and then controls the appropriate motor driver channels to go forward or backward in the desired speed. I now added a resistor divider to the receiver to read out the voltage of the battery pack, and when that voltage is too low, the receiver ignores all incoming remote control commands, and starts driving to seek the charger coil.

Now how does it know when the charging coil is right under the receiver coil? This appeared to be a very difficult question to answer. The train runs quite slow when trying to discover the coil, but even then only a fraction of a second delay means the train passes by its target. The Qi receiver IC itself only enables its outputs after about a second of Qi connection, so that is too slow. I then thought of using the magnet in the charging coil in combination with a Hall sensor to signal to the microcontroller that a magnet had been detected. I soldered the Hall sensor, but even now the detection was not in time. The magnet was detected, but the inertia of a 3-wagon train was too large to stop in time. In the end I used tape and a spare magnet I had lying  around at Tkkrlab to give the receiver an earlier warning. This worked quite reliably. I could suggest two major improvements to the current setup:

  1. Use TI's multi-coil transmitter (bq500410a) to get a larger surface where the train can be charged. The positioning is now more sensitive than wished for.
  2. The 'low battery detection' is now based on battery voltage, whereas it should be on the availability of energy; when you start pulling a lot of current (stalling the train motor, or issuing a 'full on' command while the train is standing still) the voltage drops, and this is seen as 'battery empty'. When you leave the train on the rails, but do not ride the voltage will remain quite high for a long time. When the voltage drops below the treshold, the available charge is nihil. A fuel guage like BQ2060ABQ2060A will yield more reliable results in telling what the available State of Charge is.

Nevertheless: Great fun in building this system! Videos will follow....


image

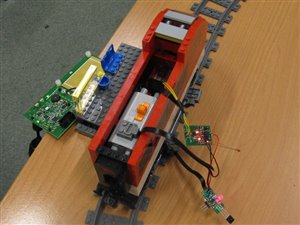
Transmitter, battery pack, Qi charger, IR receiver

image

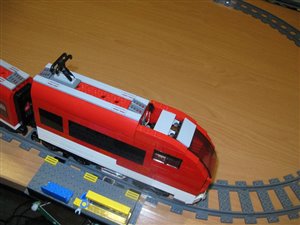
Train built together; IR receiver visible

image

Illustration of setup in action

image

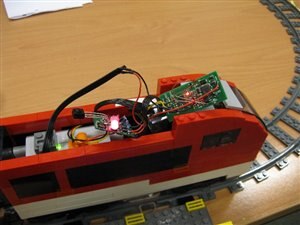
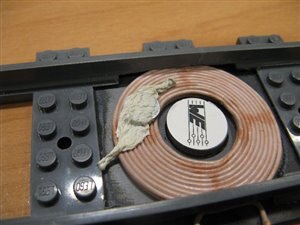
Receiver coil, Hall sensor (with a lot of tape)

image

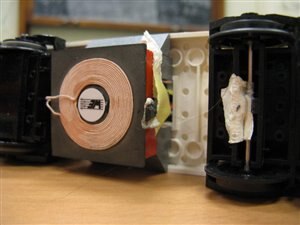
Transmitter coil in rails, with extra magnet for positioning

  • Sign in to reply
  • vsluiter
    vsluiter over 12 years ago in reply to lfa555

    See my new post for videos!

    • Cancel
    • Vote Up 0 Vote Down
    • Sign in to reply
    • More
    • Cancel
  • lfa555
    lfa555 over 12 years ago

    nice! looking forward to it!

    • Cancel
    • Vote Up 0 Vote Down
    • Sign in to reply
    • More
    • Cancel
  • vsluiter
    vsluiter over 12 years ago in reply to lfa555

    Hi Lars,


    Thanks for your comment! The videos will be posted today or tomorrow. Just have to do a bit of video editing to make it a consistent story.

    • Cancel
    • Vote Up 0 Vote Down
    • Sign in to reply
    • More
    • Cancel
  • lfa555
    lfa555 over 12 years ago

    Hi Victor,


    i join in 100% with DAB's comments. Excellent approach and great ideas. Just out of curiousity...would you be able to show us a bittle video with the QI train driving into the charging station? :-)


    Lars

    • Cancel
    • Vote Up 0 Vote Down
    • Sign in to reply
    • More
    • Cancel
  • vsluiter
    vsluiter over 12 years ago in reply to DAB

    Hello DAB,

    Thanks for  your kind words! The challenge is not over yet, who knows what Chad or Monteo come up with! And I myself am not done yet; I will post two videos in the coming days, one about the technical implementation, and one - as you were very keen in noticing - to show the fun of the project!

    • Cancel
    • Vote Up 0 Vote Down
    • Sign in to reply
    • More
    • Cancel
>
element14 Community

element14 is the first online community specifically for engineers. Connect with your peers and get expert answers to your questions.

  • Members
  • Learn
  • Technologies
  • Challenges & Projects
  • Products
  • Store
  • About Us
  • Feedback & Support
  • FAQs
  • Terms of Use
  • Privacy Policy
  • Legal and Copyright Notices
  • Sitemap
  • Cookies

An Avnet Company © 2025 Premier Farnell Limited. All Rights Reserved.

Premier Farnell Ltd, registered in England and Wales (no 00876412), registered office: Farnell House, Forge Lane, Leeds LS12 2NE.

ICP 备案号 10220084.

Follow element14

  • X
  • Facebook
  • linkedin
  • YouTube