element14 Community
element14 Community
    Register Log In
  • Site
  • Search
  • Log In Register
  • About Us
  • Community Hub
    Community Hub
    • What's New on element14
    • Feedback and Support
    • Benefits of Membership
    • Personal Blogs
    • Members Area
    • Achievement Levels
  • Learn
    Learn
    • Ask an Expert
    • eBooks
    • element14 presents
    • Learning Center
    • Tech Spotlight
    • STEM Academy
    • Webinars, Training and Events
    • Learning Groups
  • Technologies
    Technologies
    • 3D Printing
    • FPGA
    • Industrial Automation
    • Internet of Things
    • Power & Energy
    • Sensors
    • Technology Groups
  • Challenges & Projects
    Challenges & Projects
    • Design Challenges
    • element14 presents Projects
    • Project14
    • Arduino Projects
    • Raspberry Pi Projects
    • Project Groups
  • Products
    Products
    • Arduino
    • Avnet Boards Community
    • Dev Tools
    • Manufacturers
    • Multicomp Pro
    • Product Groups
    • Raspberry Pi
    • RoadTests & Reviews
  • Store
    Store
    • Visit Your Store
    • Choose another store...
      • Europe
      •  Austria (German)
      •  Belgium (Dutch, French)
      •  Bulgaria (Bulgarian)
      •  Czech Republic (Czech)
      •  Denmark (Danish)
      •  Estonia (Estonian)
      •  Finland (Finnish)
      •  France (French)
      •  Germany (German)
      •  Hungary (Hungarian)
      •  Ireland
      •  Israel
      •  Italy (Italian)
      •  Latvia (Latvian)
      •  
      •  Lithuania (Lithuanian)
      •  Netherlands (Dutch)
      •  Norway (Norwegian)
      •  Poland (Polish)
      •  Portugal (Portuguese)
      •  Romania (Romanian)
      •  Russia (Russian)
      •  Slovakia (Slovak)
      •  Slovenia (Slovenian)
      •  Spain (Spanish)
      •  Sweden (Swedish)
      •  Switzerland(German, French)
      •  Turkey (Turkish)
      •  United Kingdom
      • Asia Pacific
      •  Australia
      •  China
      •  Hong Kong
      •  India
      •  Korea (Korean)
      •  Malaysia
      •  New Zealand
      •  Philippines
      •  Singapore
      •  Taiwan
      •  Thailand (Thai)
      • Americas
      •  Brazil (Portuguese)
      •  Canada
      •  Mexico (Spanish)
      •  United States
      Can't find the country/region you're looking for? Visit our export site or find a local distributor.
  • Translate
  • Profile
  • Settings
Project Videos
  • Challenges & Projects
  • element14 presents
  • Project Videos
  • More
  • Cancel
Project Videos
Documents Affordable DIY Robot Arm: A Deep Dive into 3D Printing and Servo Motors -- Episode-628
  • Documents
  • Members
  • Mentions
  • Sub-Groups
  • Tags
  • More
  • Cancel
  • New
Join Project Videos to participate - click to join for free!
Related
Recommended
Engagement
  • Author Author: tariq.ahmad
  • Date Created: 8 Nov 2023 7:14 PM Date Created
  • Last Updated Last Updated: 10 Nov 2023 11:42 PM
  • Views 11059 views
  • Likes 13 likes
  • Comments 9 comments

Affordable DIY Robot Arm: A Deep Dive into 3D Printing and Servo Motors -- Episode-628

To learn about robotics, Milos was looking for an affordable 5 Degrees Of Freedom (5DOF) robotic arm. Although affordable arms do exist, they are usually too small and only offer a few degrees of freedom. Robotic arms that satisfy all requirements, including build quality and range of motion, usually cost in the range of a few hundred dollars.  

In this video, Milos sets out to create a high-quality 5DOF robotic arm that everyone can afford. 

Jump to Downloads & Bonus Content | Jump to Discussions

Watch the Video:

You don't have permission to edit metadata of this video.
Edit media
x
image
Upload Preview
image

image

Design & Assembly

Milos decided to 3D print the necessary parts. 3D printers are widely available now, and 3D printing parts, such as a large bearing, can be more cost-effective than finding one from a retailer. Large bearings can get expensive fast, especially if you’re looking for an unusual size. For the ball bearings, the idea was to use 3D printing for the inner and outer rings, and use common glass marbles for the balls. 

image

For powering the robot’s joints, Milos decided to use small servo motors. They are easy to find and easy to control using any microcontroller because all they require is a PWM signal. Milos chose small DFRobot servo motors because they are designed to protect the motor if the current draw is too high for too long.  The motor also has a clutch that allows it to start skipping if the load is too great, protecting the inner components. Simple rotary potentiometers were used for position feedback. Potentiometers work well with a microcontroller and offer the additional benefit of taking a bit of strain off of the servo motor shaft if they are paired for each of the modules (illustrated in the following diagram). 

image

All of the robot arm's parts were 3D printed (all of the files are available free to download). 

Electronics

Electronics for this initial build ended up being rather simple. Milos chose a Raspberry Pico W for this build, because they are popular, inexpensive, and their small size leaves room for components, such as a wireless control, to be added in the future.  

Faulty Circuit 

The Pico was required to provide six PWM outputs for each of the six possible servos (the sixth servo would be the gripper servo), as well as six input channels for the six potentiometers. The Pico only has three ADC pins, however, so Milos added a CD4053BE multiplexer to accommodate more I/O. 

image

The circuit is pretty simple, however, it didn’t work. Milos returned to the datasheets and found that the microcontroller was running off of less voltage (3.3V) than the minimum voltage that the multiplexer required (3.5V). To fix this, he added a shifter circuit using an optocoupler (4N27), as illustrated in the following diagram. 

Corrected Circuit

image

Final Schematic 

Here is the final schematic: 

image

The pinout for the Pico is as follows: 

image

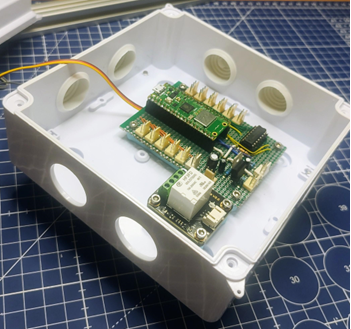
The final step was to solder everything to a piece of perf board and put it into a box. 

image

image

Software

Software is still a work in progress and will take more time, but for now, some simple commands have been implemented: 

  • Disabling all motors by taking the PWM to 0% duty cycle and switching the relay OFF 
  • Turning ON the relay 
  • Setting an angle on a single joint 
  • Setting an angle on all joints at once 
  • Calibrating the potentiometer readings on the min/max range of the servo motors 

The most important functions left to be implemented are position record and playback, which record the ADC values for all potentiometers, store them, convert the values to angles based on the parameters from the calibration procedure, and then playback those angles at a given speed. 

Links and Downloads

  • Github:  https://github.com/MilosRasic98/CheapRobotArm 
  • Download: CAD Files and Code
  •  DiPinto Da BRACCIO - Idea & Plan - Blog 1  by milosrasic98 
  •  DiPinto Da BRACCIO - Meet the Stars - Part 1 - Blog 2  by milosrasic98 
  •  Sensor Kit For BRACCIO  by milosrasic98 
  •  Tinkerkit Braccio Robot Arm by  ntewinkel 
  •  Rube Goldberg Machine to Turn On a Light by ntewinkel    

Bill of Material:

Product Name Quantity Buy Kit
RASPBERRY-PI Raspberry Pi Pico W Board, RP2040, 32 bit, ARM Cortex-M0+ 1 Buy Now
DFROBOT DFR0473 Relay Module 1 Buy Now
TT ELECTRONICS / BI TECHNOLOGIES P160KNP-0EC15B25K - Potentiometer 5 Buy Now
DFROBOT SER0050 - Small Servo Motor 5 Buy Now
PRO SIGNAL PSG08611 1 Buy Now
PRO SIGNAL PSG01595 1 Buy Now
MULTICOMP PRO MP008930 - PLA filament 1 Buy Now
CD4053BE - Texas Instruments Analog Multiplexer 1 Buy Now
DFROBOT SER0044 - Servo with analog feedback 1 Buy Now
 

 Additional Parts:

M3 screws and nuts
Perfboard
Passive components like resistors, capacitors, wires
150mm Junction Box
element14 presents

element14 presents  |  About Milos Rasic |  Project Videos

  • servo motor
  • potentiometer
  • dfrobot
  • multiplexing
  • multiplexer
  • Affordable Robot Arm
  • e14p_Milos
  • robotics
  • raspberry pi pico
  • 3D Printing
  • Pulse Width Modulation (PWM)
  • Robotics Enthusiast
  • Robot Arm Assembly
  • raspberry pi
  • 3D Printing in Robotics
  • DIY Robotics Videos
  • Potentiometer Feedback
  • Custom Bearings in Robotics
  • Position Feedback Robot Arm
  • robot arm
  • servo motors
  • robotics project
  • DIY Robot Arm
  • diy electronics
  • Cheap Robot Arm
  • Robotics Enthusiast Community
  • friday_release
  • Multiplexers for Analog Inputs
  • Share
  • History
  • More
  • Cancel
Actions
  • Share
  • More
  • Cancel
  • Sign in to reply
  • ollewacj
    ollewacj over 1 year ago

    Hi have you modified the other joints already to bigger motors as the drawings is not updated. Then did you add the Sharpie Mount as the drawing is not including it, Please share that as well as the Gripper that you plan. I see that on the 4 x 4 you also have done some 3D printers for the connectors.

    I do like the Arm that you have build. Busy to try and replicate it but might need to do modifications due to the different Servo Motors available

    • Cancel
    • Vote Up 0 Vote Down
    • Sign in to reply
    • More
    • Cancel
  • milosrasic98
    milosrasic98 over 1 year ago in reply to DAB

    Thanks, glad you like it!

    That sounds really cool and like the jitter really wouldn't help hahaha!

    That's what I've implemented in the video that can be seen in the testing part, I just called it ramp mode, and went with one degree increments but played around with the frequency of the timer for that function. I did some testing without that, by just sending directly the reference and it was extremely jittery as you pointed out, and because the servos aren't the strongest some movements wouldn't work as it would get up to speed but didn't have enough strength to slow down so the clutch would kick in the motors hahahaha.

    My plan is to later on add a feature where a "speed" could be set by either adjusting the size on the increments or the frequency of that timer.

    • Cancel
    • Vote Up 0 Vote Down
    • Sign in to reply
    • More
    • Cancel
  • DAB
    DAB over 1 year ago

    Nice build.

    When I was programming industrial servos, I made a routine to break the movement down into 5 degree increments.

    This allowed the servos to move in smaller bursts of movement, which created a smoother transition between positions.

    Since I was controlling a FLIR aboard a helicopter, it was very important not to add any jitter to the image from the position movements.

    • Cancel
    • Vote Up 0 Vote Down
    • Sign in to reply
    • More
    • Cancel
  • milosrasic98
    milosrasic98 over 1 year ago in reply to sunnyiut

    Thanks, glad you enjoyed it!

    • Cancel
    • Vote Up 0 Vote Down
    • Sign in to reply
    • More
    • Cancel
  • sunnyiut
    sunnyiut over 1 year ago

    WOW!! loved it. Nicely explained the details...

    • Cancel
    • Vote Up 0 Vote Down
    • Sign in to reply
    • More
    • Cancel
  • milosrasic98
    milosrasic98 over 1 year ago in reply to fmilburn

    Thanks, glad you liked it!

    • Cancel
    • Vote Up 0 Vote Down
    • Sign in to reply
    • More
    • Cancel
  • milosrasic98
    milosrasic98 over 1 year ago in reply to dougw

    Thanks!

    • Cancel
    • Vote Up 0 Vote Down
    • Sign in to reply
    • More
    • Cancel
  • fmilburn
    fmilburn over 1 year ago

    Very nice project with lots of interesting design elements.  I like your presentation style and method of illustration. 

    • Cancel
    • Vote Up 0 Vote Down
    • Sign in to reply
    • More
    • Cancel
  • dougw
    dougw over 1 year ago

    Nice custom bearings...Thumbsup

    • Cancel
    • Vote Up 0 Vote Down
    • Sign in to reply
    • More
    • Cancel
element14 Community

element14 is the first online community specifically for engineers. Connect with your peers and get expert answers to your questions.

  • Members
  • Learn
  • Technologies
  • Challenges & Projects
  • Products
  • Store
  • About Us
  • Feedback & Support
  • FAQs
  • Terms of Use
  • Privacy Policy
  • Legal and Copyright Notices
  • Sitemap
  • Cookies

An Avnet Company © 2025 Premier Farnell Limited. All Rights Reserved.

Premier Farnell Ltd, registered in England and Wales (no 00876412), registered office: Farnell House, Forge Lane, Leeds LS12 2NE.

ICP 备案号 10220084.

Follow element14

  • X
  • Facebook
  • linkedin
  • YouTube