element14 Community
element14 Community
    Register Log In
  • Site
  • Search
  • Log In Register
  • About Us
  • Community Hub
    Community Hub
    • What's New on element14
    • Feedback and Support
    • Benefits of Membership
    • Personal Blogs
    • Members Area
    • Achievement Levels
  • Learn
    Learn
    • Ask an Expert
    • eBooks
    • element14 presents
    • Learning Center
    • Tech Spotlight
    • STEM Academy
    • Webinars, Training and Events
    • Learning Groups
  • Technologies
    Technologies
    • 3D Printing
    • FPGA
    • Industrial Automation
    • Internet of Things
    • Power & Energy
    • Sensors
    • Technology Groups
  • Challenges & Projects
    Challenges & Projects
    • Design Challenges
    • element14 presents Projects
    • Project14
    • Arduino Projects
    • Raspberry Pi Projects
    • Project Groups
  • Products
    Products
    • Arduino
    • Avnet Boards Community
    • Dev Tools
    • Manufacturers
    • Multicomp Pro
    • Product Groups
    • Raspberry Pi
    • RoadTests & Reviews
  • Store
    Store
    • Visit Your Store
    • Choose another store...
      • Europe
      •  Austria (German)
      •  Belgium (Dutch, French)
      •  Bulgaria (Bulgarian)
      •  Czech Republic (Czech)
      •  Denmark (Danish)
      •  Estonia (Estonian)
      •  Finland (Finnish)
      •  France (French)
      •  Germany (German)
      •  Hungary (Hungarian)
      •  Ireland
      •  Israel
      •  Italy (Italian)
      •  Latvia (Latvian)
      •  
      •  Lithuania (Lithuanian)
      •  Netherlands (Dutch)
      •  Norway (Norwegian)
      •  Poland (Polish)
      •  Portugal (Portuguese)
      •  Romania (Romanian)
      •  Russia (Russian)
      •  Slovakia (Slovak)
      •  Slovenia (Slovenian)
      •  Spain (Spanish)
      •  Sweden (Swedish)
      •  Switzerland(German, French)
      •  Turkey (Turkish)
      •  United Kingdom
      • Asia Pacific
      •  Australia
      •  China
      •  Hong Kong
      •  India
      •  Korea (Korean)
      •  Malaysia
      •  New Zealand
      •  Philippines
      •  Singapore
      •  Taiwan
      •  Thailand (Thai)
      • Americas
      •  Brazil (Portuguese)
      •  Canada
      •  Mexico (Spanish)
      •  United States
      Can't find the country/region you're looking for? Visit our export site or find a local distributor.
  • Translate
  • Profile
  • Settings
Project Videos
  • Challenges & Projects
  • element14 presents
  • Project Videos
  • More
  • Cancel
Project Videos
Documents Building an Open Source Blood Pressure & Heart Signal Monitor -- Episode 674
  • Documents
  • Members
  • Mentions
  • Sub-Groups
  • Tags
  • More
  • Cancel
  • New
Join Project Videos to participate - click to join for free!
Related
Recommended
Engagement
  • Author Author: cstanton
  • Date Created: 17 Jul 2025 10:53 AM Date Created
  • Last Updated Last Updated: 17 Jul 2025 3:01 PM
  • Views 24949 views
  • Likes 6 likes
  • Comments 12 comments

Building an Open Source Blood Pressure & Heart Signal Monitor -- Episode 674

Milos builds an open-source cardiograph signal measuring device using a Raspberry Pi Pico W. The project explores how blood pressure monitors work—both manual and automatic—while integrating ECG, PPG, and a DIY electronic stethoscope. From hardware design and PCB layout to firmware development and Python-based data analysis, the video covers the full process. All code, schematics, and data are available via the below for educational, non-medical use.

Watch the Project Video

You don't have permission to edit metadata of this video.
Edit media
x
image
Upload Preview
image

Milos’s grandma, like most people her age, has problems with elevated high blood pressure (hypertension). A daily routine for people like her is using an automatic blood pressure monitor to make sure that the medication keeps it at a normal level. But this is where Milos got curious to explore further, since he saw how the performance of the device degraded from the batteries running low. To demystify this area, he made the blood pressure monitor the main theme of his Master thesis and designed a device for experimenting with different blood pressure measurement algorithms. The device is completely open source, so you can build it as well, or if you just want to play around and analyze data, Milos has provided that as well!

How do Blood Pressure Monitors Work?

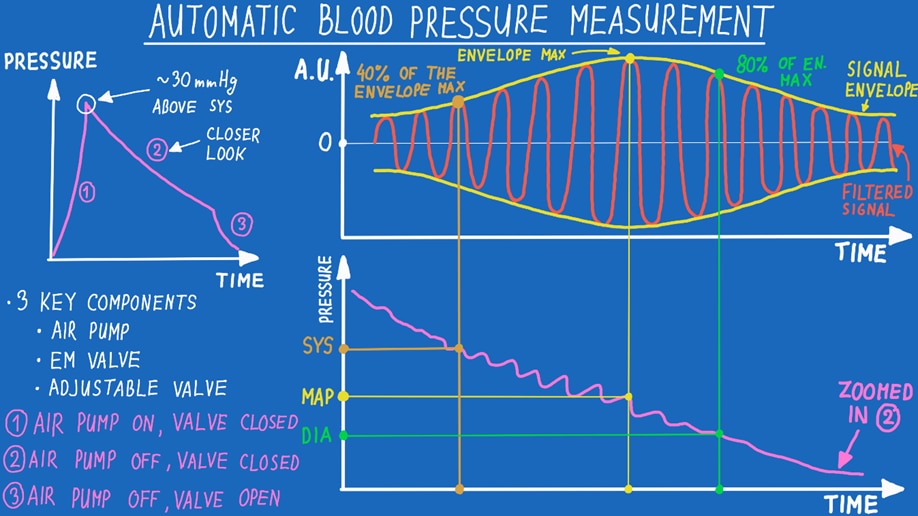
Milos begins the video by describing the differences between the manual and the automatic blood pressure method. Even in 2024 the manual method, where a doctor uses a stethoscope, is still considered the gold standard for non-invasive blood pressure measurements! The manual method works by listening to Korotkoff sounds which appear on the stethoscope once the pressure inside the cuff drops below the systolic pressure, and then they disappear once the pressure drops below the diastolic pressure.

image

Companies keep it a secret for what algorithms they use in the automatic blood pressure monitors, but some of the most famous ones from the literature are the Sapinsky and Geddes methods. These are methods that require only the signal from the pressure sensor, and they work by looking at the envelope of the filtered signal. If any of this sounds interesting, make sure to check out the video, because Milos first describes it in a drawing and shows how the analysis is done on the data recorded by the device!

image

The Electronics Inside

Before getting into the electronics, Milos began by listing the main system requirements that the system had to fulfill.

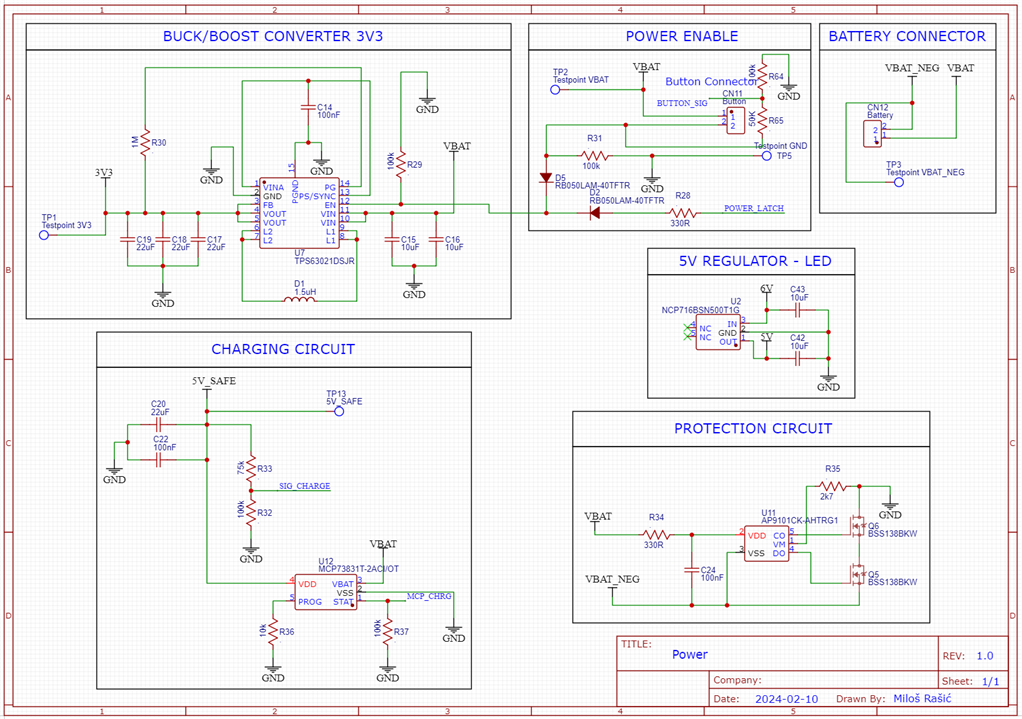
  • Safety – the first item is safety, when a person is in contact with the device, nothing should be connected directly to the wall, including the PC that is connected to the device. To fulfill that standard, Milos used a specialized USB isolator IC, and an isolated power supply for charging the battery.
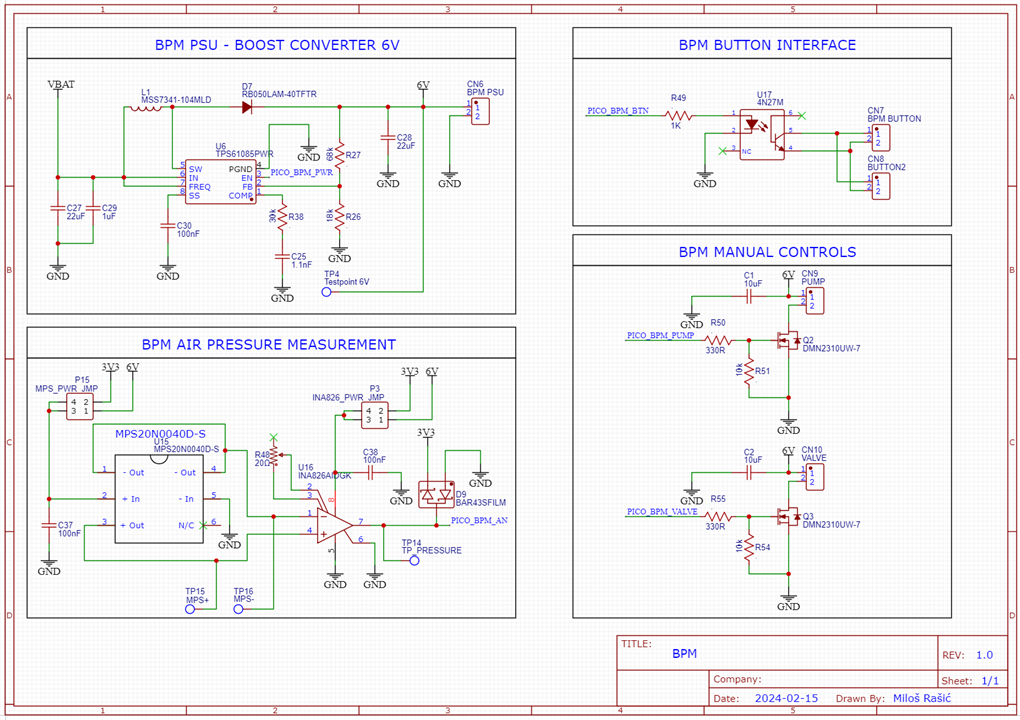
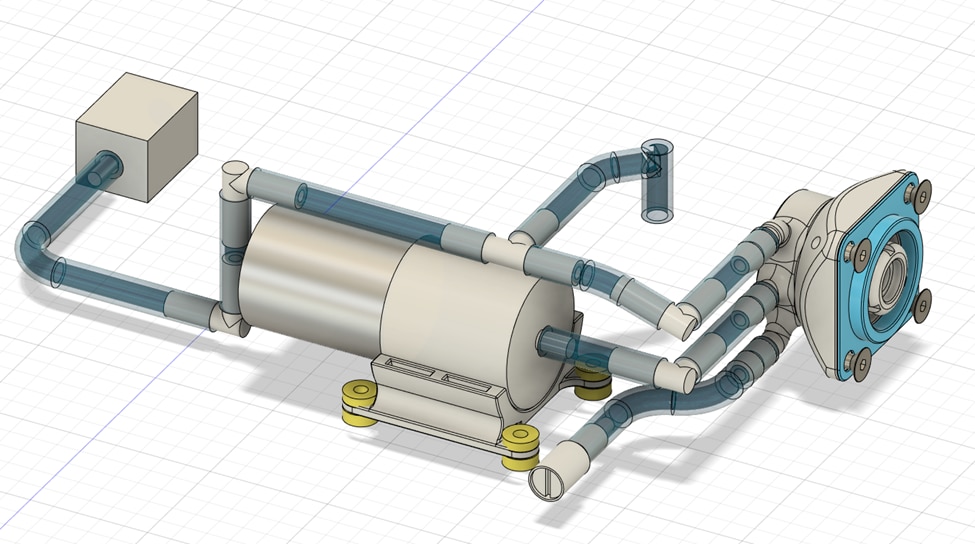
  • Blood Pressure Measurement – This is of course the focus of the video, these are the critical components for this part of the system:
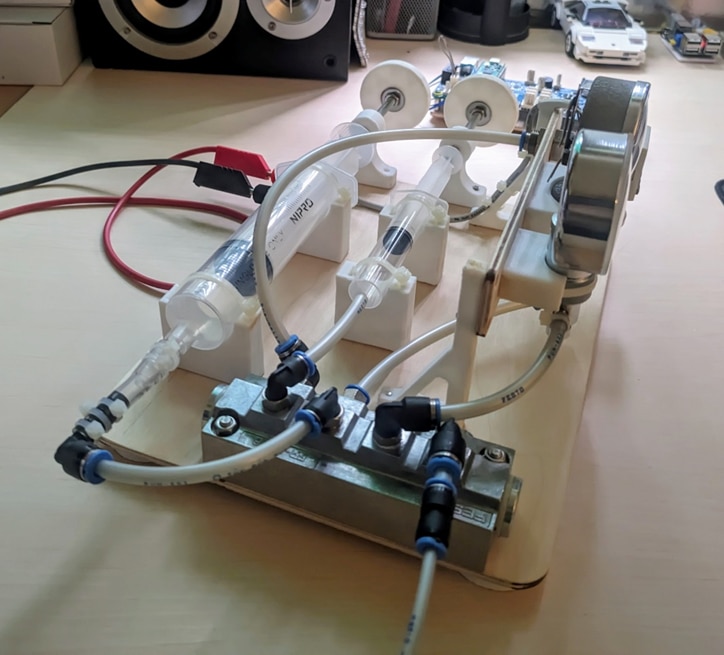
    1. Air pump
    2. EM valve
    3. Adjustable valve
    4. Pressure sensor
    5. Amplifier or 24bit ADC for the pressure sensor
  • PPG – PPG Clamps are used often for measuring oxygen saturation in the blood, but they can also be used in blood pressure measurements, since their readings are affected by blood flow in the arm.
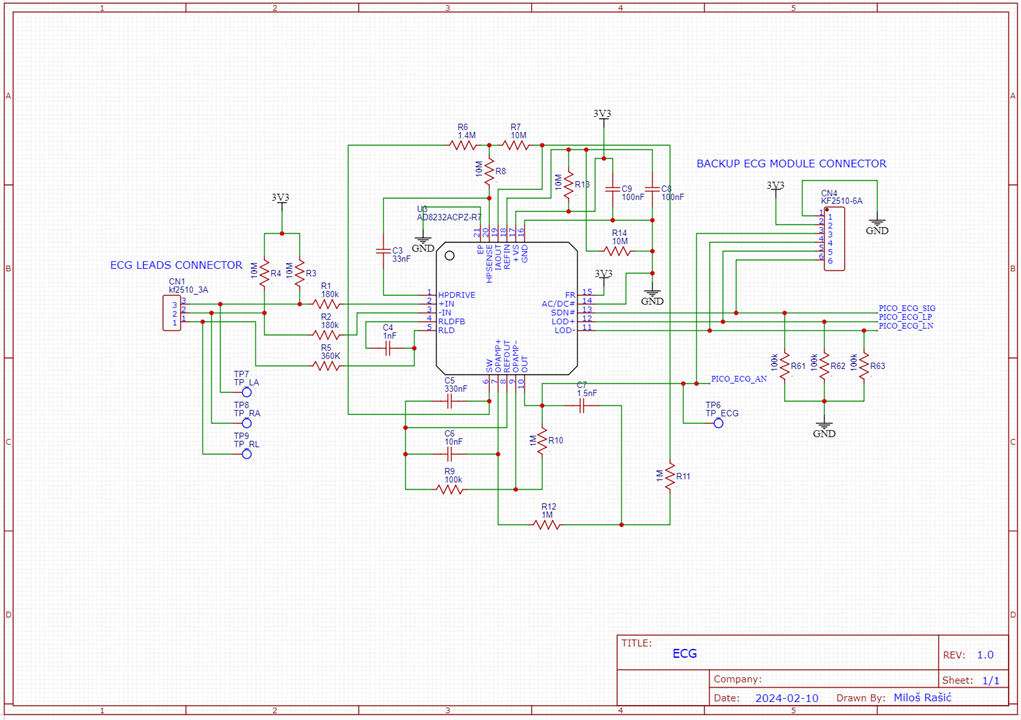
  • ECG – To ensure the validity of other results (like calculating the heart rate), Milos added the AD8232 IC to the PCB for measuring ECG signals
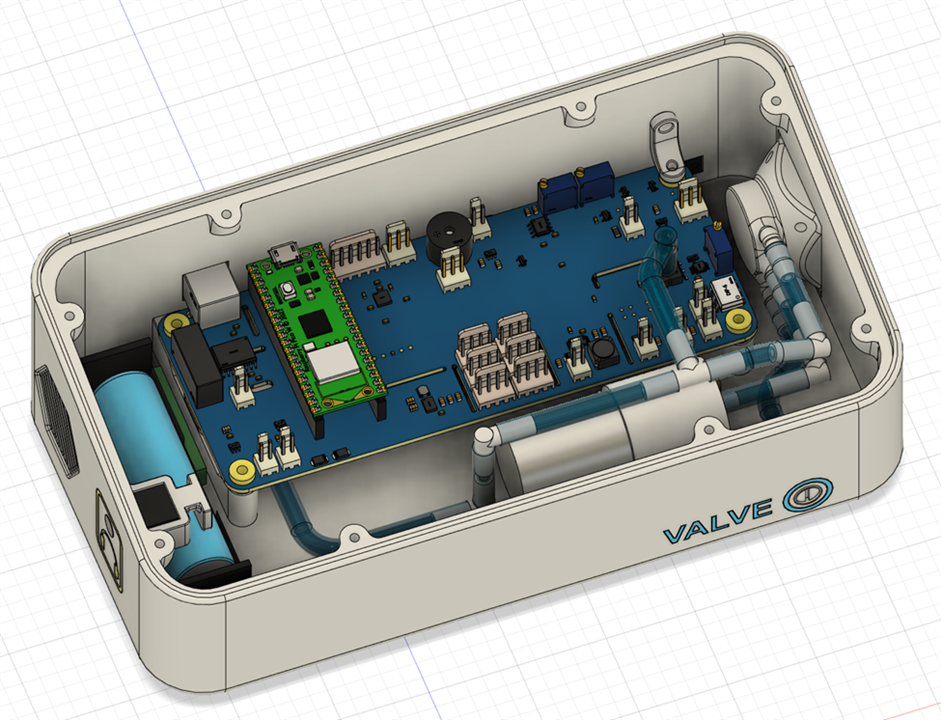
  • Wireless connectivity – To enable the possibility of wirelessly connecting to the device, either using a phone or a PC, Milos decided to go with the Raspberry Pi Pico W as the MCU. 

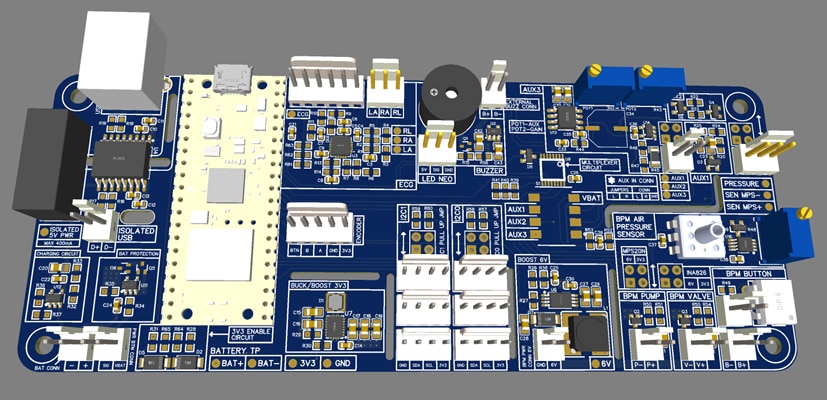
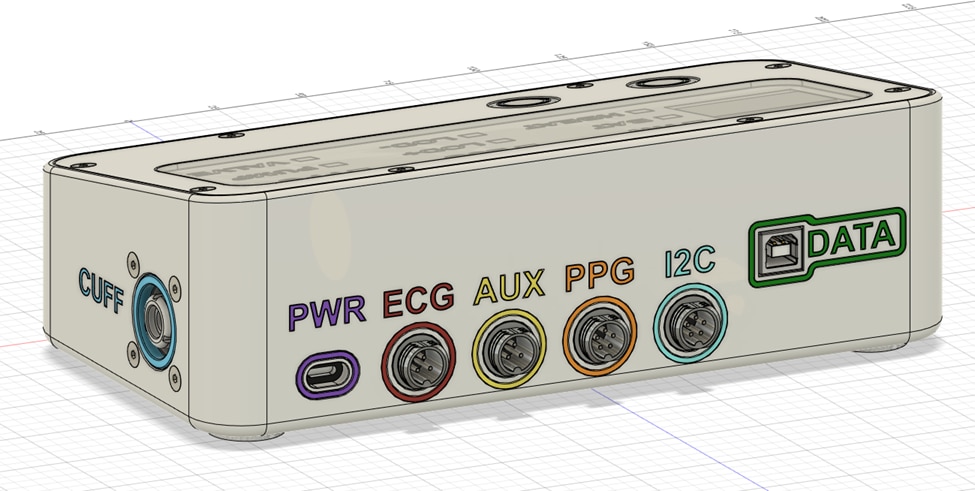
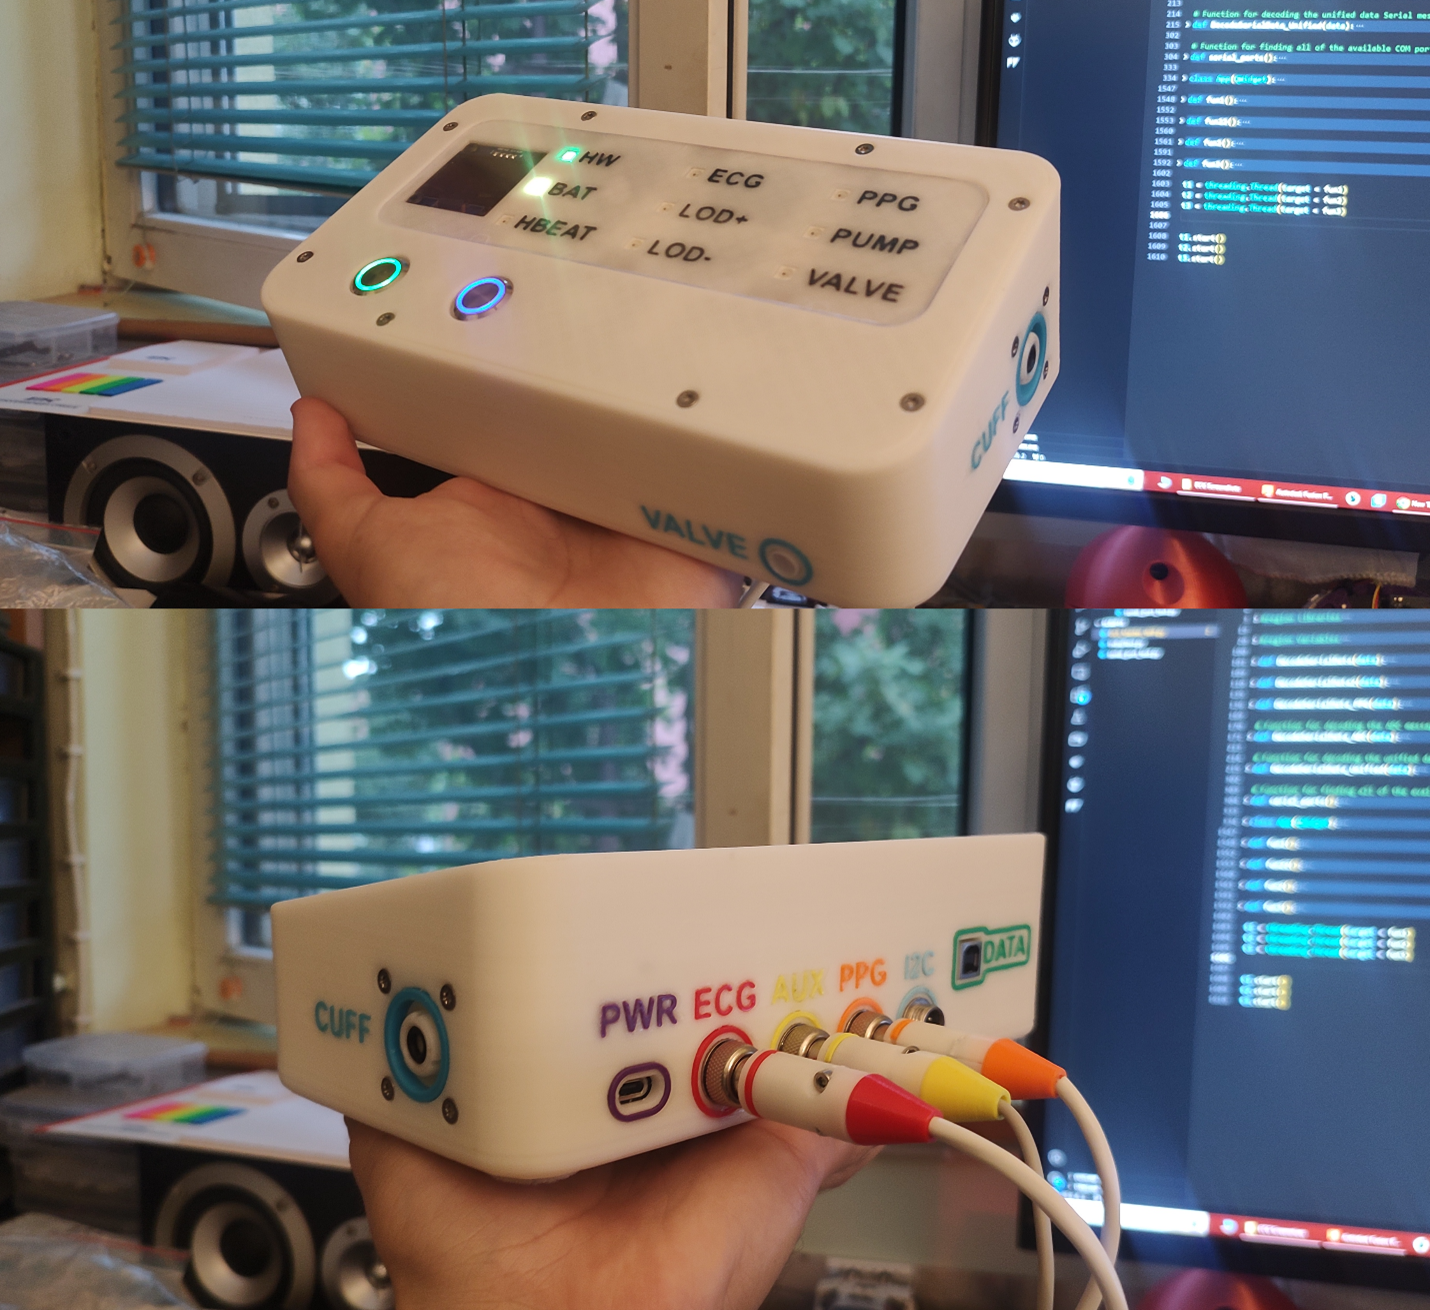
To keep the device compact, all the necessary electronics were placed on a single 4-layer PCB, with many additional I2C connectors to enable future expansions with new sensors.

image

image

image

image

image

image

image

image

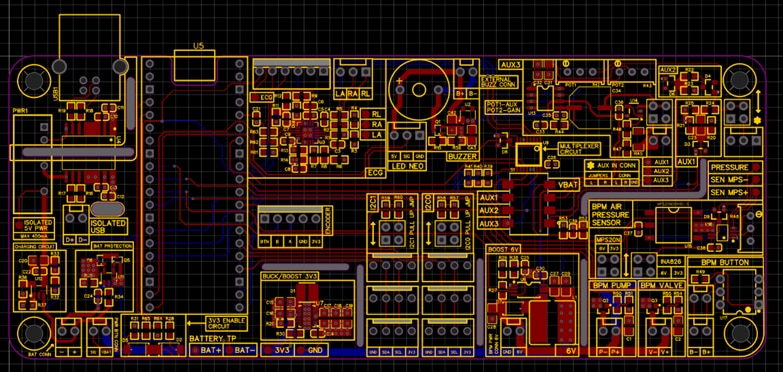
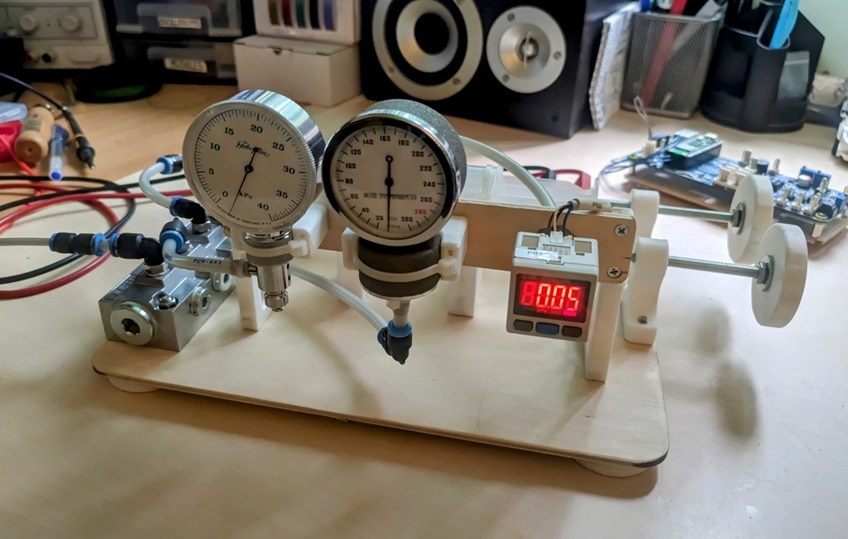
Since the pressure sensor was connected to the Raspberry Pi Pico W using an instrumentation amplifier with adjustable gain, a calibration procedure was needed to ensure that the system is providing accurate pressure readings. To accomplish this, Milos designed a calibration rig consisting of manometers and syringes which are connected to the pressure sensor. This rig can keep a constant pressure in the system, so that raw ADC readings can be written down at multiple pressures across the desired range, from which the parameters can be calculated for converting the raw ADC measurements into kPa or mmHg.

image

image

The Mechanical Design

To keep everything together and to decrease the possibility of touching anything on the PCB, Milos designed, and 3D printed an enclosure out of PLA with all the necessary connectors. Milos went a step further and colour coded everything to ensure a sleek look. While this would have been easy to do with a multi colour printer, this process was a bit tedious, since Milos had to glue in all the letters by hand into their spots.

image

image

image

image

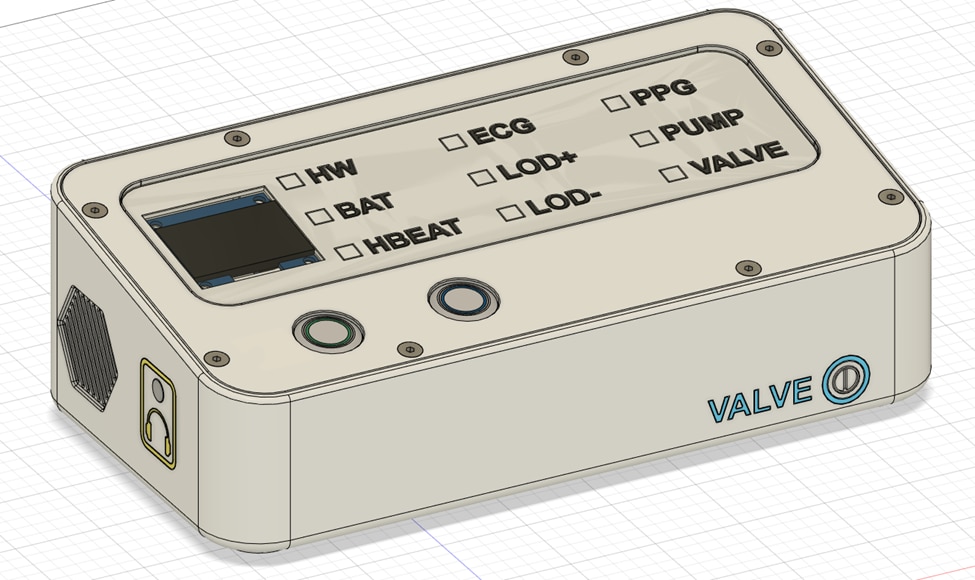
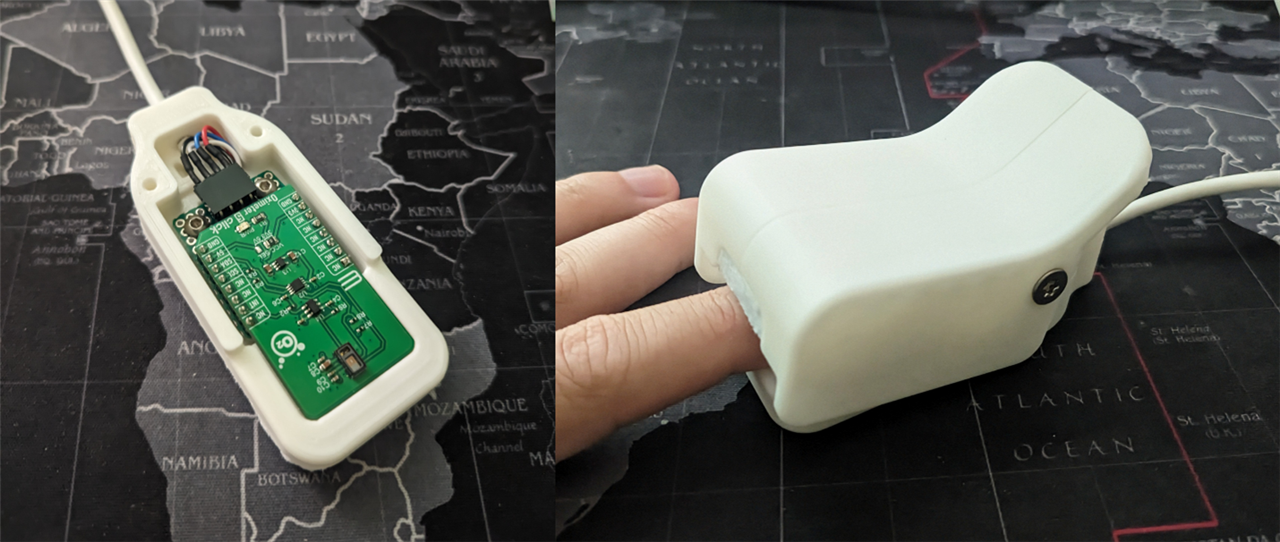
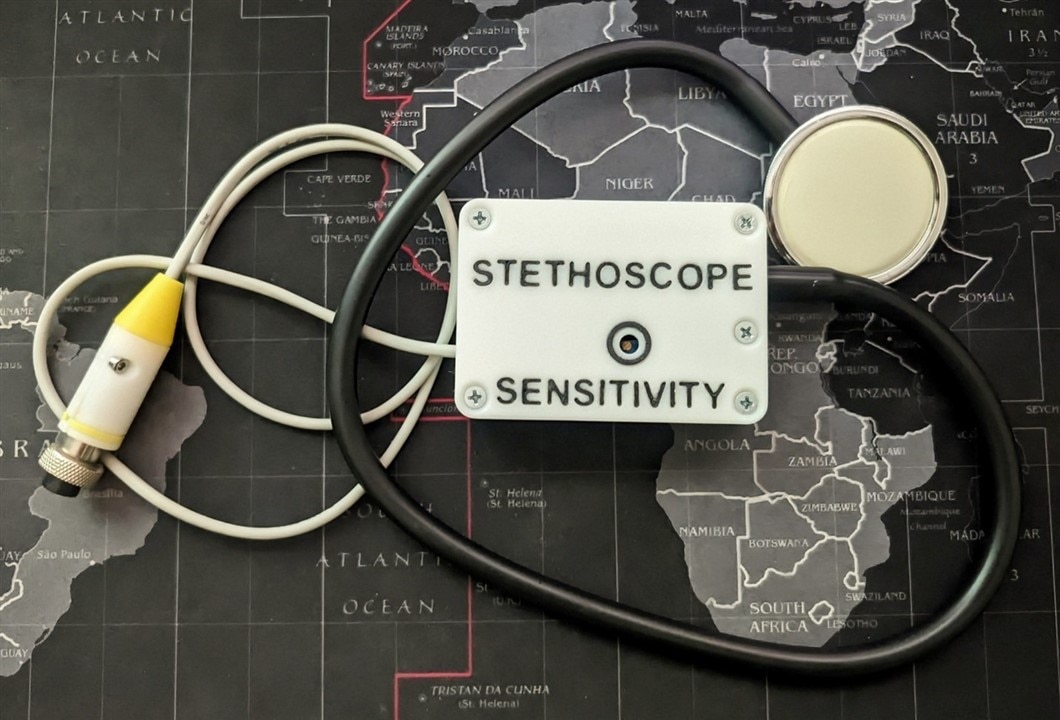
Besides this, Milos also designed and printed a clamp that goes around a Mikroelektronika Oximeter 5 Click and case for the electronics that convert an old regular stethoscope into an electronic one.

Running the Software

This was all of course accompanied by the necessary software, which includes 3 different codes:

  • Raspberry Pi Pico Code – C++
  • GUI Software – Python
  • Data Analysis – Python

The raspberry can receive commands over serial, where Milos designed commands to mimic the G code commands. Besides that, there is a GUI which shows all the signals in real time and lets you record all of them into a CSV file for further analysis.

image

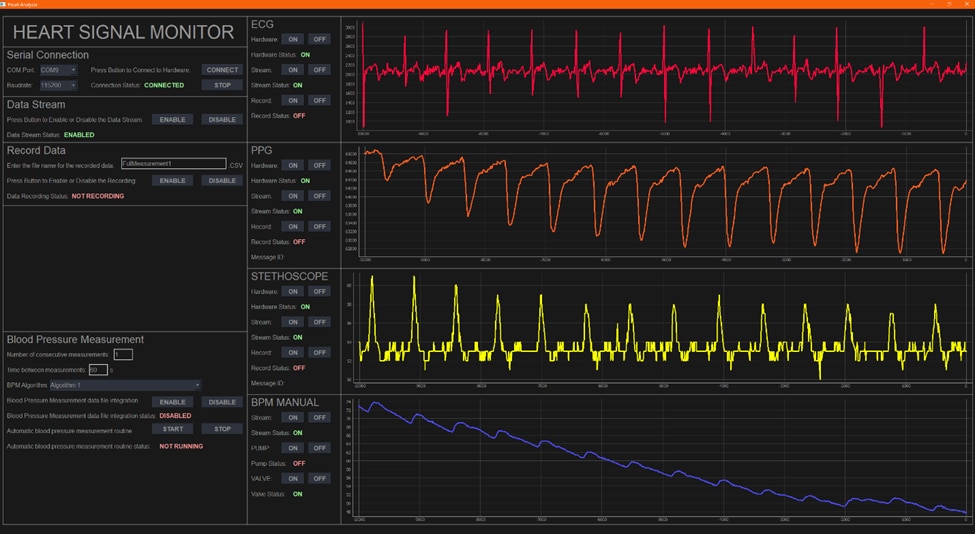
Milos dedicated the end of the video to show how Milos analyzed the data using Python and comparing that to the results acquired by a commercial blood pressure monitor. If you’re interested in just the data analysis part, you can download the dataset with the code and try analysing it yourself!

image

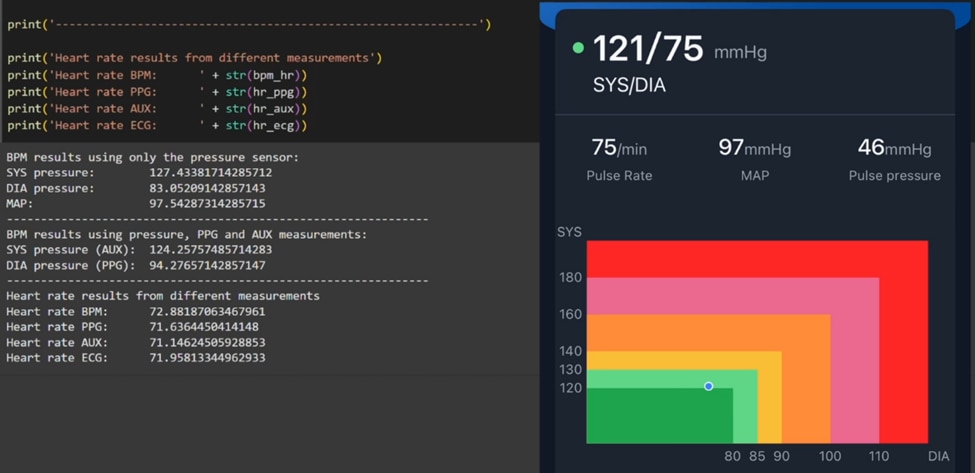
The results Milos got were not too far off from the commercial device, but as Milos discusses in the video, the end results are extremely sensitive to any noise in the signals, the way the data is filtered, or if the person has an irregular heart rate.

image

image

image

Note: 

This project is presented 'as is' and neither the project creator or element14 Community vouches for its current capability or alleges that it has medical grade certification, or should be used in place of proper, certified and verified equipment by a qualified person or persons.

Supporting Downloads and Links

  • https://github.com/MilosRasic98/OpenCardiographySignalMeasuringDevice
  •  Episode 674 Resources  

Bill of Materials

Product Name Manufacturer Quantity Buy Kit
TPS63021DSJR TEXAS INSTRUMENTS 1 Buy Now
RCG06031M00FKEA VISHAY 4 Buy Now
GRM21BR61A226ME51L MURATA 6 Buy Now
CL21A106KOQNNNE SAMSUNG 9 Buy Now
CL10B104KO8NNNC SAMSUNG 17 Buy Now
CR0603-JW-104ELF BOURNS 13 Buy Now
SRN3010-1R5Y BOURNS 1 Buy Now
RT0603BRD0750KL YAGEO 1 Buy Now
ERJP03F3300V SAMSUNG 4 Buy Now
NCP716BSN500T1G ONSEMI 1 Buy Now
MCSR06X7502FTL MULTICOMP PRO 2 Buy Now
RB055LAM-30TR ROHM 3 Buy Now
MCP73831T-2ACI/OT MICROCHIP 1 Buy Now
MCWR06X1002FTL MULTICOMP PRO 10 Buy Now
DMN2310UW-7 DIODES INC 6 Buy Now
CR0603-JW-272ELF MULTICOMP PRO 1 Buy Now
C0805C105K4PACTU KEMET 1 Buy Now
TPS61085PWR TEXAS INSTRUMENTS 1 Buy Now
MSS7341-502NLB COILCRAFT 1 Buy Now
WR06X3002FTL MULTICOMP PRO 1 Buy Now
MCWF06P6802FTL MULTICOMP PRO 1 Buy Now
MP003564 MULTICOMP PRO 1 Buy Now
C0603C112J5GACTU KEMET 1 Buy Now
MCMR06X102 JTL MULTICOMP PRO 1 Buy Now
4N32 VISHAY 1 Buy Now
INA826AIDGK TEXAS INSTRUMENTS 1 Buy Now
BAR43SFILM STMICROELECTRONICS 4 Buy Now
AD8232ACPZ-R7 ANNALOG DEVICES 1 Buy Now
AC0603JR-0710ML YAGEO 6 Buy Now
MCWR06X184 JTL MULTICOMP PRO 2 Buy Now
MCWR06X3603FTL MULTICOMP PRO 1 Buy Now
CRCW06031M40FKEA VISHAY 1 Buy Now
CL10B102KB85PNC SAMSUNG 1 Buy Now
MC0603B333K250CT MULTICOMP PRO 1 Buy Now
C0603C334K8RACTU KEMET 1 Buy Now
C0603C103J5RACTU KEMET 1 Buy Now
C0603C152K5RACTU YAGEO 1 Buy Now
MC0603SAF240JT5E MULTICOMP PRO 4 Buy Now
ADUM3160BRWZ-RL ANNALOG DEVICES 1 Buy Now
TBA 2-0511 TRACO POWER 1 Buy Now
MCWR06X5101FTL MULTICOMP PRO 2 Buy Now
XS3A4051PWJ NEXPERIA 1 Buy Now
1825058-7 ALCOSWITCH - TE CONNECTIVITY 1 Buy Now
LM386M-1/NOPB TEXAS INSTRUMENTS 1 Buy Now
MCSR06X100 JTL MULTICOMP PRO 1 Buy Now
MCP6001T-I/OT MICROCHIP 1 Buy Now
C0603C473K5RACTU YAGEO 1 Buy Now
ERJP08J8R2V PANASONIC 1 Buy Now
SMD CAP 865090249008 WURTH ELEKTRONIK 1 Buy Now
RASPBERRY PI PICO W RASPBERRY PI 1 Buy Now
67068-8000 MOLEX 1 Buy Now
MCMR06X472 JTL MULTICOMP PRO 4 Buy Now
MIKROE-5547 MIKROELEKTRONIKA 1 Buy Now
 

Additional Parts

Product Name Manufacturer Quantity
MPS20N0040D-S
Male & Female Header Pins 2.54mm
Nylon 2.54mm Crimp Connectors - Optional - Header pins are a good alternative 2P, 3P, 4P, 5P, 6P
18650 LION Cell
Air Pump, EM Valve, Adjustable Valve, Stethoscope and Arm Cuff Salvaged
Small soft tubing and connectors for pneumatics to connect the pump and the other penumatic stuff
Anti-vandal buttons - 2 of them - Optional
Small I2C OLED Screen - Optional
NeoPixel LED Strip - Optional
ECG Electrodes
Piezo Microphone with small Amp Circuit

  • diy ecg monitor
  • blood pressure monitor tutorial
  • Raspberry Pi Pico project
  • medical electronics diy
  • blood pressure measurement arduino
  • signal processing raspberry pi
  • ecg raspberry pi
  • open source medical device
  • DIY Blood Pressure Monitor
  • raspberry pi biotech project
  • healthcare electronics project
  • ppg sensor diy
  • electronic stehoscope
  • friday_release
  • cardiography signal analysis
  • open source health monitor
  • Share
  • History
  • More
  • Cancel
Actions
  • Share
  • More
  • Cancel
  • Sign in to reply
  • milosrasic98
    milosrasic98 1 month ago in reply to beacon_dave

    The above-the-elbow ones are considered more reliable and are more common, but funnily enough, signal-wise, the wrist ones have a clearer signal compared to the above-the-elbow ones, because there is less muscle and fatty tissue near the wrist compared to the biceps area!

    • Cancel
    • Vote Up 0 Vote Down
    • Sign in to reply
    • More
    • Cancel
  • milosrasic98
    milosrasic98 1 month ago in reply to beacon_dave

    Really interesting, I'll look into how that works!

    • Cancel
    • Vote Up 0 Vote Down
    • Sign in to reply
    • More
    • Cancel
  • beacon_dave
    beacon_dave 1 month ago in reply to milosrasic98

    "...where an additional cuff would be placed near the wrist to monitor sounds..."

    Just to add... I have both an arm cuff monitor and a wrist cuff monitor. Even though I had seen reports suggesting that the wrist cuff is a less accurate method, I have found it to give pretty consistent readings when compared with the arm cuff one. You have to be mindful to raise your wrist up to chest height whilst taking the reading though.

    • Cancel
    • Vote Up 0 Vote Down
    • Sign in to reply
    • More
    • Cancel
  • beacon_dave
    beacon_dave 1 month ago in reply to milosrasic98

    "...Haven't seen ones with the clothing detection..."

    The earlier version of the 'Omron M6 Comfort' monitor has it

    image

    • Cancel
    • Vote Up 0 Vote Down
    • Sign in to reply
    • More
    • Cancel
  • milosrasic98
    milosrasic98 1 month ago in reply to beacon_dave

    In my eyes, the only kind of trend that can be established is, as you've said, by routine monitoring at home. Having those one-off measurements sounds rather unreliable and would only serve the purpose of checking the current condition of the person if they are feeling unwell at that moment. As you've pointed out, too many factors influence the pressure reading.

    Haven't seen ones with the clothing detection, and honestly wanted to try over thin fabric shirts since to me it doesn't look like it should cause any errors in the readings (if it's light material and it's not constricting blood flow through the arm). I'm impressed that they can detect pieces of clothing. I'll need to explore further how they do that. Sounds cool!

    The stethoscope I had here was broken, so the readings were bad, but that's something I wanted to try, to see whether the manual method could be recreated like that. There are some other fun methods I've come across while researching, one of them being a two-cuff method, where an additional cuff would be placed near the wrist to monitor sounds, and with PPG, which is what I tried here. 

    A lot of cool research and devices have already come out to estimate blood pressure without a cuff. Some principles include looking at the delay between the ECG and PPG signal, which essentially shows the speed of the mechanical wave through the vessels, and other work solely by looking at the morphology of the PPG signal. So there are a lot of fun things to explore and research about this subject!

    • Cancel
    • Vote Up 0 Vote Down
    • Sign in to reply
    • More
    • Cancel
  • beacon_dave
    beacon_dave 1 month ago in reply to milosrasic98

    "...so I guess the general idea is to establish whether there is a clear pattern of constant high or low pressure..."

    This is why I'm generally sceptical about one-off readings taken at a doctor's check-ups, often taken years apart. 

    "...and that's the white coat syndrome..."

    Another reason why I'm sceptical. You could have low blood pressure but if you also have white coat syndrome, the reading could appear within the normal range at a check-up.

    Add to that, that check-ups usually occur at different times of the day and don't factor in activity, food, stress, etc. on each occasion.

    Realistically, I think a clear pattern can only really be achieved by routine monitoring at home. The individual needs to collect sufficient data to be able to present to the doctor.

    Interesting findings on the cuff inflation. Another mystery is how some of them do clothing detection. My monitor will throw a clothing error if the sleeve of the t-shirt gets caught under the top of the arm cuff. 


    Yes, getting different results from the same measurement by using different percentages raises some questions. Perhaps need a cuff with stethoscope built-in so as to get closer to that of the gold standard manual method.

    • Cancel
    • Vote Up 0 Vote Down
    • Sign in to reply
    • More
    • Cancel
  • milosrasic98
    milosrasic98 2 months ago in reply to beacon_dave

    Thanks, glad you enjoyed it!

    Even one minute apart, the measurements will be off, especially since all of the non-invasive procedures are just estimating the pressure. Another thing is, pressure by itself is something that, of course, drastically changes throughout the day, based on activity, food, to stress, so I guess the general idea is to establish whether there is a clear pattern of constant high or low pressure. But there is another issue here, and that's the white coat syndrome, which can actually go both ways! Some people get extra nervous when they are at the doctor and their blood pressure jumps up because of that, while other people feel at ease when they are at a doctor and their blood pressure drops.

    Since this was all inspired by my grandma, we always make sure she sits for at least 5 minutes, and if it's not a crazy high value, we remeasure after 10-15 before she takes any additional medication to lower the blood pressure, and usually, the pressure is much better the second time around!

    I haven't done any experiments in regards to estimating the systolic pressure based on the cuff inflation, got curious so I extracted that data from the video dataset. This is what I get:

    image

    image

    image

    The data is much noisier because of the pump, which is to be expected, of course, but pulsations can still be seen even after the systolic pressure has been surpassed. One reason why pulsations can still be seen is that the cuff, while cutting off circulation there is still in contact with the upper part of the arm and transferring that mechanical wave. I am not sure how they reliably cut off at about 30 mmHg above the systolic pressure, but as you've mentioned, it's rather reliable. Sometimes it fails and needs to be reinflated, but rarely.

    As for how long the deflation lasts, there are probably some models that can vary that speed as well. I remember finding a proposed mmHg/s figure in some research paper, to which I adjusted the valve I had. The ones I've taken apart have all had a small adjustable valve. Having a fully closed system with two valves would be an even better option, since that would allow for more complex and accurate algorithms where the device could keep the cuff at a set pressure level while conducting a measurement over a longer time. The time difference could also be attributed to how tightly the cuff was put around the arm, since that affects how much air will actually go in the cuff, though I don't know how much time-wise that would affect the deflation phase.

    My mistake for mixing up the 40% and 50% sorry, and here is why ahhahaha! Two of the more popular methods are the Sapinsky and Geddes methods, and they both work in the same way, look at the envelope of the signal, and using the percentages, they do the pressure estimation. One of the methods proposes using 40% and 70% while the other proposes using 50% and 80%. This is something that I found weird when looking at it since this meant that we can get two rather different results from the same measurement. I had the methods mixed up in my head a bit while doing the video, so I've probably used one in the beginning and one in the end!

    • Cancel
    • Vote Up 0 Vote Down
    • Sign in to reply
    • More
    • Cancel
  • beacon_dave
    beacon_dave 2 months ago

    Another impressive project.

    I have to wonder though when was the last time a doctor/nurse made someone sit still for 5-10mins before taking a blood pressure reading. I rarely get the same reading between two measurements taken sitting quietly 1 minute apart at home, so am sceptical about doctor's check-up measurements often taken months or years apart.

    How is the rough estimation of systolic pressure done during cuff inflation ? I have found it pretty reliable and as you point out usually around 30mmHg above the final systolic reading. Very occasionally does the pump turn back on to inflate the cuff more. Is it just monitoring for loss of heart rate detection and then adding an extra 30mmHg ? It appears to lock onto heart rate through the cuff pressure pretty quickly at about 5 seconds/40mmHg into the inflation. 

    Interesting insight into the two valves. Sometimes when taking measurements I've noticed that the measurement deflation phase appears to take a lot longer than others, even without significant variations in final readings. Up until now I had assumed that it was just the EM valve controlling the deflation phase but it looks like the adjustable valve and signal monitoring is doing the work, until the final cuff pressure release.

    In the overview section you mention 40% of the envelope max for the systolic pressure time

    image

    however later on in the analysis you start to use 50%. Was this adjusted after experimentation to more closely match the reference readings from the digital gauge ?

    • Cancel
    • Vote Up 0 Vote Down
    • Sign in to reply
    • More
    • Cancel
  • milosrasic98
    milosrasic98 2 months ago in reply to kmikemoo

    Thank you very much, glad you liked it!!!

    • Cancel
    • Vote Up 0 Vote Down
    • Sign in to reply
    • More
    • Cancel
  • kmikemoo
    kmikemoo 2 months ago

    Wow.  Impressive and thorough.  Excellent job!

    • Cancel
    • Vote Up 0 Vote Down
    • Sign in to reply
    • More
    • Cancel
>
element14 Community

element14 is the first online community specifically for engineers. Connect with your peers and get expert answers to your questions.

  • Members
  • Learn
  • Technologies
  • Challenges & Projects
  • Products
  • Store
  • About Us
  • Feedback & Support
  • FAQs
  • Terms of Use
  • Privacy Policy
  • Legal and Copyright Notices
  • Sitemap
  • Cookies

An Avnet Company © 2025 Premier Farnell Limited. All Rights Reserved.

Premier Farnell Ltd, registered in England and Wales (no 00876412), registered office: Farnell House, Forge Lane, Leeds LS12 2NE.

ICP 备案号 10220084.

Follow element14

  • X
  • Facebook
  • linkedin
  • YouTube