

Setting up a Raspberry Pi 5 for the first time? In this step-by-step guide, Natasha walks through everything you need to get started, from choosing the right microSD card and power supply to flashing Raspberry Pi OS (64-bit), configuring Wi-Fi and SSH, installing active cooling, and completing first boot. You’ll see the full hardware overview, desktop setup, remote access options, system updates, and backup tips so you can go from unboxing to a fully working Raspberry Pi 5 with confidence.
Watch Natasha's Absolute Beginner Guide
Natasha's “absolute basics” guide is aimed at beginners, educators, hobbyists, and anyone who hasn’t set up a Pi in a while. As she puts it, if “it’s been a while since you’ve set up a Raspberry Pi, let’s jump in.”
What follows is a practical, methodical walk-through, from unboxing to desktop, with small but important considerations along the way.
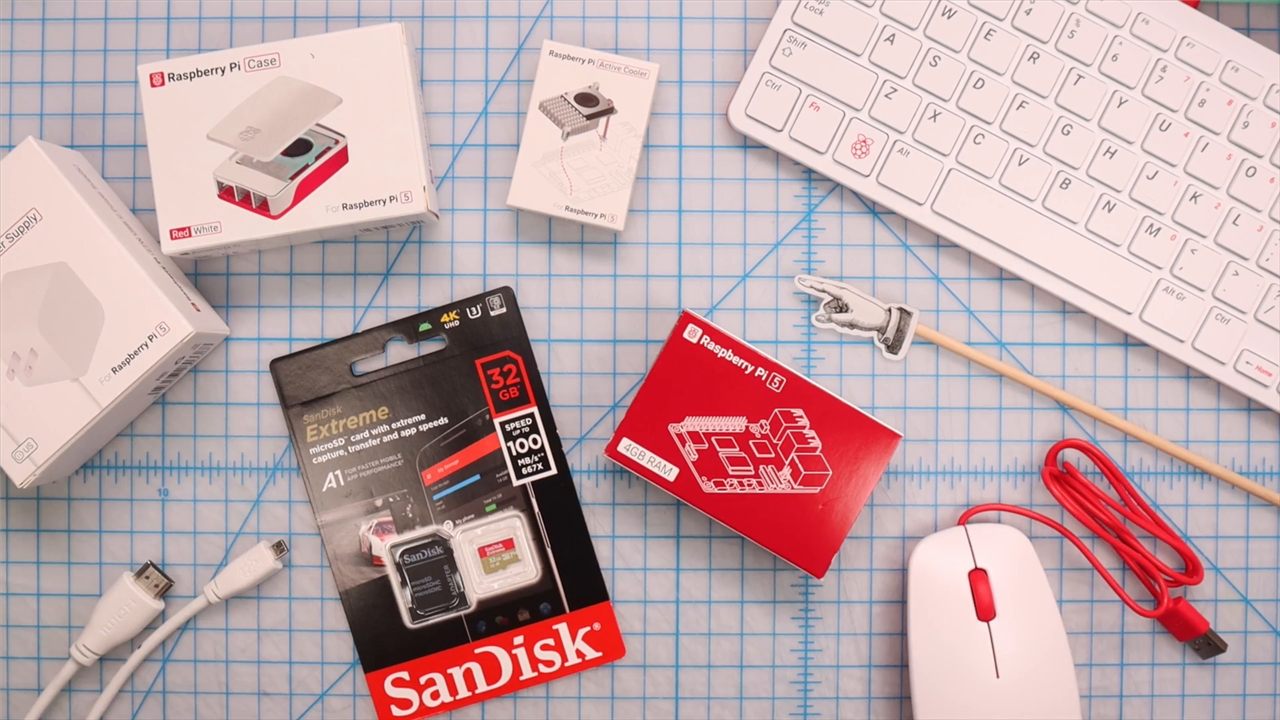
1. What You’ll Need
Before powering anything on, Natasha lays out a complete checklist. She keeps it simple and specific:
-
Raspberry Pi 5 board (2GB, 4GB, 8GB, or 16GB variant)
-
microSD card, 32GB or larger, Class 10 or better
-
microSD card reader (or SD adapter)
-
5V 5A USB-C power supply (she uses the official 27W version which is recommended)
-
Micro HDMI to HDMI cable (you may want to seek out an alternative depending on your available monitor)
-
HDMI monitor or TV (adapting to DisplayPort monitors can be tricky but most have HDMI)
-
USB keyboard and mouse
-
Internet connection (Wi-Fi or Ethernet)
She notes her own card is 32GB, Class 30 - “so I should be good.”
Cooling and Case Considerations
While optional, she strongly recommends a case with active cooling, particularly for heavier workloads. If using the official case together with the Active Cooler, she explains that the included fan and cover need to be removed first.
This is one of those small but critical details that can easily be missed. Planning cooling early avoids having to disassemble later. If you're using the official case, you do not strictly need the Active Cooler as the built in fan is adequate.
2. Preparing the Software
Natasha is clear about one key concept: the Raspberry Pi arrives as a blank computer.
“Raspberry Pi comes as a blank computer with no operating system…”
So the first step happens on a PC or Mac.
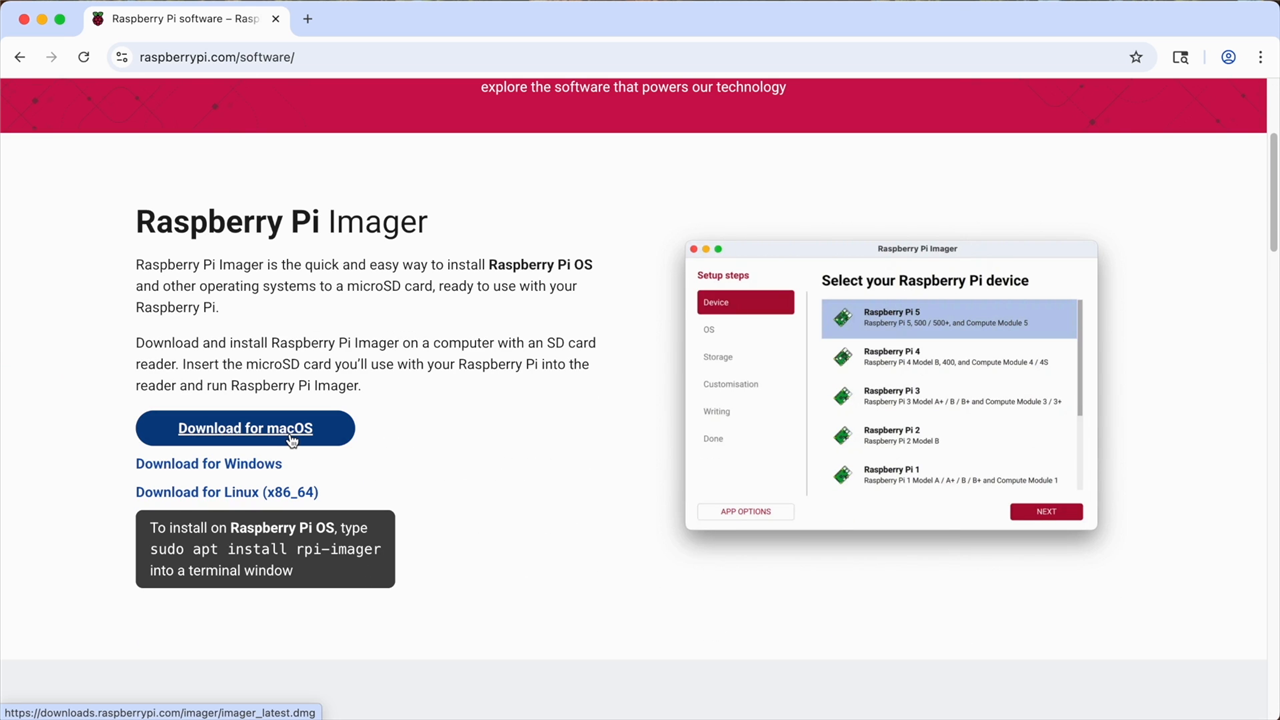
Step 2.1 – Install Raspberry Pi Imager
She downloads the official imager from raspberrypi.com/software and installs it (dragging to Applications on macOS).
Step 2.2 – Select OS and Target Drive
Inside the imager she selects:
-
Device: Raspberry Pi 5
-
OS: Raspberry Pi OS (64-bit)
-
Storage: the microSD card
At this stage she pauses for a safety check.
She notices another drive is connected and ejects it:
“Choosing the wrong drive here would erase it. So I like to play it safe.”
Raspberry Pi 5_Assembly 2
This precaution is important. The imager will overwrite whatever drive is selected.
Step 2.3 – Customisation Settings
Natasha walks through advanced configuration before writing:
-
Hostname (she uses “RaspberryPi5”)
-
Timezone and keyboard layout
-
Username and password
-
Wi-Fi SSID and password
-
Optional: Enable SSH
-
Optional: Enable Raspberry Pi Connect
She enables SSH, noting she may use it later and that she’ll show where to toggle it in the OS.
This early configuration avoids needing a monitor and keyboard during first boot, useful for headless setups.
After confirming the correct drive again, she writes the image. The system requests her computer password and takes a few minutes to complete. Once finished, she ejects the SD card safely.
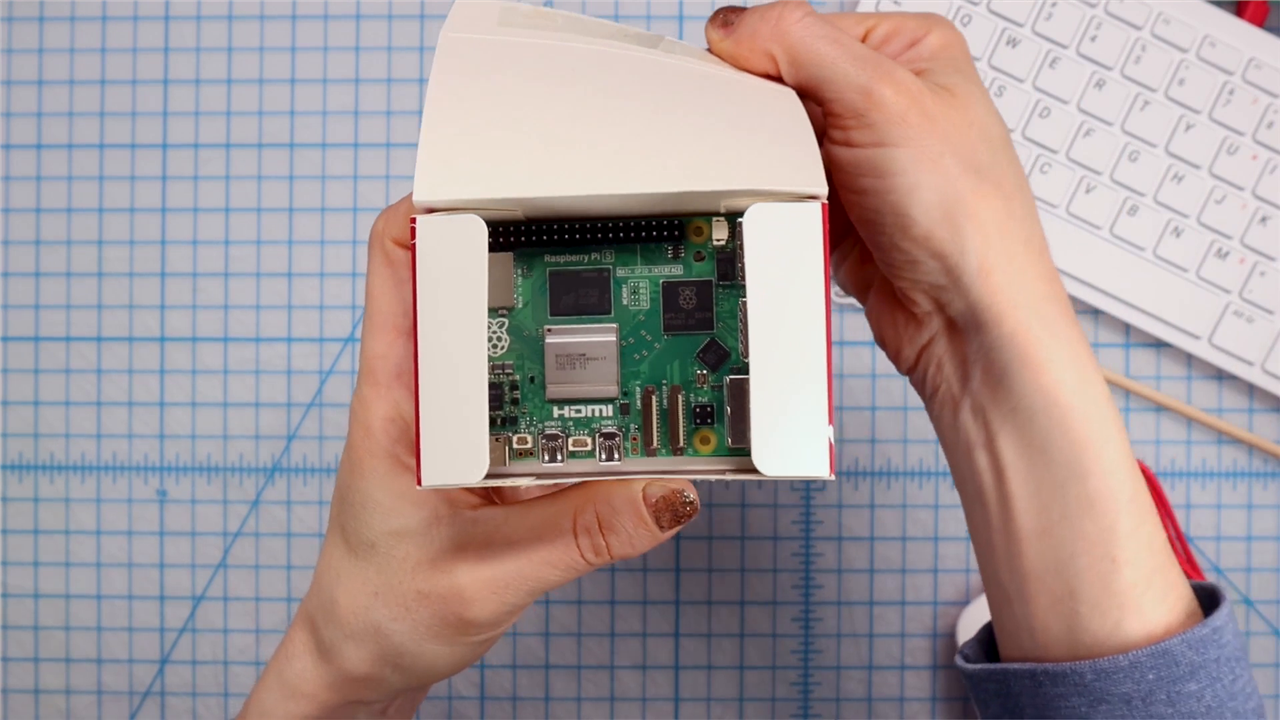
3. Hardware Setup
With the SD card prepared, it’s time to open the board.
Her reaction is immediate:
“Oh, yay! There she is.”
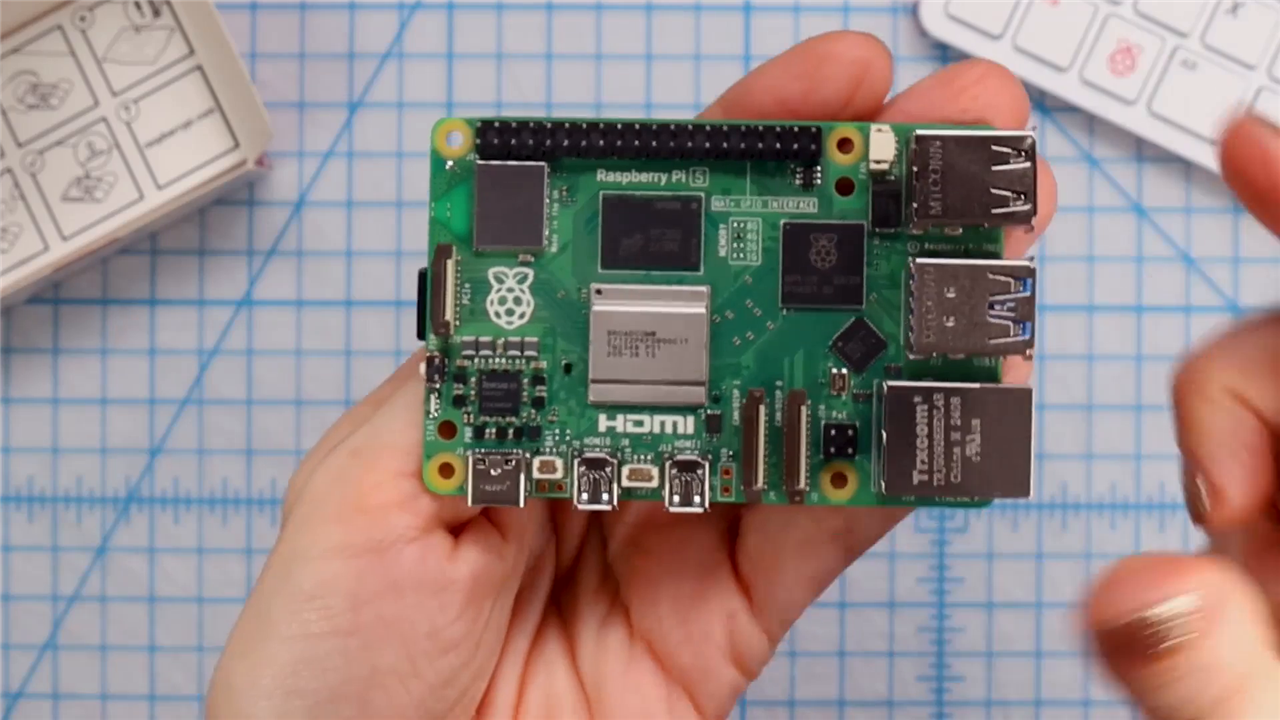
Step 3.1 – Board Overview
She gives a brief tour:
-
Ethernet port
-
Two blue USB 3.0 ports
-
Two black USB 2.0 ports
-
USB-C power input
-
Dual micro HDMI ports
-
40-pin GPIO header
-
Power button
-
microSD slot underneath
This orientation is useful for first-time users unfamiliar with port placement.
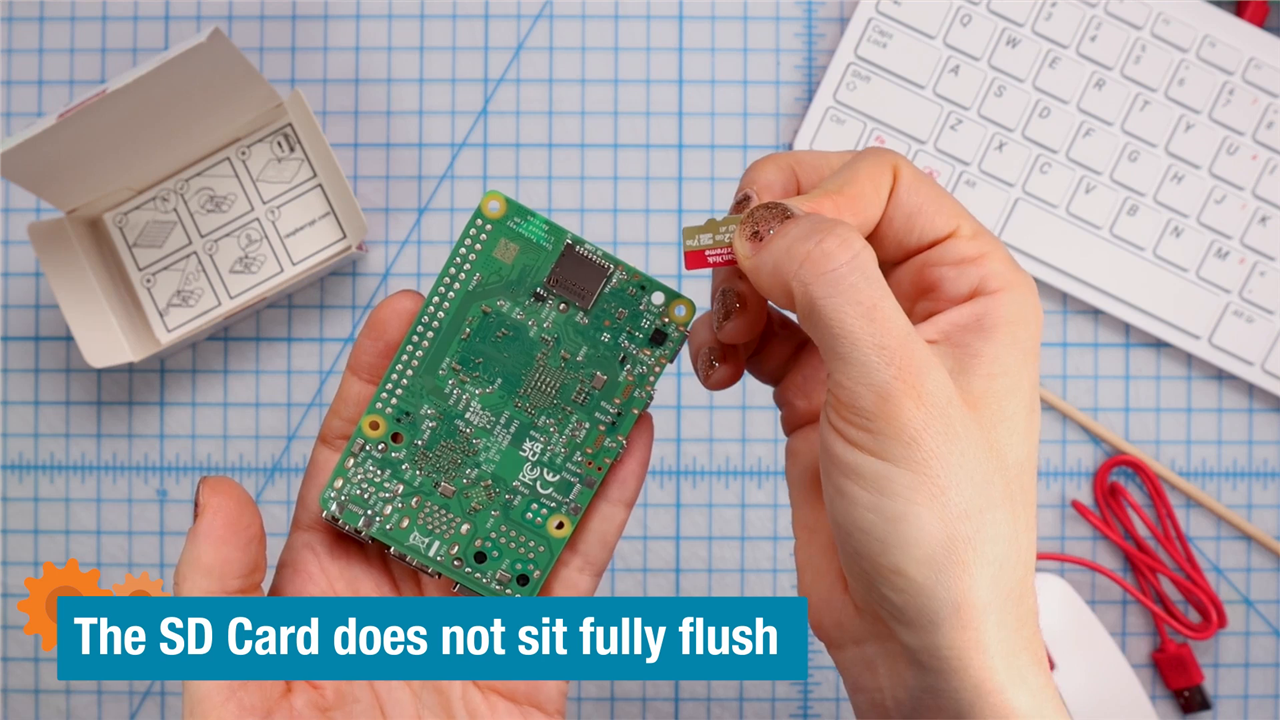
Step 3.2 – Insert the SD Card
The microSD card goes into the underside slot.
Step 3.3 – Install the Active Cooler (Optional)
Before placing the board in the case, she installs the Active Cooler, note that if you're using the official case with the active cooling fan, this isn't strictly necessary:
-
Remove protective film
-
Align pins carefully
-
Press until they click
-
Check seating from the rear
-
Remove fan connector cover
-
Plug in the fan
Taking time here ensures correct alignment and avoids bent pins.
Step 3.4 – Install into Case
She:
-
Applies rubber feet
-
Seats the board into the base
-
Removes the case’s pre-installed fan (since she’s using the Active Cooler)
-
Adds frame and lid
Sequence matters, installing cooling first prevents disassembly later, but if you're not using the Active Cooler, remember to plug in the case's fan to the Raspberry Pi 5.
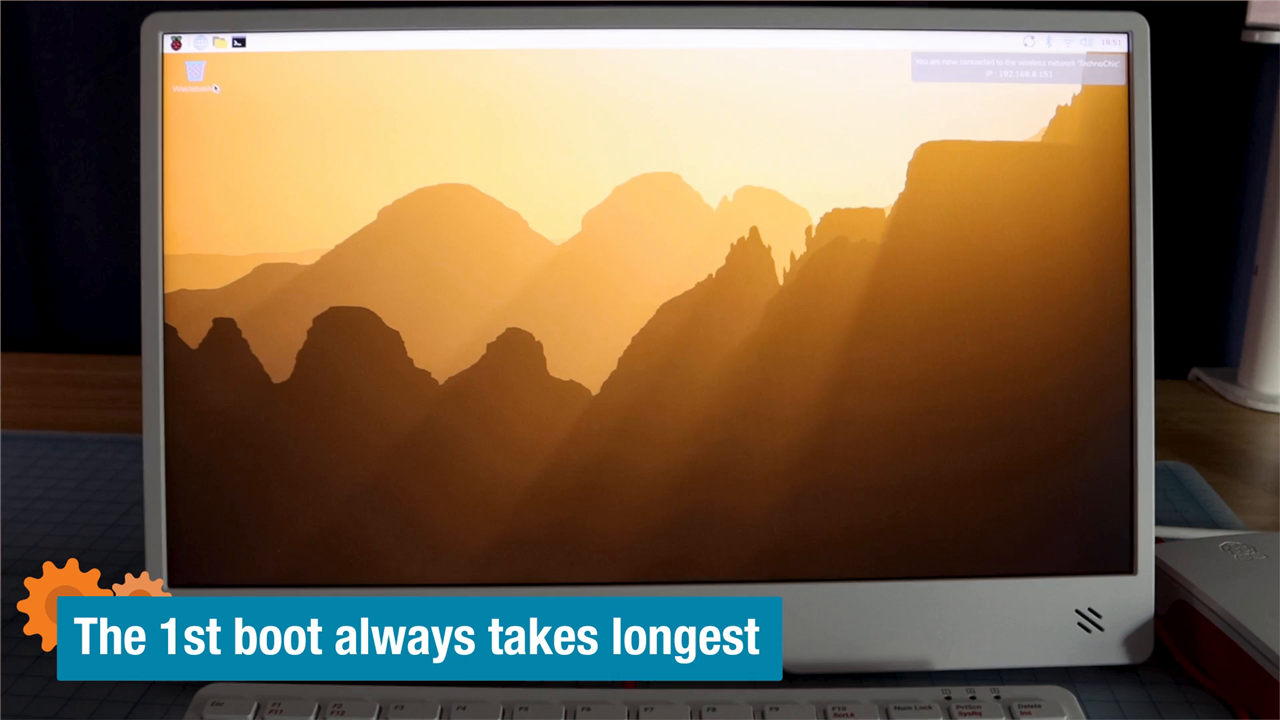
4. First Boot
Now everything is connected:
-
Micro HDMI to monitor
-
USB keyboard and mouse
-
USB-C power
The Pi powers on.
“Yay! And it looks like a computer.”
If settings weren’t configured earlier, the setup wizard would guide through language, Wi-Fi, password, and display resolution. Since she preconfigured these, the system boots directly to the desktop.
5. Initial Desktop Configuration
Natasha’s first instinct with any new system:
“The first thing I always like to do when I get a new computer is customise my desktop.”
She navigates:
Raspberry Pi icon → Preferences → Control Center → Picture
She selects aurora.jpg, commenting simply:
“Beautiful.”
This demonstrates that the Pi OS environment behaves like a standard desktop OS — file browser, browser, terminal, media player, and more are pre-installed.

6. Remote Access and Interfaces
In Control Center → Interfaces, she highlights:
-
SSH toggle
-
VNC toggle
She explains clearly:
-
SSH enables command-line remote control (headless operation).
-
VNC mirrors the graphical desktop to another device, even a phone.
Raspberry Pi 5_Assembly 2
For educators or lab environments, these features are especially useful.
She also points out:
-
Wi-Fi icon reveals IP address
-
System tray shows update notifications
-
Updates can be installed via terminal using the following commands:
-
sudo apt update sudo apt upgrade
This introduces ongoing maintenance without overwhelming beginners.
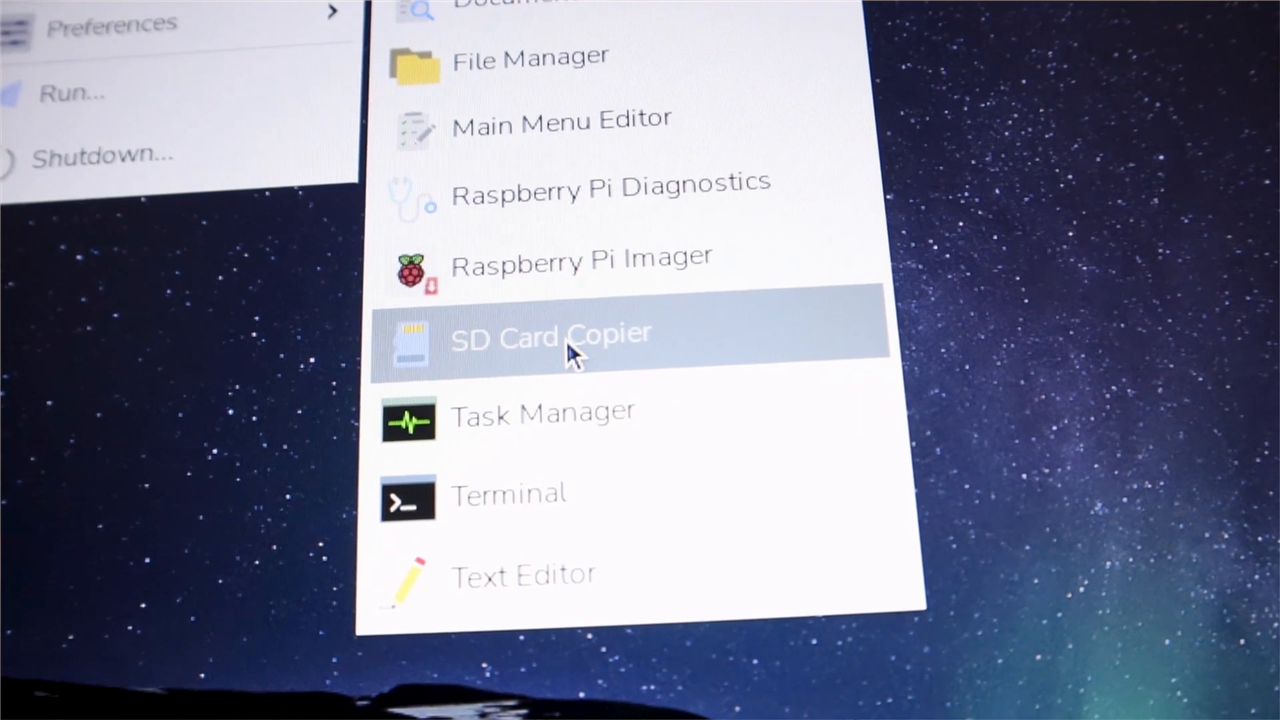
7. Backup and Maintenance
Before wrapping up, she highlights the SD Card Copier utility:
“This lets you clone your SD card to duplicate or back up your whole setup.”
Cloning is useful when:
-
Deploying multiple identical systems
-
Preserving a working configuration
-
Experimenting with riskier projects
For long-term use, this is an important habit.

8. What’s Next?
With the system fully operational, Natasha looks ahead.
Possible directions include:
-
Turning it into a Plex media server
-
Installing RetroPie
-
Exploring projects on the element14 Community: Raspberry Pi Projects
The setup guide stops at a stable, updated desktop, ready for expansion.
Key Considerations to Remember
-
Always double-check the selected drive before flashing.
-
Configure Wi-Fi and SSH in the imager if you want headless access.
-
Install cooling before placing the board into its case if using the Active Cooler.
-
Keep the system updated.
-
Clone your SD card once everything is configured.
By the end, Natasha has taken the viewer from sealed box to working desktop. The process is straightforward, but the small precautions; ejecting other drives, enabling SSH early, planning cooling, are what ensure a smooth experience.
From here, the Raspberry Pi 5 becomes whatever project you want it to be.
Supporting Links and Products
- Raspberry Pi Official Documentation
- Raspberry Pi 5 Setup Full Tutorial for Beginners
- Raspberry Pi 5: Getting Started
Raspberry Pi Parts
| Product Name | Manufacturer | Quantity | Buy Kit |
|---|---|---|---|
| Raspberry Pi Official Case | Raspberry Pi | 1 | Buy Now |
| Raspberry Pi Mouse | Raspberry Pi | 1 | Buy Now |
| Raspberry Pi Official Keyboard | Raspberry Pi | 1 | Buy Now |
| Raspberry Pi 5 Active Cooler | Raspberry Pi | 1 | Buy Now |
| Raspberry Pi Monitor | Raspberry Pi | 1 | Buy Now |
| Raspberry Pi 5 4GB | Raspberry Pi | 1 | Buy Now |


