

In this project, Milos converts a manual IKEA Trotten desk into a fully motorised standing desk using a 12V drill motor, quadrature encoder feedback and an ESP32 for control. The system includes soft-start motor driving, homing with limit switches, memory height presets and a built-in web interface for Wi-Fi access. All mounts are 3D printed, and the desk frame is expanded with modular aluminium extrusions for future upgrades. If you’re interested in ESP32 projects, desk automation or practical workshop builds, this shows how to build a programmable sit-stand desk on a modest budget.
Build with Milos
The DIY Motorised IKEA Desk
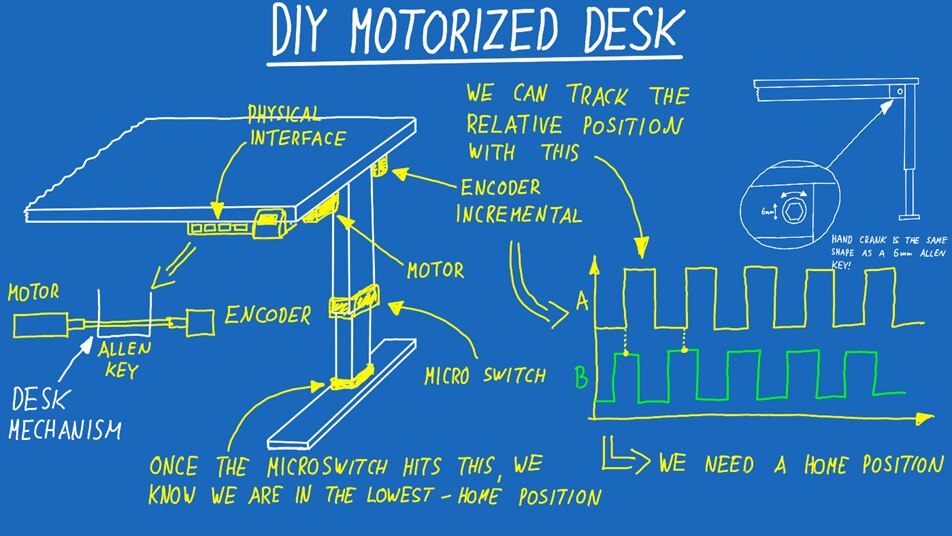
Milos came across an IKEA Trotten standing desk while browsing Facebook Marketplace. The desk was manually operated with a hand crank, but at roughly $100, it was a good starting point for modification. Once assembled at home, he noticed the lifting mechanism was driven by a simple 6 mm hexagonal shaft. As he put it, “it’s just a six millimetre shaft that you need to run to one or the other direction to lift the desk up or to lower it down”
That detail made the project straightforward in principle: rotate the shaft electrically in either direction and control the motion precisely. The goal was to convert the desk into an electric sit-stand workstation for around $50, using readily available parts and custom electronics.
Idea & Plan
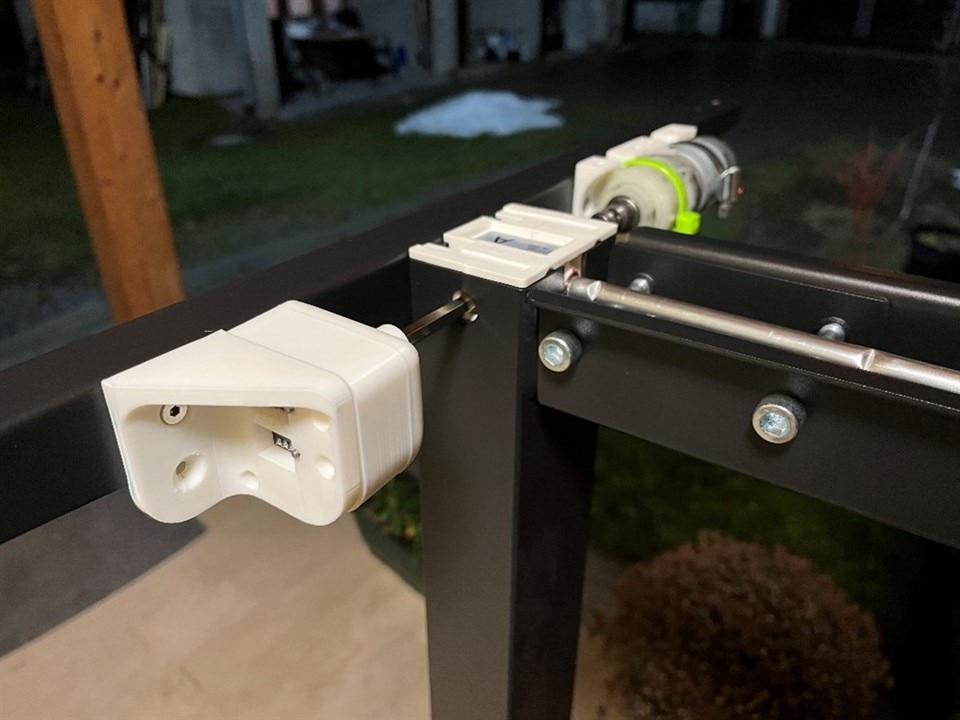
Mechanically, the desk didn’t require reverse engineering of the internal gearing. All that mattered was bidirectional rotation of the 6 mm hex input. Milos mounted a geared DC motor to drive the shaft and placed an incremental encoder on the opposite side of the mechanism. As he explained, “I put the motor and the encoder on opposite sides of the table mechanism. If you're going to do that, also make sure to cut the shaft long enough so it reaches both the motor and the encoder”
The encoder provides relative position tracking. The model used outputs 20 pulses per rotation, producing quadrature signals (A and B) that are phase-shifted. This allows the firmware to determine both movement and direction. As Milos clarified, “for the one I'm using, there will be 20 pulses per rotation, so we can then translate those pulses into actual table height” . Direction detection is handled by reading which signal transitions first.
However, incremental encoders alone cannot provide absolute position at startup. To solve this, he added a micro-switch at the lowest desk position. During a homing routine, the desk lowers until the switch is triggered. “This is why we need a known position… we’re going to get that using a micro switch”
In the final design, two switches are wired in parallel for redundancy, ensuring reliable homing and providing a hard lower limit stop.

Motor Selection, Power Considerations & Motor Control
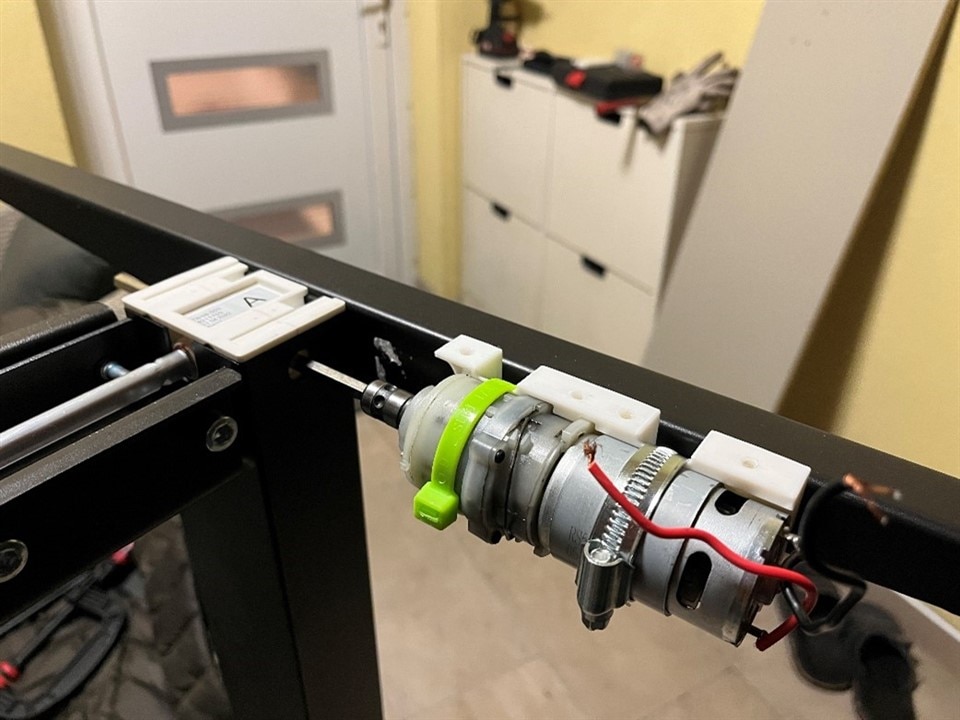
Torque was the primary requirement. Initial thoughts included automotive windshield wiper motors, but these were bulky and potentially overpowered for the application. Milos instead looked at tools designed for compact high-torque operation and landed on a 12 V cordless drill motor.
“I had an old Parkside drill that's running on 12V, and I decided to test it out with the Ikea Trotten desk… and as you can see, it can go up and down without any issues”.
The drill motor’s gearbox provided sufficient torque, and importantly, its output already featured a 6 mm hex coupling, a direct match to the desk’s crank input. This eliminated the need for custom couplers or machining. The motor, gearbox, and hex adaptor were extracted and bench-tested before integration.
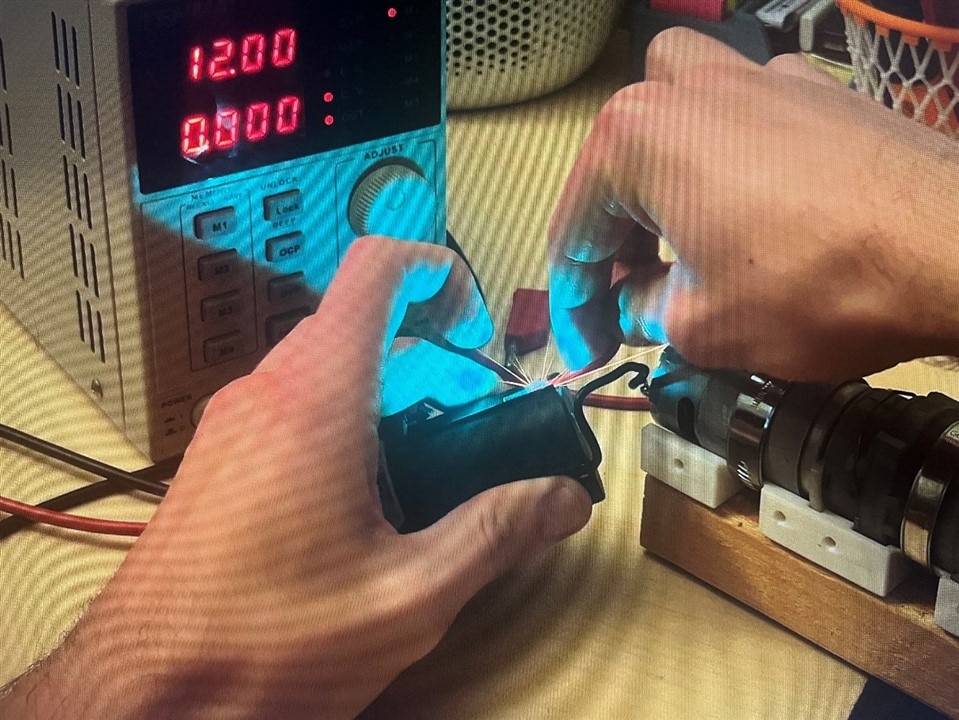
Bench testing quickly revealed a problem. When powered from a current-limited bench supply set to 12 V and 3.5 A, the motor immediately triggered over-current protection.
“As you can see the power supply goes into over-current protection immediately… the motor doesn’t actually spin”
Direct battery connection proved the motor was functional, but produced a large inrush spark. Milos observed, “the motor, when it’s in a standstill… the current it needs is rather high”
The solution was not a simple relay but a proper motor driver capable of PWM control and soft start. He explained the requirement clearly: “we need to ramp up the power slowly so that we don't have that massive current spike”

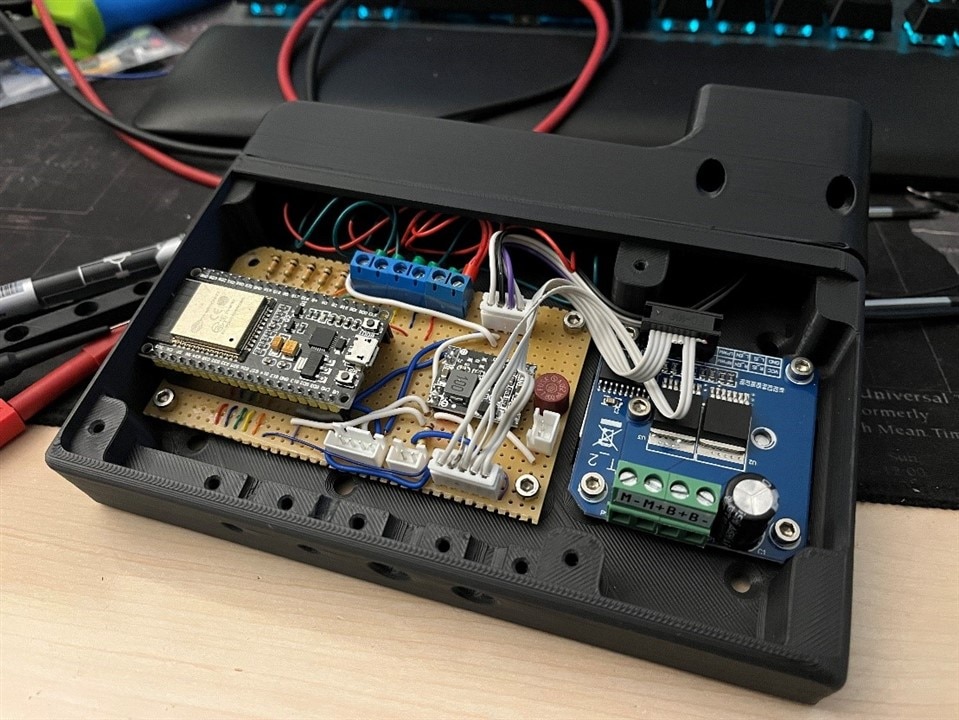
Electronics & Firmware
Control is handled by an ESP32 development board. Milos chose it for convenience and Wi-Fi capability rather than necessity: “I will just use a small Esp32 board that I have laying around because it's Wi-Fi capable and it's more than powerful enough to do stuff like this”.
The system includes:
-
ESP32 MCU
-
Motor driver (PWM + direction control)
-
Buck converter (12 V → 5 V)
-
Incremental encoder (quadrature input)
-
Dual homing/limit switches
-
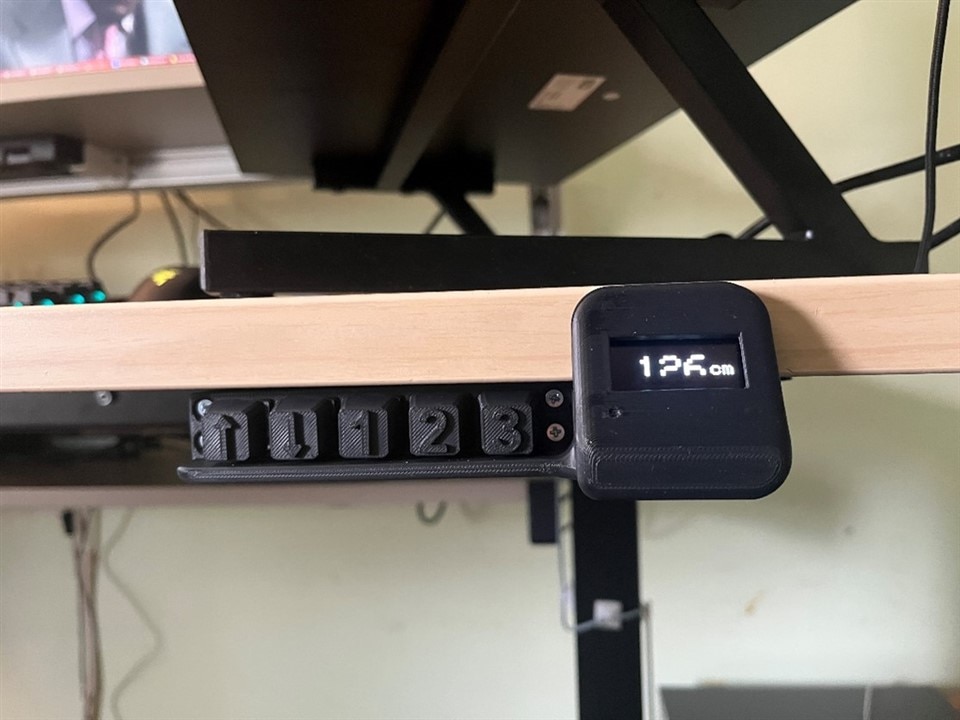
Push buttons (manual up/down + 3 memories)
-
Small OLED display
In firmware, motor pins, encoder pins, and button inputs are defined at the top of the sketch for board flexibility. The ESP32 is configured with a static IP address to simplify integration with home automation: “so in the future, if I want to automate it in any way, shape or form, I can do that easily”
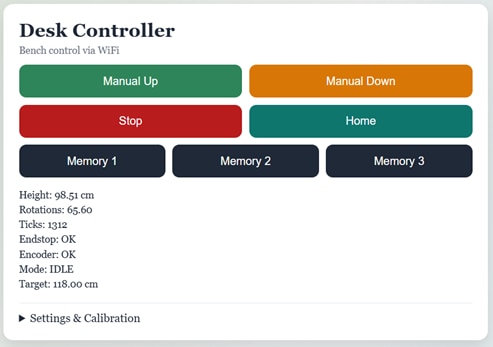
The web interface mirrors the physical controls. It includes:
-
Manual up / down
-
Stop
-
Home
-
Three memory positions
-
Adjustable min/max height
-
Calibration helpers
“You can also change these memories on the fly and they will be saved between power cycles”
During homing, the desk lowers until the endstop triggers, then sets the internal height reference (e.g., 70 cm) as configured in the interface. Memory positions then translate stored height values into encoder pulse targets.
Mechanical Assembly
All mounts were designed in CAD and 3D printed in PLA. The motor mount encloses the drill gearbox, while a dedicated encoder bracket holds the hex coupling (printed slightly oversized at 6.5 mm to account for tolerances).
The control enclosure mounts beneath the desk edge. Only the OLED display is visible from above, angled slightly for readability. Buttons sit recessed under a protective lip. Milos added a guard to prevent accidental activation: “I added it because I don't want to trigger any of the buttons by mistake… you really need to want to push these buttons”
Final assembly involved replacing the original legs, mounting the motor and encoder assemblies, routing wiring, and installing the electronics enclosure. Functional testing confirmed correct soft start behaviour, reliable homing, and accurate positioning via encoder feedback.
Modular Desk Expansion
Rather than stop at motorisation, Milos extended the design using 4040 aluminium extrusions. The spare tabletop panel became a monitor shelf, with an additional lower shelf for chargers and power strips.
This extrusion-based structure allows modular mounting of accessories: monitor arms, laptop arms, lighting, cameras, and measurement tools. As he described it, “The greatest thing about this desk is that it's fully modular because of the aluminium extrusions… it's going to be a work in progress desk”
Rounding Up
The conversion was completed in roughly three hours of physical assembly time. The system functions reliably via both physical and web interfaces. There are areas for refinement. Milos notes the noise level, “it just sounds like a drill”,
and mentions that the encoder requires minor fine tuning. These are largely consequences of re-purposing a drill gearbox rather than using a purpose-built linear actuator. Next planned upgrade: a custom 3D-printed laptop arm integrated into the extrusion framework.
What started as a basic hand-crank IKEA Trotten desk is now a fully programmable, motorised sit-stand setup powered by a salvaged drill motor, encoder feedback and an ESP32.
Instead of just adding simple up/down control, Milos built something far more flexible, with soft start motor control, height presets, homing, and a web interface baked in. Add the modular aluminium frame, and this isn’t just a desk upgrade. It’s a platform he can keep modifying and improving over time.
Supporting Files and Links
Bill of Materials
| Product Name | Manufacturer | Quantity | Buy Kit |
|---|---|---|---|
| ESP32 Board | DFROBOT | 1 | Buy Now |
| OLED MDOB128064V2V-YI | MIDAS DISPLAYS | 1 | Buy Now |
| Rotary Encoder SEN0235 | DFROBOT | 1 | Buy Now |
Additional Parts
| Product Name | Manufacturer | Quantity |
|---|---|---|
| Hand Crank Standing Desk | Ikea | |
| Battery Powered Drill | ||
| BTS7960 | ||
| Keyboard Switches | ||
| PLA Filament |


