


element14 Presents | Bald Engineer: James Lewis' VCP Profile | Project Videos
Until cryptocurrency replaces money, we have to deal with coins. Instead of just collecting them in a jar, this electronic coin bank lets you know how much you have. The simple part is the count counter module which detects up to 4 coin types. The tricky part is making it battery powered. Thanks to capacitive sensing technology, this coin bank can run off a single charge for months. |
Capacitive Coin Bank
| Product Name | Manufacturer | Quantity | Product Link |
|---|---|---|---|
| MSP-CAPT-FR2633 Evaluation Board CAPTIVATE Capacitive Touch Technology MCU | Texas Instruments | 1 | Buy Now |
| Perma-Proto Breadboard Half Size | Adafruit | 1 | NA |
| Coin Acceptor | Adafruit | 1 | NA |
| 2465 - Development Board, PowerBoost 1000. LiPo Battery Charger, 5V, 1A, USB Boost | Adafruit | 1 | Buy Now |
| 1578 - Rechargeable Battery, 3.7 V, Lithium Polymer, 500 mAh | Adafruit | 1 | Buy Now |
| 6mm Copper Foil Tape | 3M | 1 | Buy Now |
5v to 12v Boost
| Product Name | Manufacturer | Quantity | Product Link |
|---|---|---|---|
| C0805C106K4PACTU - Multilayer Ceramic Capacitor, C Series, 10 - F, - 10%, X5R, 16 V, 0805 [2012 Metric] | KEMET | 1 | Buy Now |
| MBR0540 - Schottky Rectifier, 40 V, 500 mA, Single, SOD-123, 2 Pins, 620 mV | ON | 1 | Buy Now |
| 4.7uH 0805 Inductor 600mA | Taiyo-Yuden | 1 | Buy Now |
| DC-DC Boost, SOT-23-5, 200mA out | Microchip | 1 | Buy Now |
Pyramiduino
| Product Name | Manufacturer | Quantity | Product Link |
|---|---|---|---|
| 100nF 0805 Ceramic 16V X7R | KEMET | 1 | Buy Now |
| 10nF 0805 Ceramic 16V X7R | KEMET | 1 | Buy Now |
| 22pF 0805 Ceramic 50V C0G | KEMET | 2 | Buy Now |
| 1uF 0805 Ceramic 16V X7R | KEMET | 1 | Buy Now |
| ATmega328 QFN (Or MLF) Package | Microchip | 1 | Buy Now |
| LDO 3v3 Regulator, SOT-23-5 | Microchip | 1 | Buy Now |
| Crystal 16M FA-238 | EPSON | 1 | Buy Now |
Also Featured:
| Product Name | Manufacturer | Quantity | Product Link |
|---|---|---|---|
| RTM3K-104 - Oscilloscope, RTM3000 Series, 4 Channel, 1 GHz, 2.5 GSPS, 40 Mpts, 350 ps | Rohde & Schwartz | 1 | Buy Now |
Touch Tutorial: Capacitive Touch Tutorial from James Lewis - Bald Engineer
MSP430FR2633 MCU Development Kit: Capacitive touch evaluation and rapid prototyping for MSP430FR2633 microcontroller MCU Development Kit
Autodesk Fusion 360: Autodesk Fusion 360
| 12 V Boost | Breadboard Circuits |
|---|---|
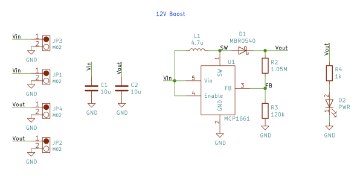 |  |
Arduino Code:
// Pins
#include <Arduino.h>


const byte coinSig = A0;
const byte hvSolenoid = A1; // for turning on solenoid/coin counter
const byte battControl = 4;
const byte battRead = A3;
const byte resetButton = 3;


bool previousCoinSignal = false;
const float coinValue = 0.05;
float bankValue = 0.00;
unsigned long bankCount = 0;
const unsigned long pulseTimeOut = 75;


unsigned long armedForCount = 0;
unsigned long previousUpdateMillis = 0;
unsigned long updateInterval = 110;
bool printOnceFlag = false;


unsigned long previousEEPROMwrite = 0;  // delays writing to EEPROM
unsigned long updateEEPROMinterval = 1000;
//float EEPROMbankValue = 0.00;
unsigned long EEPROMbankCount;


unsigned long previousBatteryMillis = 0;
const unsigned long batteryInterval = 1000;
const float adcResolution = 5.00/1023.0;
bool enableCounter = true;
#include <Arduino.h>
#include <EEPROM.h>
#include <Wire.h>
#include <U8g2lib.h>
#include "coin-slot-arduino.h"


// u8g2 constructor
U8G2_SSD1306_128X64_NONAME_F_HW_I2C u8g2(U8G2_R2, /* reset=*/ U8X8_PIN_NONE);


void loadEEPROM() {
EEPROM.get(0, bankCount);
EEPROMbankCount = bankCount;
}


byte getValueWidth(float displayValue) {
  // average character width for u8g2_font_logisoso24_tn is 14
  const byte charWidth = u8g2.getMaxCharWidth();
  byte theWidth = 4 * charWidth; //1.00
  if (displayValue >= 10.00)
    theWidth = 5 * charWidth;
  if (displayValue >= 100.00)
    theWidth = 6 * charWidth; //1.00
  if (displayValue >= 1000.00)
    theWidth = 7 * charWidth; //1.00
return ((u8g2.getDisplayWidth()-theWidth)/2);
}


void printOLED() {
u8g2.clearBuffer();     // clear the internal memory
u8g2.setFont(u8g2_font_logisoso34_tn); // choose a suitable font
byte centerHeight = (u8g2.getDisplayHeight()/2) + (u8g2.getMaxCharHeight()/2);
u8g2.setCursor(getValueWidth(bankValue),centerHeight);
u8g2.print(bankValue);
u8g2.sendBuffer();     // transfer internal memory to the display
}


void printBank() {
bankValue = bankCount * coinValue;
printOLED();
Serial.print(F("Bank Value: "));
Serial.println(bankValue);
}


void printPulses() {
Serial.print(F("Pulse coutn: "));
Serial.println(bankCount);
}


void handleSerial() {
char incomingChar = Serial.read();


switch(incomingChar) {
case '!':
Serial.println(F("Clearing..."));
bankCount = 0;
      bankValue = bankCount * coinValue;
      printBank();
      break;
    case '.':
      printPulses();
      printBank();
      break;
}
}


void checkBattery() {


// hceck battery voltage
digitalWrite(battControl, HIGH);
delay(10);
int battReading = analogRead(battRead);
digitalWrite(battControl, LOW);
// Serial.print(F("Battery: "));
// Serial.println(battReading);
if (battReading < 700) {
// battery is too low, turn off solenoid
enableCounter = false;
// turn off enableCounter
digitalWrite(hvSolenoid, LOW);
//print message
// Serial.println(F("Low Battery Disable"));
u8g2.clearBuffer(); // clear the internal memory
u8g2.setFont(u8g2_font_logisoso34_tr); // choose a suitable font
u8g2.drawStr(0, 50, "lo batt");
u8g2.sendBuffer(); // transfer internal memory to the display
while(1);
}


return;
}


void handleBankReset() {
unsigned long resetCounter = millis();
bool waiting = true;
while((digitalRead(resetButton) == HIGH) && waiting) {
if (millis() - resetCounter < 1000) {
u8g2.clearBuffer(); // clear the internal memory
u8g2.setFont(u8g2_font_logisoso34_tr); // choose a suitable font
u8g2.drawStr(0, 50, "3");
u8g2.sendBuffer(); // transfer internal memory to the display
}


if ((millis() - resetCounter > 1000) && (millis() - resetCounter <= 2000)) {
u8g2.clearBuffer(); // clear the internal memory
u8g2.setFont(u8g2_font_logisoso34_tr); // choose a suitable font
u8g2.drawStr(0, 50, "2");
u8g2.sendBuffer(); // transfer internal memory to the display
}


if ((millis() - resetCounter > 2000) && (millis() - resetCounter <= 3000)) {
u8g2.clearBuffer(); // clear the internal memory
u8g2.setFont(u8g2_font_logisoso34_tr); // choose a suitable font
u8g2.drawStr(0, 50, "1");
u8g2.sendBuffer(); // transfer internal memory to the display
}


if ((millis() - resetCounter > 3000) && (millis() - resetCounter <= 3500)) {
u8g2.clearBuffer(); // clear the internal memory
u8g2.setFont(u8g2_font_logisoso34_tr); // choose a suitable font
u8g2.drawStr(0, 50, "0");
u8g2.sendBuffer(); // transfer internal memory to the display
}


if ((millis() - resetCounter > 3500) && (millis() - resetCounter <= 4000)) {
bankCount = 0;
}


if ((millis() - resetCounter > 4000)) {
waiting = false;
}


}
printBank();
}


void setup() {
pinMode(battControl, OUTPUT);   // battery transistor
digitalWrite(battControl, LOW);
u8g2.begin();
checkBattery();
// init coin counter
pinMode(hvSolenoid, OUTPUT);
//Serial.print(F("Turning on counter..."));
  digitalWrite(hvSolenoid, HIGH);
pinMode(coinSig, INPUT_PULLUP);
u8g2.clearBuffer(); // clear the internal memory
u8g2.setFont(u8g2_font_logisoso34_tr); // choose a suitable font
u8g2.drawStr(0, 50, "Wait");
u8g2.sendBuffer(); // transfer internal memory to the display
Serial.begin(115200);
  //delay(100); // TODO is there a way to tell when coin acceptor is ready
  while(digitalRead(coinSig));  // add timeout and error.
previousCoinSignal = digitalRead(coinSig);
  //Serial.println(F("done!"));


pinMode(resetButton, INPUT);


  // init screen
  //pinMode(hvOLED, OUTPUT);
loadEEPROM();
//Serial.print(F("After Setup: "));
//Serial.println(freeMemory());
printBank();
}


void loop() {
handleSerial();


if (digitalRead(resetButton) == HIGH)
handleBankReset();


if (millis() - previousBatteryMillis >= batteryInterval) {
previousBatteryMillis = millis();
checkBattery();
}


byte currentCoinSignal = digitalRead(coinSig);


if (currentCoinSignal == HIGH) {
previousUpdateMillis = millis(); // print after pulse train is done
    previousEEPROMwrite = millis(); // don't write until pulse train is over
printOnceFlag = true;
}


  // only print after pulses stop
if (printOnceFlag && (millis() - previousUpdateMillis >= updateInterval)) {
printBank();
printOnceFlag = false;
}


// is time to update the EEPROM?


if (millis() - previousEEPROMwrite >= updateEEPROMinterval) {
// reset the clock
previousEEPROMwrite = millis();


// only write to EEPROM when a new value
if (bankCount != EEPROMbankCount) {
EEPROM.put(0,bankCount);  // writes a float to EEPROM
Serial.println(F("!!! EEPROM WRITE !!!"));
EEPROMbankCount = bankCount;
}
}


if (currentCoinSignal != previousCoinSignal) {
// Save the state for next iteration
previousCoinSignal = currentCoinSignal;


if (currentCoinSignal == HIGH) {
      // we see an edge, but is it a coin pulse?
      armedForCount = millis();
} else {
      // short timeout to make sure it was a full pulse
      if (millis() - armedForCount < pulseTimeOut) {
        bankCount++;
      }
    }
}
}
Full source Code, Design Files, and Schematics Attached!
Top Comments