
2.jpg.jpg-68x68x2.jpg?_=zqdYZYFj3EWNUExYxEhR6Q==)
Table of contents

Abstract
This Halloween, an engineer built an over-the-top sweets dispenser and "Trick" machine, complete with lights, sounds, and mild chaos - entertaining kids, confusing the dogs, and proving overengineering is the ultimate spooky sport.
Project
Automated Trick-or-Treating: One Man, Many Dogs, and a Delightfully Overengineered Halloween
Introduction
Confession: I have more dogs than most have furniture, and I love them - until Halloween when they audition for Britain’s Loudest Canines. Every guest gets a bark symphony that rattles windows and drowns out conversation.
Being an engineer, my motto is simple: if it doesn’t work, add motors, sensors, and a dash of mild insanity. The result? A trick-or-treat automation system that delivers sweets, contains chaos, and mostly keeps the dogs from turning Halloween into a contact sport.
Warning: the wiring looks like a caffeinated octopus had a knitting spree on my workbench. Elegance optional. Functionality mandatory.
Design Challenges
Automating Trick-or-Treating sounds simple: a button, some sweets, maybe a light show. Easy. Not.
Key requirements:
- Play Button: tough enough to survive sugar-fuelled ninja attacks.
- Decision: Trick or Treat, with suspense.
- Sweets Delivery: reliable and easy to retrieve.
- Trick Mechanism: startling, but not lawsuit-inducing.
Extras: outdoor-ready, low-voltage (12V), and presentable—no “shed monstrosity” here. Think budget arcade game, not chaos in a box.
Concept Development
"One has to look out for engineers - they begin with sewing machines and end up with the atomic bomb." Marcel Pagnol
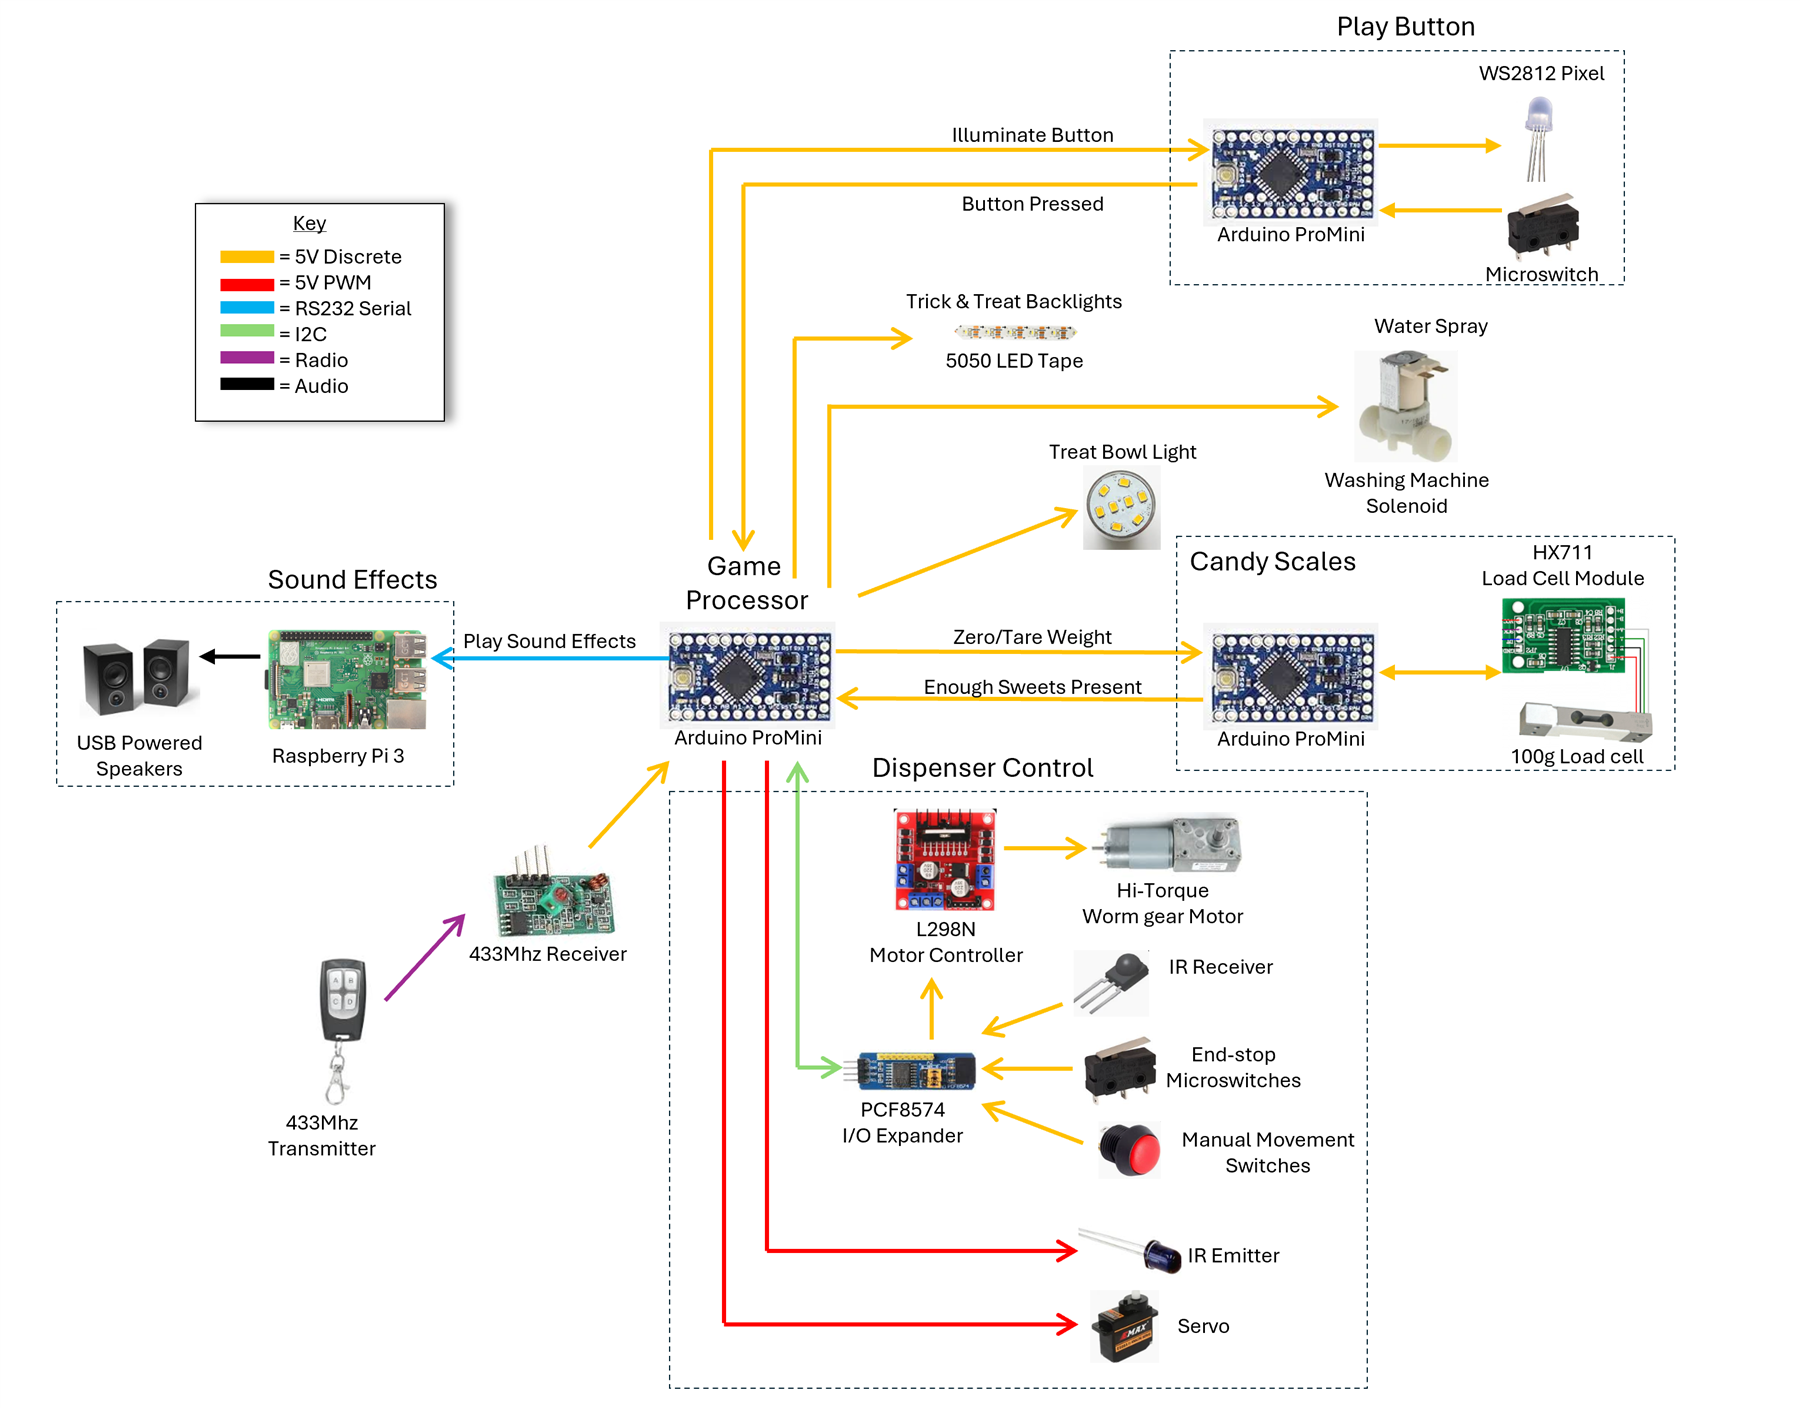
Figure 1: The Grand Plan for Maximum Mischief
The Play Button
My first Play button was a microswitch wedged between plywood—rugged, but looked like a medieval torture device.
Then I remembered: I don't need to reinvent arcade buttons. I mounted one, added a single RGB Pixel LED in a 3D-printed holder, and programmed a pulsing red heartbeat on the Arduino. The result: sturdy, satisfying to press, and able to survive sugar-fuelled chaos.
Figure 2: The Button of Doom (with a Soundtrack of Panic)
Trick or Treat Display
I wanted a display that clearly said “Trick” or “Treat” with some visual oomph.
LED Neon? Disaster. 5mm LEDs? Looked like a budget 80s arcade.
Solution: PowerPoint. I designed the instructions and words on A3, backlit it, and laminated it. Bright, clear, and surprisingly professional-looking—engineers love PowerPoint!
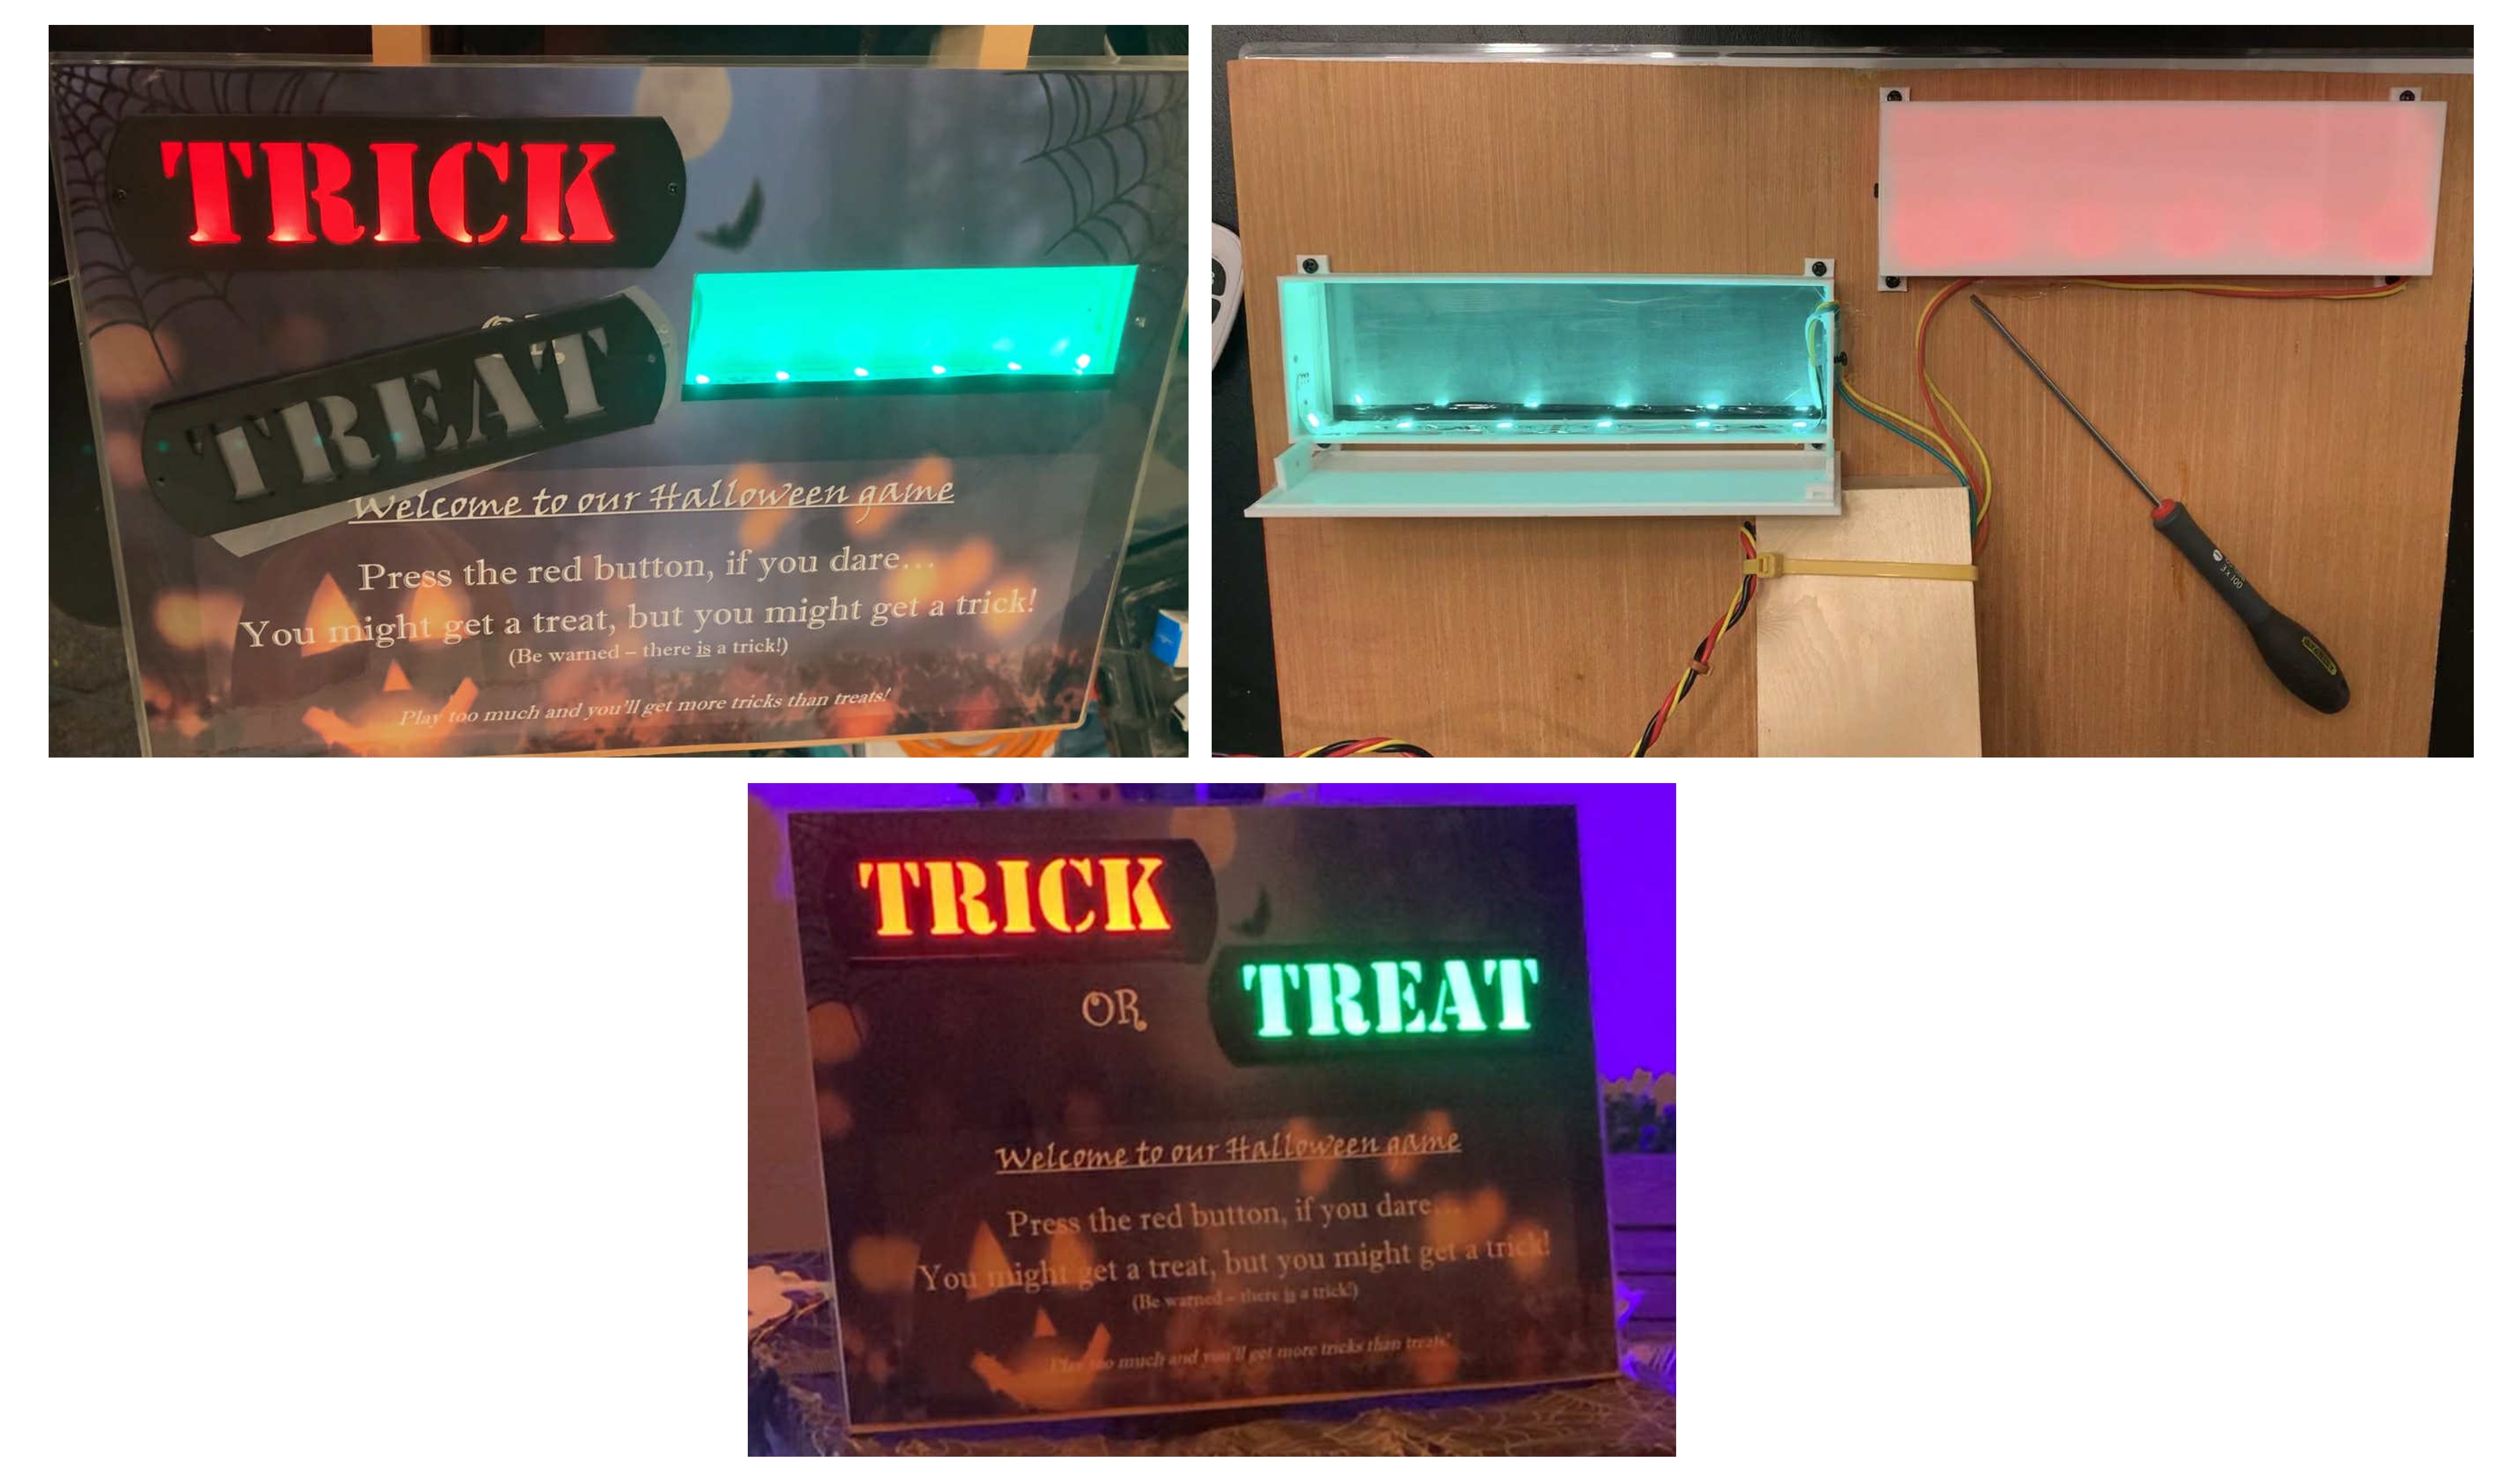
Figure 3 : The Nightmare Display
Treat – The Sweets Dispenser
Sweets. Simple in theory. Nightmare in practice.
Prototype 1: Rising Platform
A platform lifts a set volume of sweets into a chute via a stepper motor and rack-and-pinion. Elegant in theory.
Problems: sweets jam, the motor stalls, and refills are unpredictable—sometimes a handful, sometimes nada. Result: glorious failure, but valuable lessons learned.
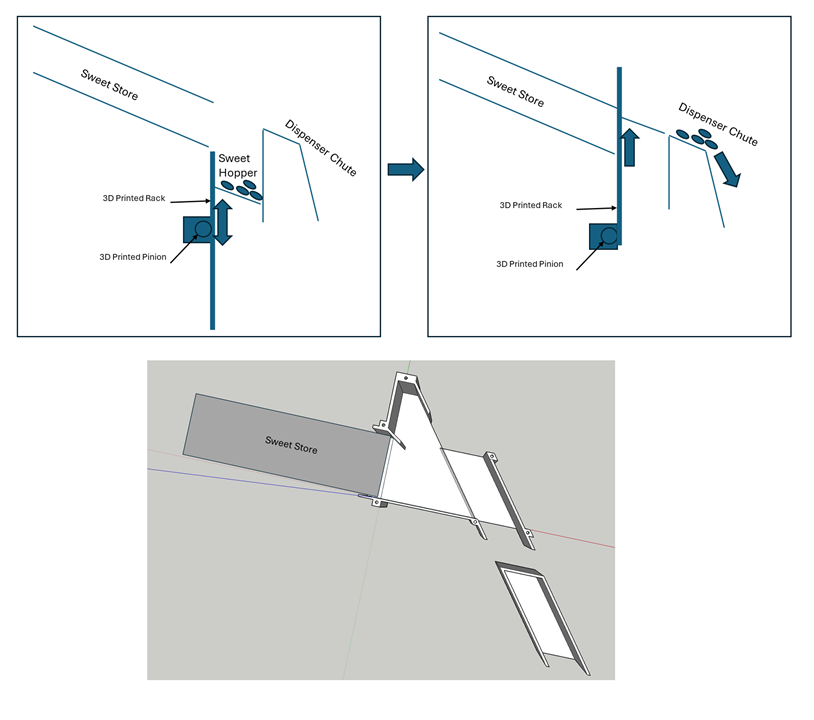
Figure 4: The ‘Rise and Occasionally Cooperate’ Platform
Prototype 2: Rotating Drum
A rotating drum scooped sweets into a chute. Worked… sometimes. Jams were frequent—“sugar guillotines”—and it only liked Giant Skittles, which cost a fortune.
Verdict: mechanically clever, financially ridiculous.
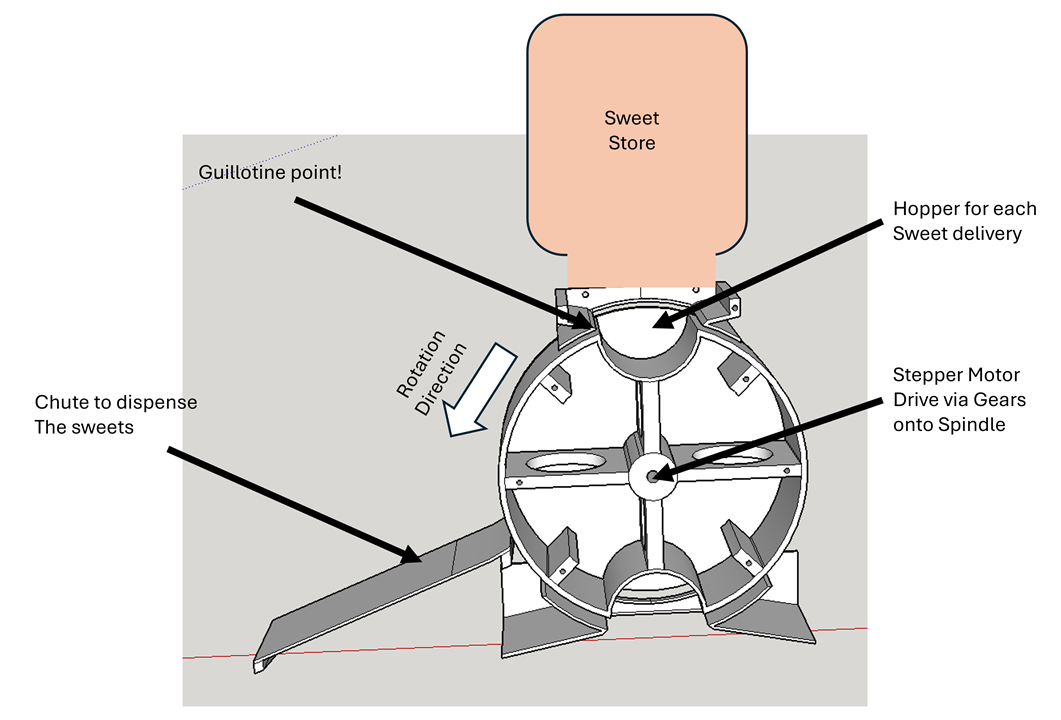
Figure 5: The Rotating Confectionery Carnage Design
Final Version: Linear Shelf Pusher
Sweets sit on a shelf. A motor-driven pusher nudges them into a hopper, which drops them to lucky trick-or-treaters. Linear rails keep it smooth, worm-gear motor avoids stalls, limit switches prevent disasters, and an IR beam confirms sweets are present. Simple, reliable, and sweet-shape agnostic.
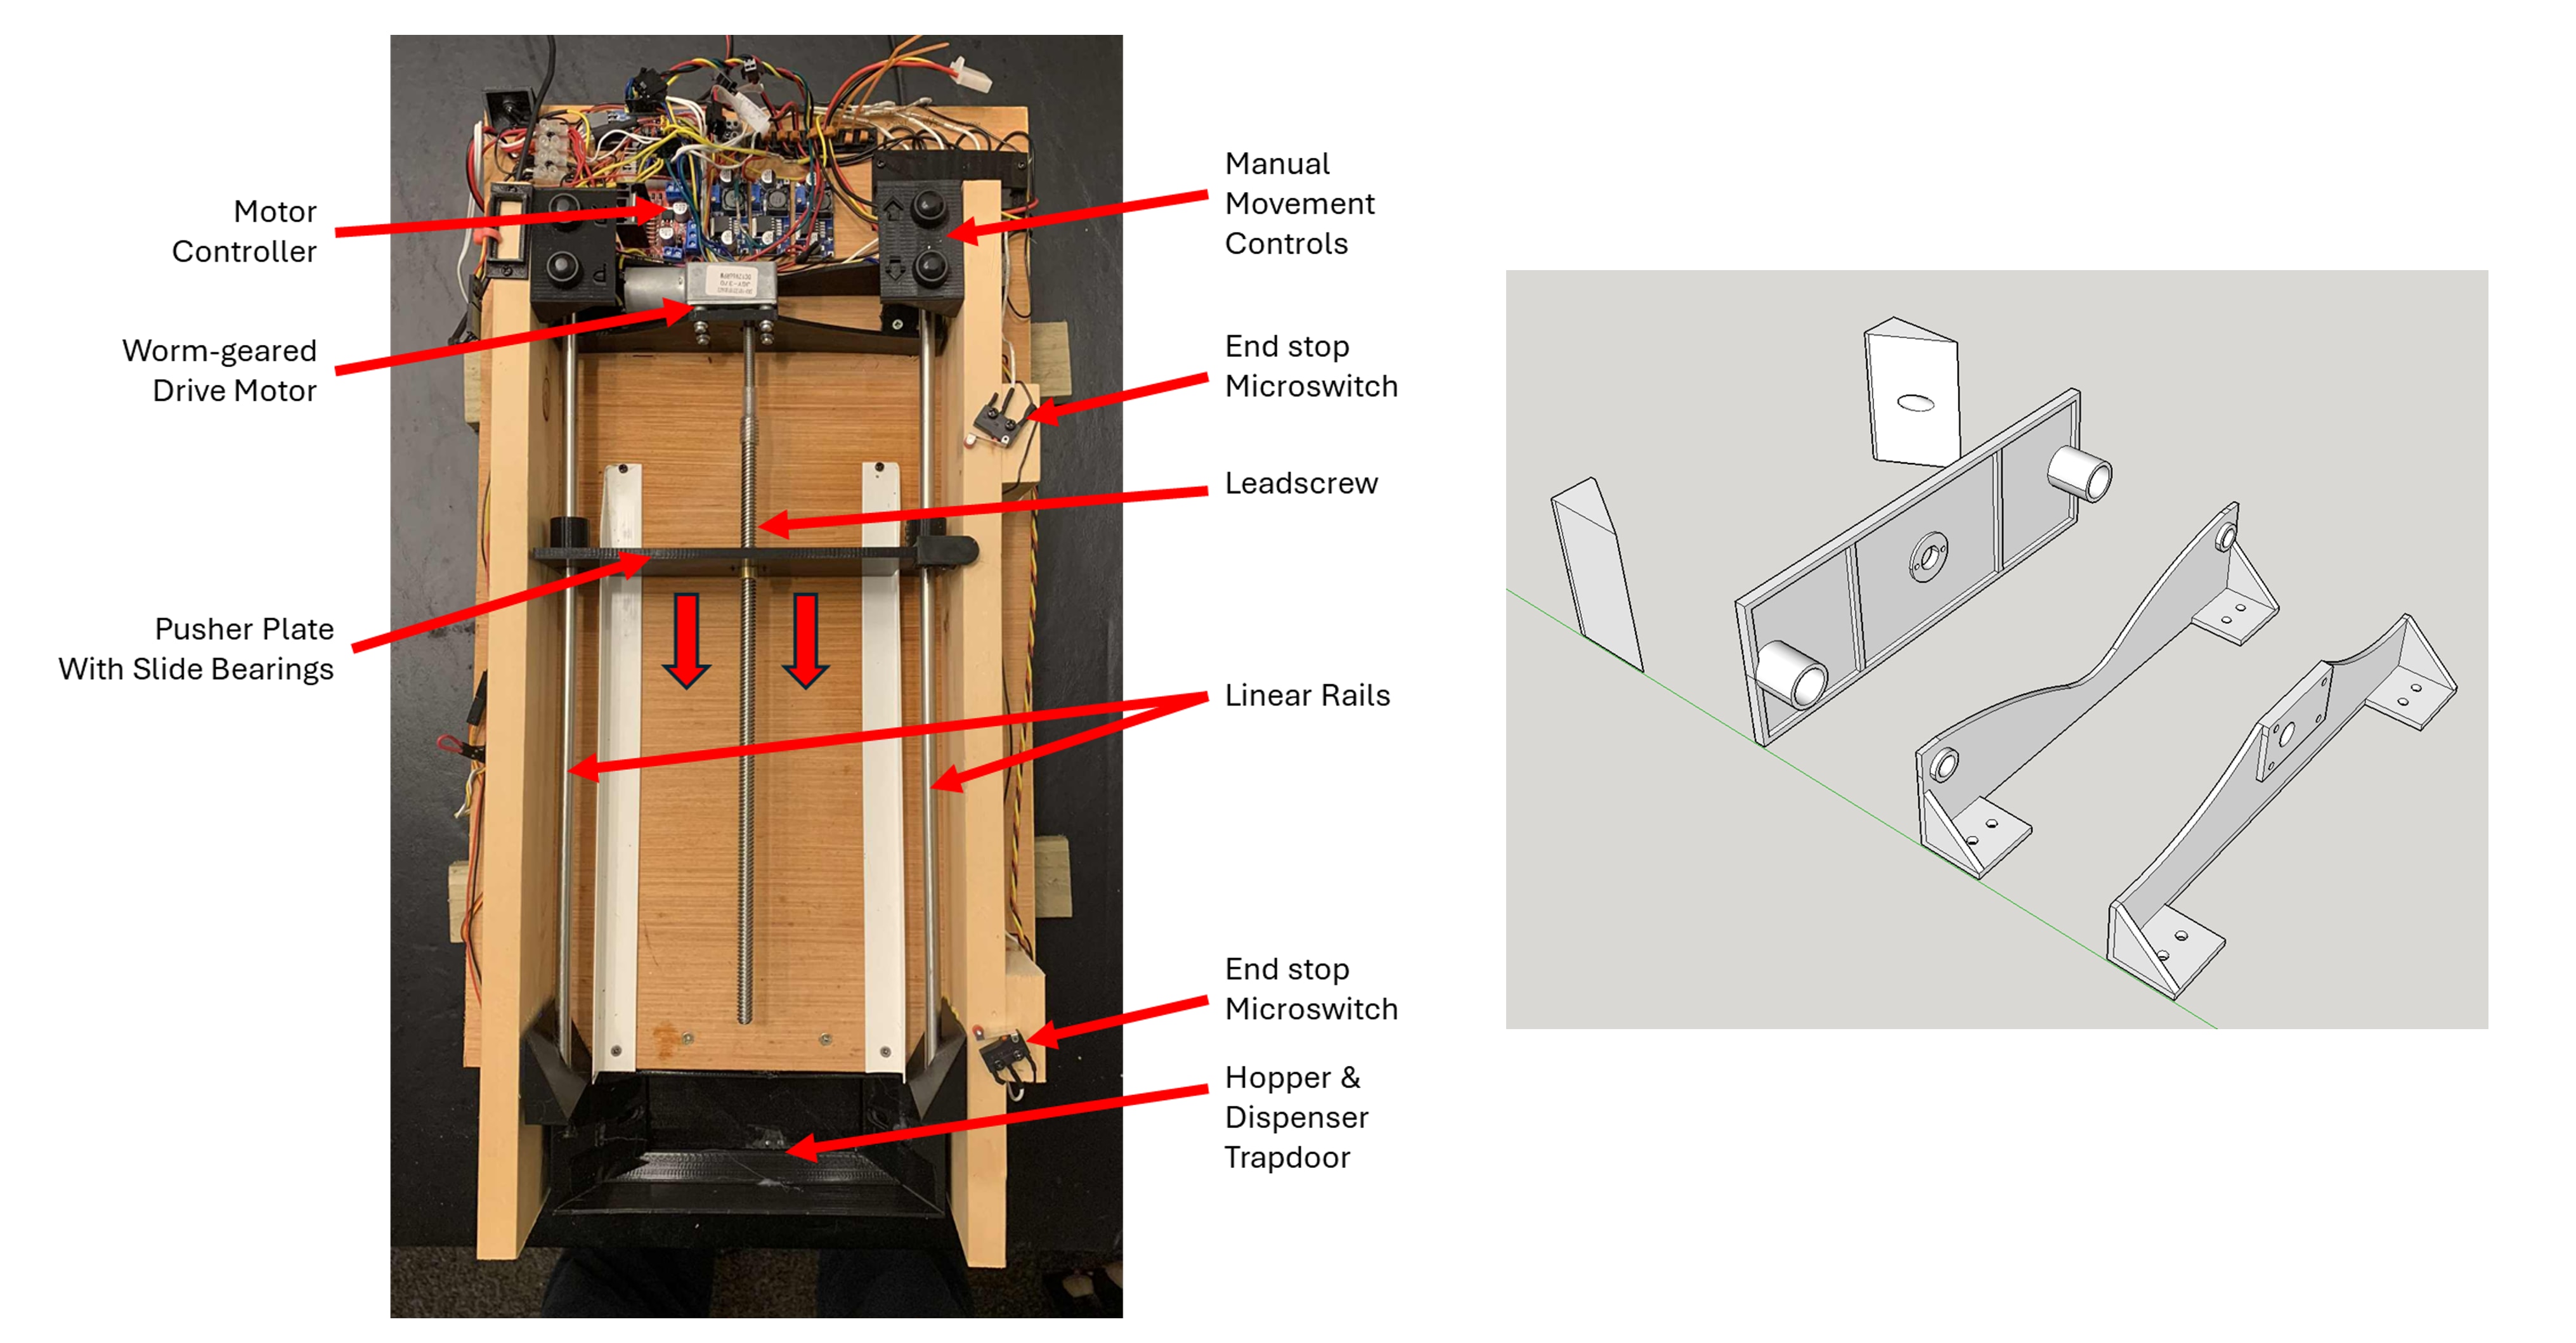
Figure 6 : Plywood Perfection
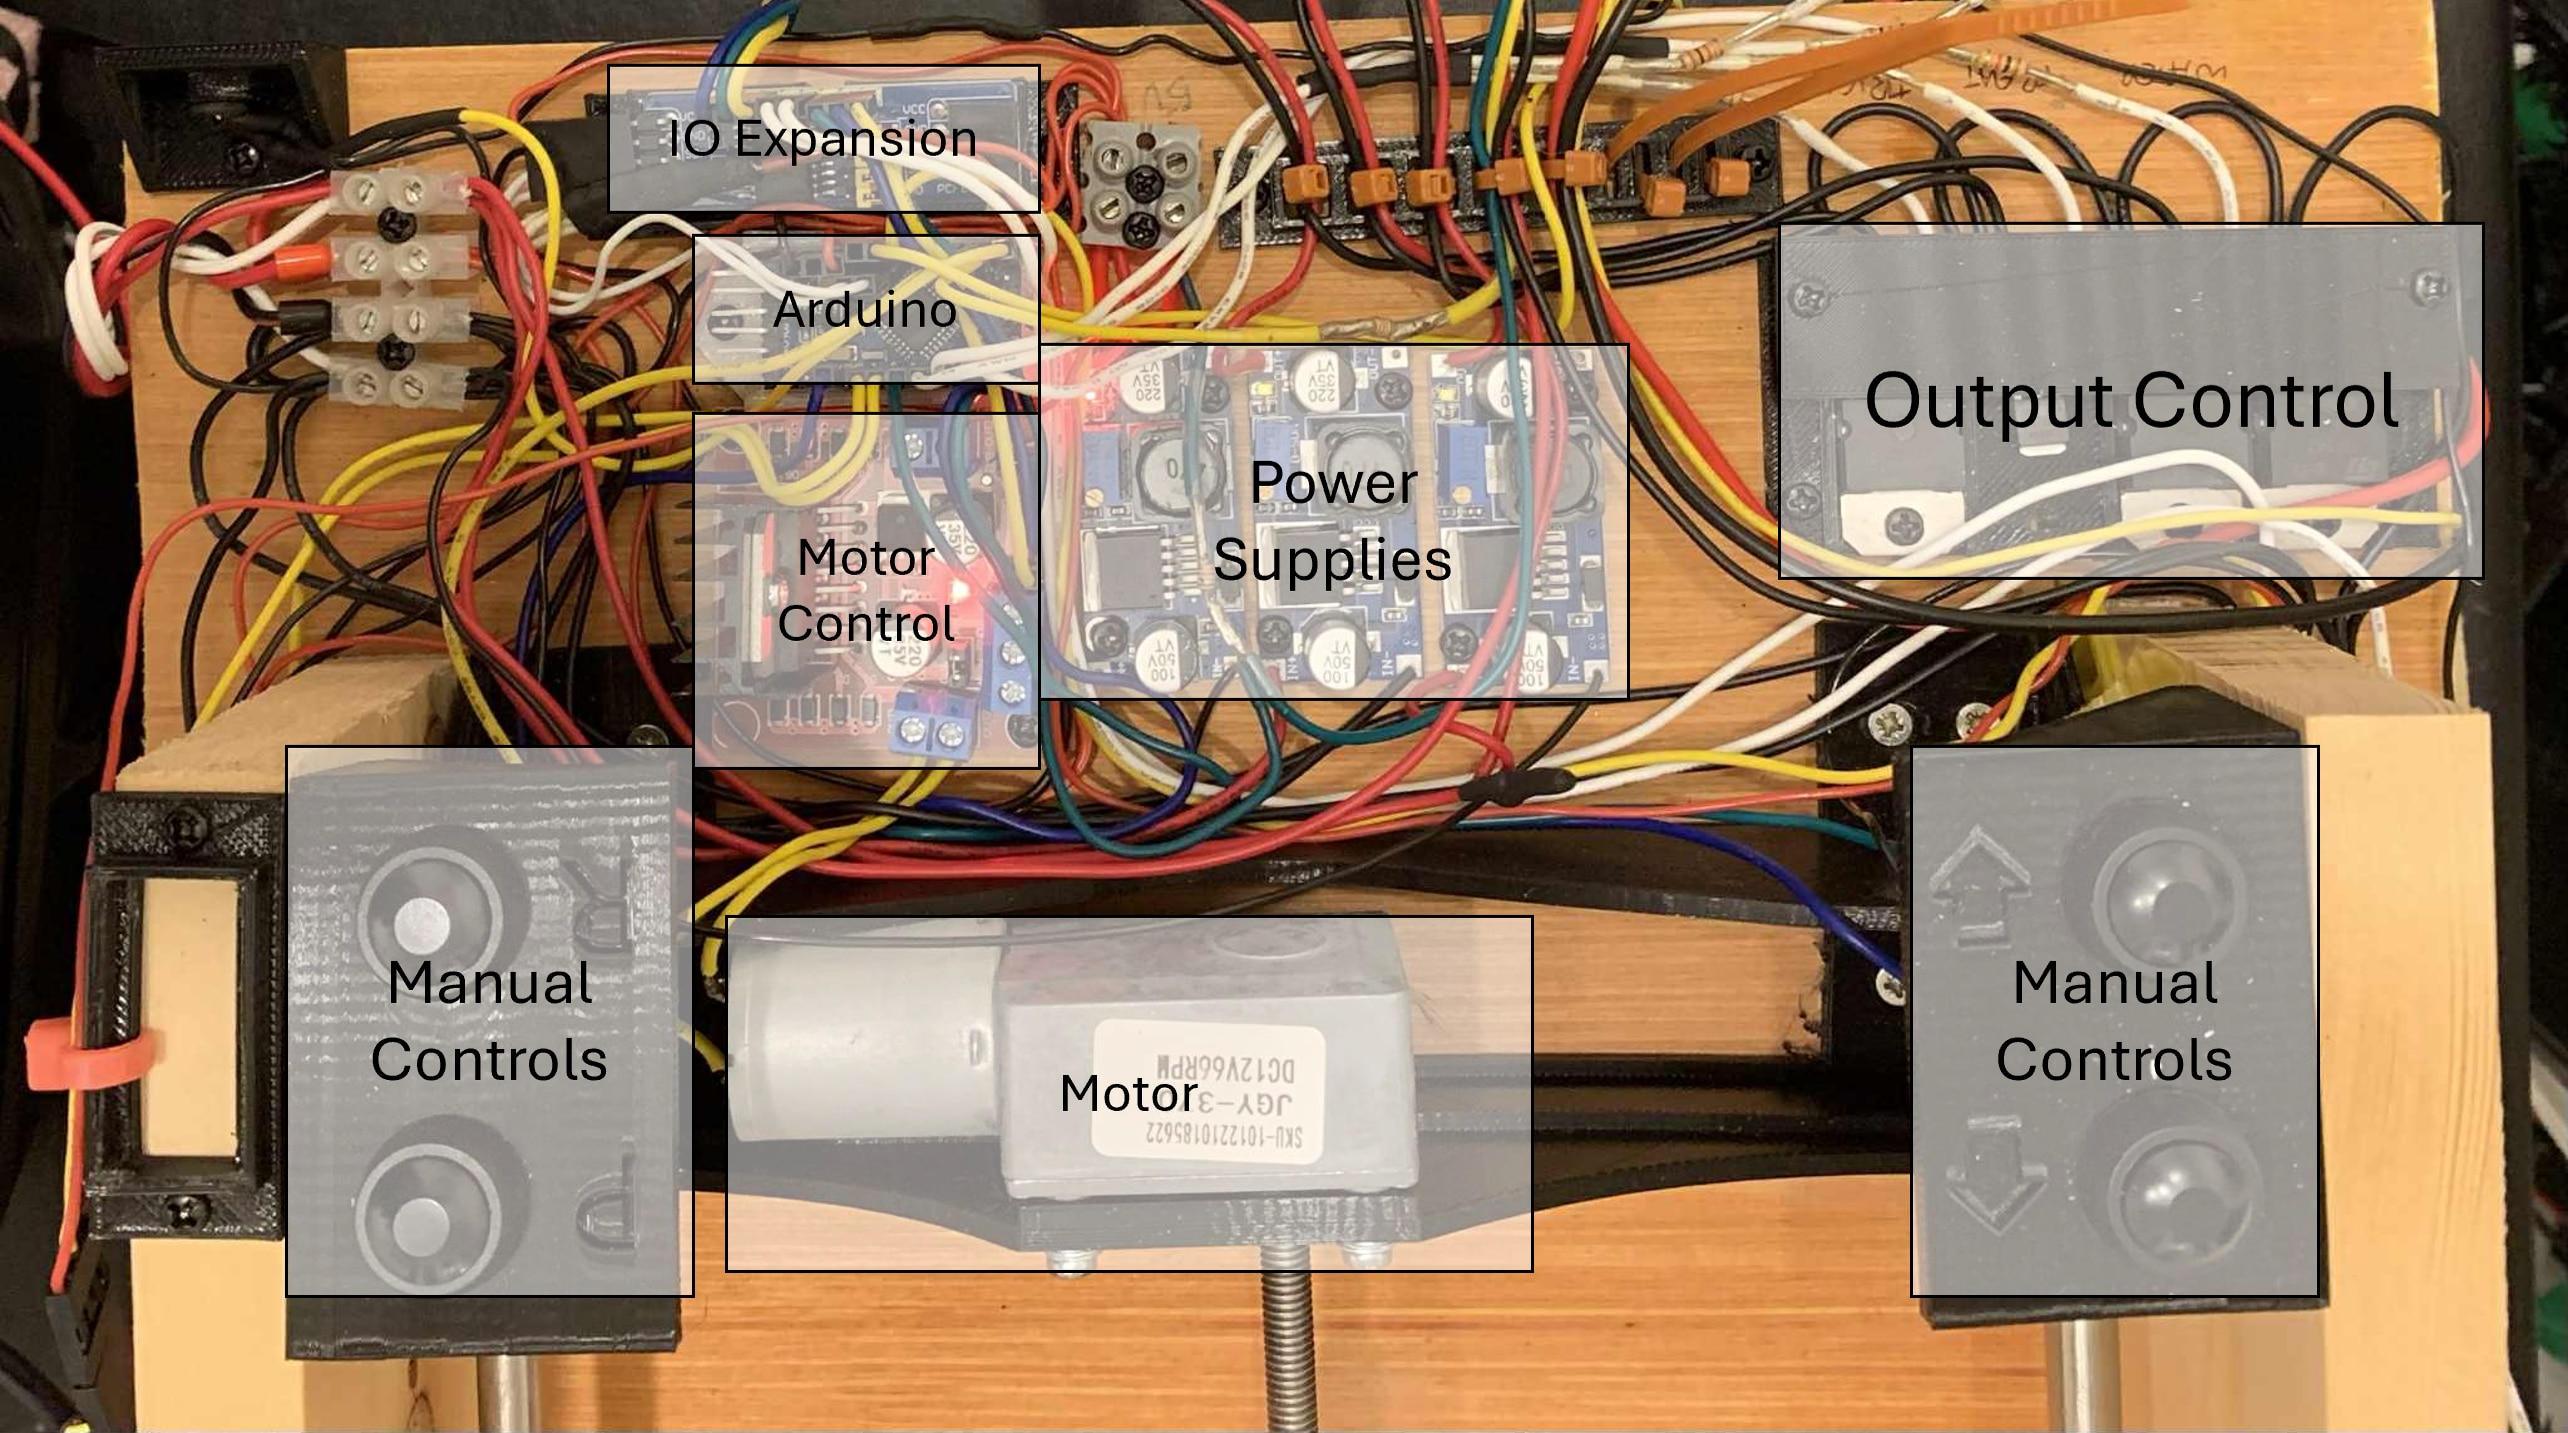
Figure 7 : Behold the Finesse
Trick – A Short, Sharp Shock
Loud noises, fire, and strobe lights? Tempting, but the neighbours might intervene. Solution: water. A 12V solenoid on the garden hose delivers a precise 30-millisecond spray—enough to startle visitors without handing out towels.
200 milliseconds? Cruel.
Simple, effective, and the perfect mix of horror and humour: memorable, but free of legal action.
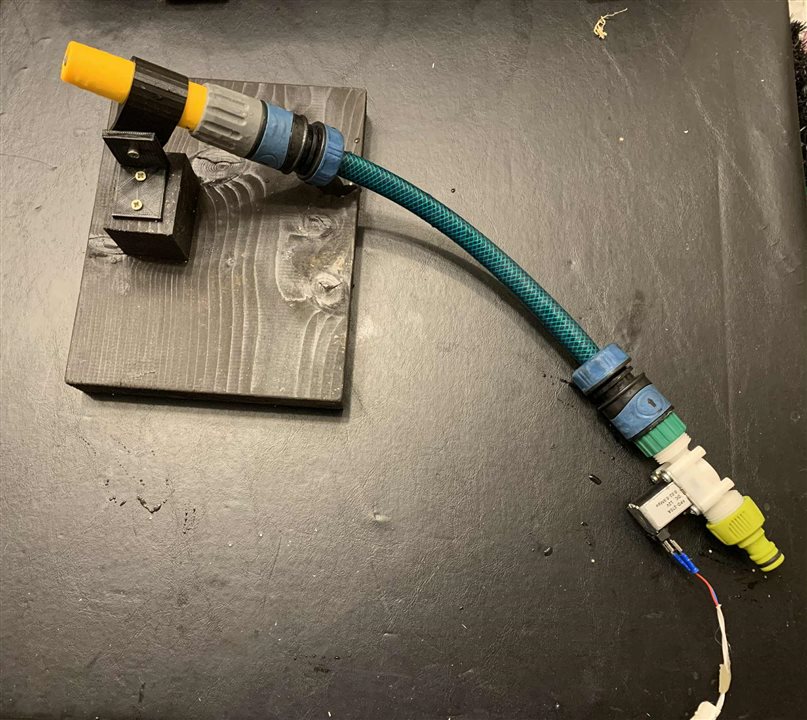
Figure 8: The Sprayer of Startled Screams
Let’s Get This Show On the Road!
Sweets and water alone are charming, but without spectacle it’s just a soggy lottery. I wanted lights, sound, and arcade-style showmanship.
Arduino sound modules? Useless—they sounded like a dial-up modem doing The Exorcist. Instead, a Raspberry Pi running Python and pygame plays audio on command from the Arduino, with logic-level converters protecting the Pi.
Lighting got creative: a hacked pound-shop ghost for Tricks, a £2 torch for the Treat bowl, and RGB pixels pulsing the Play button. Even the solenoid spray triggers a mini-lighting storm. Simple, spooky, and ridiculously overengineered.
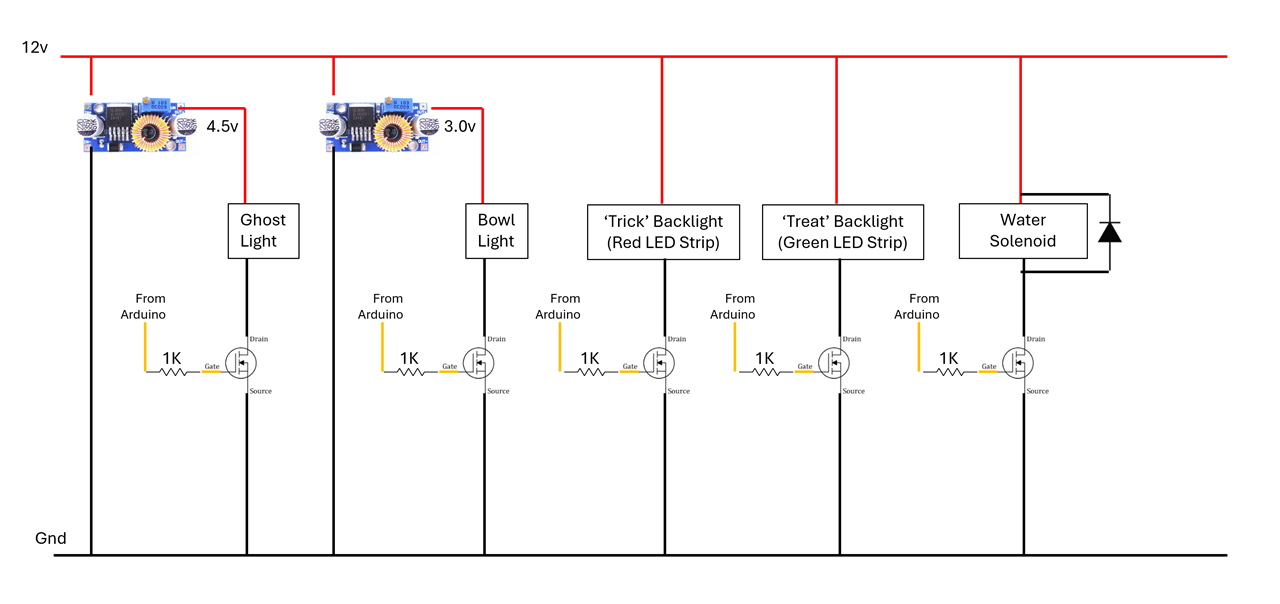
Figure 9 : The Mischief Management Module
In short, The Show is where engineering meets theatre. It’s part haunted arcade, part mechatronic puppet show, part mischievous prank. And it works: guests are startled, delighted, occasionally drenched, and always thoroughly entertained - all while I sit inside, smug, coffee in hand, enjoying the chaos I orchestrated.
Figure 10: The Big Show
Scope Creep: Never Leave an Engineer Unattended
Ah, scope creep—the inevitable companion of any engineer. Relying on a random number generator for Trick or Treat risked leaving one guest drenched and empty-handed while another scooped up all the sweets.
Solution: a 433 MHz remote. From indoors I can force Treats, force Tricks, or play a “Game Over” clip when someone overstays. A load-cell in the hopper ensures fair distribution, distinguishing a single sweet from a sugar heist.
Scope creep transformed a simple project into a fully controllable, slightly sadistic theatre of Trick-or-Treat. But let’s be honest: overthinking is practically mandatory when you’re an engineer.
.
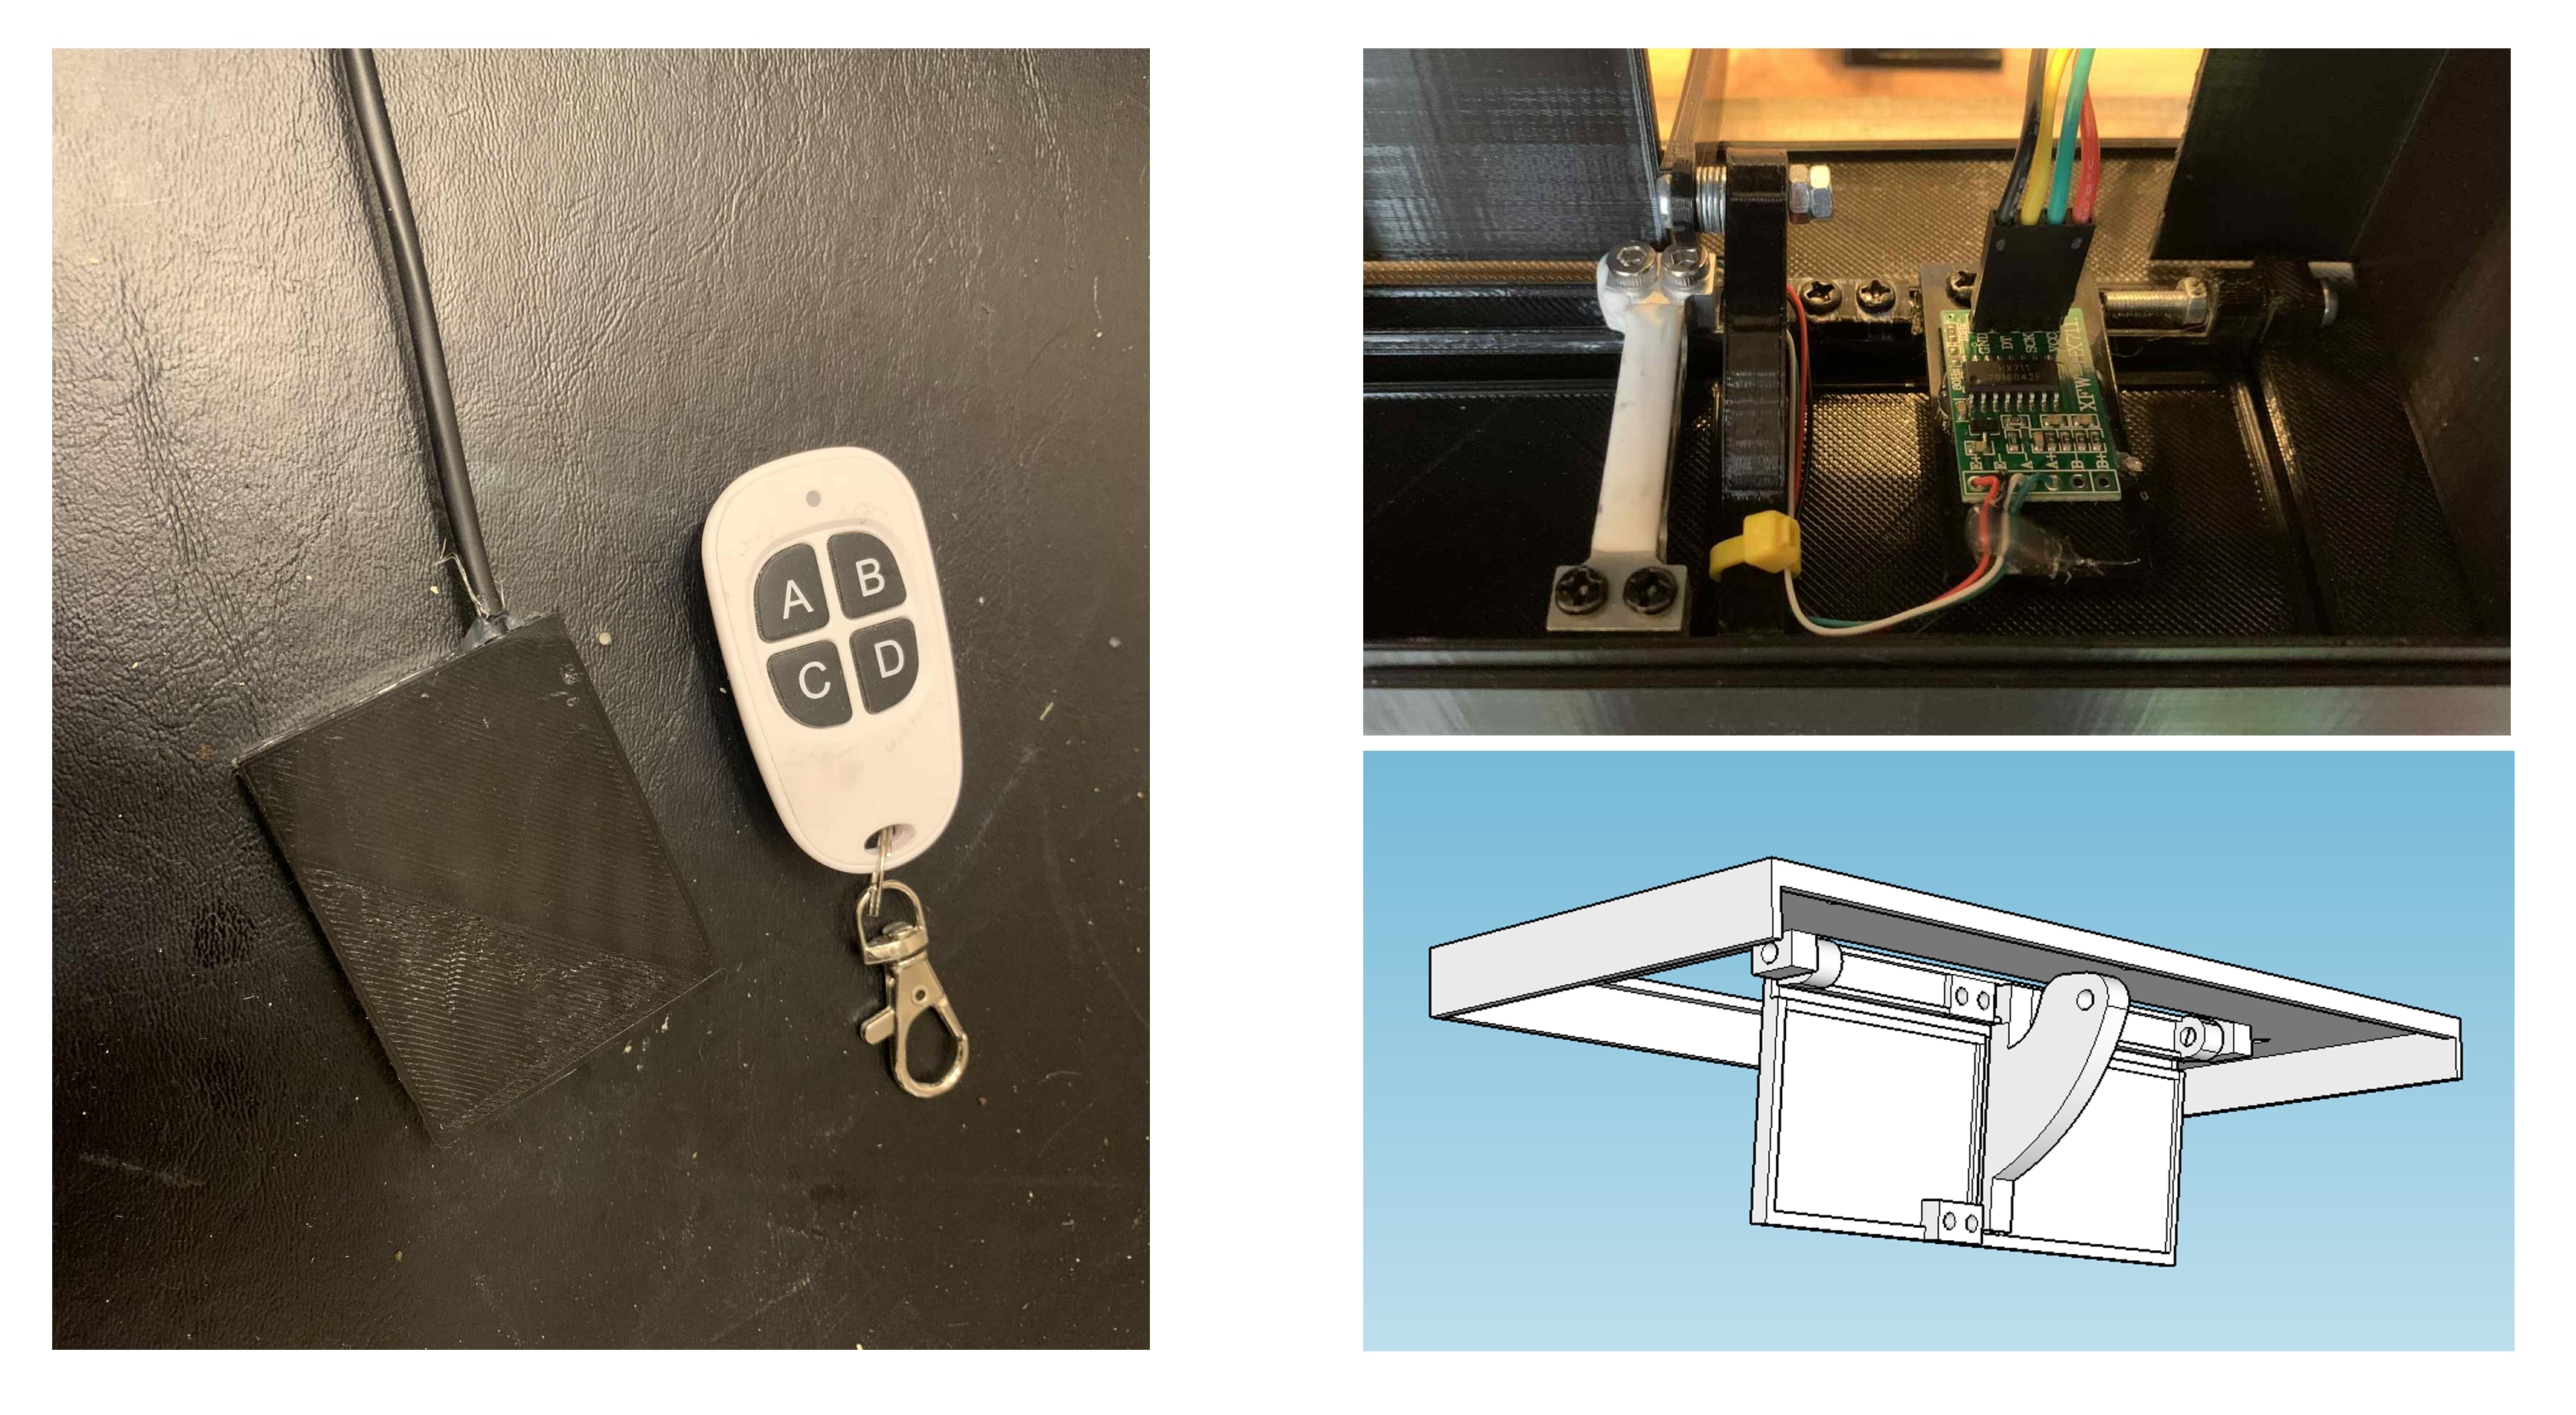
Figure 11: Chaos Controller (left) and the Scales of Justice (right)
Testing & Improvements
Testing is where the project came alive. Indoors? Perfect: sweets landed, lights pulsed, solenoid fired. Outdoors? Gravity conspired. A downhill slope sent sweets flying, software panicked, neighbours stared. Solution: bricks under the table legs. Brute force triumphs again.
Sticky wrappers jammed the dispenser, so fault LEDs now flash codes: three flashes = refill, four = minor chaos, five = hide under the sofa.
Complexity demanded three Arduinos running simultaneously, all non-blocking: lights, servo, solenoid, sweets detection, and sound coordinated flawlessly. After many iterations, the system finally delivered reliable, chaos-free trick-or-treating… mostly.
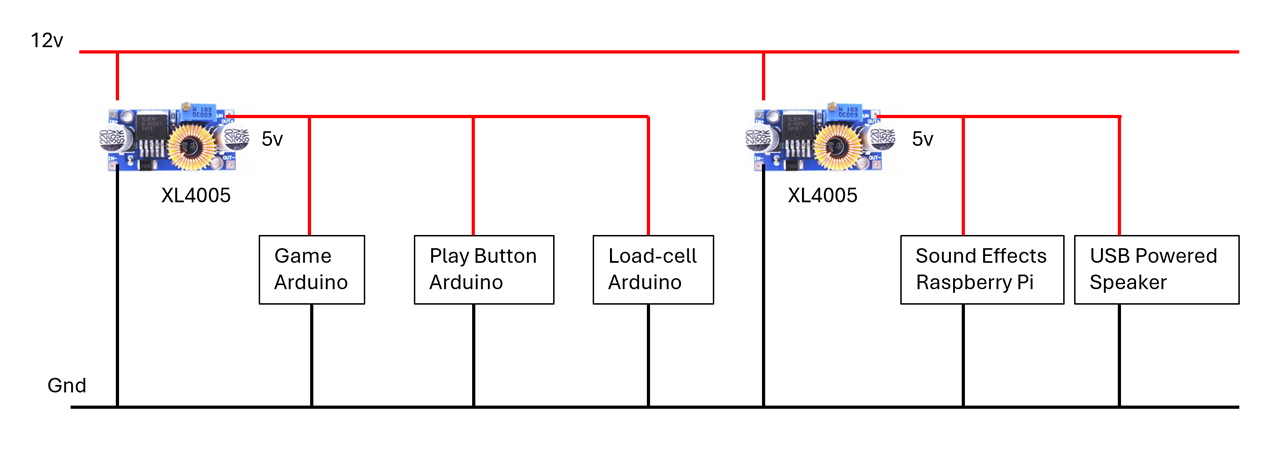
Figure 12: Powering the Chaos
Conclusions
What began as a plan to relax my dogs became a full-blown mechatronic sideshow: multi-processor coordination, precision weighing, remote overrides, lights, sounds, and motion. Over-engineered? Absolutely. Effective? Spectacularly. Rain survived, sugar-fuelled visitors entertained, and I enjoyed Halloween in peace while the dogs gawked.
Next year? Smoke, facial recognition, live streaming… clearly, the madness continues.
Where are the Details!!!
I hear you engineers shouting already: ‘But where are the details?! Where is the source code?!’ Calm down, I got you. When I first prepared this, I didn’t realise the element14 site had a word limit - rookie mistake. As you may have guessed, I like to write. A lot. So, for those brave souls craving the full, unabridged saga of my over-engineered Halloween madness… here’s the feature-length version. Buckle up, it’s a novel:
The End?
This project proves you don’t need a PhD—or much clue—to create impressively chaotic fun. Start small, embrace the mess, and treat every failed prototype as a hilarious story. Grab LEDs, a microcontroller, maybe a dog for moral support, and dive in. Flying sweets, startled visitors, slightly damp engineers guaranteed.
Hopefully, this inspires your own mechatronic madness. May your wiring be neater and your pets more entertained than mine. And remember: seize every opportunity to engineer—but keep a bowl of sweets handy, even when it's not Halloween.
References
- Arduino with Load Cell and HX711 Amplifier
https://randomnerdtutorials.com/arduino-load-cell-hx711/ - Practical Guide to PCF8574: Adding Extra Pins for Arduino
https://www.hackster.io/mdraber/practical-guide-to-pcf8574-adding-extra-pins-for-arduino-4095f2 - Controlling WS2812B Addressable LEDs with Arduino
https://lastminuteengineers.com/ws2812b-arduino-tutorial/ - L298N Motor Driver – Arduino Interface, How It Works, Codes, Schematics
https://howtomechatronics.com/tutorials/arduino/arduino-dc-motor-control-tutorial-l298n-pwm-h-bridge/ - pygame module API for loading and playing sounds
https://www.pygame.org/docs/ref/mixer.html - Complete Guide for RF 433MHz Transmitter/Receiver Module With Arduino
https://randomnerdtutorials.com/rf-433mhz-transmitter-receiver-module-with-arduino/ - Raspberry Pi Arduino Serial Communication – Everything You Need To Know
https://roboticsbackend.com/raspberry-pi-arduino-serial-communication/ - Arduino Lesson 6. Digital Inputs
https://learn.adafruit.com/adafruit-arduino-lesson-6-digital-inputs/arduino-code - Servo Motor Basics with Arduino
https://docs.arduino.cc/learn/electronics/servo-motors/


