

Table of contents

Abstract
SpookyPod is a portable Halloween-themed audio player built around the MAX32655, featuring offline MP3/WAV playback, a dedicated stereo audio codec, custom animations, and a 3D-printed enclosure.
Project
SpookyPod – Building a Halloween-Themed Portable Audio Player
1. The Idea Behind SpookyPod
What if I could build a small handheld device that could play spooky sound effects, Halloween background music, and custom audio tracks without depending on a smartphone or an internet connection?
That was the thought behind SpookyPod.
I wanted to build something for Halloween that was more than just an LED decoration or a simple sound-triggered module. I wanted a complete, standalone electronic device with its own display, physical controls, audio system, storage, and a custom enclosure.
I also wanted to challenge myself technically. Instead of using a ready-made MP3 player module, I decided to build the audio playback system around the Analog Devices MAX32655 and a dedicated stereo audio codec.
This meant working with several things I was particularly interested in: embedded C , digital audio, peripheral interfaces, DMA, display drivers, storage management, and hardware integration.
As the project developed, it became much more than an MP3 player. I ended up building the firmware, designing the user interface, developing a desktop application for managing music, and designing a custom 3D-printed enclosure.
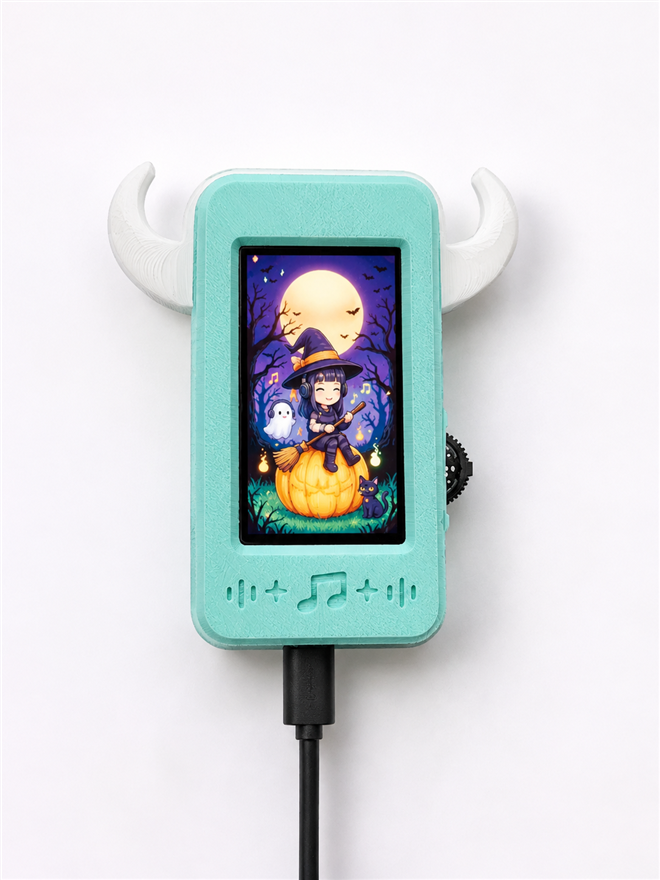
The result is SpookyPod – a small Halloween-themed audio player that can be used as a portable sound-effects device, a costume accessory, or an audio source for Halloween props and animatronics.
Youtube Demonstration Video :
https://youtu.be/krAEVXIfLwc?si=InQeQdV0IIOdVJzV
2. Getting the Hardware Together
The first major decision was choosing the microcontroller.
I went with the Analog Devices MAX32655FTHR development platform. The MAX32655 provides an Arm Cortex-M4F processor running at up to 100 MHz, along with the memory and peripheral interfaces required for this application.
For audio, I chose the MAX9867 stereo audio codec. I specifically wanted a dedicated codec because I wanted to understand the complete digital audio path rather than simply connecting an audio playback module.
The main hardware used in my project is:
| Component | Purpose |
|---|---|
| MAX32655FTHR | Main processing and control |
| MAX9867 | Stereo audio conversion and headphone output |
| ST7789V2 IPS display | Graphical user interface |
| MicroSD card | Offline audio storage |
| MAX20303 | Power-management subsystem |
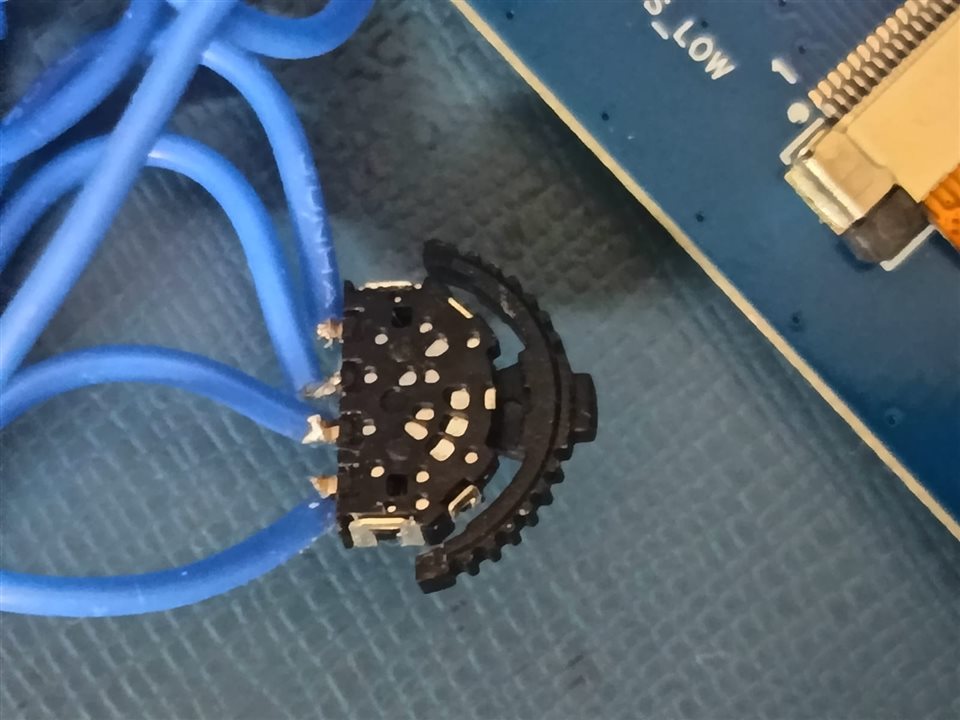
| Physical jog switch | Navigation and user interaction |
| Tactile pushbutton | Additional playback controls |
| LiPo battery | Portable power |
| 3D-printed PLA enclosure | Mechanical housing |
One thing I wanted to get right was the separation between the different hardware functions. The MAX32655 handles the application and peripheral control, the MicroSD card stores the audio, and the MAX9867 handles the audio output.
This gives the project a fairly clean architecture and makes it easier to work on individual subsystems.
3. The Interesting Part: Building the Audio Engine
This was one of the parts I was most excited to work on.
I didn't want SpookyPod to depend on preloaded audio in flash memory. I wanted users to be able to insert a MicroSD card, add their own MP3 or WAV files, and use the device as an offline audio player.
So I implemented the audio playback pipeline myself.
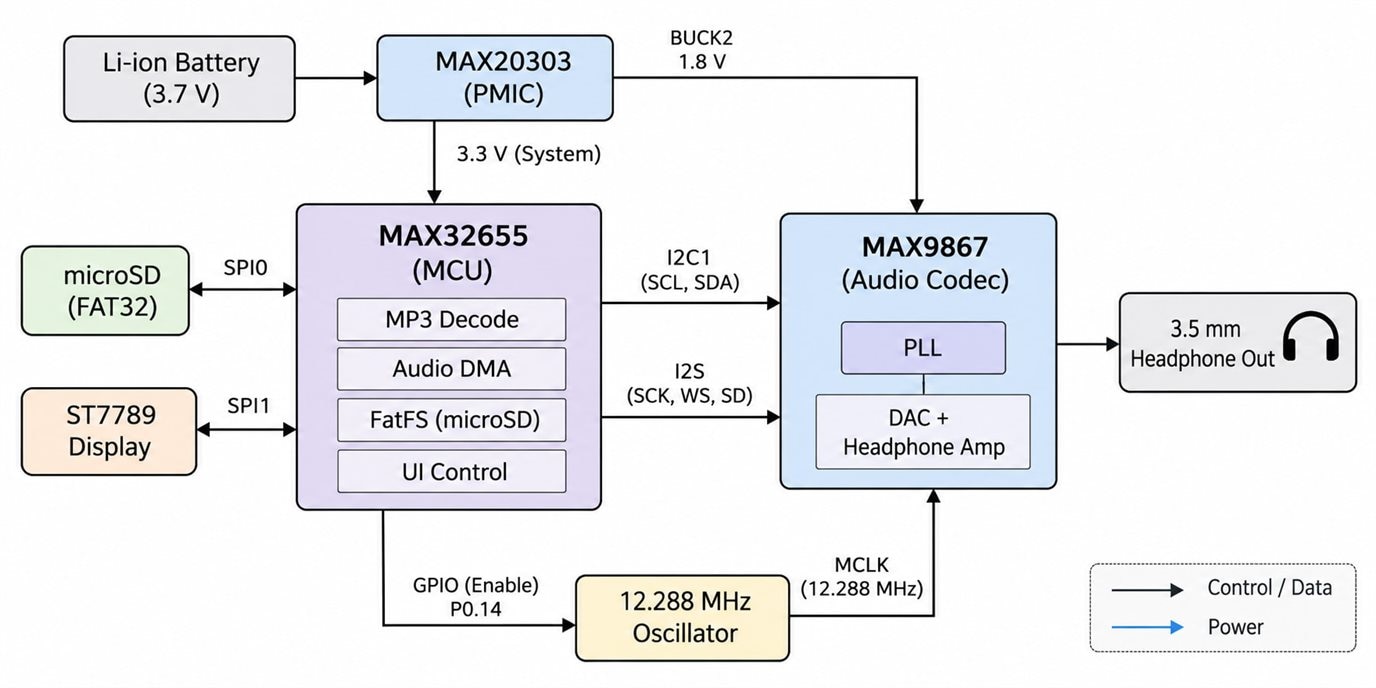
The audio files are read from the MicroSD card using SPI and accessed through FatFS. For MP3 playback, I integrated the lightweight minimp3 decoder.The decoder converts the compressed MP3 data into PCM samples. These samples are then prepared for transmission to the MAX9867 through the I2S interface.
The complete audio path looks like this:
MicroSD → SPI → FatFS → MP3 Decoder → PCM Audio Buffers → I2S + DMA → MAX9867 → Headphone Output
The MAX9867 is configured through I2C, while I2S is responsible for transmitting the actual digital audio samples.
I configured the playback path for 16-bit stereo audio at 48 kHz.
One important implementation detail is DMA-based audio transmission. I didn't want the processor to spend all its time manually transferring audio samples. Instead, DMA handles the transfer between memory and the I2S peripheral.
I also implemented double buffering. While one PCM buffer is being transmitted, the next buffer can be prepared with decoded audio data. This helps keep the audio stream continuous and reduces the processor's workload.
Apart from MP3, I also implemented WAV file handling.
Working on this subsystem was particularly interesting because it connected several concepts that are often studied separately. File systems, digital signal representation, audio decoding, buffering, serial communication, and hardware codecs all have to work together to produce something as simple as music coming out of a headphone.
That is probably one of my favourite aspects of SpookyPod.
4. Firmware: Bringing Everything Together
The firmware is written in C using the Analog Devices MSDK.
I wanted to keep the code organised instead of putting all the application logic into a single source file. So I separated the firmware into modules based on their responsibilities.
| Firmware module | What it handles |
|---|---|
main.c |
System initialisation and main application loop |
audio_player.c |
Audio reading, decoding, buffering and playback |
player_app.c |
Player logic, navigation and application states |
display.c |
Display communication and graphics |
max9867.c |
Audio codec configuration |
sd_spi.c |
MicroSD communication |
The application handles the different player states, including stopped, playing, and paused. Physical button events are processed by the application logic, which updates the playback state and the user interface accordingly.
I also worked on inactivity handling, screen-sleep functionality, and peripheral shutdown operations.
The idea was to make the device behave like a standalone product rather than a development board that needs to be controlled through a computer.There is still scope for further optimisation, but having the firmware divided into separate modules makes it much easier to maintain and extend.
5. Giving SpookyPod Its Own Identity – Display and UI
I didn't want to put a generic music-player interface on a Halloween-themed device.
The display was an opportunity to give SpookyPod its own personality.
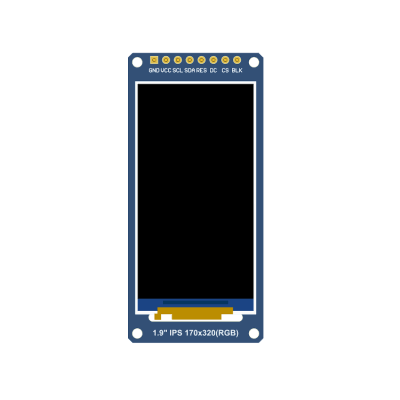
I used a 1.9-inch, 170 × 320 IPS display based on the ST7789V2 controller. The interface uses custom Halloween artwork, with elements such as witches, pumpkins, bats, and moonlit backgrounds.
I designed different visual screens for the player interface, startup, and USB upload mode. I also created a custom Halloween-themed screensaver.
The physical controls are deliberately simple. The jog switch is used for navigating the interface, while the additional button provides playback and selection operations.
I wanted the device to be usable without a touchscreen. For something that might be handled while wearing a Halloween costume or operating a prop, physical controls make a lot of sense.
The witch-themed artwork currently displayed on the device is one of the details that makes the prototype feel like an actual Halloween product rather than just an electronics experiment.
6. Spooky Music Manager – I Built a Desktop Companion Too!
There was another small problem I wanted to solve.
Once the device is assembled, accessing the MicroSD card every time I want to change the audio files isn't particularly convenient.
So I decided to build a desktop companion application called Spooky Music Manager using Python and PyQt6.
The application provides two ways to manage the audio library.
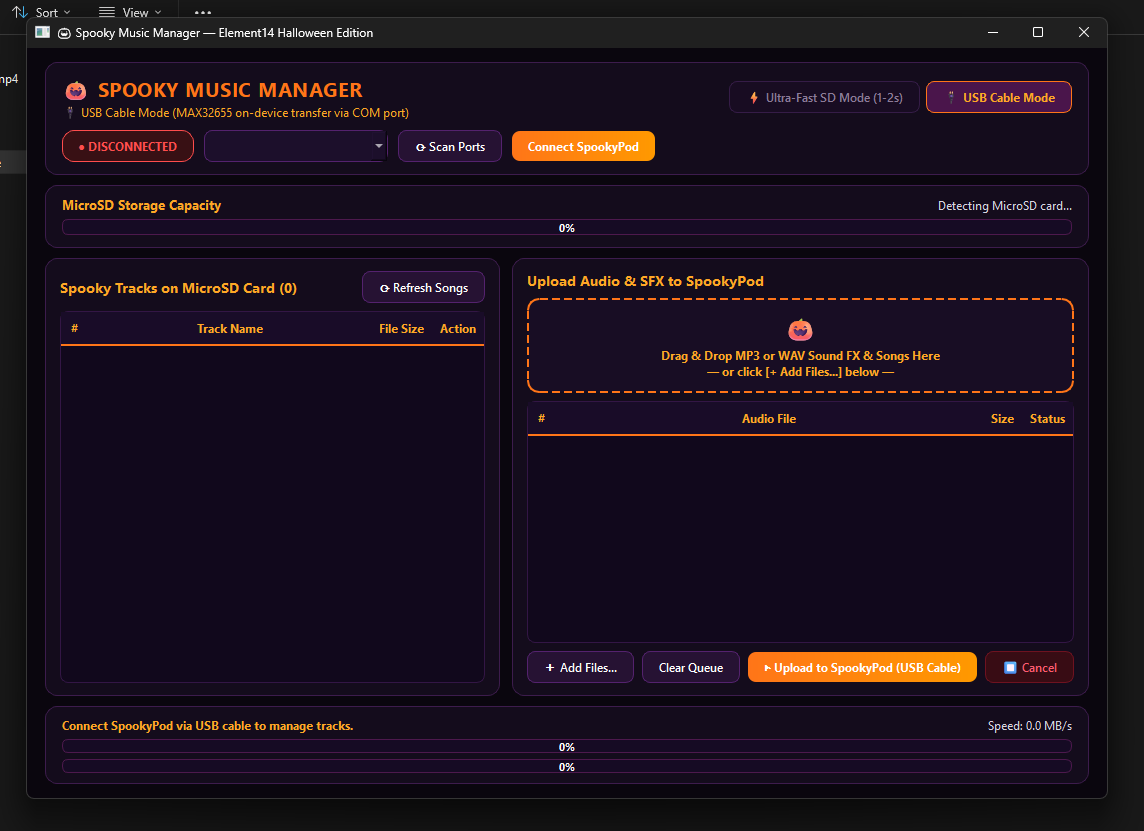
Direct MicroSD mode
The user can connect the MicroSD card to a computer through a card reader. The application can then access the storage and help manage the audio files.
USB serial transfer mode
I also implemented a USB upload mode in the embedded firmware.
When SpookyPod enters this mode, the desktop application can communicate with the device through a serial connection and transfer audio files.
This is particularly useful because the user doesn't need to remove the MicroSD card every time they want to update the audio library.
I also included a precompiled Windows executable in the repository, so someone can try the application without setting up the entire Python development environment.
I liked working on this part because it extended the project beyond the embedded device itself. It became a small ecosystem consisting of the player, firmware, and desktop application.
7. Designing the Enclosure – Making It Look Like a Halloween Device
I didn't want to leave all the electronics exposed or put them inside a generic plastic box.
I wanted the enclosure to match the concept of the project.
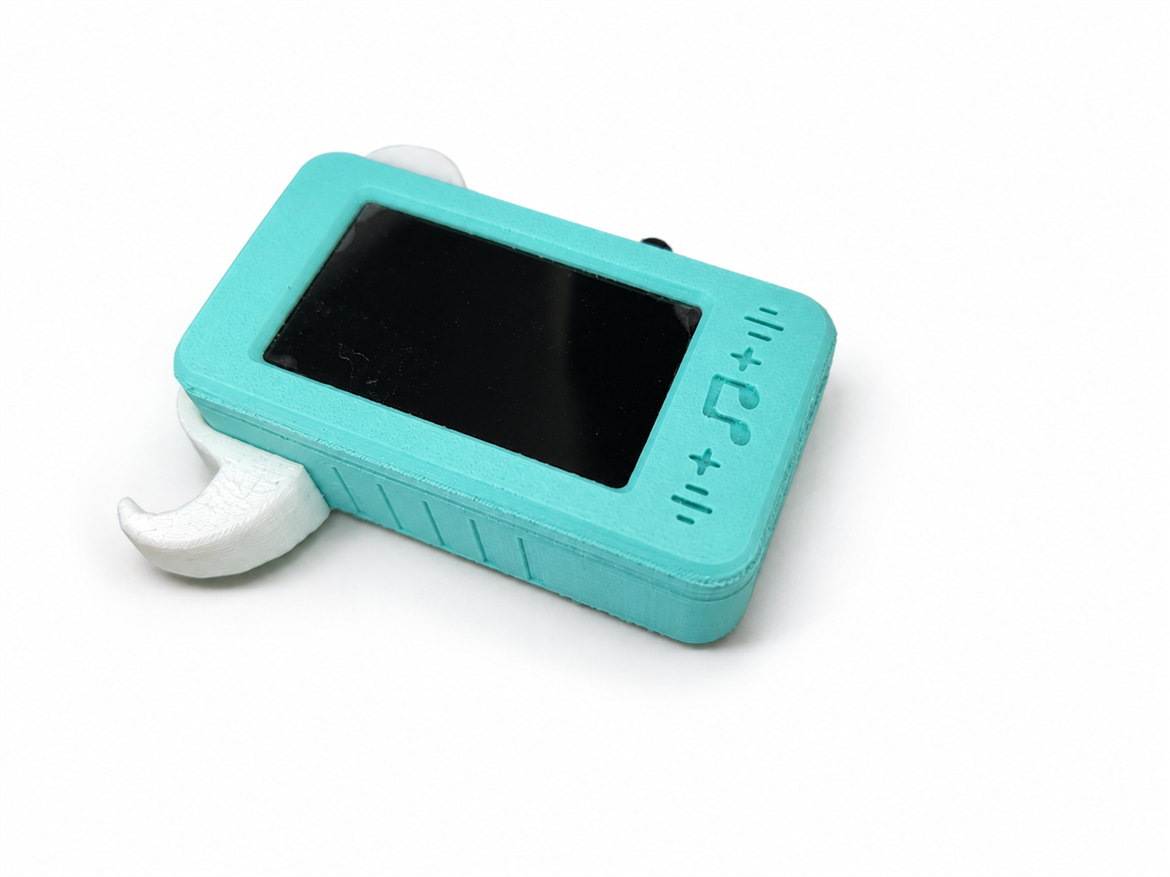
I designed a custom housing and 3D-printed it using PLA filament. The main body has a turquoise finish, with white decorative horn attachments on either side.
The enclosure accommodates the display, physical controls, side-mounted jog switch, and the required external connections.
The detachable demon horns are probably the most recognisable part of the design. They give SpookyPod its own appearance and make it look more like a Halloween prop.
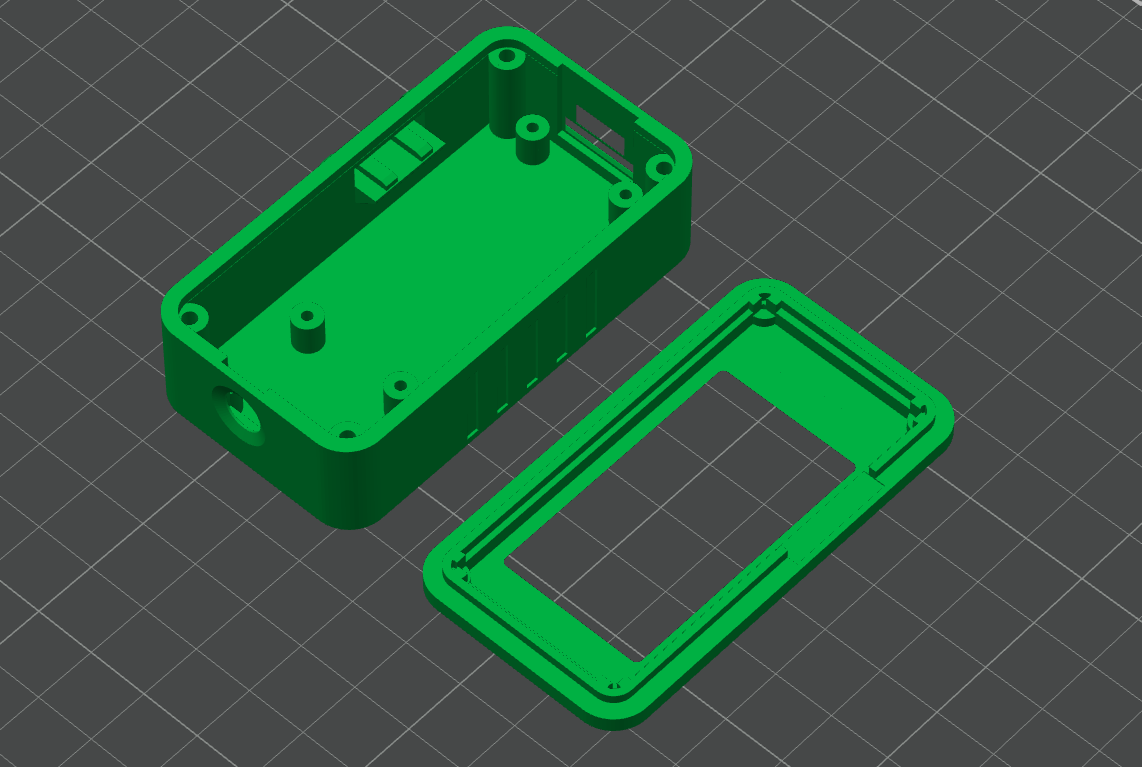
I have included the 3D model files in my repository and also here, so anyone interested can download and print the enclosure.
The mechanical design was an important part of the project for me. I wanted the finished device to feel like something that could actually be carried and used, not just a collection of connected development boards.
8. How to Build Your Own SpookyPod
If you would like to reproduce the project, I've provided the firmware, hardware documentation, and supporting software in the GitHub repository.
click here github repo
Hardware assembly
Start with the MAX32655FTHR development board and the peripherals listed in the component table.
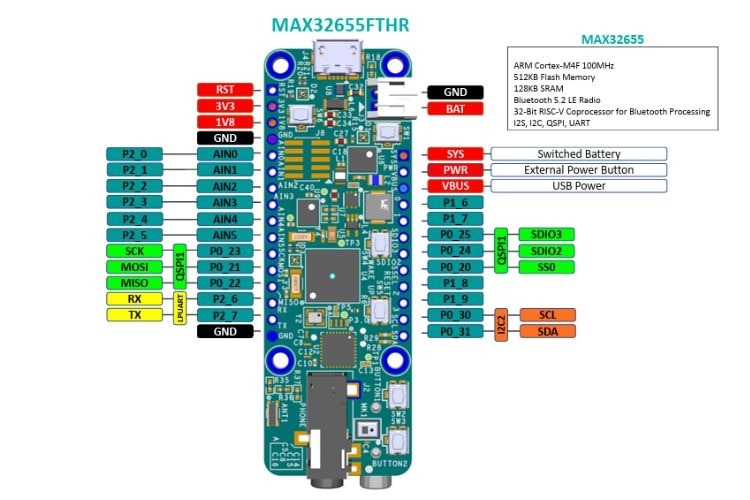
The main connections are:
| Peripheral | MAX32655 interface | Purpose |
|---|---|---|
| ST7789V2 display | SPI1 + GPIO | Display communication and control |
| MicroSD card | SPI0 | Audio file storage |
| MAX9867 | I2C + I2S | Codec configuration and audio streaming |
| Jog switch | GPIO | Navigation |
| Tactile buttons | GPIO | Playback and selection |
| Power subsystem | Battery and PMIC arrangement | Portable operation |
For the exact board-pin assignments, use the hardware/PINOUT.md file in the repository. It contains the pin mapping for the individual connections.
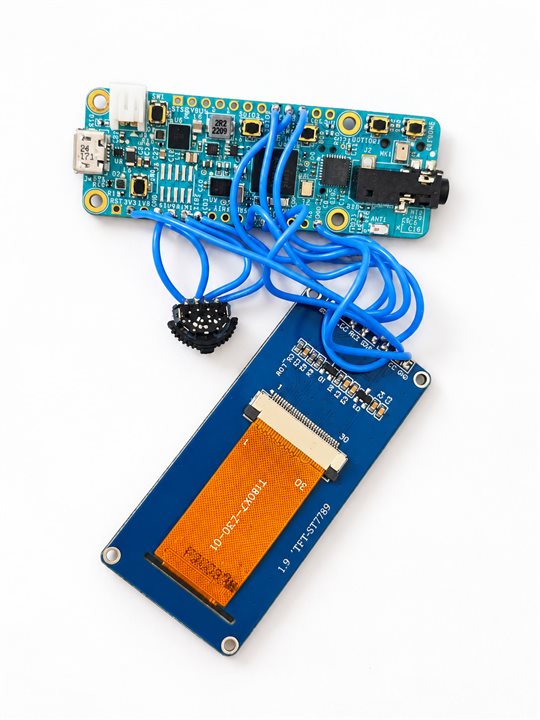
Also follow the MAX9867 datasheet and the hardware documentation for the codec's power, clock, analogue, and headphone connections. The table above describes the main digital interfaces, not the complete analogue circuit.
Firmware setup
The firmware uses the Analog Devices MSDK and an ARM GCC toolchain.
Clone the repository:
git clone https://github.com/Sparkshiva007/SpookyPod-Halloween-Audio-Player.git
Install the required Python serial package:
pip install pyserial
Set up the MSDK, GNU Make, ARM GCC, and OpenOCD according to your operating system.
The firmware source and build configuration are inside the firmware/ directory. The repository also provides precompiled binaries and flashing utilities for users who want to get started without compiling the firmware themselves.
Follow the build and flashing instructions in the GitHub README for the current project configuration.
Preparing the MicroSD card
Format a compatible MicroSD card as FAT32 and copy your MP3 or supported WAV files onto it.
Insert the card into SpookyPod and power on the device. The firmware accesses the storage using FatFS and makes the available audio files accessible to the player.
I recommend starting with a few standard audio files before adding a large music library.
3D printing and assembly
Download the attached STL/3D model files from repo and open them in your preferred slicer.
Print the main housing and decorative attachments using PLA filament. Once printed, test-fit the display, controls, connectors, and electronics before completing the assembly.
The enclosure files are supplied separately with this project so that the mechanical design can be reproduced independently.
Desktop application
The tools/ directory contains Spooky Music Manager and its supporting files.
The application is developed using Python and PyQt6. It can be used to manage the MicroSD card directly or transfer files through the device's USB serial upload mode.
For further details, source code, and the complete project documentation, visit:
https://github.com/Sparkshiva007/SpookyPod-Halloween-Audio-Player
Youtube demo video support my work guys ;) :
9. What I Would Like to Improve Next
SpookyPod is a project that I would like to continue developing even after the Halloween Hackathon.
There are several possibilities that I find interesting.
- One is making the device more useful for animatronics and interactive Halloween installations by improving how individual sound effects can be triggered.
- I would also like to explore additional audio formats, more customisable interfaces, improved battery monitoring, and wireless remote-control functionality.
- Another area I would like to explore is making the desktop music manager even more convenient, particularly when handling larger audio libraries.
- The current hardware and firmware provide a foundation for experimenting with these improvements without having to redesign the entire device.
10. Final Thoughts
SpookyPod has been one of those projects where I got to work on several different things that I genuinely enjoy.
I got to work with a microcontroller, an external audio codec, digital audio interfaces, DMA, storage, display drivers, firmware, and even a desktop application. Then I had to bring all of it together inside a custom-designed 3D-printed enclosure.
The audio pipeline was particularly satisfying to work on. Seeing how data travels from a MicroSD card, gets decoded into PCM samples, moves through I2S, and finally becomes audible through the codec is something I found much more interesting than simply connecting a ready-made audio module.
And, of course, getting the Halloween interface and the physical enclosure together was the fun part!
I have shared the source code, hardware documentation, and 3D model files because I would love for others to experiment with the project, build their own versions, and perhaps take it in a completely different direction.
It started as a small Halloween idea, but it turned into a project that brought together a lot of the electronics and engineering concepts I wanted to explore.
Built with electronics. Designed to scare! 
References
References & Technical Resources
The following resources cover the hardware components, datasheets, firmware, development tools, and software libraries used in SpookyPod.
1. Project Repository
SpookyPod – Handheld Halloween Audio & Sound Effects Player
Complete project source code, firmware binaries, hardware documentation, desktop application, and supporting files.
https://github.com/Sparkshiva007/SpookyPod-Halloween-Audio-Player
2. Hardware & Component Documentation
-
MAX32655 – Microcontroller: Official product page and datasheet
-
MAX32655FTHR – Development Platform: Official evaluation-board documentation and datasheet
-
MAX9867 – Stereo Audio Codec: Official product page and datasheet
-
MAX20303 – Power Management IC: Official product page and datasheet
3. Project Hardware Documentation
-
Bill of Materials (BOM): Component list and hardware references
-
Hardware Pinout: Microcontroller pin mapping and peripheral connections
4. Firmware & Software Resources
-
Audio Playback Engine: MP3 decoding, WAV parsing, FatFS, PCM buffering and I2S/DMA
-
Player Application: Playback controls, navigation and application logic
-
Main Firmware: System initialisation and main application
-
Spooky Music Manager: Desktop companion application and utilities
5. Software Libraries & Development Tools
-
Analog Devices MSDK: MAX32 microcontroller development framework
-
FatFS: FAT file-system library
-
minimp3: Lightweight MP3 decoder
All project-specific firmware, hardware resources, software utilities, and supporting documentation are available in the SpookyPod GitHub repository.