


 | Enter Your Electronics & Design Project for a chance to win an $200 Shopping cart of product! | Project14 Home |
| Monthly Themes | ||
| Monthly Theme Poll |

Straight from Meet the Robinsons with 3D-printed spidey legs, an LED MATRIX eye, and turning towards sources of sound to intimidate!
Required Hardware
Before getting started, let's review what you'll need.
- Raspberry Pi 3 (Recommended). Not tested yet in Pi 4 or Pi 2 Model B.
- MATRIX Voice ESP32 Version - Raspberry Pi does not have a built-in microphone, the MATRIX Voice has an 8 mic array and the one in this project comes with an ESP32 WiFi/BT Micro-controller an - Buy MATRIX Voice/MATRIX Creator.
- Micro-USB power adapter for Raspberry Pi.
- Micro SD Card (Minimum 8 GB) - An operating system is required to get started. You can download Raspbian Stretch and use etcher.io to flash the image onto your SD Card.
- A USB Keyboard & Mouse, and an external HDMI Monitor - we also recommend having a USB keyboard and mouse as well as an HDMI monitor handy. You can also use the Raspberry Pi remotely through SSH, see this guide from Google.
- Internet connection (Ethernet or WiFi). Note: Pi 3 has built-in WiFi.
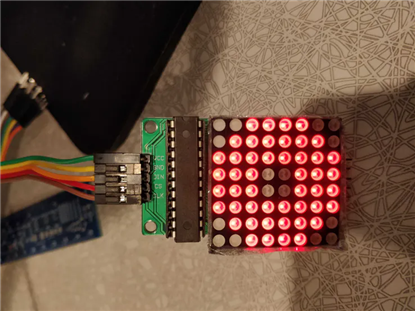
- Maxim Integrated MAX7219 8x8 Red LED Matrix Display Module
- LD-20MG Servo- Buy here
- Bowler hat from your local Halloween store or this Amazon one
Overview
This project uses ODAS (Open embeddeD Audition System) and some custom code to move a servo motor in the direction of the most concentrated incoming sound in a 180 degree radius. This enables the hat to face a person calling to it.
The ESP32 on the MATRIX Voice is used to control an 8x8 LED MATRIX via SPI with eye animations, adopted from this companion bot guide, to intimidate.
3D-printed spidey legs complete Doris' evil bowler hat look.
We'll set up the guide to go over the software setup first and then run through the wiring and 3D-printed designs.
Let's get started
First set up your MATRIX Voice ESP32 version with a flashed SD card as shown here. We used Raspbian Stretch for this project, but Raspbian Buster should work as well.
1. Installing ODAS (Open Embedded Audio System)
Follow the steps in our ODAS guide to set it up.
Once the above guide is completed and tested, switch to our Halloween branch. This handles the servo connection of our hat due to ODAS.
cd odas
git checkout si/halloween
cd build
cmake ..
make
2. The Eye Code on the ESP32
We're now going to work on our MATRIX Voice's ESP32. Follow our documentation to learn how with PlatformIO.
Now that you're familiar on how to install a PlatformIO project, do the same with this repository.
git clone https://github.com/matrix-io/esp32-halloween-2019
On Step 4 (Initial Build and Deploy), the compilation will fail. This is due to a change that we need to make in the LedControl library itself.
Enter the esp32-halloween-2019 repo and run the line below to edit the LedControl.h file in the nano terminal editor.
cd esp32-halloween-2019
nano .pio/libdeps/esp32dev/LedControl_ID914/src/LedControl.h
Replace the line #include <avr\pgmspace.h> to instead have the following:
#if (defined(__AVR__))
#include <avr\pgmspace.h>
#else
#include <pgmspace.h>
#endif
Save LedControl.h by pressing Ctrl+X, then Y.
Now, hit the check mark in VS Code to compile again and this should work!
Go back to Step 4 in the ESP32 PlatformIO guide and finish off uploading the compiled code to the ESP32 on your MATRIX Voice.
3. Start Your Project on Boot
Enter into the esp32-halloween-2019/services folder.
cd esp32-halloween-2019/services
Turn the odas.sh bash script into an executable.
chmod +x ./odas.sh
Set read permissions for the service file.
chmod 644 ./odas.service
Create a symbolic link in systemd for the odas service.
sudo ln -s ./odas.service /etc/systemd/system/
Enable your odas service so that it starts on boot.
sudo systemctl enable odas
For more helpful commands to manage your service, click here.
4. Wiring the Servo and 8x8 LED MATRIX
Attach the red wire (power) of the servo to the 5V pin on the MATRIX Voice expansion GPIO, the black wire (ground) to a GND pin, and the white wire (signal) to GPIO4 as shown below.
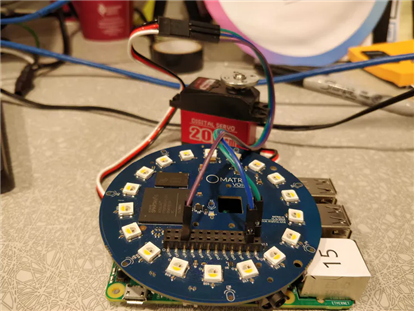
For the LED MATRIX, attach VCC to the 3V3 pin, GND to the other GND pin, DIN to IO25, CLK to IO26, and CS to IO27. The pins marked IO come straight from the ESP32 as shown here.
5. Assembly
In order to lodge the 8x8 LED MATRIX in the front of our bowler hat, we cut out a square of similar size for it to poke out through.

We then cut out 8 squares around the bowler hat around the height where the MATRIX Voice's microphones would be exposed for audio to go through to them. We covered up the cut-outs with audio mesh, which is a nice addition if you have them.

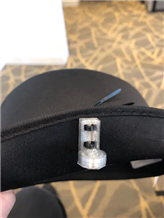
We attached the servo motor to the ESP32 MATRIX Voice using the camera holes and threaded two sturdy wires through to go over and across the servo as shown in the images below.
Note: In order to ensure that the servo is attached to the MATRIX Voice in the appropriate orientation, run the odas program and ensure that the servo angle lines up with the LEDs on the MATRIX Voice.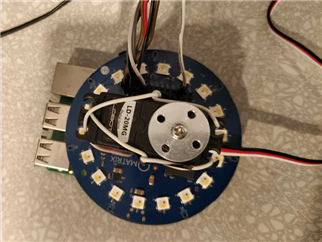
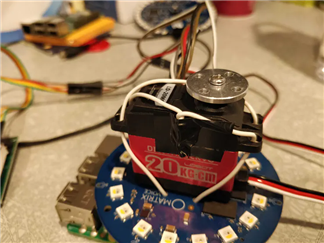
Make sure to attach the Raspberry Pi to the MATRIX Voice with two spacers, bolts, and nuts (we used plastic ones). That way the torque from the motor does not attempt to twist off the MATRIX Voice from the Pi.
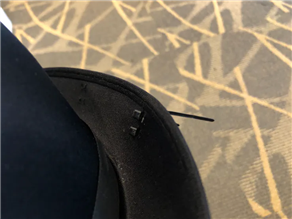
We poked two holes in the top of the hat to attach the hat to the servo hub as shown in the images below.
Note: Set the servo to 90 degrees by running the odas program, then exit out of the program and attach the hub to the hat such that the 90 degree side of the servo makes the hat face the "front".
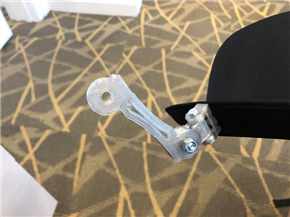
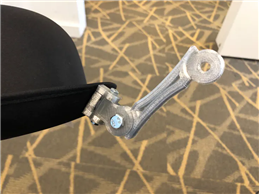
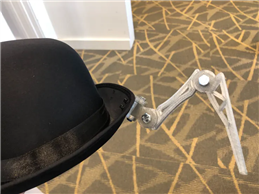
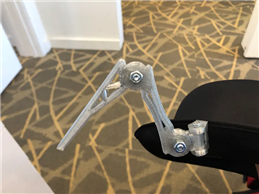
For the spidey legs, we designed and 3D-printed with clear black PLA.
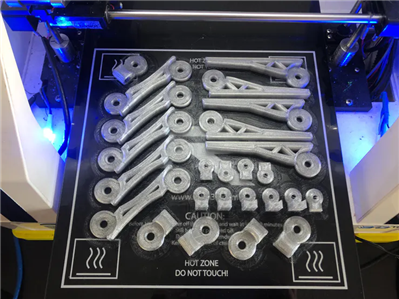
The assembly of the legs to the hat can be shown in the series of pictures below. Follow the process of cutting slits in the hat, zip-tying hinge to hat, and bolting each joint together.
We used 16mm M6 bolts for the 2 leg joints and 30mm M4 bolts for the swivel joint.


We zip-tied the Raspberry Pi to an inner hat to secure it to our heads by looping through the remaining two screw holes in the Pi and looping around the Pi itself on the other side.
And there you have it! Doris, the evil bowler hat from Meet the Robinsons, ready to scare 
We plan on establishing serial communication between the ESP32 and the Raspberry Pi to trigger special eye animations programmatically and may add to the project as more ideas come by. Feel free to suggest cool ideas to improve or add to the project!
Top Comments
-

jw0752
-
Cancel
-
Vote Up
+3
Vote Down
-
-
Sign in to reply
-
More
-
Cancel
Comment-

jw0752
-
Cancel
-
Vote Up
+3
Vote Down
-
-
Sign in to reply
-
More
-
Cancel
Children