


This blog contains the final build of the Singing Traditional Christmas star project, created for this years Project14 Holiday Theme - Build a Present . For the last six years, my Dad has been using the same old traditional star, so this year my present for him, was to make him a much bigger star, and dress it with his favorite colors, that is red and white paper. In addition, to keep with the Holiday theme, I planned to use the Arduino MKR ZERO with a LED Strip, which would light up, when the PIR sensor detects motion.
Initially, while looking through the Arduino boards that I could use, I planned to use the Arduino Nano, but when I came across the Arduino MKR ZERO in my kit, I realized that it had a SD card slot, which I could use to store some holiday tunes, and connect it to an I2S Amplifier and a speaker, to play the tunes. So, as part of the final build, when the star detects a person in the door way as you see in the video below, the star will cycle through colors using the APA102 LED strip and also play the "Jingle Bells" tune. The tune play for about 2 minutes, which is enough time for my Dad/Me to get to the front door..
A couple of my neighbors and cousins, mentioned that it took them a minute to figure out where the music was playing from. Some thought we had put in a new door bell  .. And, my sister-in-law wants me to build something similar for her home next year.
Here are the steps, if you want to build something similar..
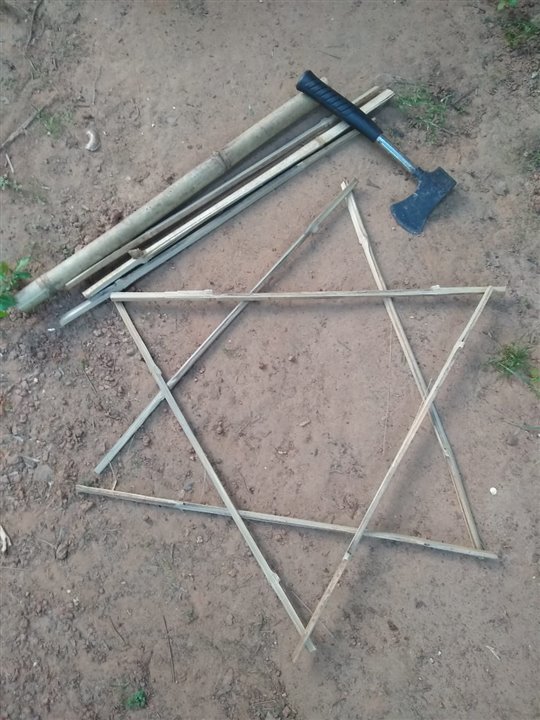
#1 To build the star, I am using Bamboo sticks, which is the method used here for a century. Basically you need to cut two pieces of the bamboo of equal size and the make six pieces of each, to make two sets of stars , which are then put together and expanded using thread and more bamboo in between.
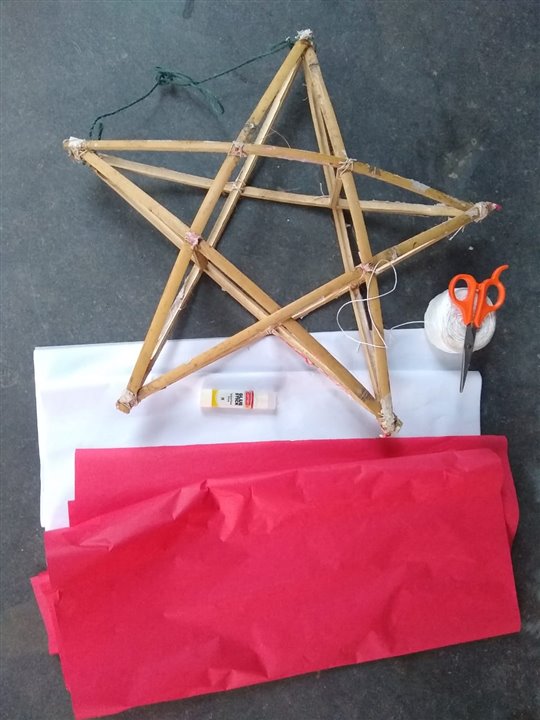
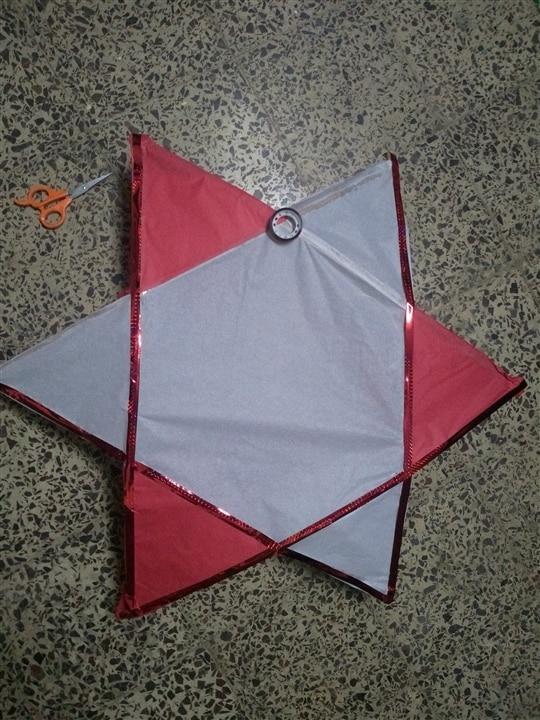
#2 Once I was done with the frame, I covered one side of the frame and the sides with butter paper, here I am using red and white alternatively for the spokes
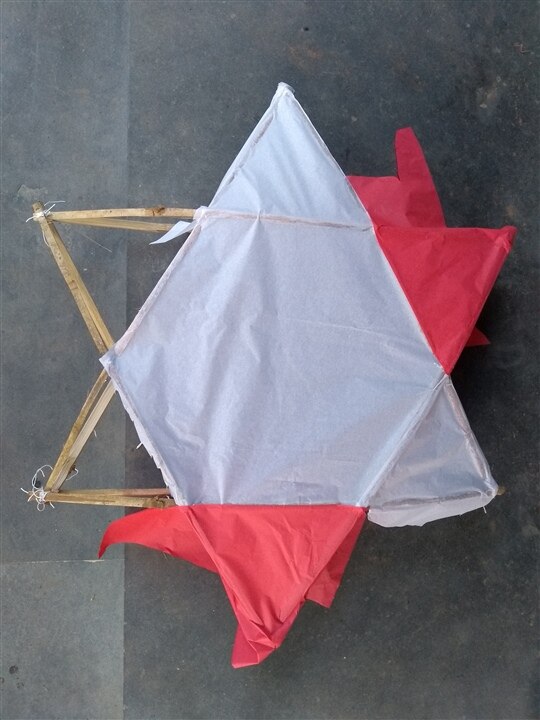

FYI - based on the comment on my previous blog post from scottiebabe the paper used above, to dress the frame of the star is also called Parchment Paper https://en.wikipedia.org/wiki/Parchment_paper.
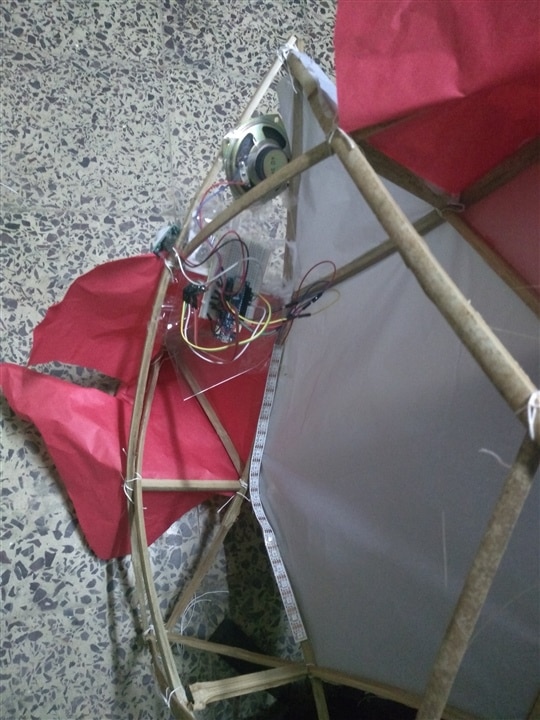
#3 Adding the Electronics to the star, for this I added the speaker to one side of the star using some tape and hot glue. And added LED strip to bottom two sides, my plan was to cover hexagon in the middle, but I had only 1/4th of a LED strip remaining, which meant I had to add it to the bottom of the hexagon. To hold the breadboard, I created a platform by cutting an old face shield, and hot gluing it to the bamboo edges. And finally added the PIR sensor to the edge below.
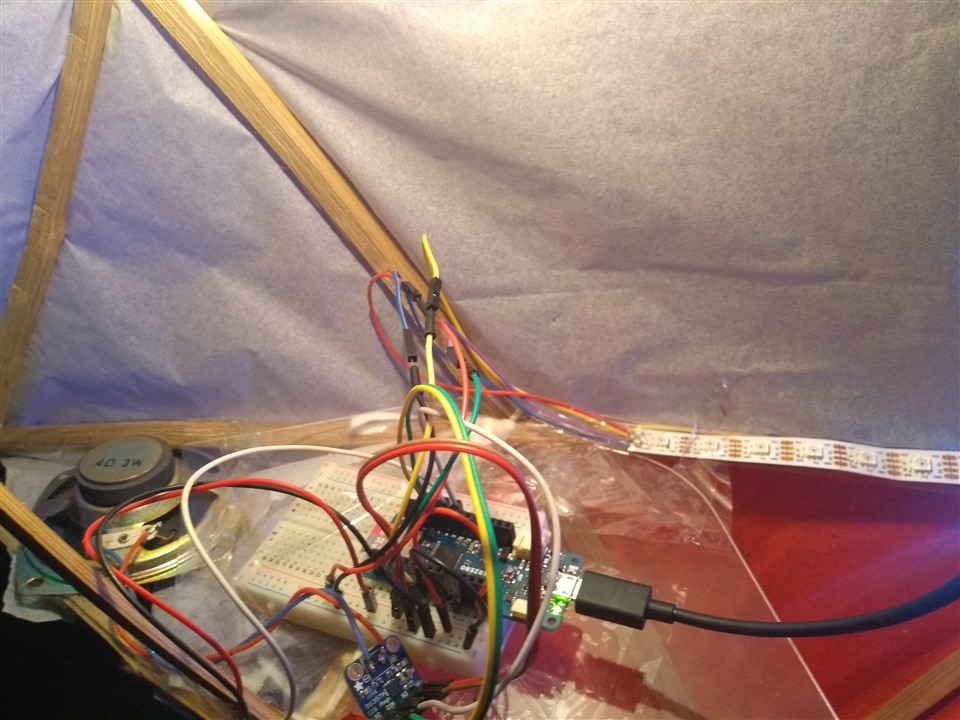
Here are the details of the circuit using the Arduino MKR ZEROhttps://referral.element14.com/OrderCodeView?nsku=47AC4166
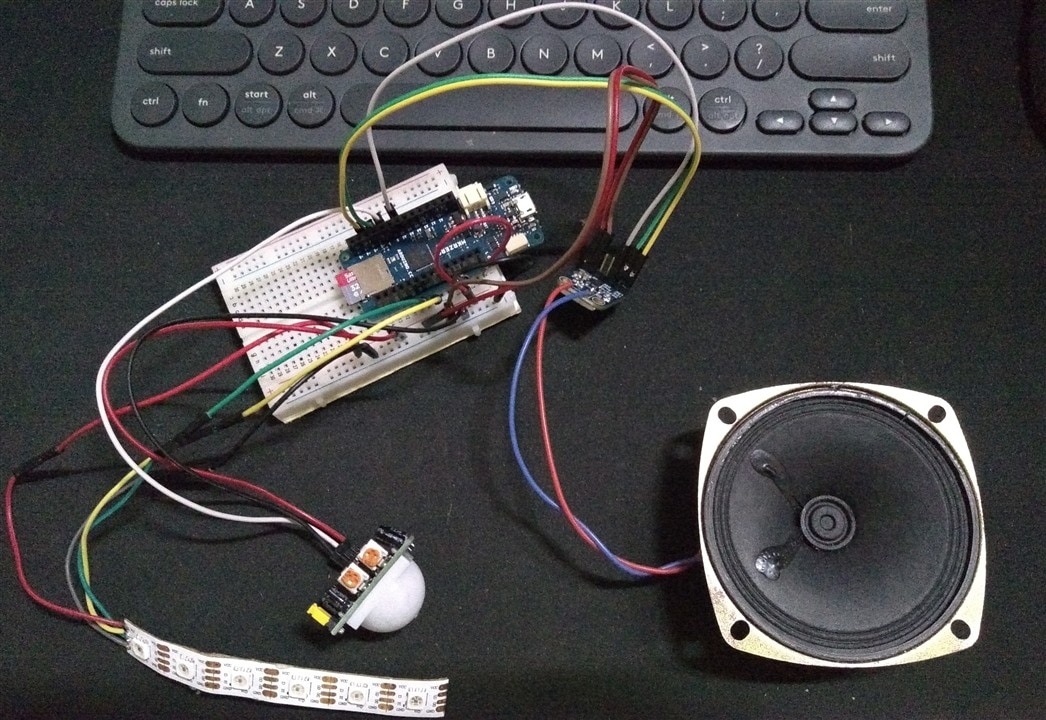
The APA102 LED strip connection to the Arduino MKR ZERO
-
VCC of the LED strip is connected to 5V on the Arduino MKR ZERO
-
GND connected GND
-
DI on the LED strip is connected to pin 11 SDA of the Arduino MKR ZERO
-
CI on the LED strip is connected to pin 12 SCL
PIR sensor is connected to pin 1 on the Arduino MKR Zero
Here are the connection details for the Adafruit I2S 3W Class D Amplifier Breakout MAX98357A and Arduino MKR ZERO
-
VIN on the I2S amplifier connected 5V of the Arduino MKR Zero
-
GND connected GND
-
LRC connected to pin 3
-
BCLK connected to pin 2
-
DIN connected to pin A6
Then, add the tune to the SD card, if you have mp3 files, you will have to convert it into a wav files using a tool like Audacity.
In addition, in the Arduino IDE, I installed the MKR family of boards , using the Board Manager for the Arduino MKR Zero. And then installed the following Libraries, from the managed library section
- ArduinoSound
- APA102
Here is the Arduino sketch upload to the MKR ZERO
#include "Arduino_APA102.h"
#include <SD.h>
#include <ArduinoSound.h>

int ledPin = LED_BUILTIN;  // LED to check if some is detected
int pirPin = 1;   // PIR pin
int pirStat = 0;  // PIR status
// Setting up APA102
int dataPin = 11;
int clockPin = 12;
int totalLEDs = 20; //change this to the number of LEDs in the star
//Construct object, Arduino_APA102(nLEDS, data line, clock line)
Arduino_APA102 leds(totalLEDs, dataPin, clockPin);
int i,j = 0;

// filename of wave file to play
const char filename[] = "MUSICO.WAV";
// variable representing the Wave File
SDWaveFile waveFile;
void setup() {
  pinMode(ledPin, OUTPUT);
  pinMode(pirPin, INPUT);
  // Open serial communications and wait for port to open:
  /*Serial.begin(9600);
  while (!Serial) {
    ; // wait for serial port to connect. Needed for native USB port only
  }*/

  // setup the SD card, depending on your shield of breakout board
  // you may need to pass a pin number in begin for SS
  Serial.print("Initializing SD card...");
  if (!SD.begin()) {
    Serial.println("initialization failed!");
    return;
  }
  Serial.println("initialization done.");

  // create a SDWaveFile
  waveFile = SDWaveFile(filename);

  // check if the WaveFile is valid
  if (!waveFile) {
    Serial.println("wave file is invalid!");
    while (1); // do nothing
  }
  // print out some info. about the wave file
  Serial.print("Bits per sample = ");
  Serial.println(waveFile.bitsPerSample());
  long channels = waveFile.channels();
  Serial.print("Channels = ");
  Serial.println(channels);
  long sampleRate = waveFile.sampleRate();
  Serial.print("Sample rate = ");
  Serial.print(sampleRate);
  Serial.println(" Hz");
  long duration = waveFile.duration();
  Serial.print("Duration = ");
  Serial.print(duration);
  Serial.println(" seconds");

  // adjust the playback volume
  AudioOutI2S.volume(95);
  // check if the I2S output can play the wave file
  if (!AudioOutI2S.canPlay(waveFile)) {
    Serial.println("unable to play wave file using I2S!");
    while (1); // do nothing
  }
leds.begin();
}

void loop() {
 pirStat = digitalRead(pirPin);
 if (pirStat == HIGH) {            // if motion detected
   digitalWrite(ledPin, HIGH);
   Serial.println("starting playback");
   AudioOutI2S.play(waveFile);

 }
 else {
   digitalWrite(ledPin, LOW); // turn LED OFF if we have no motion
   Serial.println("Errr...");
   j = AudioOutI2S.isPlaying();
  //check if playback is still going on
   if (AudioOutI2S.isPlaying())
   {
      Serial.println("playback going on..");
    //running LEDs
     // leds.begin();
      for(i=0; i < totalLEDs; i++)
      {
        leds.setPixelColor(i ,255,0,0);
        leds.show();
        delay(100);
      }
      for(i=0; i < totalLEDs; i++)
      {
        leds.setPixelColor(i ,0,255,0);
        leds.show();
        delay(100);
      }
      for(i=0; i < totalLEDs; i++)
      {
        leds.setPixelColor(i ,0,0,255);
        leds.show();
        delay(100);
      }

   }
   Serial.println(j);
     for(i=0; i < totalLEDs; i++)
      {
        leds.setPixelColor(i ,0,0,0);
        leds.show();
        delay(10);
      }
 }
delay(100);
}
Before I applied the paper to the back of the star, I ran another quick test
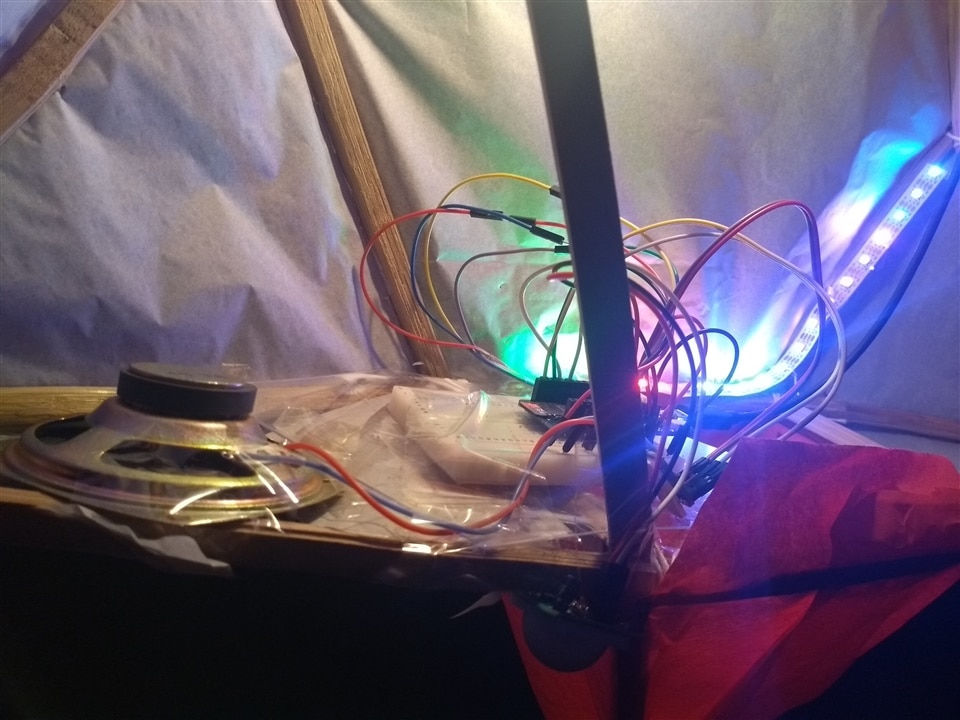
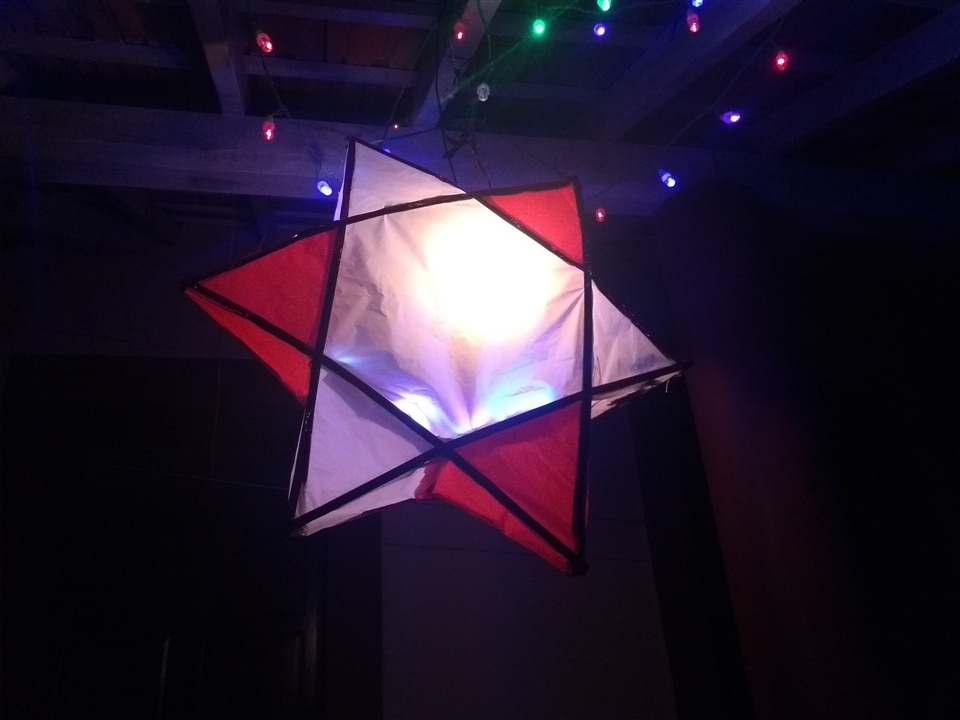
#4 once done, I added a fancy red table, to cover up all the glue'ing error's. And, I also added a 10 watt bulb in the center.
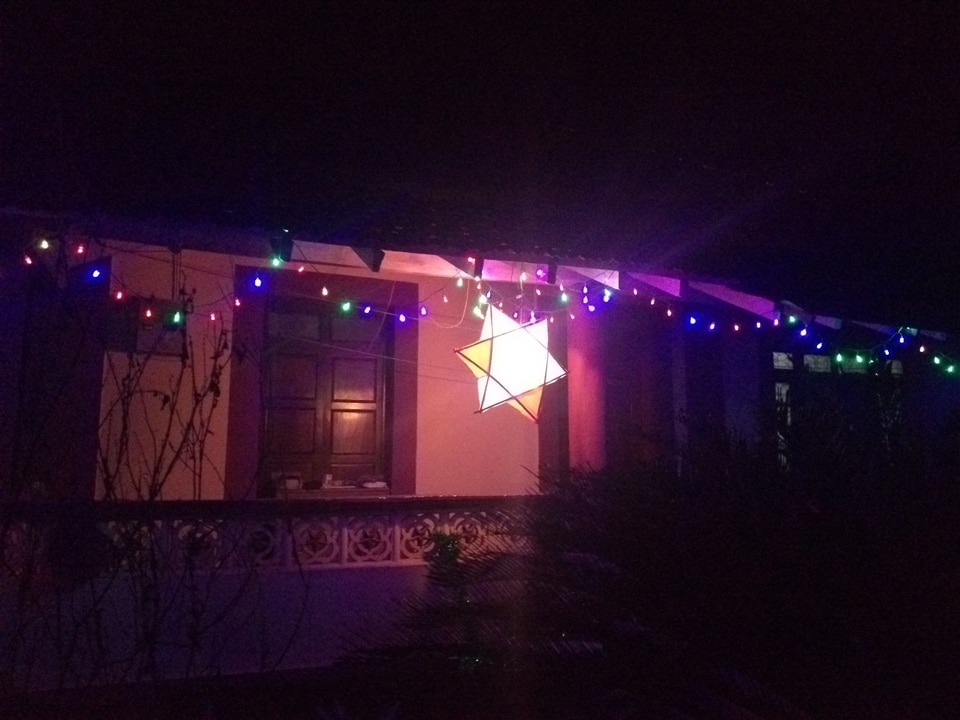
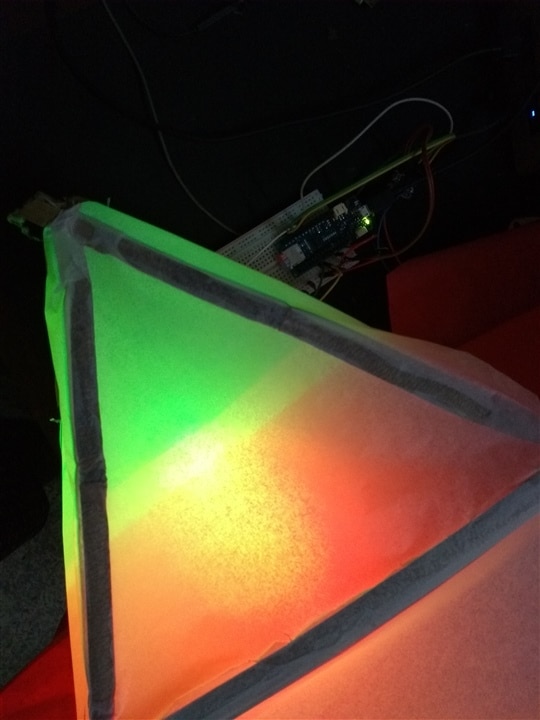
And here is a picture of the star once the PIR detects someone in the front of the main door. The picture/video shot from my mobile does not do justice to the LED diffusion, it looks much better in real life.
Here are the previous two blog post in this series, just in case you need some more info, or want to follow the progression to the final build.
Blog#1 using the Arduino MKR ZERO to play a tune
Blog#2 Testing LED strip- APA102
-

robogary
-
Cancel
-
Vote Up
0
Vote Down
-
-
Sign in to reply
-
More
-
Cancel
Comment-

robogary
-
Cancel
-
Vote Up
0
Vote Down
-
-
Sign in to reply
-
More
-
Cancel
Children