element14 Community
element14 Community
    Register Log In
  • Site
  • Search
  • Log In Register
  • Community Hub
    Community Hub
    • What's New on element14
    • Feedback and Support
    • Benefits of Membership
    • Personal Blogs
    • Members Area
    • Achievement Levels
  • Learn
    Learn
    • Ask an Expert
    • eBooks
    • element14 presents
    • Learning Center
    • Tech Spotlight
    • STEM Academy
    • Webinars, Training and Events
    • Learning Groups
  • Technologies
    Technologies
    • 3D Printing
    • FPGA
    • Industrial Automation
    • Internet of Things
    • Power & Energy
    • Sensors
    • Technology Groups
  • Challenges & Projects
    Challenges & Projects
    • Design Challenges
    • element14 presents Projects
    • Project14
    • Arduino Projects
    • Raspberry Pi Projects
    • Project Groups
  • Products
    Products
    • Arduino
    • Avnet Boards Community
    • Dev Tools
    • Manufacturers
    • Multicomp Pro
    • Product Groups
    • Raspberry Pi
    • RoadTests & Reviews
  • Store
    Store
    • Visit Your Store
    • Choose another store...
      • Europe
      •  Austria (German)
      •  Belgium (Dutch, French)
      •  Bulgaria (Bulgarian)
      •  Czech Republic (Czech)
      •  Denmark (Danish)
      •  Estonia (Estonian)
      •  Finland (Finnish)
      •  France (French)
      •  Germany (German)
      •  Hungary (Hungarian)
      •  Ireland
      •  Israel
      •  Italy (Italian)
      •  Latvia (Latvian)
      •  
      •  Lithuania (Lithuanian)
      •  Netherlands (Dutch)
      •  Norway (Norwegian)
      •  Poland (Polish)
      •  Portugal (Portuguese)
      •  Romania (Romanian)
      •  Russia (Russian)
      •  Slovakia (Slovak)
      •  Slovenia (Slovenian)
      •  Spain (Spanish)
      •  Sweden (Swedish)
      •  Switzerland(German, French)
      •  Turkey (Turkish)
      •  United Kingdom
      • Asia Pacific
      •  Australia
      •  China
      •  Hong Kong
      •  India
      •  Korea (Korean)
      •  Malaysia
      •  New Zealand
      •  Philippines
      •  Singapore
      •  Taiwan
      •  Thailand (Thai)
      • Americas
      •  Brazil (Portuguese)
      •  Canada
      •  Mexico (Spanish)
      •  United States
      Can't find the country/region you're looking for? Visit our export site or find a local distributor.
  • Translate
  • Profile
  • Settings
Circuit Prototype Techniques
  • Challenges & Projects
  • Project14
  • Circuit Prototype Techniques
  • More
  • Cancel
Circuit Prototype Techniques
Blog I'm Board...Cutting Board to Printed Circuit Board
  • Blog
  • Forum
  • Documents
  • Events
  • Polls
  • Files
  • Members
  • Mentions
  • Sub-Groups
  • Tags
  • More
  • Cancel
  • New
Join Circuit Prototype Techniques to participate - click to join for free!
  • Share
  • More
  • Cancel
Group Actions
  • Group RSS
  • More
  • Cancel
Engagement
  • Author Author: colporteur
  • Date Created: 27 Jan 2022 2:52 AM Date Created
  • Views 40674 views
  • Likes 12 likes
  • Comments 5 comments
  • circuitprototypingch
  • circuitprototypetechniques
  • arduino
Related
Recommended

I'm Board...Cutting Board to Printed Circuit Board

colporteur
colporteur
27 Jan 2022
I'm Board...Cutting Board to Printed Circuit Board

I currently working on a project for a local organization. I'm always looking for novel opportunities to exchange knowledge. Writing is my passion. I stumbled across the Circuit Prototype Techniques Challenge and thought maybe this project can fit?. After some reflection, I came up with a strategy to document this project using the criteria for the challenge. I have taken the project and divided the prototyping tasks into Boards. Each Board describes a Prototyping Techniques employed to reach the goal of designing a circuit board. 

image

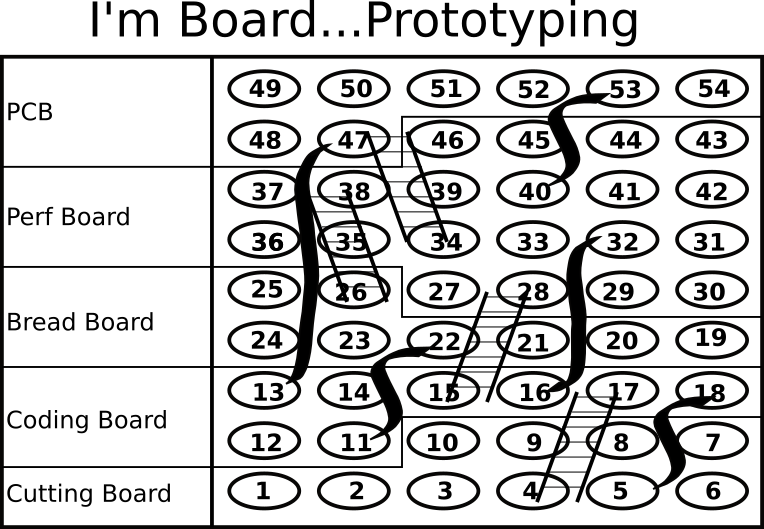
The process to develop and design a printed circuit board (PCB) is a lot like playing the game of Chutes & Ladders. The object is to step through the numbers to reach the final number. When you reach the final step the PCB should be ready for production. The numbers are divided along the different Boards that are described below. Along the path of steps are Chutes that take you back to lower steps to start over. The Ladders enable you to advance ahead steps. 

From the Cutting Board, I completed the steps to get a drawing and then moved on to the Coding Board steps. In the Coding Board, I needed to go back and make changes in the drawing  (i.e. I landed on a chute) to solve problems. 

From the Cutting Board

The project goal is to automate the operation of a model train layout. The objective was to take an existing HO scale DC model railroad layout and automate the operation. The goal was to minimize the amount of user interaction. The first step was to napkin out an understanding of the operation. The napkin doodles started the prototyping process. A number of iterations of the napkin drawing produced a block diagram that explained the layout and its operation in simple terms. The block diagram became the focal point for communication between the client and designer. 
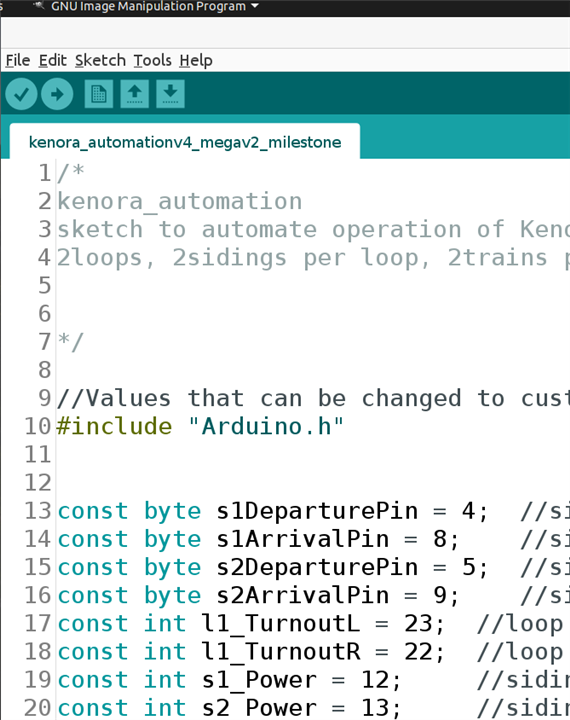
image

From the Code Board

Using the block diagram produced from the Cutting Board generate a code framework to automate the layout sequence. This Board uses the block diagram to help define the code to produce the desired outcomes. Producing the code defined the I/O requirements. The I/O requirements define the Arduino board requirements. Oh did I mention the project was going to use an Arduino?

image

From the Bread Board

This Board does some proof of concept. Does a circuit work? Assemble small circuits on breadboards using sensors and motors. The circuits would have to connect to the I/O's. It was necessary to confirm what was defined in the code can be supported in the physical world. An example: When the train moves across an IR sensor does it produce the desired output for the code to use.

image

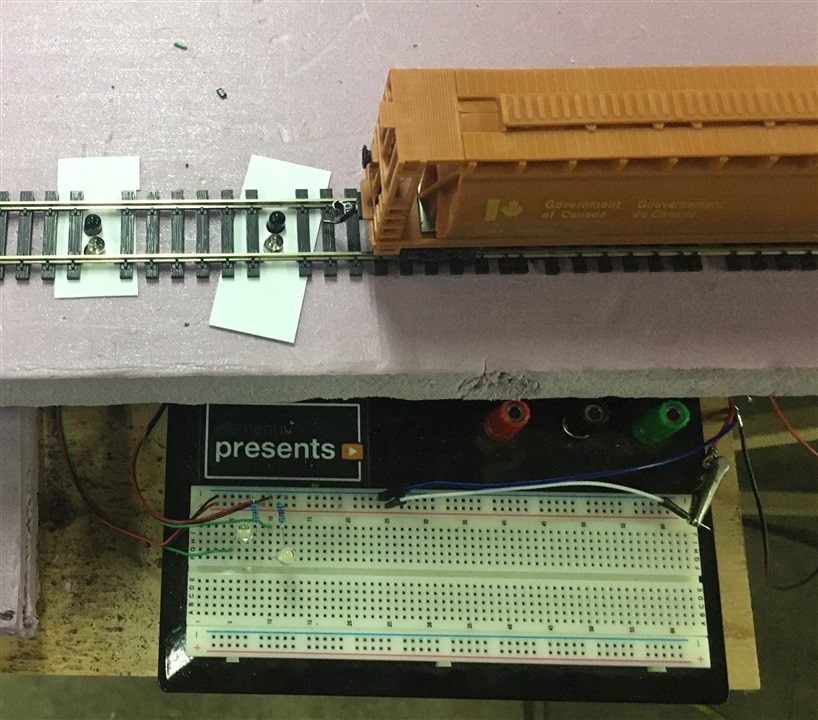
The video display a railcar moving across a block of IR sensors. An LED turns on when the sensor is tripped. The position and sensitivity need to be determined on the layout for proper operation. One of the things this breadboarding demonstrated is that the gap in between cars is detected. It is impacted by the sensitivity of the sensor and the speed of the train.

You don't have permission to edit metadata of this video.
Edit media
x
image
Upload Preview
image
 

From the Perf Board

image

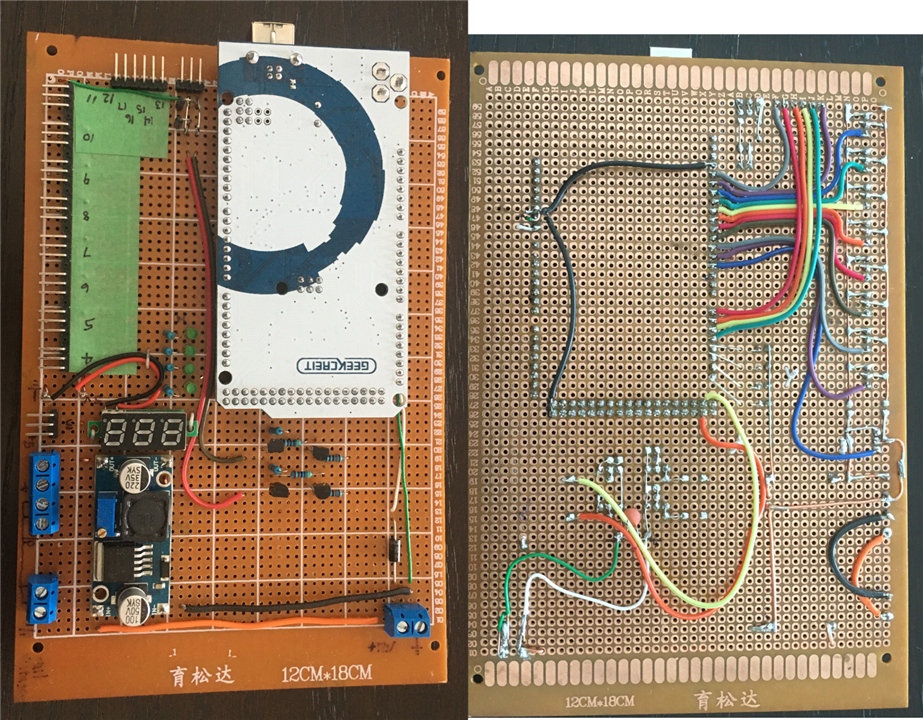
Using Perf board create a circuit board wired to the Arduino I/O and to the physical world. Establish connections and connectors to interface to the components that will be on the railroad layout. This has to generate a working model. This is the working prototype. The board may not be pretty but it works. It includes the infrastructure like power to run the electronics. This is where the block diagram now spawns a schematic drawing.

From the Printed Circuit Board

The results from the Perf Board provide the requirements to design the printed circuit board layout in Fritzing.

image

From the Charcuterie Board

image

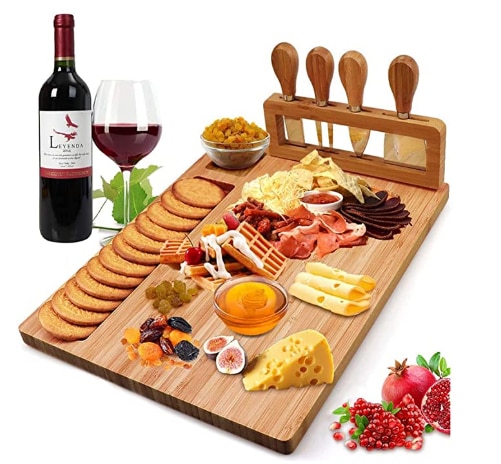
With success comes rewards!

A number of prototyping techniques are used to design the printed circuit board. I'm currently testing the perf board. It has resulted in a few wiring changes, that have to be incorporated into the PCB. When testing of the Perf Board is complete I hope to wine and dine.

  • Sign in to reply
  • colporteur
    colporteur over 3 years ago

    An update to the post. The Chutes and Ladder prototyping exercise continues.

    A working sequence of code is being tested that resolved the Inquiry post I had made some time ago. Using suggestions provided in the post, displaying serial messaging, was the key to flushing out what was actually happening. A chronic problem of me mentally reversing logic levels doesn't help matters.

    Information discovered during perf-board testing highlighted some details not provided during the block diagram development stage, resulting in the processing taking a chute back to the beginning of the design process. Mechanical turnouts, i.e. devices that switch the tracks, requiring pulse triggering and not steady voltage triggers, along with the devices drawing over 2 Amps caused some consternation. The 200ma transistor circuit to power the turnouts just wasn't going to cut it!

    I confess I am not surprised. The prototyping process that I have documented has been used throughout my career. It all comes back to that all-important beginning of the requirements stage. What do you want it to do?

    It is extremely important to have a prototyping process to accommodate the "I don't know, what I don't know but now that I know it, I have to be able to be able to deal with it."

    I tell model railroaders I'm not into model trains. I like animation projects but trains no som much. They are continually surprised to discover I actually don't know what they are talking about. 

    • Cancel
    • Vote Up 0 Vote Down
    • Sign in to reply
    • More
    • Cancel
  • colporteur
    colporteur over 3 years ago in reply to Jan Cumps

    OK, this may be hard to accept but I am not a model train enthusiast. I do little with the trains. I don't enjoy them. My involvement centers around animation using microcontrollers and single-board computers.

    I'm lucky if I even use the correct terms when I speak. Railroaders are constantly correcting when I explain how stuff works. "That is not a relay it's a turnout. Well, it's actually a solenoid but I won't argue." I have attended numerous club events and have yet to operate a train. No interest whatsoever. I like the camaraderie. I look for opportunities to use technology or better yet drink beer if available.

    This project came my way because of an animation demonstration done at our local site. A person in attendance was in contact with the club that wanted to automate. Since retiring, I gravitate to projects that require problem-solving. The nice part is I don't have to deliver since I don't get paid.

    To be honest I am nervous about the outcomes. It all works in theory and some small-scale testing. I have been avoiding full testing of the perf board. I spent 35 years delivering on requirements. Yeah, it was a rush doing stuff that was never done before but it took a toll on my health.

    • Cancel
    • Vote Up 0 Vote Down
    • Sign in to reply
    • More
    • Cancel
  • Jan Cumps
    Jan Cumps over 3 years ago

    Is your train a Jouef?

    • Cancel
    • Vote Up 0 Vote Down
    • Sign in to reply
    • More
    • Cancel
  • colporteur
    colporteur over 3 years ago in reply to robogary

    Thanks for the comment.

    I have built a number of perf boards type modules for railroad layouts. I discovered that in the railroad community things are rarely done once. The cost of this board (most expensive yet) is $11 US for five. I need two if I don't count the Perf board being a working unit. I really don't want to create another perf board:( Eleven bucks seemed to be a small price to pay.

    This will be the fifth time I have gone from perf board to PCB. If I had to learn the software for laying out the PCB I might not undertake the project. Using the skills I have accumulated doesn't make a PCB a big stretch.

    Does this answer your question?

    • Cancel
    • Vote Up 0 Vote Down
    • Sign in to reply
    • More
    • Cancel
  • robogary
    robogary over 3 years ago

    very nice. I usually stop after the perf board. What drives your decision to create and produce a PWB ?  

    • Cancel
    • Vote Up 0 Vote Down
    • Sign in to reply
    • More
    • Cancel
element14 Community

element14 is the first online community specifically for engineers. Connect with your peers and get expert answers to your questions.

  • Members
  • Learn
  • Technologies
  • Challenges & Projects
  • Products
  • Store
  • About Us
  • Feedback & Support
  • FAQs
  • Terms of Use
  • Privacy Policy
  • Legal and Copyright Notices
  • Sitemap
  • Cookies

An Avnet Company © 2025 Premier Farnell Limited. All Rights Reserved.

Premier Farnell Ltd, registered in England and Wales (no 00876412), registered office: Farnell House, Forge Lane, Leeds LS12 2NE.

ICP 备案号 10220084.

Follow element14

  • X
  • Facebook
  • linkedin
  • YouTube