


Machine Vision Deep Learning Automation on Arduino Portenta or MKR 1010
Table of Contents
1. Machine Vision Deep Learning
There is no doubt that AI is knocking at doors. As for Machine Vision deep learning, it is valid technology but not thoroughly proved in MCUs.
WIth camera catching video, via AI engine on various model, automation can be really automatically. Most MCUs can only show demo since, hardware resources limited the application.
Luckily, I was awarded giveway Arduino Portenta H7, that is perfect entry level MCU with enough performance.
2. Machine Vision Deep Learning on Portenta H7
While, the process is not so OK. I have updated firmware according to official documents, It seems go well.

But the program downloading is all the way unsuccessful.

The download port is not accessible in normal mode, as red LED is on.

I switch to bootloader mode, double click the on board button switch, as green LED is on.
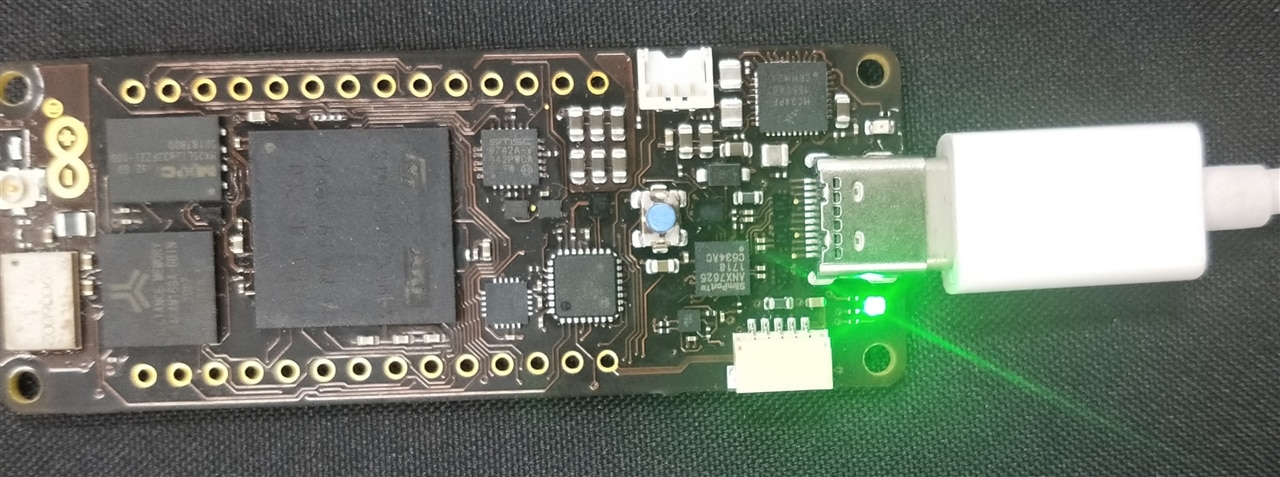
After download report OK. the green led go off and return to normal mode.

It seems lost link again and serial port is not accessible.
This problem has been discussed in arduino forum Invalid DFU suffix signature , but without useful clue for this case. It is said that, it can brick the Portenta H7 board, so I did not try further.
With this example project, Portenta H7 has been proved capable of camera video capture and Person Detection with valid vgg-16 tensorflow AI model.
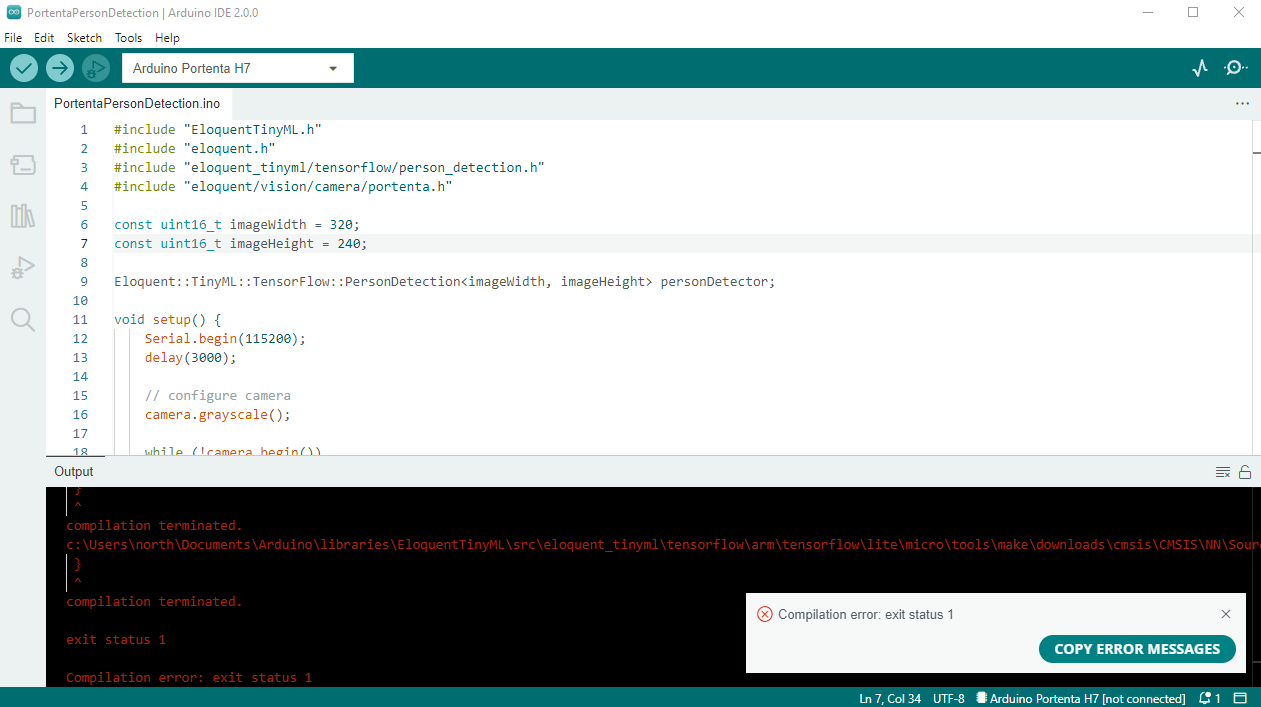
But I could not re-run the example within 2 moths. This example combines complex tensorflow running flow, but anyone can skip the steps, just replace the model with customized one and got result quickly based on Arduino IDE. Here attached main part of code for reference.
#include "EloquentTinyML.h"
#include "eloquent.h"
#include "eloquent_tinyml/tensorflow/person_detection.h"
#include "eloquent/vision/camera/portenta.h"

const uint16_t imageWidth = 320;
const uint16_t imageHeight = 240;

Eloquent::TinyML::TensorFlow::PersonDetection<imageWidth, imageHeight> personDetector;

void setup() {
    Serial.begin(115200);
    delay(3000);

    // configure camera
    camera.grayscale();

    while (!camera.begin())
        Serial.println("Cannot init camera");

    personDetector.setDetectionAbsoluteThreshold(190);
    personDetector.begin();

    // abort if an error occurred on the detector
    while (!personDetector.isOk()) {
        Serial.print("Detector init error: ");
        Serial.println(personDetector.getErrorMessage());
    }
}

void loop() {
    if (!camera.capture()) {
        Serial.println("Camera capture error");
        delay(1000);
        return;
    }

    bool isPersonInFrame = personDetector.detectPerson(camera.buffer.getBuffer());

    if (!personDetector.isOk()) {
        Serial.print("Person detector detection error: ");
        Serial.println(personDetector.getErrorMessage());
        delay(1000);
        return;
    }

    Serial.println(isPersonInFrame ? "Person detected" : "No person detected");
    Serial.print("\t > It took ");
    Serial.print(personDetector.getElapsedTime());
    Serial.println("ms to detect");
    Serial.print("\t > Person score: ");
    Serial.println(personDetector.getPersonScore());
    Serial.print("\t > Not person score: ");
    Serial.println(personDetector.getNotPersonScore());
}
3. Deep Learning on Arduino MKR 1010
It is possible to run deep learning model on other arduino board, such as MKR 1010.

But only fit for much simple model like magic-wand project shows. Or even simpler example using sine way prediction can shows.
#include "MicroFlow.h"

void setup(){
  Serial.begin(9600);
  //Neural network architecture
  int topology[] = {1, 16, 16, 1};
  //Total number of layers in the network
  int layers = 4;
  //The weights obtained by training
  double weights[] = {-0.18020691, -0.7092932, 0.53228974, -0.40353614, -0.114111565, -0.2179853, -0.34155884, 0.34106994, -0.76267976, -0.7380614, 0.21569583, -0.2139194, 0.5167245, -0.17401153, -0.20049067, 0.31810948, -0.17641671, -0.11120919, -0.16200458, -0.3888606, -0.6602876, -0.061384033, 0.09223559, 0.37525204, 0.54230714, -0.5420377, 0.40341657, -0.0478172, 0.28266862, -0.16159488, -0.59365463, 0.35424334, 0.3267206, -0.26376727, 0.47587544, -0.33641315, 0.16030453, -0.1666632, 0.40059495, -0.04251305, 0.28301397, 0.5904949, -0.053780366, 0.45721573, 0.25754863, -0.259782, 0.5664863, 0.17266153, 0.25059226, -0.22529407, 0.42905506, -0.33436966, -0.31328633, 0.24930298, 0.44240353, -0.09201871, -0.43963534, -0.5105577, 0.27138227, -0.14273775, -0.34870732, -0.25906843, -0.06970604, 0.18929191, -0.2530467, -0.104917064, 0.0068679363, 0.21536273, -0.30234316, -0.28891304, -0.29332885, 0.32503358, 0.3919649, -0.14170253, 0.11798309, 0.17980376, -0.27192476, 0.4303235, -0.02947342, 0.15107746, -0.2598052, -0.3284807, 0.27634418, -0.57950014, -0.08253329, -0.1491105, 0.010676943, 0.3210985, 0.086009555, 0.023121554, 0.17110659, 0.2914402, -0.5632771, -0.48083237, -0.1702254, -0.6491043, -0.1612504, -0.35910985, -0.43094563, 0.23703146, -0.41070735, 0.05850029, 0.33020738, 0.15090854, 0.25278658, -0.40165377, 0.18157364, 0.18397272, -0.067259625, -0.030623805, -0.38906488, 0.12120787, -0.35681978, -0.015840149, -0.39917877, -0.1926287, 0.15764198, -0.2787829, -0.106904484, -0.1643053, -0.22026277, -0.23380375, -0.26905668, 0.4879554, 0.3085039, 0.056550965, -0.47284326, 0.39882433, -0.3420191, -0.006475827, 0.105744, -0.3470057, 0.30272853, 0.48758823, 0.22344781, -0.043175608, -0.5166243, 0.44461092, -0.30219212, -0.18622203, -0.24710214, -0.27750847, 0.4833279, -0.12194787, -0.27154568, -0.30576727, -0.06120761, 0.11141779, -0.0645274, -0.34420022, 0.096229844, 0.4865377, -0.1540132, 0.23028192, -0.26451805, -0.09253174, -0.18938746, -0.4590808, 0.31901625, -0.24549583, -0.085119374, 0.012193947, 0.49030626, 0.070009544, 0.023369858, 0.116173156, 0.40282694, -0.1602629, 0.044649825, 0.0009477779, 0.46261105, 0.3733308, -0.09214332, -0.19407125, 0.5048038, -0.35704875, 0.261917, 0.2097674, 0.26111174, -0.333162, -0.23447216, -0.2689979, -0.3026904, 0.37091032, -0.47135738, 0.2387071, 0.18147138, -0.42423972, 0.28588268, -0.24024953, -0.01607273, 0.1431519, 0.34595066, -0.3051451, 0.32938224, -0.5095388, -0.02898916, 0.14163107, -0.21729809, -0.10920483, 0.39760444, -0.27399564, -0.10921634, 0.32889658, -0.1374087, 0.40601486, -0.44281253, 0.10765017, -0.49679792, -0.118123636, 0.08053128, -0.39885703, 0.36950678, 0.60096014, 0.12667942, -0.20069866, 0.11185153, 0.061183166, 0.53899825, -0.5582451, -0.10679583, -0.1396875, 0.037886318, -0.26643562, -0.16470054, -0.48525092, 0.18584907, -0.8386027, -0.7082003, -0.14894205, 0.2340593, -0.23536055, 0.589809, -1.0950022, 0.111260764, 0.61106294, -0.6224934, -0.28117228, -0.41649967, -0.8452682, -0.5354197, -0.40446323, 0.58809686, -0.93311673, -0.2974728, 0.09037152, 0.65899205, 0.093838304, 0.0036487002, -1.1248379, 0.47060364, 0.9855872, 0.041951336, -0.10897197, -0.9551882, -0.66548353, -0.49177283, 0.20674603, -0.13553445, -0.19582628, 0.648527, 0.39960903, 0.39197195, -0.20611076, -0.28021467, 0.31050676, -0.1316053, -0.52917576, 0.07111866, 0.23193023, 0.6888892, -0.074324824, 0.5296529, -0.29145825, -0.8676659, 0.86751336, -0.19699064, 0.27004054, -1.145208, -0.43273923, -0.09138022, -0.7838448, -0.4405369, -0.30264875, 0.79583466, 0.7128926, -0.820885, 0.80208766};
  //The biases obstained by training
  double biases[] = {0.38599014, -0.04392276, -0.2874584, 0.3675327, 0.047080062, 0.20073166, 0.31219038, -0.2136711, 0.05555728, -0.05662671, -0.19972037, 0.40990645, -0.79461235, 0.7073865, 0.91056496, -0.48865843, -0.00048907846, 0.0021766948, -0.07139468, 0.039431103, -0.046511196, -0.09260542, -0.028098255, -0.0614371, 0.0024643205, -0.1337608, -0.060558215, 0.13885157, 0.049416065, 0.047094665, -0.12406271, -0.1402871, 0.049416292};
  //Inputs and outputs
  double inputs[] = {0};
  double output[1] = {};

  MicroMLP mlp(layers, topology, weights, biases, TANH);
  for (int i=0;i<180;i++){
    inputs[0] = i * (3.14/180);
    //Feedforward pass through the network
    mlp.feedforward(inputs, output);
    Serial.print("Inputs: ");Serial.println(inputs[0]);
    Serial.print("Neural Network Output: ");Serial.println(output[0]);
    Serial.print("Actual:");Serial.println(sin(inputs[0]));
  }
}

void loop(){

}
4. Automation on MKR motor shield
MKR family boads come with many shield board. The MKR motor shield is very good choice for automation, it can drive 4x DC Motor, 4 x servo, with 4 x Hall sensor input.
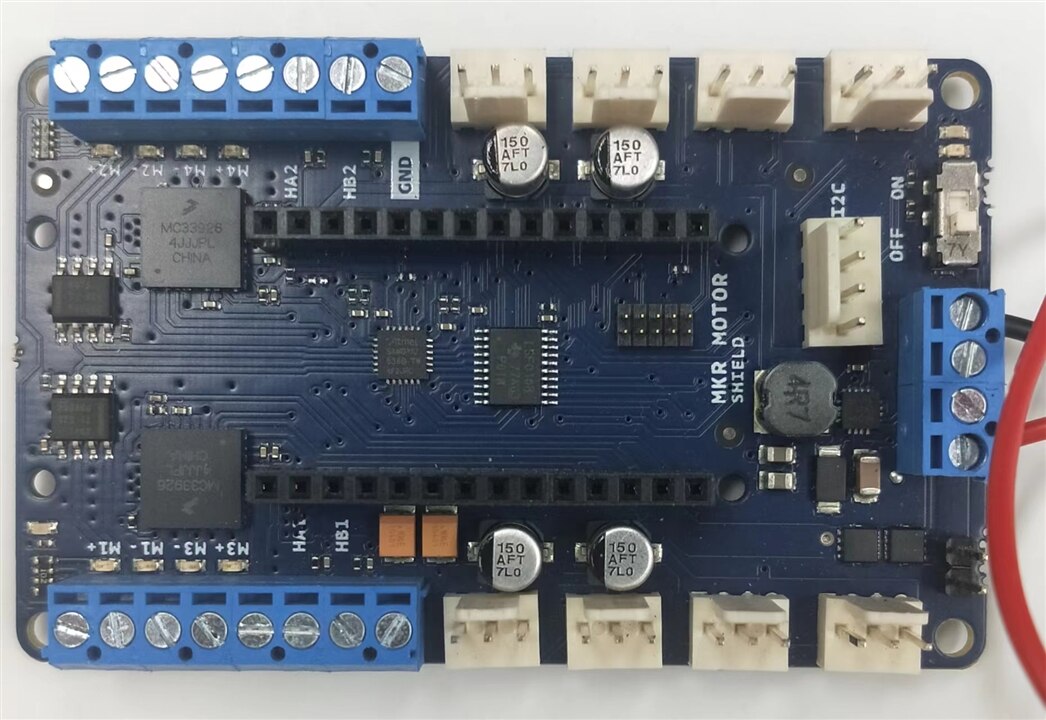
Update the firmware of MKR motor shield first, as introduced in How to update the MKR Motor Carrier Firmware .According to source code for MKR motor shield, I2C library < wire.h> is used , and MKR board control the MKR motor shield with Control Command, but the API for motor control is as simple as one line for each motor
    M1.setDuty(0);
    M2.setDuty(0);
    M3.setDuty(0);
    M4.setDuty(0);
5. Machine Vision Automation Solution with Arduino
Then the final choice shall be machine vision workload shall be assigned to other board and control of motors with MKR 1010 and MKR motor board.
5.1 Connection The MKR Motor Shield with three motors to move around.

5.2 Add two batteries to MKR 1010 and MKR motor shield

5.3 Download the arduino code to MKR 1010 board

/*
 A simple web server that control motor MKR motor shield
 This sketch will print the IP address of your WiFi module (once connected)
 to the Serial Monitor. From there, you can open that address in a web browser
 to turn on and off the LED on pin 9.

 If the IP address of your board is yourAddress:
 http://yourAddress/R turns Motor 1 right
 http://yourAddress/L turns Motor 1 left
 http://yourAddress/U turns Motor 3 upward
 http://yourAddress/D turns Motor 3 backward
 http://yourAddress/B turns Motor 2 Picking
 http://yourAddress/F turns Motor 2 Releasing
 This example is written for a network using WPA encryption. For WEP or WPA, change the WiFi.begin() call accordingly.
 */
#include <SPI.h>
#include <WiFiNINA.h>
#include <MKRMotorCarrier.h>

#include "arduino_secrets.h"
///////please enter your sensitive data in the Secret tab/arduino_secrets.h
char ssid[] = SECRET_SSID;        // your network SSID (name)
char pass[] = SECRET_PASS;    // your network password (use for WPA, or use as key for WEP)
int keyIndex = 0;                 // your network key index number (needed only for WEP)
int status = WL_IDLE_STATUS;


//Variable to change the motor speed and direction
#define INTERRUPT_PIN 6
//Variable to store the battery voltage
static int batteryVoltage;
static int duty = 0;

WiFiServer server(80);

void setup() {
  Serial.begin(9600);      // initialize serial communication
  pinMode(9, OUTPUT);      // set the LED pin mode

    //Establishing the communication with the motor shield
  if (controller.begin())
    {
      Serial.print("MKR Motor Shield connected, firmware version ");
      Serial.println(controller.getFWVersion());
    }
  else
    {
      Serial.println("Couldn't connect! Is the red led blinking? You may need to update the firmware with FWUpdater sketch");
      while (1);
    }
  // Reboot the motor controller; brings every value back to default
  Serial.println("reboot");
  controller.reboot();
  delay(500);
    //Take the battery status
  float batteryVoltage = (float)battery.getConverted();
  Serial.print("Battery voltage: ");
  Serial.print(batteryVoltage);
  Serial.print("V, Raw ");
  Serial.println(battery.getRaw());


  // check for the WiFi module:
  if (WiFi.status() == WL_NO_MODULE) {
    Serial.println("Communication with WiFi module failed!");
    // don't continue
    while (true);
  }

  String fv = WiFi.firmwareVersion();
  if (fv < WIFI_FIRMWARE_LATEST_VERSION) {
    Serial.println("Please upgrade the firmware");
  }

  // attempt to connect to WiFi network:
  while (status != WL_CONNECTED) {
    Serial.print("Attempting to connect to Network named: ");
    Serial.println(ssid);                   // print the network name (SSID);

    // Connect to WPA/WPA2 network. Change this line if using open or WEP network:
    status = WiFi.begin(ssid, pass);
    // wait 10 seconds for connection:
    delay(10000);
  }
  server.begin();                           // start the web server on port 80
  printWifiStatus();                        // you're connected now, so print out the status
}


void loop() {
  WiFiClient client = server.available();   // listen for incoming clients

  if (client) {                             // if you get a client,
    Serial.println("new client");           // print a message out the serial port
    String currentLine = "";                // make a String to hold incoming data from the client
    while (client.connected()) {            // loop while the client's connected
      if (client.available()) {             // if there's bytes to read from the client,
        char c = client.read();             // read a byte, then
        Serial.write(c);                    // print it out to the serial monitor
        if (c == '\n') {                    // if the byte is a newline character

          // if the current line is blank, you got two newline characters in a row.
          // that's the end of the client HTTP request, so send a response:
          if (currentLine.length() == 0) {
            // HTTP headers always start with a response code (e.g. HTTP/1.1 200 OK)
            // and a content-type so the client knows what's coming, then a blank line:
            client.println("HTTP/1.1 200 OK");
            client.println("Content-type:text/html");
            client.println();

            // the content of the HTTP response follows the header:
            client.print("Click <a href=\"/H\">here</a> turn the LED on pin 9 on<br>");
            client.print("Click <a href=\"/L\">here</a> turn the LED on pin 9 off<br>");

            // The HTTP response ends with another blank line:
            client.println();
            // break out of the while loop:
            break;
          } else {    // if you got a newline, then clear currentLine:
            currentLine = "";
          }
        } else if (c != '\r') {  // if you got anything else but a carriage return character,
          currentLine += c;      // add it to the end of the currentLine
        }

        // Check to see if the client request was "GET /H" or "GET /L":
        //if (currentLine.endsWith("GET /H")) {       digitalWrite(LED_BUILTIN, HIGH);               // GET /H turns the LED on      }
        //if (currentLine.endsWith("GET /L")) {       digitalWrite(LED_BUILTIN, LOW);                // GET /L turns the LED off     }
        if (currentLine.endsWith("GET /L")) {
          duty = 30 ;
          M1.setDuty(duty);
          delay(50);
        }
        if (currentLine.endsWith("GET /R")) {
          duty = -30 ;
          M1.setDuty(duty);
          delay(50);
        }
        if (currentLine.endsWith("GET /U")) {
          duty = 30 ;
          M3.setDuty(duty);
          delay(50);
          //digitalWrite(LED_BUILTIN, HIGH);
        }
        if (currentLine.endsWith("GET /D")) {
          duty = -30 ;
          M3.setDuty(duty);
          delay(50);
          //digitalWrite(LED_BUILTIN, LOW);
        }
        duty = 0 ;
        if (currentLine.endsWith("GET /F")) {
          duty = 30 ;
          M2.setDuty(duty);
          delay(50);
          //digitalWrite(LED_BUILTIN, HIGH);
        }
        if (currentLine.endsWith("GET /B")) {
          duty = -30 ;
          M2.setDuty(duty);
          delay(50);
          //digitalWrite(LED_BUILTIN, LOW);
        }
        M1.setDuty(duty);
        M3.setDuty(duty);
        delay(50);
        controller.ping();
      }
    }
    // close the connection:
    client.stop();
    Serial.println("client disconnected");
  }

  //Motor test
    for (duty=-100; duty<100; duty+=5)
    {
      Serial.print("Motor Duty: ");
      Serial.println(duty);
      M1.setDuty(duty);
      M2.setDuty(duty);
      M3.setDuty(duty);
      M4.setDuty(duty);
      delay(50);
    }
    for (duty=100; duty>-100; duty-=5)
    {
      Serial.print("Motor Duty: ");
      Serial.println(duty);
      M1.setDuty(duty);
      M2.setDuty(duty);
      M3.setDuty(duty);
      M4.setDuty(duty);
      delay(50);
    }

  //Keep active the communication MKR1000 & MKRMotorCarrier
  //Ping the samd11
  controller.ping();
  //wait
  delay(50);

}

void printWifiStatus() {
  // print the SSID of the network you're attached to:
  Serial.print("SSID: ");
  Serial.println(WiFi.SSID());

  // print your board's IP address:
  IPAddress ip = WiFi.localIP();
  Serial.print("IP Address: ");
  Serial.println(ip);

  // print the received signal strength:
  long rssi = WiFi.RSSI();
  Serial.print("signal strength (RSSI):");
  Serial.print(rssi);
  Serial.println(" dBm");
  // print where to go in a browser:
  Serial.print("To see this page in action, open a browser to http://");
  Serial.println(ip);
}
5.4 After the MKR 1010 and MKR motor shield are powered on. Control the motor in web browser with the http GET command,
if (currentLine.endsWith("GET /L")) {
          duty = 30 ;
          M1.setDuty(duty);
          delay(50);
        }
        if (currentLine.endsWith("GET /R")) {
          duty = -30 ;
          M1.setDuty(duty);
          delay(50);
        }
        if (currentLine.endsWith("GET /U")) {
          duty = 30 ;
          M3.setDuty(duty);
          delay(50);
          //digitalWrite(LED_BUILTIN, HIGH);
        }
        if (currentLine.endsWith("GET /D")) {
          duty = -30 ;
          M3.setDuty(duty);
          delay(50);
          //digitalWrite(LED_BUILTIN, LOW);
        }
        duty = 0 ;
        if (currentLine.endsWith("GET /F")) {
          duty = 30 ;
          M2.setDuty(duty);
          delay(50);
          //digitalWrite(LED_BUILTIN, HIGH);
        }
        if (currentLine.endsWith("GET /B")) {
          duty = -30 ;
          M2.setDuty(duty);
          delay(50);
          //digitalWrite(LED_BUILTIN, LOW);
        }
        M1.setDuty(duty);
        M3.setDuty(duty);
        delay(50);
        controller.ping();
      }
5.5 There shall be Machine Vision detecting engine to give such http GET command, such as Raspberry Pi 4B with OpenVINO SSD object detection. Of which, is next project in my plan.
In this project, MKR board with MKR motor shield provide reliable, fast deploy platform for Motor control.
