element14 Community
element14 Community
    Register Log In
  • Site
  • Search
  • Log In Register
  • Community Hub
    Community Hub
    • What's New on element14
    • Feedback and Support
    • Benefits of Membership
    • Personal Blogs
    • Members Area
    • Achievement Levels
  • Learn
    Learn
    • Ask an Expert
    • eBooks
    • element14 presents
    • Learning Center
    • Tech Spotlight
    • STEM Academy
    • Webinars, Training and Events
    • Learning Groups
  • Technologies
    Technologies
    • 3D Printing
    • FPGA
    • Industrial Automation
    • Internet of Things
    • Power & Energy
    • Sensors
    • Technology Groups
  • Challenges & Projects
    Challenges & Projects
    • Design Challenges
    • element14 presents Projects
    • Project14
    • Arduino Projects
    • Raspberry Pi Projects
    • Project Groups
  • Products & Partners
    Products & Partners
    • Arduino
    • Avnet & Tria Boards Community
    • Dev Tools
    • Manufacturers
    • Multicomp Pro
    • Product Groups
    • Raspberry Pi
    • RoadTests & Reviews
  • About Us
    About the element14 Community
  • Store
    Store
    • Visit Your Store
    • Choose another store...
      • Europe
      •  Austria (German)
      •  Belgium (Dutch, French)
      •  Bulgaria (Bulgarian)
      •  Czech Republic (Czech)
      •  Denmark (Danish)
      •  Estonia (Estonian)
      •  Finland (Finnish)
      •  France (French)
      •  Germany (German)
      •  Hungary (Hungarian)
      •  Ireland
      •  Israel
      •  Italy (Italian)
      •  Latvia (Latvian)
      •  
      •  Lithuania (Lithuanian)
      •  Netherlands (Dutch)
      •  Norway (Norwegian)
      •  Poland (Polish)
      •  Portugal (Portuguese)
      •  Romania (Romanian)
      •  Russia (Russian)
      •  Slovakia (Slovak)
      •  Slovenia (Slovenian)
      •  Spain (Spanish)
      •  Sweden (Swedish)
      •  Switzerland(German, French)
      •  Turkey (Turkish)
      •  United Kingdom
      • Asia Pacific
      •  Australia
      •  China
      •  Hong Kong
      •  India
      •  Japan
      •  Korea (Korean)
      •  Malaysia
      •  New Zealand
      •  Philippines
      •  Singapore
      •  Taiwan
      •  Thailand (Thai)
      •  Vietnam
      • Americas
      •  Brazil (Portuguese)
      •  Canada
      •  Mexico (Spanish)
      •  United States
      Can't find the country/region you're looking for? Visit our export site or find a local distributor.
  • Translate
  • Profile
  • Settings
Crazy Arduino Automations
  • Challenges & Projects
  • Project14
  • Crazy Arduino Automations
  • More
  • Cancel
Crazy Arduino Automations
Crazy Arduino Automations Blog Raising the Bridge...Automation with Arduino: Failure reconciliation
  • Blog
  • Forum
  • Documents
  • Files
  • Members
  • Mentions
  • Sub-Groups
  • Tags
  • More
  • Cancel
  • New
Join Crazy Arduino Automations to participate - click to join for free!
  • Share
  • More
  • Cancel
Group Actions
  • Group RSS
  • More
  • Cancel
Engagement
  • Author Author: colporteur
  • Date Created: 20 Apr 2023 8:29 PM Date Created
  • Views 5389 views
  • Likes 10 likes
  • Comments 16 comments
  • crazyarduinoautomationch
Related
Recommended

Raising the Bridge...Automation with Arduino: Failure reconciliation

colporteur
colporteur
20 Apr 2023

I have made unserviceable two L293N and one L298N motor driver modules doing something but I don't know what. I would like to know what I did, so I can prevent it from happening in the future. Can anyone share their experience or knowledge to help me isolate the cause of these failures?
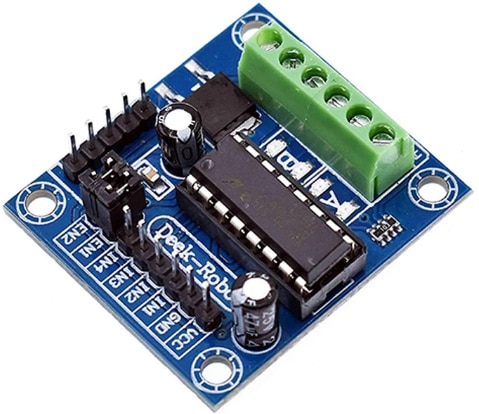
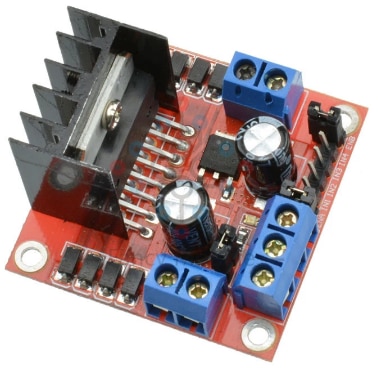
L293NL298N

As part of the Automation Design Challenge I am developing a solution to raise the bridge on a model railroad layout. 
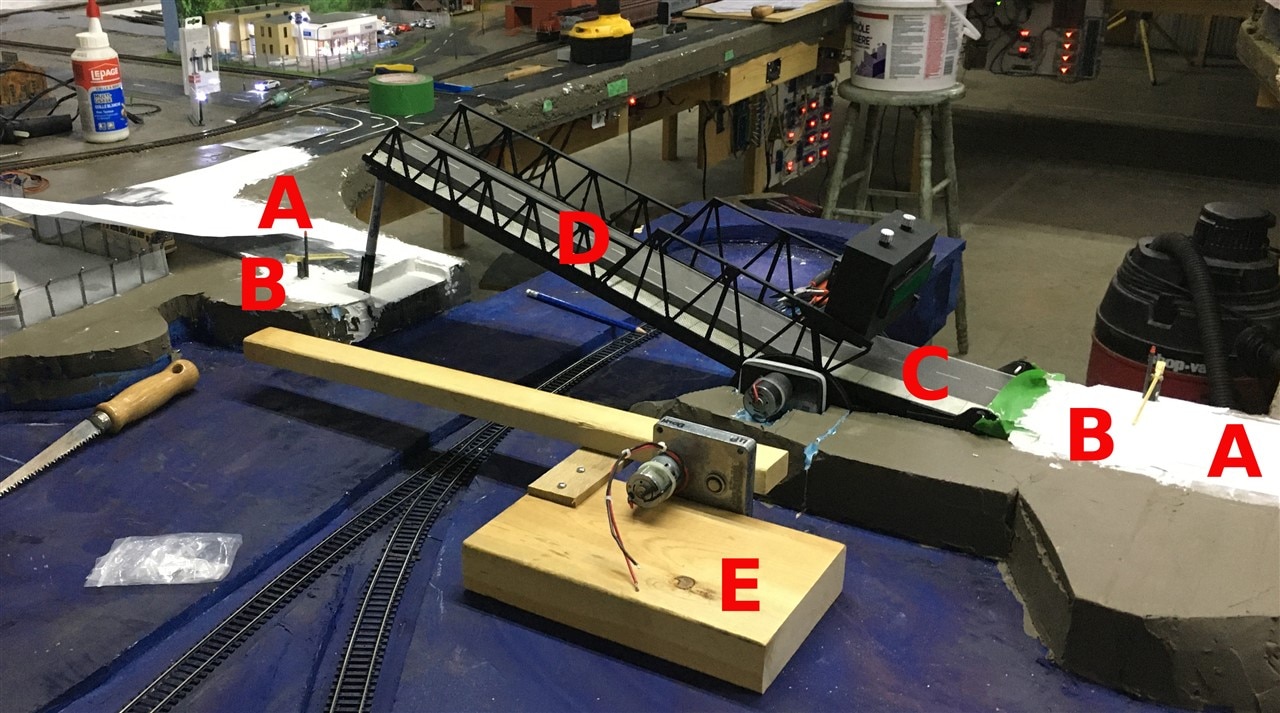
image

Model railroaders have been busy working on building the bridge. A magnet raised and lowered using a servo motor are located under the roadbed at points A. The barrier gates that are raised and lowered via servo are at points B. A ramp at point C is raised and lowered to make room for the bridge point D, to move is also controlled by a servo. The bridge has a separate motor to raise and lower it.

While the model railroaders are putting the finishing touches on the bridge installation, automation development continues. I built a bridge simulator point E using the same model of motor that is used for the bridge movement. My goal was to use the simulator to resurrect Arduino code that will manage the raising and lowering of the bridge. 

In the past I have smoked electronics and had to tear apart the layout to make repairs. The simulator will hopefully eliminate that step:)

The test unit has the motor moving an arm, controlled by a Nano and switches (not shown in the picture). The Nano uses an L293N or L298N to drive the motor. I did about three hours of testing with an L293N module raising and lowering the arm before it didn't work anymore. I can’t recall doing anything that would result in the failure. I replaced the driver module and continued to test but once again I did something to cause it not to work.

I took the assembly home and continued to test (while watching the playoff hockey games) and discovered the failed modules are outputting a little less than a half of the motor supply voltage of 12V. I then tried a spare L298N module I had and performed some tests.

It initially worked. 12V was being outputted to the motor. At one point I prevented the arm from rising. I also noticed the module LED’s come on when I pushed the arm back down. The L298N didn’t work after that. Did the action of preventing the arm from rising or pushing it down, smoked the chips. I’m just not sure?

My speculation is either preventing the motor to raise the arm or pushing the arm down might have caused a back emf that damaged the driver chips. There is a possibility that this action may happen when the bridge goes into production. As you can see from the picture the bridge is exposed to operators.

I have worked with these driver modules in the past to control motor speed with no issue. In those scenarios, I wasn’t impeding the motor movement. I made some amateur mistakes (shite happens) like shorting outputs but the chips still worked.

I recall before damaging the first two L293N modules I did impede the motor by stopping the arm but no damage was apparent because I was able to continue testing. Maybe at low motor speed settings impeding the arm is not a problem but at max settings the chip is damaged. I’m not sure?

If anyone has any insights, suggestions or condolences please pass them along. I have no more spares at the moment so I have to park the project until a delivery truck arrives.

  • Sign in to reply

Top Comments

  • colporteur
    colporteur over 3 years ago in reply to Jan Cumps +1
    Appreciate the response. You challenge me J, I like that. I found this definition of dead-band, hope I am on the same page as you. There is no mention of it in the data sheets that I found. In Half-Bridge…
  • colporteur
    colporteur over 3 years ago +1
    I had put further troubleshooting of the issue with the L293D until I had some spares. I received L293D driver chips this week. My thought was to replace the chip in the problem modules to determine if…
  • colporteur
    colporteur over 3 years ago in reply to shabaz

    Son of a butcher block. Just dropped an order for dozen L298N modules.

    Live a learn. This is the first incident I have experienced with either module. I have never used them in an industrial application so I have to experience with stress. They appear to be very popular in projects. If hits on motor drivers is any indication. I am using the L298N to control DC locomotives.

    • Cancel
    • Vote Up 0 Vote Down
    • Sign in to reply
    • More
    • Cancel
  • scottiebabe
    scottiebabe over 3 years ago

    Apparently this is common, people are blowing up 3-d printers! if the driver broad was designed correctly I wouldn't expect it too...

    Why you should not move your 3d printers axis by hand. Demonstrated by killing an led:#3dprinter #electronics pic.twitter.com/2DmgAmG73W

    — MAYER MAKES 🦆 (@MAYERMAKES) March 6, 2023

    Source mayermakes

    • Cancel
    • Vote Up 0 Vote Down
    • Sign in to reply
    • More
    • Cancel
  • shabaz
    shabaz over 3 years ago

    The other elephant in the room is that these driver boards are not very good. They have a lot of caveats, and if you're not sure of the code or the motor or supply connections are likely to change, then these are not the modules to use. 

    These ones look much better, and are cheap, and are a bit more modern:

    image

    They use a Toshiba chip (TB67H450) which, being more modern, is more efficient, won't get as hot, has various protections built-in, including that there's no risk of the shoot-through, so if the code is faulty, there's no problem. Plus it has over-current protection.

    Also, the boards you're using look like they have a very small capacitor. The one in the photo has a larger one, but even then, it is built down to a cost like all these cheap boards are, so if it were me, I'd be desoldering the capacitors and adding better quality ones, since they are essential for protecting the chips from inductively caused spikes. An example on the Newark website would be this one: https://www.newark.com/united-chemi-con/elxz350ell101mf15d/aluminum-electrolytic-capacitor/dp/23K4236 

    It has fairly low ESR for an electrolytic, and is a good price, and would probably be a lot better than the one on the board. Also, you could solder a ceramic capacitor across the two pins of the electrolytic. Something like this: https://www.newark.com/kemet/c1206c105k5racauto/cap-mlcc-aec-q200-x7r-1uf-50v/dp/91Y9113 on sale currently, just $0.03 USD.

    It is surface mount but large, so you'll easily be able so solder that (tweezers help but not essential, it could even be temporarily held in place with a tiny amount of glue before soldering).

    If you did all that, you'd have something that is more rugged for a variety of scenarios. 

    • Cancel
    • Vote Up 0 Vote Down
    • Sign in to reply
    • More
    • Cancel
  • Gough Lui
    Gough Lui over 3 years ago

    "At one point I prevented the arm from rising. I also noticed the module LED’s come on when I pushed the arm back down. The L298N didn’t work after that. Did the action of preventing the arm from rising or pushing it down, smoked the chips. I’m just not sure?"

    Yes, that could certainly have hurt the module.

    Depending on the module's current capability, when you stopped the arm from rising, the motor current may have risen to a much higher level (i.e. the stall current) compared to the normal operating current. This may have overstressed or overheated the bridge. Depending on your power supply, you may be able to have a protective current limit to prevent over-stressing the bridge, but keep in mind, if there are large capacitors then they can also provide a short burst of current during anomalous operation that can hurt the bridge. If your motors are brushed, incorrect brushes or carbon dust may cause spikes of current as the commutators cross the split-ring and that can cause a transient short circuit and back-EMF spike that might hurt the chip. Snubber capacitors are likely to be recommended in that case.

    As for moving the motor when it is powered off, it will be working as a generator and creating back-EMF. Many drivers are MOSFET based and the body diode will conduct this back EMF to the voltage rails. As this is not regulated, if you did it quickly enough, you may have generated enough voltage to fry things upstream (e.g. an Arduino's output) thus that may later cause damage to future modules as they're not outputting properly. At worst, it may have stressed input ESD protection diodes which may cause early failure of inputs/outputs on an IC. But if there is a beefy capacitor and you were not too vigorous, then you may have survived this one.

    Jan's suggestion regarding dead-time is absolutely important for many types of drivers with no integrated prevention. Your code should NEVER enable the bridge in such a way that it would short out the supply as that is a quick way to failure.

    - Gough

    • Cancel
    • Vote Up 0 Vote Down
    • Sign in to reply
    • More
    • Cancel
  • colporteur
    colporteur over 3 years ago in reply to Jan Cumps

    Appreciate the response. You challenge me J, I like that.  I found this definition of dead-band, hope I am on the same page as you. There is no mention of it in the data sheets that I found.

    In Half-Bridge or Full-Bridge Enhanced PWM applications, if both the upper and lower power circuits are switched at the same time (one turned on, and the other turned off), due to delay in the circuitry, both switches may be on for a short period of time. During this brief interval, a very high current (shoot through current) will flow through both power switches, shorting the bridge supply.

    To avoid this potentially destructive shoot-through current from flowing during switching, Dead-Band Delay can be implemented to allow one current path to completely turn off before the other current path is turned on.

    • Cancel
    • Vote Up +1 Vote Down
    • Sign in to reply
    • More
    • Cancel
<>
element14 Community

element14 is the first online community specifically for engineers. Connect with your peers and get expert answers to your questions.

  • Members
  • Learn
  • Technologies
  • Challenges & Projects
  • Products
  • Store
  • About Us
  • Feedback & Support
  • FAQs
  • Terms of Use
  • Privacy Policy
  • Legal and Copyright Notices
  • Sitemap
  • Cookies

An Avnet Company © 2026 Premier Farnell Limited. All Rights Reserved.

Premier Farnell Ltd, registered in England and Wales (no 00876412), registered office: Farnell House, Forge Lane, Leeds LS12 2NE.

Follow element14

  • X
  • Facebook
  • linkedin
  • YouTube