element14 Community
element14 Community
    Register Log In
  • Site
  • Search
  • Log In Register
  • Members
    Members
    • Benefits of Membership
    • Achievement Levels
    • Members Area
    • Personal Blogs
    • Feedback and Support
    • What's New on element14
  • Learn
    Learn
    • Learning Center
    • eBooks
    • STEM Academy
    • Webinars, Training and Events
    • More
  • Technologies
    Technologies
    • 3D Printing
    • FPGA
    • Industrial Automation
    • Internet of Things
    • Power & Energy
    • Sensors
    • More
  • Challenges & Projects
    Challenges & Projects
    • Design Challenges
    • element14 presents
    • Project14
    • Arduino Projects
    • Raspberry Pi Projects
    • More
  • Products
    Products
    • Arduino
    • Dev Tools
    • Manufacturers
    • Raspberry Pi
    • RoadTests & Reviews
    • Avnet Boards Community
    • More
  • Store
    Store
    • Visit Your Store
    • Choose Another Store
      • Europe
      •  Austria (German)
      •  Belgium (Dutch, French)
      •  Bulgaria (Bulgarian)
      •  Czech Republic (Czech)
      •  Denmark (Danish)
      •  Estonia (Estonian)
      •  Finland (Finnish)
      •  France (French)
      •  Germany (German)
      •  Hungary (Hungarian)
      •  Ireland
      •  Israel
      •  Italy (Italian)
      •  Latvia (Latvian)
      •  
      •  Lithuania (Lithuanian)
      •  Netherlands (Dutch)
      •  Norway (Norwegian)
      •  Poland (Polish)
      •  Portugal (Portuguese)
      •  Romania (Romanian)
      •  Russia (Russian)
      •  Slovakia (Slovak)
      •  Slovenia (Slovenian)
      •  Spain (Spanish)
      •  Sweden (Swedish)
      •  Switzerland(German, French)
      •  Turkey (Turkish)
      •  United Kingdom
      • Asia Pacific
      •  Australia
      •  China
      •  Hong Kong
      •  India
      •  Korea (Korean)
      •  Malaysia
      •  New Zealand
      •  Philippines
      •  Singapore
      •  Taiwan
      •  Thailand (Thai)
      • Americas
      •  Brazil (Portuguese)
      •  Canada
      •  Mexico (Spanish)
      •  United States
      Can't find the country/region you're looking for? Visit our export site or find a local distributor.
  • Translate
  • Profile
Digital Fever
  • Challenges & Projects
  • Project14
  • Digital Fever
  • More
  • Cancel
Digital Fever
Blog SecuCam #2: Hardware Accelerated Motion Detection with the PYNQ-Z2
  • Blog
  • Forum
  • Documents
  • Events
  • Members
  • Mentions
  • Sub-Groups
  • Tags
  • More
  • Cancel
  • New
Digital Fever requires membership for participation - click to join
Blog Post Actions
  • Subscribe by email
  • More
  • Cancel
  • Share
  • Subscribe by email
  • More
  • Cancel
Group Actions
  • Group RSS
  • More
  • Cancel
Engagement
  • Author Author: Attila Tőkés
  • Date Created: 10 Apr 2021 10:54 AM Date Created
  • Views 566 views
  • Likes 6 likes
  • Comments 0 comments
  • pynq-z2
  • vidor 4000
  • pynq
  • project14
  • digital_fever
  • computer vision
  • digitalfeverch
Related
Recommended

SecuCam #2: Hardware Accelerated Motion Detection with the PYNQ-Z2

Attila Tőkés
Attila Tőkés
10 Apr 2021

This is the second part of my "SecuCam" project for the Project14's Digital Fever contest.


In the first part we connected a RaspiCam v1.3 to an Arduino MKR Vidor 4000, and did some basic image processing:

SecuCam #1: Experimenting with the MKR Vidor 4000


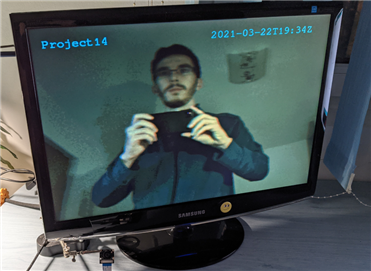
The camera image is taken from a RaspiCam v1.3. A Project14 logo along with an internet synced timestamp are applied as overlays. The resulting image was outputted to the Vidor 4000's MicroHDMI port.


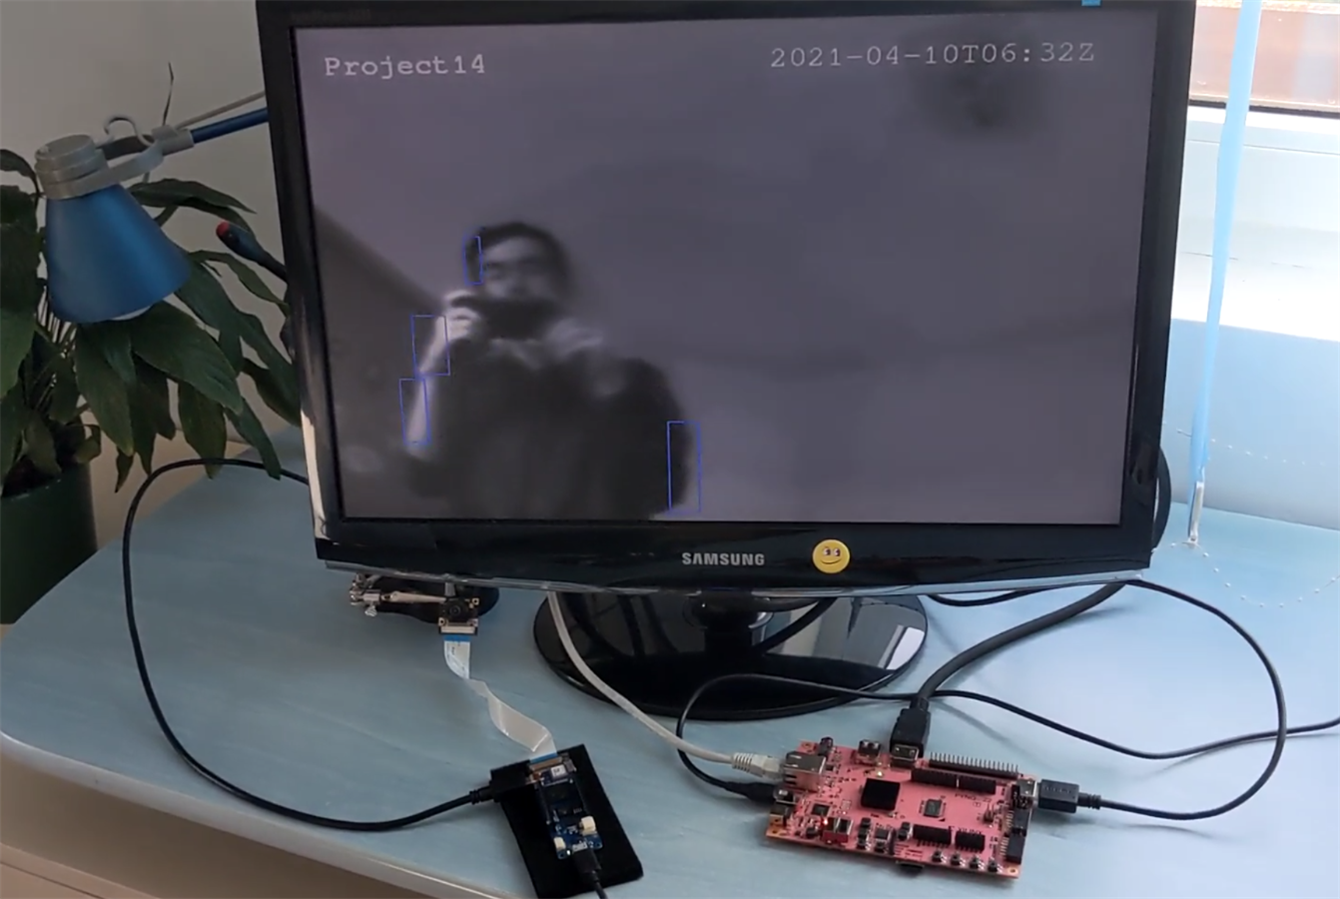
Today we will use the TUL PYNQ-Z2 to implement Hardware Accelerated Motion Detection:


1. TUL PYNQ-Z2 and the PYNQ Framework


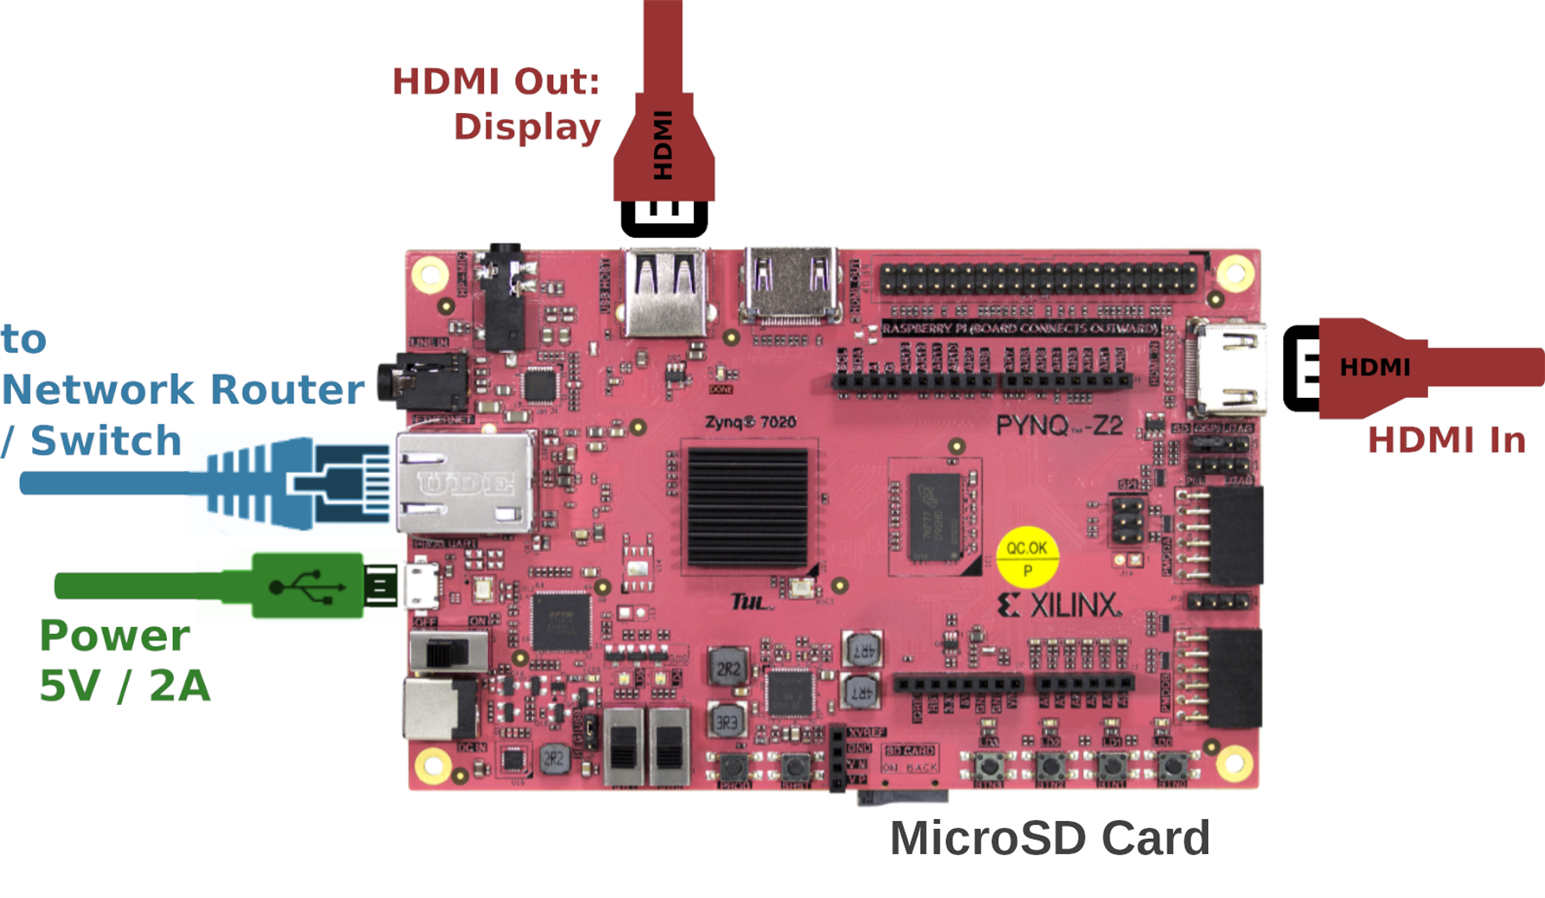
The TUL PYNQ-Z2 is a development board based on the Xilinx Zynq XC7Z020 FPGA SoC:


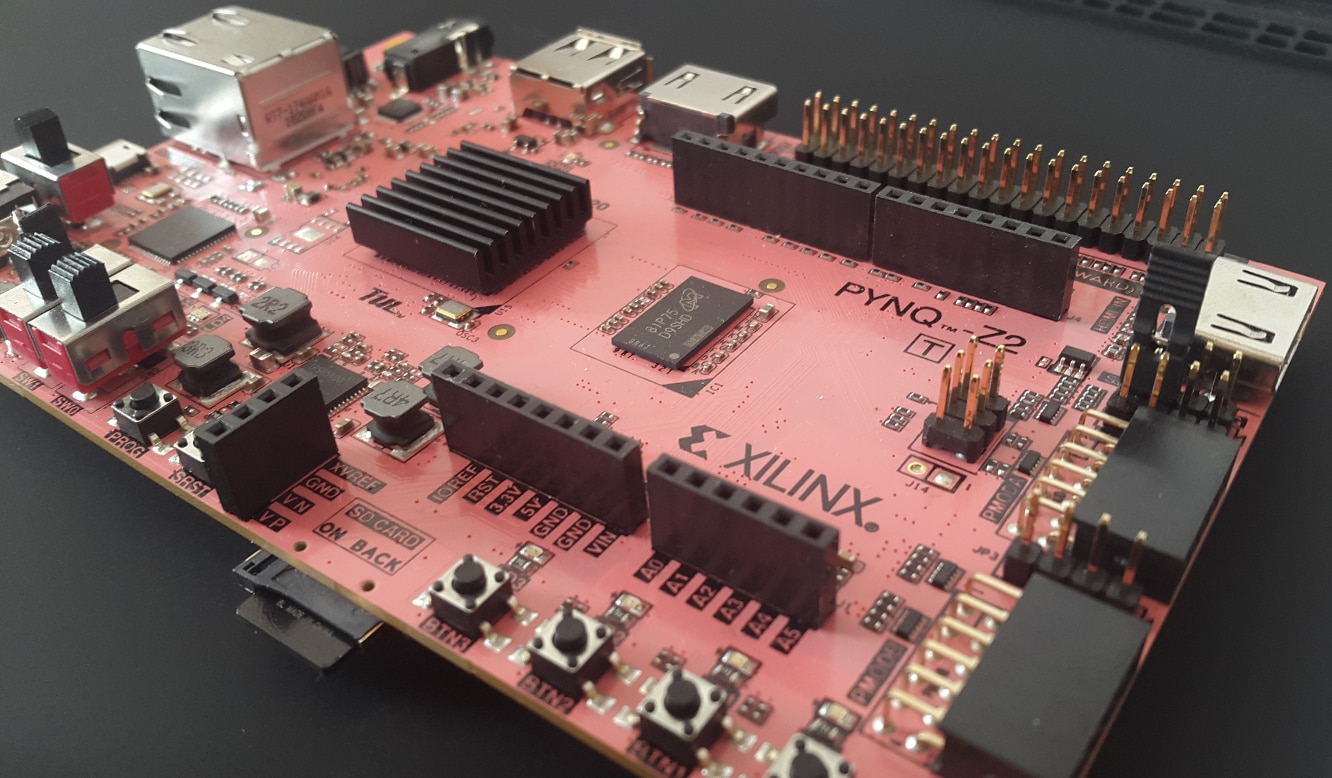
It features a 512 MB DDR3 RAM, a HDMI Input and a HDMI Output port and other interesting features.


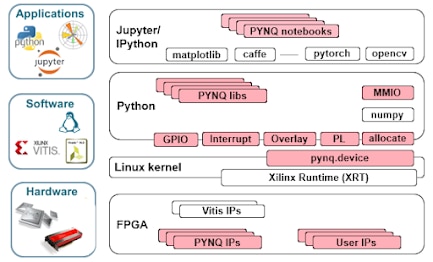
The PYNQ-Z2 is also one of the "official" demo boards for the PYNQ (Python Productivity for Zynq) framework.


PYNQ (Python Productivity for Zynq) is a open-source framework from Xilinx that aims to make FPGA development easier.


PYNQ uses pre-built FPGA designs along with Python libraries, to allow exploiting the power of PL acceleration much easier.

Getting started with PYNQ on the is TUL PYNQ-Z2 easy. What we need to do is:

  • download and flash a PYNQ SD card image on a microSD card
  • connect a MicroUSB cable for power, and Ethernet cable for networking
  • (optional) connect a HDMI Input (source) and Output (display)

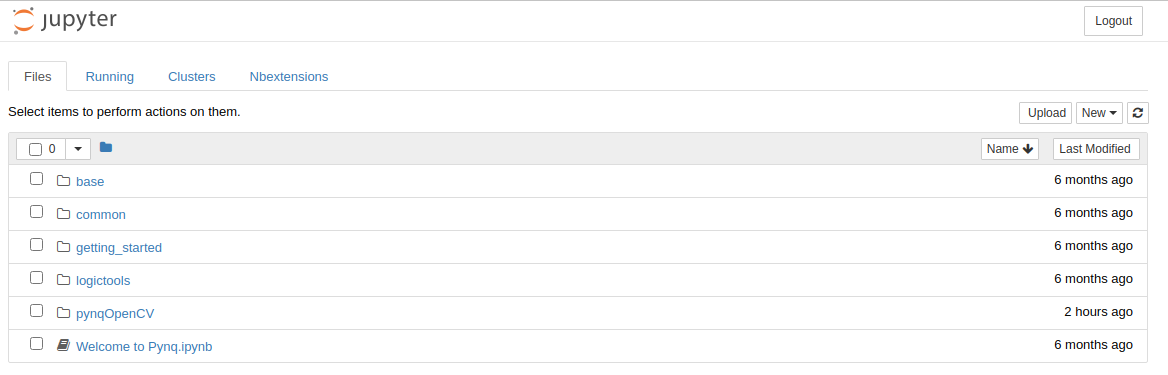
After we power up the board, a Jupyter Notebook server will be started. We can access it on http://pynq:9090/:

Note: I have the board from the Road Test I did back in 2019. Feel free to check it out:

PYNQ-Z2 Dev Board: Python Productivity for ZynqRegistered - Review


2. Hardware Accelerated Motion Detection


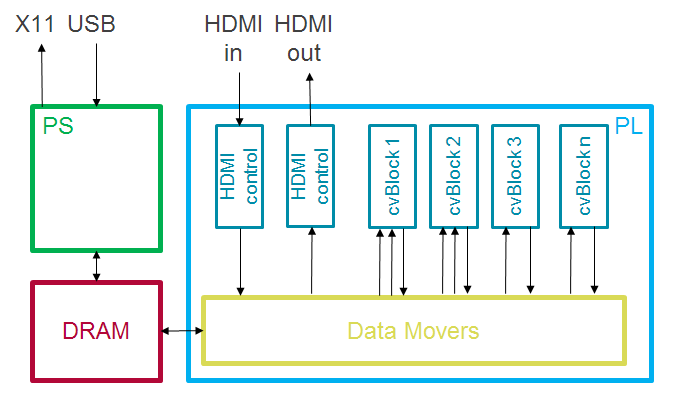
To do image processing with PYNQ will use OpenCV. For HDMI Input and Output we can use the Base overlay.


The PYNQ-ComputerVision overlays provide hardware accelerated versions of common OpenCV functionality:

  • we can install the Computer Vision overlays by executing the following commands on a SSH session:

    $ sudo -H pip3.6 install –upgrade git+https://github.com/Xilinx/PYNQ-ComputerVision.git
    $ sudo apt-get install libopencv-*

  • after a restart there will a new pynqOpenCV folder in the Jupyter with examples


To implement hardware (partially) hardware accelerated motion detection, I used the following algorithm:

  • two consecutive Input Frames are used as input
  • Gaussian Blur is applied for noise filtering
  • the Absolute Difference of the two frames is calculated
  • a Binary Threshold algorithm is used to transform the gray-scale image into a black-and-white image
  • two Dilation iterations are applied to fill up small gaps in the white areas
  • a Find Contours algorithm is applied on the resulting image

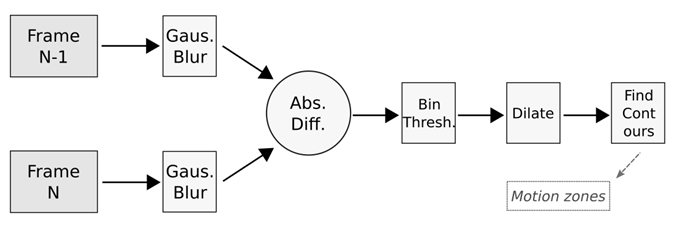
  • the resulting Contours represent the areas in the image where Motion was detected


The parts that can be hardware accelerated are:

  • the Gaussian Blur calculation, which is implemented as a 2D Filter - using xv2.filter2D()
  • the Dilation - using xv2.dilate()

(note other steps may also be hardware accelerated, but it may require building custom Pynq overlays)


The algorithm is mostly inspired from the Use Python, Zynq and OpenCV to Implement Computer Vision article from Adam Taylor.


I implemented the algorithm a Jupyter notebook, in a step-by-step manner. The notebook is available in the following Gist:

https://gist.github.com/bluetiger9/5aaa049380e795877c31d16cb009d486


A pure software and a (partially) hardware accelerated version of the algorithm were implemented.


The performance of the two versions looks like follows:

  • software: ~10 FPS
  • hardware: ~16 FPS

(note: it is not too spectacular result, but given that 3 of the 5 steps are still implemented in software it can be considered ok)


Here is a demo video showcasing the project:

You don't have permission to edit metadata of this video.
Edit media
x
Upload Preview


Hope You enjoyed this project!

Anonymous
Element14

element14 is the first online community specifically for engineers. Connect with your peers and get expert answers to your questions.

  • Members
  • Learn
  • Technologies
  • Challenges & Projects
  • Products
  • Store
  • About Us
  • Feedback & Support
  • FAQs
  • Terms of Use
  • Privacy Policy
  • Legal and Copyright Notices
  • Sitemap
  • Cookies

An Avnet Company © 2022 Premier Farnell Limited. All Rights Reserved.

Premier Farnell Ltd, registered in England and Wales (no 00876412), registered office: Farnell House, Forge Lane, Leeds LS12 2NE.

ICP 备案号 10220084.

Follow element14

  • Facebook
  • Twitter
  • linkedin
  • YouTube