element14 Community
element14 Community
    Register Log In
  • Site
  • Search
  • Log In Register
  • About Us
  • Community Hub
    Community Hub
    • What's New on element14
    • Feedback and Support
    • Benefits of Membership
    • Personal Blogs
    • Members Area
    • Achievement Levels
  • Learn
    Learn
    • Ask an Expert
    • eBooks
    • element14 presents
    • Learning Center
    • Tech Spotlight
    • STEM Academy
    • Webinars, Training and Events
    • Learning Groups
  • Technologies
    Technologies
    • 3D Printing
    • FPGA
    • Industrial Automation
    • Internet of Things
    • Power & Energy
    • Sensors
    • Technology Groups
  • Challenges & Projects
    Challenges & Projects
    • Design Challenges
    • element14 presents Projects
    • Project14
    • Arduino Projects
    • Raspberry Pi Projects
    • Project Groups
  • Products
    Products
    • Arduino
    • Avnet Boards Community
    • Dev Tools
    • Manufacturers
    • Multicomp Pro
    • Product Groups
    • Raspberry Pi
    • RoadTests & Reviews
  • Store
    Store
    • Visit Your Store
    • Choose another store...
      • Europe
      •  Austria (German)
      •  Belgium (Dutch, French)
      •  Bulgaria (Bulgarian)
      •  Czech Republic (Czech)
      •  Denmark (Danish)
      •  Estonia (Estonian)
      •  Finland (Finnish)
      •  France (French)
      •  Germany (German)
      •  Hungary (Hungarian)
      •  Ireland
      •  Israel
      •  Italy (Italian)
      •  Latvia (Latvian)
      •  
      •  Lithuania (Lithuanian)
      •  Netherlands (Dutch)
      •  Norway (Norwegian)
      •  Poland (Polish)
      •  Portugal (Portuguese)
      •  Romania (Romanian)
      •  Russia (Russian)
      •  Slovakia (Slovak)
      •  Slovenia (Slovenian)
      •  Spain (Spanish)
      •  Sweden (Swedish)
      •  Switzerland(German, French)
      •  Turkey (Turkish)
      •  United Kingdom
      • Asia Pacific
      •  Australia
      •  China
      •  Hong Kong
      •  India
      •  Korea (Korean)
      •  Malaysia
      •  New Zealand
      •  Philippines
      •  Singapore
      •  Taiwan
      •  Thailand (Thai)
      • Americas
      •  Brazil (Portuguese)
      •  Canada
      •  Mexico (Spanish)
      •  United States
      Can't find the country/region you're looking for? Visit our export site or find a local distributor.
  • Translate
  • Profile
  • Settings
Electromagnetism
  • Challenges & Projects
  • Project14
  • Electromagnetism
  • More
  • Cancel
Electromagnetism
Blog One String Electric Guitar #3 : Completing the Prototype
  • Blog
  • Forum
  • Documents
  • Events
  • Polls
  • Files
  • Members
  • Mentions
  • Sub-Groups
  • Tags
  • More
  • Cancel
  • New
Join Electromagnetism to participate - click to join for free!
  • Share
  • More
  • Cancel
Group Actions
  • Group RSS
  • More
  • Cancel
Engagement
  • Author Author: dubbie
  • Date Created: 21 Mar 2019 11:11 AM Date Created
  • Views 1635 views
  • Likes 11 likes
  • Comments 6 comments
  • guitar
  • electromagnetismch
Related
Recommended

One String Electric Guitar #3 : Completing the Prototype

dubbie
dubbie
21 Mar 2019

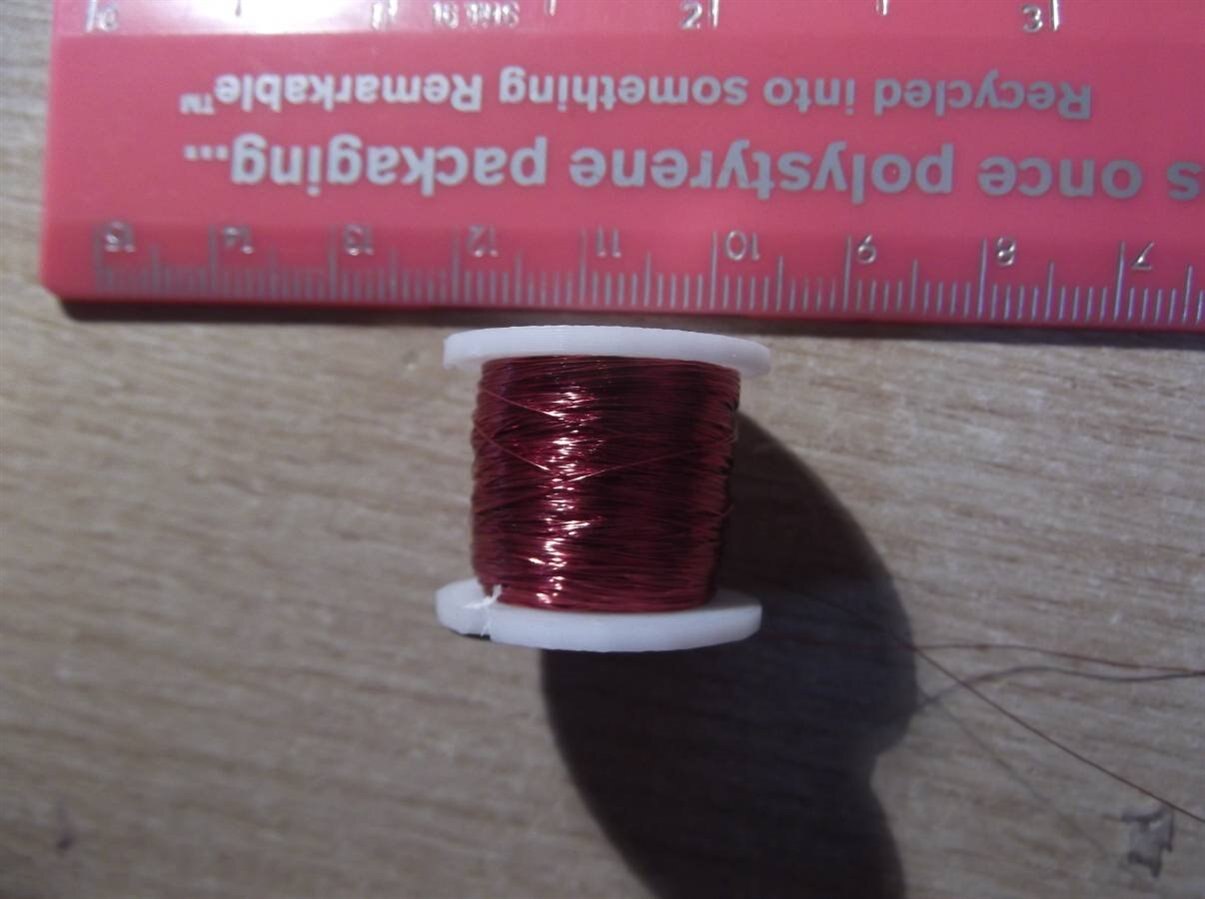
As the prototype body for the one string electric guitar has been completed the next step is to make the pickup coil. I have previously made a 3D printed bobbin to wind the coil on so all I need now is to select the wire to be used and wind it. I have selected the thinnest wire I had, which is 'pretty thin' (that's a technical term for non-mechanical engineers like me) which I think is 32 SWG or 38 SWG. It is so thin I can barely see it, even with my glasses on. It is enamelled so that the coils do not short out. I thought about making a coil winding mechanism with perhaps a continuous rotation servo motor but then thought - blow it, I'll just try winding it by hand. I don't think I'll do that again as it took a long time and the coils are not especially neat but eventually I had something made, see below:


image


The wire is so thin I had trouble handling it but by being very careful I managed to avoid breaking the wire (until right at the end!). I used sandpaper to gently remove the varnish coating, which again it was difficult to see if I had been successful, even with a magnifying glass. I know that some wires are coated with a varnish that evaporates when soldered so I hoped for the best. As the wire was so thin I decided that directed connections wasn't going to work as the stressed would have been too great and the wire would break. Instead I used a pice of stripboard and added some Veropins and then wrapped the wire around the pin and soldered the lot. It seemed to work as when I measured the resistance ot came up as 112 Ohms - which seemed reasonable for a very long length of pretty thin copper wire. I had an old guitar cable in by box (in fact I have several - left over from my son) which I cut one end off and soldered to more Veropinis on the stripboard see below.


image


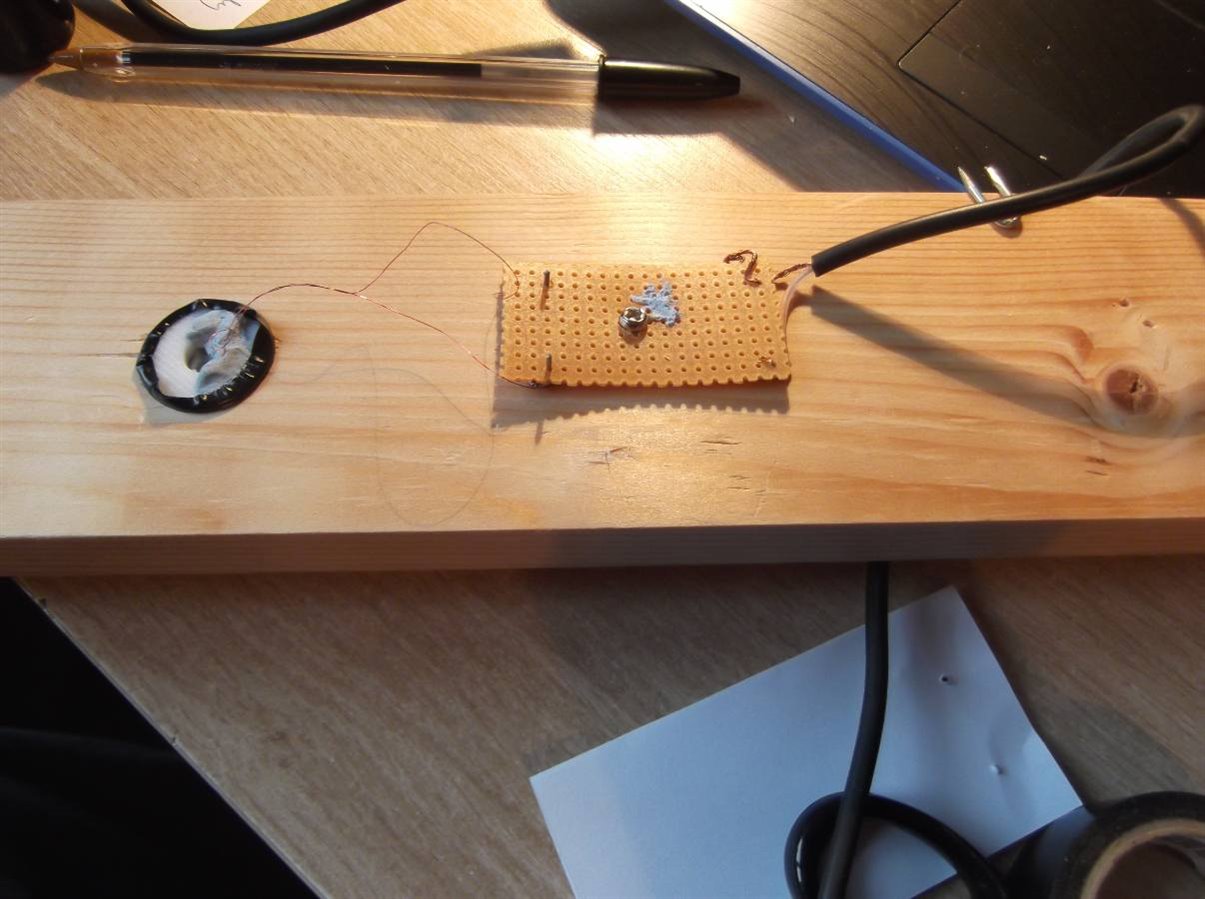
I used some black insulation tape on the pickup bobbin to create an interference fit into the wood as the hole drilled was slightly too large and then a U staple as strain relief on the guitar cable. Everything is now solid and stable and the coil wire should not break. I used a piece of white paper to cover up the bobbin and pretty thin wires to provide protection against mechanical rubbing and movement. As this is pretty much all there is to a simple electric guitar pickup I connected my Digital Signal Oscilloscope directly across the pickup coil and plucked the string. After some fiddling about with the settings I managed to obtain the waveform shown below. My DSO isn't that great as I bought it mainly for displaying digital waveforms and it's not that great at showing analogue signals. Either that or I just don't know how to get it to make good images - which is quire possible.


image


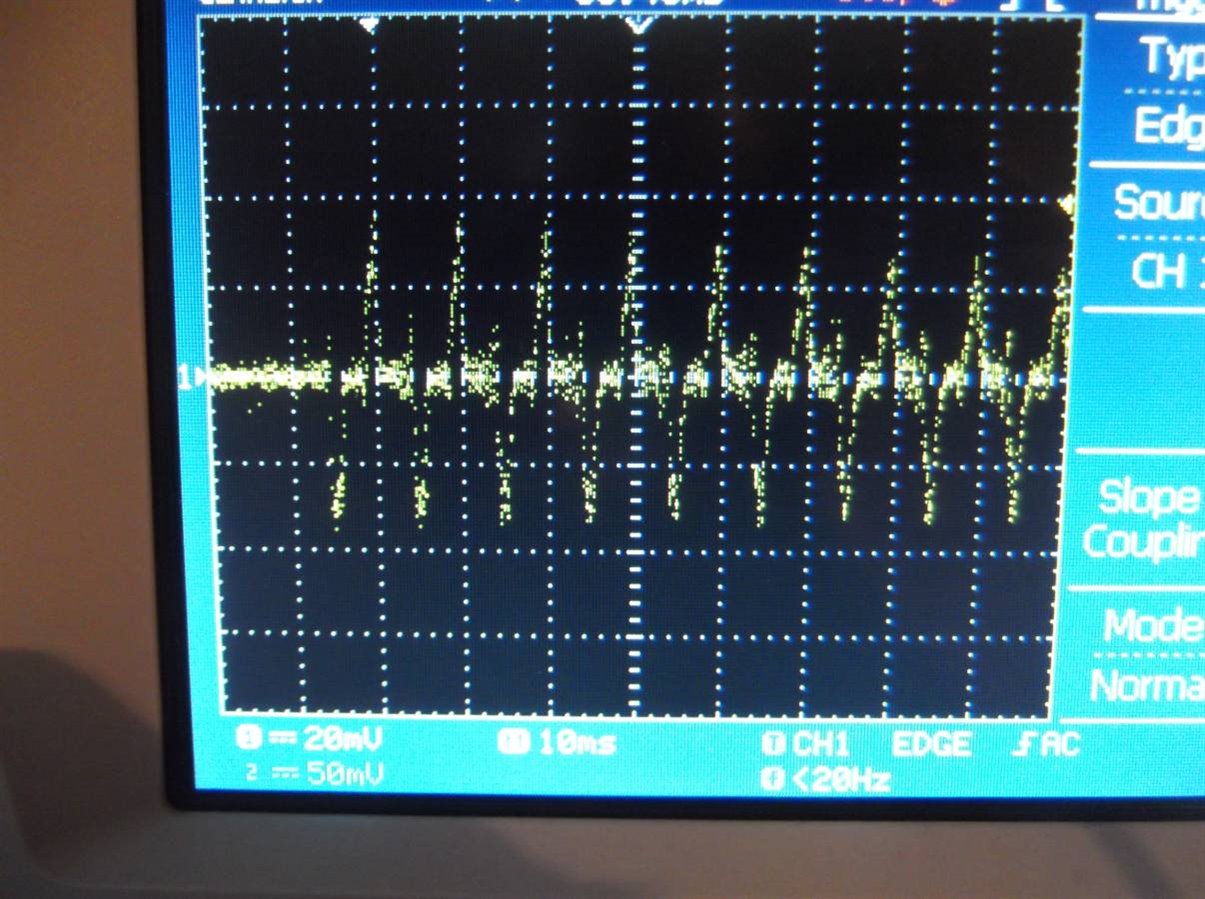
It is not that clear but I think the timebase setting is 10 ms per square which makes the frequency about 100 Hz. I don't know if this is good or bad.


I borrowed a guitar tuner and then realised that I did not know how to use it! I changed the 440Hz setting to 450 Hz and it then showed a tuned G string, see below. Sorry about the mess on my desk, but it's just the way I work - I can never stay tidy.


You don't have permission to edit metadata of this video.
Edit media
x
image
Upload Preview
image


So everything the pickup and string are working and the prototype electric guitar is complete. I have since looked on YouTube on How to Tune a Guitar and realised I have used the tuner incorrectly. I think it needs to be set to 440 Hz and then the string tightened to bring it into tune - assuming that is possible. While trying to find a circuit or kit for a guitar pre-amp I stumbled across a headphone amplifier module for an electric guitar. Apparently this is effectively an electric guitar pre-amp (makes sense really) and I can plug the one string guitar directly into it and then into my left-over iPhone Amplifier/Speaker set. This should be arriving today so shortly I should have a fully functioning working electric guitar. If it all works I might try taking it down to a place where there is a proper guitar amplifier and try it out at full volume, maybe even turn it up to 11!


Assuming all this goes well I will then turn my attentions to making the wood work look a bit more like a real guitar. I'm not sure how I might do that as I'm not a wood worker of any sort and I don't have much spare wood just lying around.


Dubbie

  • Sign in to reply

Top Comments

  • jw0752
    jw0752 over 6 years ago +4
    Hi Dubbie, Nice project, Now we are all waiting for the concert. If you switch your scope to vector mode it should connect the dots and make your waveforms look more conventional. John
  • aptbartmess
    aptbartmess over 6 years ago +3
    Hi Dubbie, I've been working on something similar and I regret not seeing your project until now. Well done! I've been trying to figure out how to make coils of magnet wire into effective transducers and…
  • genebren
    genebren over 6 years ago +2
    Very nice job. You really did build this from scratch. Nicely done! Gene
  • aptbartmess
    aptbartmess over 6 years ago

    Hi Dubbie,

    I've been working on something similar and I regret not seeing your project until now. Well done! I've been trying to figure out how to make coils of magnet wire into effective transducers and only very lately did I realize that I was essentially making guitar pickups. I could have picked up some helpful ideas from your documentation.

    Great project!

    Patrick

    • Cancel
    • Vote Up +3 Vote Down
    • Sign in to reply
    • More
    • Cancel
  • kiri-ll
    kiri-ll over 6 years ago

    I am positively surprised, that it works image I mean, without a plan for the electric part, you made something functional - that's impressive!


    AFAIK, the output signal for real pickups is around 200 mV, so you achieved not that bad signal-to-noise ratio!


    Also, I wouldn't worry about the 440 Hz tuning: your value is still a real note. Just play the music with notes not lower then your 452 Hz image (I also don't know the note names associated to the frequencies). Anyway, you will not be able to play precise notes without position markers - so, no need in the precise tuning

    • Cancel
    • Vote Up +2 Vote Down
    • Sign in to reply
    • More
    • Cancel
  • dubbie
    dubbie over 6 years ago in reply to genebren

    Gene,


    So far, mostly from scratch. The guitar string is real, as is the guitar cable. The pre-amp will be purchased as well.


    Dubbie

    • Cancel
    • Vote Up +1 Vote Down
    • Sign in to reply
    • More
    • Cancel
  • dubbie
    dubbie over 6 years ago in reply to jw0752

    Gene,


    I might try a few plinkings but a tune might be pushing it a bit. I might try adding some frets as I found a metal coat hanger in the garage this week that might make good fret wires.


    I looked at my DSO and I couldn't see anything that would switch to vector mode. It was a low cost model so it might not have vectors, or it might be hidden in a menu somewhere. I'll have another look. If anyone might know it is a GW INSTEK GDS-1052-U. I still haven't worked out how to capture the images digitally yet, hence the photograph.


    Dubbie

    • Cancel
    • Vote Up +1 Vote Down
    • Sign in to reply
    • More
    • Cancel
  • genebren
    genebren over 6 years ago

    Very nice job.  You really did build this from scratch. Nicely done!

    Gene

    • Cancel
    • Vote Up +2 Vote Down
    • Sign in to reply
    • More
    • Cancel
>
element14 Community

element14 is the first online community specifically for engineers. Connect with your peers and get expert answers to your questions.

  • Members
  • Learn
  • Technologies
  • Challenges & Projects
  • Products
  • Store
  • About Us
  • Feedback & Support
  • FAQs
  • Terms of Use
  • Privacy Policy
  • Legal and Copyright Notices
  • Sitemap
  • Cookies

An Avnet Company © 2025 Premier Farnell Limited. All Rights Reserved.

Premier Farnell Ltd, registered in England and Wales (no 00876412), registered office: Farnell House, Forge Lane, Leeds LS12 2NE.

ICP 备案号 10220084.

Follow element14

  • X
  • Facebook
  • linkedin
  • YouTube