


-Connor Miller
Build Video
INTRODUCTION
One of my favorite recent movies is Spider-man: Into the Spider-verse released in 2018.

The Spider-verse concept is really cool. It opens the possibilities that there are parallel dimensions which allow for many different evolutions of Spider-man. The movie had some very crazy characters:

Just a Few of the Heroes of the Spider-Verse
Since I was six, I thought it would be cool to make my own web caster. Not knowing much then, I thought I could have an explosive shoot out fishing line with a suction cup on the end and it could do the trick. 3D printers were just getting somewhat affordable and we didn't have one at the time. So, the project idea was shelved.
Since then, my Dad (sjmill01) and I have become Makers. It gave me a thought, what if in the Spider-Verse there was another character - say, 14 years old, only child, grew up with old motors and mechanical parts in the basement and electronics tools. He's accumulated two 3D printers and a welder. At 9, he started a Maker channel (Raising Awesome). His dad impulse bought a sewing machine on Prime Day, and THEN, at 14, he was bitten by the radioactive Maker bug...well arachnid. He was a Maker first - then got his Spidey powers. What would that character be like?

Dreaming Up a Maker Version of Spider-man
PROJECT OVERVIEW
Skills
At its core, this project is a "wearables" project consisting of a smart suit and wrist gauntlet web slinger. The following skills are applied:
- Python Programming
- Circuit Design
- Soldering
- Cable Crimping
- Autodesk Fusion 360
- 3D Printing
- TIG Welding (optional)
- Vinyl Cutting
- Sewing
Maker Made Components
- CO2 Powered Wrist Gauntlet Webslinger using Kevlar
 kite thread (as thin as it sounds, it can hold about 3x my weight)
 - Spidey Sense Rear Proximity Sensor to flag close objects and update an LED Matrix in the center of my back
- Spidey Sense Rear Camera to use Microsoft Azure Machine Vision to report objects seen
- Small vibration motor that rests on my neck and vibrates whenever the A.I. report a danger
- 3D Printed Belt Accessories to hold the components and CO2 Cartridges
- Modded hoodie to integrate the wearables
- Hardened steel TIG welded hook
Design Details
The webslinger gauntlet will house a 16gram CO2 cartrige to use a burst of pressure to shoot out a hook that is tethered with Kevlar. No MCU is needed for this, just a valve like you find for inflating bike tires. It will has a motor in the gauntlet to retrack the Kevlar.
The camera & proximity sensor will be sewn into the back of the shirt. The Raspberry Pi A+ will serve as a brain for the full suit, controlling all sensors and cameras within the suit. Along with that, we used a Pi SenseHat with its built in RGB display to change logos like when the "Spidey Sense" is triggered. With the timing of this contest, I was able to score one last Halloween costume. 
Bill of Materials
To handle the Spidey-sense AI and sensor components, I'm using:
- Raspberry Pi 3 Model ARaspberry Pi 3 Model A
- Raspberry Pi NoIR CameraRaspberry Pi NoIR Camera
- Raspberry Pi Sense HatRaspberry Pi Sense Hat
- 330 Ohm Resistor
- 470 Ohm Resistor
- 2n2222 NPN Transistor
- 1N4007 Diode
- LM2596 DC to DC Buck Converter 3.0-40V to 1.5-35V Power Supply Step Down Module
- 12mm x 2.7mm Cellphone Vibration DC Micro Motor 3V 70mA 12000RPM
- 3D Printer Filament
- HC-SR04 Ultrasonic SensorHC-SR04 Ultrasonic Sensor
To project the hook and "web", I'm using:
- 16 gram 3/8"-24 CO2 Cartridge
- CYCPLUS CO2 Inflator Bicycle Tire Pump
- 1/4" Clear Vinyl Tubing tubing
- Custom 3D Printed Gauntlet (https://github.com/RaisingAwesome/Spider-man-Into-the-Maker-Verse/tree/master)
- Kevlar Braided Cord 500lb High Strength Low Stretch Tent Tarp Guyline
- 1/4" Steel Rod Stock (for metal hook, alternately it can be 3D Printed)

16 Gram 3/8"-24 threaded CO2 Cartridges
WEBSLINGER DESIGN-Spring versus CO2
Of course, before we turned to CO2, there were loads of ideas I sketched up in Autodesk Fusion 360. I studied the many designs of Nerf guns. As simple as it sounds, a lot of Nerf guns use air velocity to fire the dart. They draw back on a small cylinder, which is spring loaded behind the piston. The spring pushes a piston in the tank. The piston covers a wider area within the cylinder than its discharge nozzle has. In turn, the velocity of the air rapidly increases out the discharge and that is what propels the dart forward when you pull the trigger releasing the spring. It's not the spring directly push the dart out, but rather the high velocity of air that is jetted out of the cylinder's discharge nozzle.
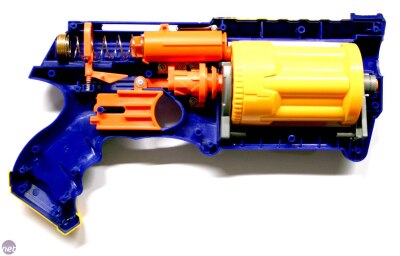
Cutaway of the "Maverick" Nerf Gun, showing all of the components
After a lot of trials with the spring loaded variant, ranging from taking up my whole forearm to only a bit of my wrist for what I called "movie accuracy," my dad and I decided it was time for the more powerful upgrade - CO2 cartridges. Changing to CO2 was the only way we were going to get a hook to shoot that to the desired 15-20 feet.
CO2 provides high gas velocity when expelled due to it being stored in the cartridge as a liquid. At room temperature, to get it to be a liquid it has to be compressed to over 850psi. As long as there is liquid remaining in the CO2 cartridge, its natural vapor pressure is there to deliver more than enough of the rapid change in velocity required to propel our "web".

Source: Bennett Eberle on Quara.com
The First Trial with CO2
At first, we didn't have the full grasp of knowledge behind how things like CO2 powered BB guns worked. Our first day was pretty much us researching airsoft gun maintenance videos on the web. Our first official trial would be the next day. I designed a small wristband with a tube along the top and a cylinder off to the side for the cartridge to be loaded into. At first glance, this would be our best work. But... it was far from it. (Or should I say, "Far From Home.")

First Prototype of the Webslinger
The wristband was designed as seen above. This was before I came to the shocking realization that the curvature of a human arm is outward expanding, and not the equivalent of placing an ellipse in Autodesk Fusion and extruding a few inches. Whenever I pulled it out of the printer for the first time, I felt really happy to see that this design had come so far. Immediately, I attempted to mount it upon the inside of my wrist, which then led to the unclean brim around the edges of the print slicing my arm up pretty well. That stung a lot for a good while, but while i was patching myself up, my dad came up with a better idea.
We used a profile gauge to measure my wrist from the front to the back, drew those onto paper, and then traced that in Autodesk using its "calibrated canvas" feature. When the two profiles were "lofted" to the desired length, we knew that we were in the endgame then.

Profile Gauge That Allowed Us to Design the Gauntlet to Fit My Arm

The Loft feature of Autodesk Fusion 360 Allows you to create a 3D Body by filling in the space between Two Profiles

2nd Prototype of the Webslinger - Much More Comfortable!
First Launch
We were too chicken to go straight to 850psi, so we took this new design out to the air compressor in the garage. It shot a good 15 feet. The compressor charges to 120psi. Although, what Spider-man would have a 4 foot tall air compresser dragging behind him at all times? We knew we had to complete the mobile part of this to get full results. When we set up the webslinger to a 12g CO2 cartridge, we got it to shoot a solid 50 feet with wind, and about 15 again with our Kevlar string attached. This was solid progress like we hadn't seen before.

With 850psi CO2 as the Propellent, we got over 50 feet projection
(Dotted Line shows the Path)
Retracting the Web
Spooling thread gets a lot harder when you have to make it fly out, retract, and have enough Kevlar to hold someone's weight. We knew we had to find a way that the little metal hook could be roped back in so I wouldn't have to do it manually while fighting crime. We found my old spider man fishing pole for inspiration on the automated retraction mechanism. However, to get a high speed motor perfectly aligned to prevent it from trashing itself would be impossible. My Dad showed me how industrial motors are coupled. We found a tile spacer for bathroom tile for the center elastomer and we had ourselves a coupling.

We Studies My Spiderman Fishing Rod for Inspiration

A Lovejoy Industrial Coupling:
Used to Prevent Mechanical Fatigue Due to Misalignment
The Final Webslinger Model
So, we had our final model. A hook and string capable of holding 500 lbs propelled by 850psi CO2 cartridges with self retraction. You can find the model on our GitHub site: https://github.com/RaisingAwesome/Spider-man-Into-the-Maker-Verse/tree/master

The Final Webslinger Design - Very Cyberpunk!
DESIGNING THE AI, "Karen":
If you've seen Spider-man: Homecoming, you'd know about the all new Stark branded AI, Karen, that Peter uses in his mask to assist him in missions. Karen was designed to be able to highlight threats and alert Peter of his surroundings, along with controlling many of his suit functions. While making an AI chatbot that responds with a voice and sense of emotion may not be the easiest thing to accomplish for this competition, we did think ahead to include a way to create this artificial "Spidey-Sense." We decided now would be a good time to take advantage of the surge in popularity of the Microsoft Azure, and the Machine Vision API provided by Microsoft.
This software is able to analyze things in an image which will be taken by a Raspberry Pi camera (aka my Pi-der cam) that is mounted to a belt. To activate this super sixth sense, I have to be very still. Once the accelerometer of the Sense Hat stabilizes, the picture is taken automatically. Using my cell phone's personal hot spot, the Azure API analyzes the image and the Raspberry Pi's eSpeak package let's me know through an earpiece. This will allows the suit to be able to tell if a car is close behind me, or maybe an evil villain.

Azure's image diagnosis software
Here is the Machine Vision code that pulls this off:
import os
import requests
from picamera import PiCamera
import time
# If you are using a Jupyter notebook, uncomment the following line.
# %matplotlib inline
import matplotlib.pyplot as plt
from PIL import Image
from io import BytesIO
camera = PiCamera()
# Add your Computer Vision subscription key and endpoint to your environment variables.
subscription_key = "YOUR KEY HERE!!!"
endpoint = "https://westcentralus.api.cognitive.microsoft.com/"
analyze_url = endpoint + "vision/v2.0/analyze"
# Set image_path to the local path of an image that you want to analyze.
image_path = "image.jpg"
def spidersense():
    camera.start_preview()
    time.sleep(3)
    camera.capture('/home/spiderman/SpiderBrain/image.jpg')
    camera.stop_preview()
# Read the image into a byte array
    image_data = open(image_path, "rb").read()
    headers = {'Ocp-Apim-Subscription-Key': subscription_key,
       'Content-Type': 'application/octet-stream'}
    params = {'visualFeatures': 'Categories,Description,Color'}
    response = requests.post(
    analyze_url, headers=headers, params=params, data=image_data)
    response.raise_for_status()
    # The 'analysis' object contains various fields that describe the image. The most
    # relevant caption for the image is obtained from the 'description' property.
    analysis = response.json()

    image_caption = analysis["description"]["captions"][0]["text"].capitalize()
    the_statement="espeak -s165 -p85 -ven+f3 \"Connor. I see " +\"" + image_caption +"\" --stdout | aplay  2>/dev/null"
    os.system(the_statement)
    #print(image_caption)
spidersense()
The Microsoft Azure Cloud API analyzes the image and returns a body of JSON as seen here:
{'categories': [{'name': 'abstract_', 'score': 0.02734375},
{'name': 'others_', 'score': 0.046875},
{'name': 'outdoor_', 'score': 0.0078125, 'detail': {'landmarks': []}}],
'color': {'dominantColorForeground': 'Black',
'dominantColorBackground': 'Brown', 'dominantColors': ['Brown', 'Black'],
'accentColor': '200B08', 'isBwImg': False, 'isBWImg': False},
'description':
{'tags': ['indoor', 'person', 'laptop', 'sitting', 'television', 'computer', 'dark', 'monitor', 'man', 'table', 'screen', 'front', 'hand', 'black', 'white', 'woman', 'light', 'room', 'holding', 'young', 'video', 'keyboard', 'remote', 'board', 'standing', 'laying', 'cat'],
'captions': [{'text': 'a person sitting in a dark room', 'confidence': 0.2671876355092342}]},
'requestId': '-------------------------------------------------', 'metadata': {'width': 720, 'height': 480, 'format': 'Jpeg'}}
They already have a Python library that does all the JSON parsing of the response, so you can snag out the caption's text element and directly put it into a sentence. (See line 35 in the above code)
SPIDEY SENSE
The main AI is always checking for something getting close from behind. It does this using an ultrasonic distance sensor. As an object gets closer, an animation of the Spider-man logo moves faster that is sewn into the back of my jersey. In addition, when something gets real close, a cellphone vibration motor stuck to the back of my neck begins to tingle out my Spidey-sense.

My Spidey-Sense: A Cell Phone Vibration Motor Stuck to the Back of my Neck

Ultrasonic Sensor used to trigger the Spikey-Sense vibration Motor

Spidey-Sense Vibration Motor Installed to Tingle When Objects Approach from the Back
Here is the code to pull all off all the AI of Karen:
from sense_hat import SenseHat
import time
import RPi.GPIO as GPIO
# GPIO Mode (BOARD / BCM)
GPIO.setmode(GPIO.BCM)
# set GPIO Pins
GPIO_ECHO = 9
GPIO_TRIGGER = 10
GPIO_VIBRATE = 11
# set GPIO direction (IN / OUT)
GPIO.setup(GPIO_TRIGGER, GPIO.OUT)
GPIO.setup(GPIO_ECHO, GPIO.IN)
GPIO.setup(GPIO_VIBRATE, GPIO.OUT)

sense = SenseHat()
g = (0, 255, 0)
b = (0, 0, 255)
y = (255, 255, 0)
w = (255,255,255)
r = (204, 0, 0)
a1 = [
    b, r, b, b, b, b, r, b,
    b, r, b, b, b, b, r, b,
    b, b, r, r, r, r, b, b,
    b, b, b, r, r, b, b, b,
    r, r, r, r, r, r, r, r,
    b, b, b, r, r, b, b, b,
    b, b, r, b, b, r, b, b,
    b, r, b, b, b, b, r, b
]
a2 = [
    b, b, r, b, b, r, b, b,
    b, r, b, b, b, b, r, b,
    b, b, r, r, r, r, b, b,
    r, b, b, r, r, b, b, r,
    b, r, r, r, r, r, r, b,
    r, b, b, r, r, b, b, r,
    b, b, r, b, b, r, b, b,
    b, b, r, b, b, r, b, b
]
a3 = [
    r, b, b, b, b, b, b, r,
    b, r, b, b, b, b, r, b,
    b, b, r, r, r, r, b, b,
    r, b, b, r, r, b, b, r,
    b, r, r, r, r, r, r, b,
    r, b, b, r, r, b, b, r,
    b, b, r, b, b, r, b, b,
    b, r, b, b, b, b, r, b
]
def animate():
    # dist is given in feet.
    # speed is calculated by a linear equation y=mx+b where b=0 and m=.1
    sense.set_pixels(a1)
    time.sleep(.05*distance())
    sense.set_pixels(a2)
    time.sleep(.05*distance())
    sense.set_pixels(a1)
    time.sleep(.05*distance())
    sense.set_pixels(a3)
    time.sleep(.05*distance())
def distance():
    # Returns distance in feet
    StartTime = time.time()
    timeout = time.time()
    timedout = False
    # set Trigger to HIGH to get the system ready
    GPIO.output(GPIO_TRIGGER, True)
    # set Trigger after 0.00001 seconds (10us) to LOW to send out a ping from the sensor
    time.sleep(.00010)
    GPIO.output(GPIO_TRIGGER, False)
    # so we don't wait forever, set a timeout to break out if anything goes wrong.
    while GPIO.input(GPIO_ECHO) == 0:
        # if we don't get a response to let us know its about to ping, move on.
        # the sensor should trigger, do its thing, and start reporting back in milliseconds.
        StartTime = time.time()
        if (time.time()>timeout+.025):
           timedout=True
           break
    #print("Echo from low to high trap timed-out:  ",timedout)
    timeout = StartTime
    StopTime=StartTime
    while GPIO.input(GPIO_ECHO) == 1:
        # if we don't get a bounce back on the sensor with the top of its range of detection, move on.
        # Ultrasonic travels at the speed of sound, so it should pong back at least this
        # fast for things within the top of its dectection range.
        timedout=False
        StopTime = time.time()
        if (time.time()>timeout+.025):
           timedout=True
           break
    #print("Echo from High back to Low timed-out: ",timedout)
    # record the time it ponged back to the sensor
    # time difference between start and arrival
    TimeElapsed = StopTime - StartTime
    # multiply with the sonic speed (34300 cm/s)
    # and divide by 2, because it has to get there over the distance and back again
    # then convert to feet by dividing all by 30.48 cm per foot
    distance = (TimeElapsed * 17150)/30.46
    #print("Distance: ",distance)
    if (distance<.1):
         distance=5
    distance=round(distance)
    if distance<5:
         vibrate()
    return distance
def vibrate():
    #if something is very close, vibrate the spidey-sense
    #code pending
    GPIO.output(GPIO_VIBRATE, True)
    time.sleep(.1)
    GPIO.output(GPIO_VIBRATE, False)
# The next line will allow for this script to play stand alone, or you can
# import the script into another script to use all its functions.
if __name__ == '__main__':
    try:
        GPIO.output(GPIO_TRIGGER, False)
        GPIO.output(GPIO_VIBRATE, False)
        time.sleep(1)
        while True:
            animate()
   # The next line is an example from the SenseHat library imported:
 # sense.show_message("Sean Loves Brenda and Connor!!", text_colour=yellow,  back_colour=blue, scroll_speed=.05)
    # Handle pressing CTRL + C to exit
    except KeyboardInterrupt:
        print("\n\nSpiderbrain execution stopped.\n")
        GPIO.cleanup()
Spidey-Sense Circuit
To allow sufficient current and get the distance sensor voltage compatible with the Raspberry Pi, a circuit was needed. For one, the distance sensor is powered by 5V and returns a 5V pulse. This required a voltage divider circuit to take it to 3.3V since the Raspberry Pi pins are not 5V tolerant. The other need was for the vibration motor. It drew up to 170ma - over 3xs what the Raspberry Pi GPIO pins should attempt to deliver. So, we used a transistor to switch in the higher current network off the PIs 5V pins. Since the vibrator has a tiny motor, we used a fly-back diode across it to prevent damage due to the voltage spike you get when cutting voltage on an inductor.

Without the Voltage Divider and Transistor, the Pi would have Fried

Spidey Sense Circuit Soldered and Scoped
The Spidey-Suit
With all this advanced tech, we need somewhere to house it. The suit finally is coming together, and the front has been given its vinyl spider across the hoodie. This hoodie is what holds the Raspberry Pi SenseHAT, and the proximity sensor connected to it.

Sewing - one of the first true Maker skills
Here I'm Adding Stitching for the Wire and LED Display Holes

Sewn Ultra Sonic Sensor and Sensehat Pocket

Here we are trying to learn the ways of vinyl cutting and sticking

Perfection! "Scarlet Spider" Inspired Hoodie

We never heard of the Scarlet Spider until We Searched for CO2 Cartridges!
He wears extras on his wrist - as will I

The animation speed is timed with the distance an object is behind me
A Vibration Motor vibrates when objects get real close
Microsoft Azure Machine Vision Tells me what my Pi-der Cam Sees
The Spidey-Belt
To hold the tech, the sensors are in the hoodie. The power and Raspberry Pi are on a utility belt. This took three custom 3D printed belt accessories:

3D Printed Utility Belt Accessories
Left: Raspberry Pi 3 Model A with NoIR Camera Box
Middle: DC-DC Buck Converter Box
Right: LiPo Battery Bo
ASSEMBLY

Mounting the "Pi" der Cam
The Spidey Sense Vibration Motor
The LED and Spidey Sensor

We used Gorilla Glue to mount the Drive Train

Spidey Belt
FINISHED PROJECT
Making the Webslinger and Spidey Sense tech challenged us more than many projects have for in a long time. Overcoming design challenges like getting a string that could hold my weight, getting a plastic shaft not to shatter under high speed rotation, and learning Microsoft Machine Vision's API were tough since we never did experienced those challenges before. But, like all projects, now it seems straight forward and these new techniques and skills will add to our tool kit.

You can see the full build and demo video on Raising Awesome on Youtube
Top Comments