element14 Community
element14 Community
    Register Log In
  • Site
  • Search
  • Log In Register
  • Community Hub
    Community Hub
    • What's New on element14
    • Feedback and Support
    • Benefits of Membership
    • Personal Blogs
    • Members Area
    • Achievement Levels
  • Learn
    Learn
    • Ask an Expert
    • eBooks
    • element14 presents
    • Learning Center
    • Tech Spotlight
    • STEM Academy
    • Webinars, Training and Events
    • Learning Groups
  • Technologies
    Technologies
    • 3D Printing
    • FPGA
    • Industrial Automation
    • Internet of Things
    • Power & Energy
    • Sensors
    • Technology Groups
  • Challenges & Projects
    Challenges & Projects
    • Design Challenges
    • element14 presents Projects
    • Project14
    • Arduino Projects
    • Raspberry Pi Projects
    • Project Groups
  • Products
    Products
    • Arduino
    • Avnet Boards Community
    • Dev Tools
    • Manufacturers
    • Multicomp Pro
    • Product Groups
    • Raspberry Pi
    • RoadTests & Reviews
  • Store
    Store
    • Visit Your Store
    • Choose another store...
      • Europe
      •  Austria (German)
      •  Belgium (Dutch, French)
      •  Bulgaria (Bulgarian)
      •  Czech Republic (Czech)
      •  Denmark (Danish)
      •  Estonia (Estonian)
      •  Finland (Finnish)
      •  France (French)
      •  Germany (German)
      •  Hungary (Hungarian)
      •  Ireland
      •  Israel
      •  Italy (Italian)
      •  Latvia (Latvian)
      •  
      •  Lithuania (Lithuanian)
      •  Netherlands (Dutch)
      •  Norway (Norwegian)
      •  Poland (Polish)
      •  Portugal (Portuguese)
      •  Romania (Romanian)
      •  Russia (Russian)
      •  Slovakia (Slovak)
      •  Slovenia (Slovenian)
      •  Spain (Spanish)
      •  Sweden (Swedish)
      •  Switzerland(German, French)
      •  Turkey (Turkish)
      •  United Kingdom
      • Asia Pacific
      •  Australia
      •  China
      •  Hong Kong
      •  India
      •  Korea (Korean)
      •  Malaysia
      •  New Zealand
      •  Philippines
      •  Singapore
      •  Taiwan
      •  Thailand (Thai)
      • Americas
      •  Brazil (Portuguese)
      •  Canada
      •  Mexico (Spanish)
      •  United States
      Can't find the country/region you're looking for? Visit our export site or find a local distributor.
  • Translate
  • Profile
  • Settings
Hardware Hacking
  • Challenges & Projects
  • Project14
  • Hardware Hacking
  • More
  • Cancel
Hardware Hacking
Blog BattPackHack #3 : Adding a Case and a TinyDVM
  • Blog
  • Forum
  • Documents
  • Events
  • Polls
  • Files
  • Members
  • Mentions
  • Sub-Groups
  • Tags
  • More
  • Cancel
  • New
Join Hardware Hacking to participate - click to join for free!
  • Share
  • More
  • Cancel
Group Actions
  • Group RSS
  • More
  • Cancel
Engagement
  • Author Author: dubbie
  • Date Created: 14 Jul 2020 10:52 PM Date Created
  • Views 919 views
  • Likes 5 likes
  • Comments 2 comments
  • nano
  • 128x64
  • oled display
  • hardwarehackingch
  • tinydvm
Related
Recommended

BattPackHack #3 : Adding a Case and a TinyDVM

dubbie
dubbie
14 Jul 2020

I have now produced a 3D printed case for the battery hack for the protoboard to make it look a bit prettier. It isn't brilliant but after some fettling I managed to get it all to stick together. And, it still works as well, despite some rather rough handling as I squeezed it all into a slightly too small case - I'm still not leaving enough internal space for the wires.


image


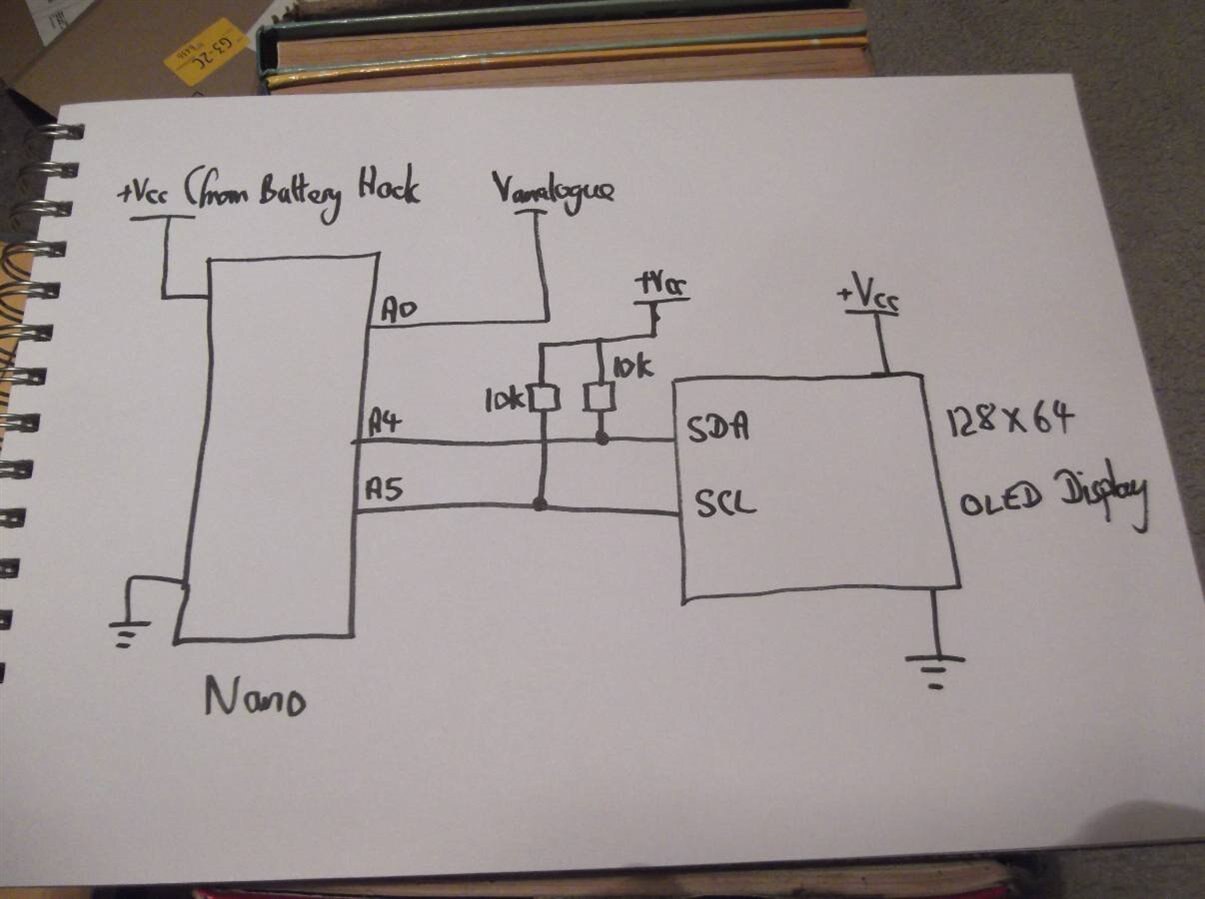
To be useful as a portal prototyping board there really needs to be some sort of digital meter. I could just carry around a low cost DVM but where's the fun it that so I decided to hack my previous Tiny DVM (TinyDVM#4 : Graphical Display ). I'm not entirely sure whether this counts as a proper hardware hack, or even a hack at all, but I've decided to include it. The original TinyDVM used a MKR 1000 as the controller as it was the only 3.3V device I had that was compatible with the 3.3V OLED display. For this implementation I wanted to use a Nano rather than the MKR 1000 as it was smaller and better suited to the available space on the protoboard. I had previously purchased several 5V OLED displays with an I2C interface  (to be the eyes for my walking robots) which I wanted to find out more about so I decided to use one of those. It all became a bit more difficult than I imagined as I had considerable difficulty getting the Nano to control the 128x64 OLED display. This was a clone display using the Adafruit libraries and it just would not work at all. Eventually I found a YouTube video that provided a working solution - sort of - using a Nano and this display. The basic problem seemed to be that the SCL and SDA lines needed pull-up resistors to Vcc and this took me several days to determine.  The display would update on the top 20% but the rest would just be noise. The circuit diagram is pretty simple and is shown below. The power will be provided directly from the battery beneath the protoboard although it is not yet connected.


image


I had hoped to just take the original TinyDVM code and port it to the Nano. Regretfully this was not possible as I had used a mixture of GFX graphics library commands and commands native to the original 64x64 OLED display. Obviously the native commands did not work with the new display but eventually I managed to find GFX commands that would do what I wanted and now have a working version of the even tinyier Tiny DVM. See the important part of the code below.


TinyV = 0.0;

value = 0;

x = 0;

y = 0;

colour = 0;

for (y=0;y<displaywidth; y++)

  yarray[y] = 0;


while (1)

  {

    display.setCursor(90, 50); // Output the analogue voltage - bottom right

    display.fillRect(90, 50, 30, 8, 0); // Clear previous value

    value = analogRead(0);

    TinyV = (5.0 * value)/1023;

    display.setCursor(90, 50);    

    display.print(TinyV,2);    // Print a float

    display.print("V");


// Erase the previous point

    colour = 0;

    display.drawRect(x, yarray[x], 2, 2, colour); 


// Add the new point

    y = 47 - ((47 * value)/1023);

    yarray[x] = y;

    colour = 1;

    display.drawRect(x, yarray[x], 2, 2, colour); 


    display.display(); // Draw the new point

    delay(50);  

    x = x+1;

    if (x > displaywidth-1)

      x = 0;

  } /* while */


I think that this version of the Tiny DVM  programme is better than the original version and is definitely more compact (Tinyier!). It does work, displaying both the voltage numerical as well as a time related graphical display as well. There is some problem as the display will occasionally freeze and then a reset is needed. I think this may be something to do with the I2C interface, perhaps when there is some noise on these control lines.


image


I wanted to create a 3D printed case for this new Tiny DVM to match the other parts of the Battery Hack Protoboard but regretfully I was unable to complete this - time just ran out and I made a mistake measuring the width of the Nano board with my micrometer. I did manage to print the bottom part of the case as illustrated below. The top part and final wiring will just have to wait until another day.


You don't have permission to edit metadata of this video.
Edit media
x
image
Upload Preview
image


I'm generally pleased with how it has all turned out and I think this will be a useful system - I have already used it several times. As the Nano in the Tiny DVM is still programmable I might even look into more possibilities of using the graphic display, maybe some sort of low frequency digital oscilloscope. Who knows!


Dubbie

  • Sign in to reply

Top Comments

  • jw0752
    jw0752 over 4 years ago +1
    Hi Dubbie, You did a great job making this project. Thank you for sharing it. John
  • sialasad24
    sialasad24 over 4 years ago +1
    Nice its great i like it its so useful for me and i got interesting information from your works... Gif Maker
  • sialasad24
    sialasad24 over 4 years ago

    Nice its great i like it its so useful for me and i got interesting information from your works...

    Gif Maker

    • Cancel
    • Vote Up +1 Vote Down
    • Sign in to reply
    • More
    • Cancel
  • jw0752
    jw0752 over 4 years ago

    Hi Dubbie,


    You did a great job making this project. Thank you for sharing it.


    John

    • Cancel
    • Vote Up +1 Vote Down
    • Sign in to reply
    • More
    • Cancel
element14 Community

element14 is the first online community specifically for engineers. Connect with your peers and get expert answers to your questions.

  • Members
  • Learn
  • Technologies
  • Challenges & Projects
  • Products
  • Store
  • About Us
  • Feedback & Support
  • FAQs
  • Terms of Use
  • Privacy Policy
  • Legal and Copyright Notices
  • Sitemap
  • Cookies

An Avnet Company © 2025 Premier Farnell Limited. All Rights Reserved.

Premier Farnell Ltd, registered in England and Wales (no 00876412), registered office: Farnell House, Forge Lane, Leeds LS12 2NE.

ICP 备案号 10220084.

Follow element14

  • X
  • Facebook
  • linkedin
  • YouTube