


 | Enter Your Project for a chance to win a Maker Tool Kit, an Oscilloscope Grand Prize for the project that brings the Most Joy to the Heart, and Gift to Gives! | Project14 Home |
| Monthly Themes | ||
| Monthly Theme Poll |

Intro.
On the run up to Christmas this year, we had a works lunch which involved playing some party games.
One of the games involved each of us having a bell and trying to play tunes. After many mistakes we finally managed to produce something resembling a tune to a resounding cheer.

I was convinced and ended up getting a set of the bells for the family. However I also had an ulterior motive... As it was while trying to pull a tune together I thought I could make this into a seasonal display.
In the beginning...
After rummaging through my many boxes of what is unilaterally called 'junk' by the rest of my family I concluded that I needed to order some RC servos. I could also have bought a servo controller but I already had a couple of Arduino pro mini boards, so deciding to use one of them, I set to hacking.
The project is based on my laptop running a Python program that interprets the musical sequence and outputs the commands over the same FT232 USB COM port as is used for programming the Arduino. The Arduino receives the commands and moves the servos as required.
There is lots of information online as to how to use Arduino, and that's just as well. I usually write in C as that's what I do for work. However I wanted to see how quickly I could get something working using the Arduino IDE. The answer is very quickly! it's great for hacking something together. In fact I was quite lazy to see what I cold get away with. If you go over the code attached below you'll see that I used delay rather than implementing a proper timer using millis the overall effect is that the servo movements hold up the program, however for this it worked fine, and I never got round to improving it. Based on the feedback from the family I might be getting round to it for next year
I quickly had the Arduino blinking an led when it received a serial character. I then coded up a small state machine using a switch...case statement. It looks for a capital S for the start of a message. then it looks for a board number then a channel number. I did this so I could add more boards in the future if I want to add more servo channels by adding more boards. If there are any problems then it drops back to waiting for a command.
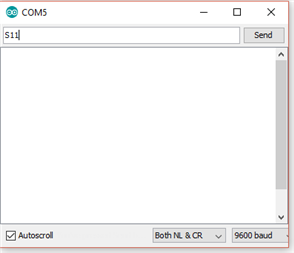
I could test the operation of the comms by typing S11, or S12 into the arduino serial monitor and watching the LED Blink
The Python code opens a serial port and sends a command every time a note is required, The notes and the timings are stored as a list. I also used a list to allow me to map the bells to the servo motors and therefore the commands that were sent out. I didn't have the sermos yet so I added a beep so that I could at least get part of the program running. I'm not a python guy, but wanted to have a go at something I'm not used to. I also thought if I had the time I would port it to my Raspberry Pi.
And that was it. For a few days I made the most of the Christmas holiday and tried not to eat too much while I waited for my motors to arrive.
If you want to see the software I've linked it here ->> Merry Boxes and LED's Software.
They're here!
A couple of days after Christmas the servos arrived. As soon as I could I connected them to the Arduino using a breadboard. A quick search of the internet got me a schematic that I could quickly implement.
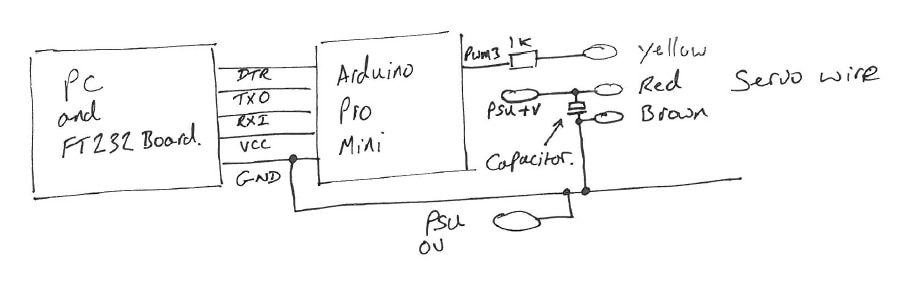
The 1K resistor is there to protect the Arduino I/O if there are voltage mis-matches as the servos will be powered from a separate supply. The arduino will be powered from the laptop, the servos will take large current spikes of over an amp when they move. More than I can take out of the USB Port on my laptop can handle so an external supply is needed. I'm using my bench supply that can output up to 2A, set it to 5V. The ground rail of the Arduino and the PSU for the servos is linked so they all have the same 0V reference. As a precaution I used my Laptop on battery just in case there were some weird ground loops going on.
Although the sketch shows one capacitor, I actually added two, a 1000uf and 100nF that I found in my parts box, in a bid to smooth out any spikes. The reason for using the two is that when the servo starts to move it'll draw a lot of current, and the power supply is relatively slow to respond to the change in current consumption. The smaller value will help supply a small amount of additional power for very fast or high frequency transients / noise. With the slower / lower frequency noise being dealt with by the larger capacitor. When I get the opportunity I'd like to investigate these signals on an oscilloscope to see whether the capacitors are having the desired effect. They were an add in, just in case.
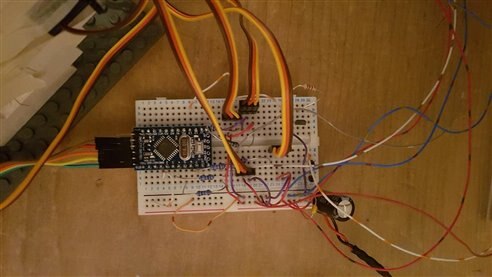
The finished breadboard looked a bit of a mess... Ok a lot of a mess! Still it works.
I wrote the program so I only have to send one command to the Arduino and ring a bell so the Arduino does the timing of the servos.
This works well, but at the expense of having to program the arduino with the relevant servo positions rather than just being able to control everything from the laptop.
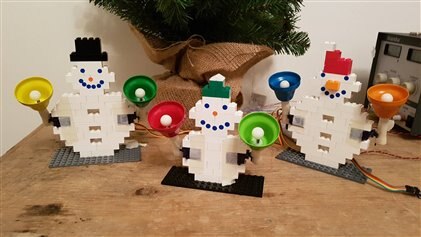
Snow people!
I've got so far but now I need something to ring the bells and what better than some snow people. Luckily I have a son who through the years has been crazy about Lego. So with his permission and assistance we built something to mount the servos to. Quite how he has amassed so many white pieces I do not know. However, there were enough to make these three characters.
I should add at this point that my son is now 16 and too cool for most things, but still got involved when he saw I was up to something interesting!
The servos aren't lego compatible, however I have found that engineers I mean masking tape can be almost as useful as duct tape at times .
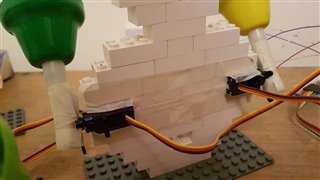
I found the bells worked best with the servo horn. (Black plastic bit) fitted toward the end of the bell handle to help the bell get a good swing. Once again masking tape was used to hold it all together. I chose to leave the screws off the horns so that I could easily re-position the bells on the Snowfolk.

Once it was all put together I had to tweak the timings and movement of the servo movements to get the bells to reliably ring. This was trial and error until I hit on some values that worked. I think it could still be perfected somewhat but it worked well enough for a family demonstration!
Last Minute Addition!
At the last minute I thought it needed brightening up! so I used the LED output (Pin 13) to drive a ZTX 653 NPN transistor Via a 2K resistor to limit current through the base of the transistor. I used this high power output to switch the low side of a set of fairy lights on a small tree. I hastily added it in using wires pushed into the contacts of the battery box for the Fairy Lights. I set the lights to turn on or off each time a command is received. I think next time I would opt to give the lights their own command to add more control. Or perhaps get a bit adventurous with some neopixels.


So It was done!
It's rather bodged together project both my son and daughter got interested and involved, even my wife liked this one! In fact I think I may be getting commissioned by the family to work on something bigger for next Christmas. I will probably run it all on the Arduino next time as it's a bit wasteful to have a laptop sat there, Though I might use a raspberry Pi for some IOT shenanigans. I may even hit the sales for some cheap plush toys that may need to be robotized!
Here is a video of the finished project and I hope you like it!
If you have any comments / constructive criticism let me know. I'm a bit new to this blogging lark!
Top Comments
-

Workshopshed
-
Cancel
-
Vote Up
+4
Vote Down
-
-
Sign in to reply
-
More
-
Cancel
-

danielw
in reply to Workshopshed
-
Cancel
-
Vote Up
+2
Vote Down
-
-
Sign in to reply
-
More
-
Cancel
-

Workshopshed
in reply to danielw
-
Cancel
-
Vote Up
+3
Vote Down
-
-
Sign in to reply
-
More
-
Cancel
-

dubbie
in reply to Workshopshed
-
Cancel
-
Vote Up
+3
Vote Down
-
-
Sign in to reply
-
More
-
Cancel
Comment-

dubbie
in reply to Workshopshed
-
Cancel
-
Vote Up
+3
Vote Down
-
-
Sign in to reply
-
More
-
Cancel
Children