


Overview
There are many ways to interact with the Arduino Nano 33 BLE Sense including over a serial interface, an LCD, command line, GPIO and so on. However, these either require a physical device connected to the Nano 33 or typing manual commands. One easy method to create an remote interface to a device is to use Flask running on a system that can run Python. Flask provides web server functionality via a microframework and can be configured using Python and interact with HTML, CSS, or JavaScript. Once installed, the configuration is fairly simple. A Flask view can be used to interact with other Python code as well as with an HTML page via RESTful GET and POST commands. In this post, a Python class was created to send read and write commands to the Nano 33 BLE Sense using the BlueZ Bluetooth tools.
The complete configuration of Flask has been covered in other posts listed under Previous Flask Projects, thus it will not be covered here.
Related Posts
BLE on Arduino Nano 33 BLE Sense - BlueZ Connect
References
Arduino Nano 33 BLE Sense
https://store.arduino.cc/usa/nano-33-ble-sense
ArduinoBLE- BLEStringCharacteristic
https://github.com/arduino-libraries/ArduinoBLE/blob/master/src/BLEStringCharacteristic.h
Flask
https://palletsprojects.com/p/flask/
Previous Flask Projects
FLiP Connected X-Mas Ornament part II
Arduino Powered MSE-6 (Mouse Droid) - Arduino Yun UI
Hardware
- Arduino Nano 33 BLE Sense
https://store.arduino.cc/usa/nano-33-ble-sense
- Remote system such as Raspberry Pi running Flask
Arduino BLE String Characteristic
The example in the previous post only shown the use of the ArduinoBLE Byte Characteristic, however there is a String Characteristic that is not really well documented. This was found after searching for a string option which was found in the GitHub code.
1. Create a BLEStringCharacteristic
BLEStringCharacteristic stringCharacteristic("19B10014-E8F2-537E-4F6C-D104768A1214", BLERead | BLEWrite, 20);2. Add characteristic to ledService
ledService.addCharacteristic(stringCharacteristic);
3. Send a string via BLE
stringCharacteristic.writeValue("LED On")4. Read the string in
if (stringCharacteristic.written())
 {
     String inValue = stringCharacteristic.value();
     Serial.print("String value:");
     Serial.println(inValue);
     if (inValue.equals("LEDON")) {
         stringCharacteristic.writeValue("LED On");
     }
     else if (inValue.equals("LEDOFF")) {
         stringCharacteristic.writeValue("LED On");
     }
     else {
        stringCharacteristic.writeValue("UNKN");
     }
  }
BlueZ - Write and Read commands
1. Write a string to the Nano 33 via BLE; value is in ASCII.
$ sudo gatttool -i hci0 -b D8:4C:FD:36:96:EB --char-write-req --handle=0x0013 --value="0x50726F6A6563743134"
 Characteristic value was written successfully
NOTE: "0x50726F6A6563743134" = “Project14”
2. Message received from Nano 33 see in the Arduino IDE Serial Monitor
String value:Project14
3. Read value from BlueZ
$ sudo gatttool -i hci0 -b D8:4C:FD:36:96:EB --char-read --handle=0x0013
Characteristic value/descriptor: 4c 45 44 20 4f 6e
NOTE: Value returned is in ASCII
4. Using Python to convert ASCII to text string
$ python3
Python 3.7.3 (default, Dec 20 2019, 18:57:59)
[GCC 8.3.0] on linux
Type "help", "copyright", "credits" or "license" for more information.
>>>
>>> return_code = "Characteristic value/descriptor: 55 4e 4b 4e"
>>> text = return_code.split(':', 1)[1]
>>> text
' 55 4e 4b 4e'
>>> ble_text = text.replace(" ", "")
>>> bytes_object = bytes.fromhex(ble_text)
>>> bytes_object
b'UNKN'
NOTE: Arduino code was expecting "LEDON" or "LEDOFF" otherwise returns "UNKN" for unknown.
Install Flask
1. On a Remote system such as a Raspberry Pi, install Flask, Pip and Python virtualenv
$ sudo apt-get install python-pip python-flask
$ pip install virtualenv
2. Start a virtualenv session
$ python3 -m venv env
$ source env/bin/activate
(env)
NOTE: Use deactivate to end the session.
3. Install flask in the virtualenv
(env) $ sudo pip install flask
Flask Configuration
1. Directory structure of the Flask project
$ nano-web-server
 run.py
 config.py
 set_flask.sh

 app
├── application.py
├── __init__.py
├── nano33_ble_sense.py
├── static
│   ├── css
│   │   └── style.css
│   └── images
│    ├── arduino-logo-prj14.jpg
│    ├── arduino-tinyml.jpg
│    ├── auduino_logo.jpg
│    └── tinyml.jpg
├── templates
│    └── index.html
└── views.py
2. Python class to call BlueZ gatttool to send read and write commands to the Nano 33 BLE Sense
#!/usr/bin/env python3

import sys
import os
import subprocess as sp
from subprocess import Popen, call
import time

nano_devs = { 'Ilumi1': 'C5:0B:A1:81:44:DB',
               'BLE33' : 'D8:4C:FD:36:96:EB'
             }

class BLEDev:

    def __init__(self, mac_addr, dev_no):
        self.mac_addr = nano_devs[mac_addr]
        self.dev_no = dev_no
        pass

    def set_up(self):
        call(['sudo', 'hciconfig', self.dev_no, 'down'])
        call(['sudo', 'hciconfig', self.dev_no, 'up'])
        call(['sudo', 'hcitool', '-i', self.dev_no, 'lecc', self.mac_addr])
        cmd_data="""sudo gatttool -i """ + self.dev_no + """ -b """ + self.mac_addr + """ --char-read --handle="""+self.hndl
        time.sleep(1)

    def getASCII(self, myText):
        cmd = ''.join([chr(int(''.join(c), 16)) for c in zip(myText[0::2],myText[1::2])])
        print (str(cmd))


    def send_write_command(self, hndl, myValue):
        if( myValue != "00" and myValue != "01"):
            myValue2 = myValue.upper()
            myValue2 = myValue2.encode('utf-8')
            myValue2 = myValue2.hex().strip()
            myValue2 = str(myValue2)
        else:
            print("Value returned: %s" % myValue)
            myValue2 = myValue

        cmd_data="""sudo gatttool -i """ + self.dev_no + """ -b """ + self.mac_addr + """ --char-write-req --handle="""+ hndl +""" --value=""" + myValue2

        print("Sending command: %s" % cmd_data)
        try:
            p = Popen(cmd_data, shell=True, stdout=sp.PIPE, stderr=sp.PIPE)
            out, err = p.communicate()

        except OSError as e:
            print ("OSError err = %s" % e.errno)


    def send_read_command(self, hndl):
        cmd_data="""sudo gatttool -i """ + self.dev_no + """ -b """ + self.mac_addr + """ --char-read --handle="""+ hndl
        try:
            p = Popen(cmd_data, shell=True, stdout=sp.PIPE, stderr=sp.PIPE)
            out, err = p.communicate()

        except OSError as e:
            print("ERR %s OSErr: %s" % (err, e))


        out_data = str(out)
        out_data = out_data.rstrip("'")
        out_data = out_data.rstrip('\n')
        print(out_data)
        out_data = out_data.split(":")[1].replace(" ", "")
        out_data = out_data.rstrip("'")

        if out_data.find('\\n') != -1:
            out_data = out_data[:-2]
            print("New line found")

        print(out_data)
        if(out_data != "00" and out_data != "01"):
            ble_text = out_data.replace(" ", "")
            ble_text = bytes.fromhex(ble_text)
            out_data = ble_text.decode()
            print("HEX convert: %s", out_data)
        else:
            print("Value returned: %s" % out_data)

        return out_data

def main(args):
    bledev = BLEDev(args.mac_addr, args.dev_no)
    if (args.rdwr == "read"):
        bledev.send_read_command(args.hndl)
    if (args.rdwr == "write"):
        bledev.send_write_command(args.hndl, args.value)

if __name__ == "__main__":
    import argparse

    parser = argparse.ArgumentParser()

    parser.add_argument('--d', type=str, default='hci0', help='Pass hci device number', dest="dev_no")
    parser.add_argument('--mac', type=str, default=' ', help='Pass BLE MAC address', dest="mac_addr")
    parser.add_argument('--hndl', type=str, default='0x0001', help='Pass handle', dest="hndl")
    parser.add_argument('--rw', type=str, default='read', help='Select Read or write', dest="rdwr")
    parser.add_argument('--val', type=str, default='00', help='Send data to write', dest="value")

    args = parser.parse_args()
    main(args)
3. In the Flask views.py file, an instance of the BLEDev class is created to pass RESTful POST and GET commands to the Nano 33.
a. Import nano_ble_sense.py BLEDev to the views.py file
from .nano33_ble_sense import BLEDev
b. Create an instance of BLEDev
nano33 = BLEDev("BLE33", "hci0")
c. Read a value from the Nano 33
Ex:
NOTE: I have no idea why this is being created as a table.
| btn1_output = nano33.send_read_command("0x000e") | |
| led_output = nano33.send_read_command("0x0013") |
d. Write a value to the Nano 33
Ex:
nano33.send_write_command("0x0013", newNanoMsg)
4. Initialize the webpage.
@app.route('/')
def index():
    now = datetime.datetime.now()
    timeString = now.strftime("%Y-%m-%d %H:%M")
    print (timeString)
    arduino_logo_path = os.path.join(app.config['UPLOAD_FOLDER'], 'auduino_logo.jpg')
    btn1_output = nano33.send_read_command("0x000e")
    led_output = nano33.send_read_command("0x0013")
    templateData = {
        'title' : 'Nano 33 BLE Sense TinyML',
        'time' : timeString,
        'btn1_output' : btn1_output,
        'led_output' : led_output
        #'ledState' : ledState
        }
5. Reading a command from the HTML page and passing it through Flask to the Nano 33
@app.route('/nanoMsg', methods = ['POST'])
def show_nanoMsg():
    newNanoMsg = request.form['newMsg']
    print("Message received '" + newNanoMsg + "'")
    nano33.send_write_command("0x0013", newNanoMsg)
    return ('nanoMsg', 204)
6. Readng a button press from the HTML page and sending a commands to the Nano 33 to turn on the LED
@app.route('/ledBtn', methods = ['POST'])
def set_ledBtn():
    ledState = request.form['ledState']
    if ledState == 'On':
        print ("LED ON")
        nano33.send_write_command("0x000b", '01')
    elif ledState == 'Off':
        print ("LED OFF")
        nano33.send_write_command("0x000b", '00')
    templateData = {
        'ledState' : ledState
        }

    return ('nanoMsg', 204)
7. Read a button press from the Nano 33 and update the HTML page with the Button state.
@app.route('/nanoBTN1', methods = ['GET'])
def get_Btn1():
    btn1_output = nano33.send_read_command("0x000e")
    print ("BTN1 value: ", btn1_output)
    templateData = {
        'btn1_output' : btn1_output
        }
    return render_template("index.html", btn1_output=btn1_output)
8. Start flask
$ python3 run.py
 * Serving Flask app "app" (lazy loading)
 * Environment: production
   WARNING: Do not use the development server in a production environment.
   Use a production WSGI server instead.
 * Debug mode: on
 * Running on http://0.0.0.0:5000/ (Press CTRL+C to quit)
 * Restarting with stat
 * Debugger is active!
 * Debugger PIN: 236-143-413
2020-04-23 21:48
HTML Webpage
1. The webpage code is placed in index.html under the templates folder.
<!DOCTYPE html>
<html lean="en" data-ng-app>
<head>

    <!-- define on/off styles -->
    <link rel= "stylesheet" type= "text/css" href= "{{ url_for('static', filename='css/style.css') }}">

    <!-- define the toggle function -->
    <script language="javascript">
        function toggleState(item) {
            if(item.className == "on") {
                item.className="off";
                item.value="Off";
            } else {
                item.className="on";
                item.value="On";
            }
        }
    </script>
    <meta charset="utf-8">
    <title>{{ title }}</title>

</head>
<body style="background-image: url({{ arduino_logo }})">
<body>
   <header>
      <p>
        <div>
          <h1>Arduino Nano 33 BLE Sense</h1>
           <h2> Flask </h2>
        </div>
      </p>
   </header>
      <p>
      <form action="/show_index" method="post" >
        <div>
          <!-- <img src="{{ tinyml_logo }}" alt="TinyML Logo" id="tinyml_logo" ></img> -->
          <img src="{{url_for('static', filename='images/arduino-logo-prj14.jpg')}}" alt="Arduino Logo" id="tinyml_logo" ></img>
        </div>
      </form>
      </p>
     <p align="center">
       <div>
         <label name=nanoDS" id="nanoDS">"BLE"</label>
       </div>
     </p>

      <p>
        <form action="/nanoMsg" method="post">
          <div align="center">
            <label for="newMsg" id="msgLbl">Enter New Message:</label>
            <input type="text" name="newMsg" id="newMsg"></input>
            <input type="submit" value="Send Message"></input>
         </div>
       </form>
     </p>

      <p>
       <form action="/nanoBTN1" method="post">
          <div align="center">
            <h2> Button1 pressed: {{ btn1_output }}</h2>
         </div>
       </form>
       <form action="/ledWrState" method="post">
          <div align="center">
            {% if led_output %}
            <h2> LED Write state: {{ led_output }}</h2>
             {% endif %}
         </div>
       </form>
     </p>
     <p align="center">
        <form action="/ledBtn" method="post" >
           <!-- call 'ledBtn' whenever clicked -->
          <div align="center">
              <label for="ledState" name="ledStateLbl" id="ledStateLbl">Set LED</label>
              <input type="submit" name="ledState" id="ledState" value="On"
                 onclick="toggleState(this)" />
          </div>
       </form>
     </p>
          <p align="center">
        <form action="/buzzBtn" method="post" >
           <!-- call 'buzzBtn' whenever clicked -->
          <div align="center">
              <label for="buzzState" name="buzzStateLbl" id="buzzStateLbl">Set Buzzer</label>
              <input type="submit" name="buzzState" id="buzzState" value="Off"
                 onclick="toggleState(this)" />
          </div>
       </form>
     </p>
     </p>


      <p>
</body>
</html>
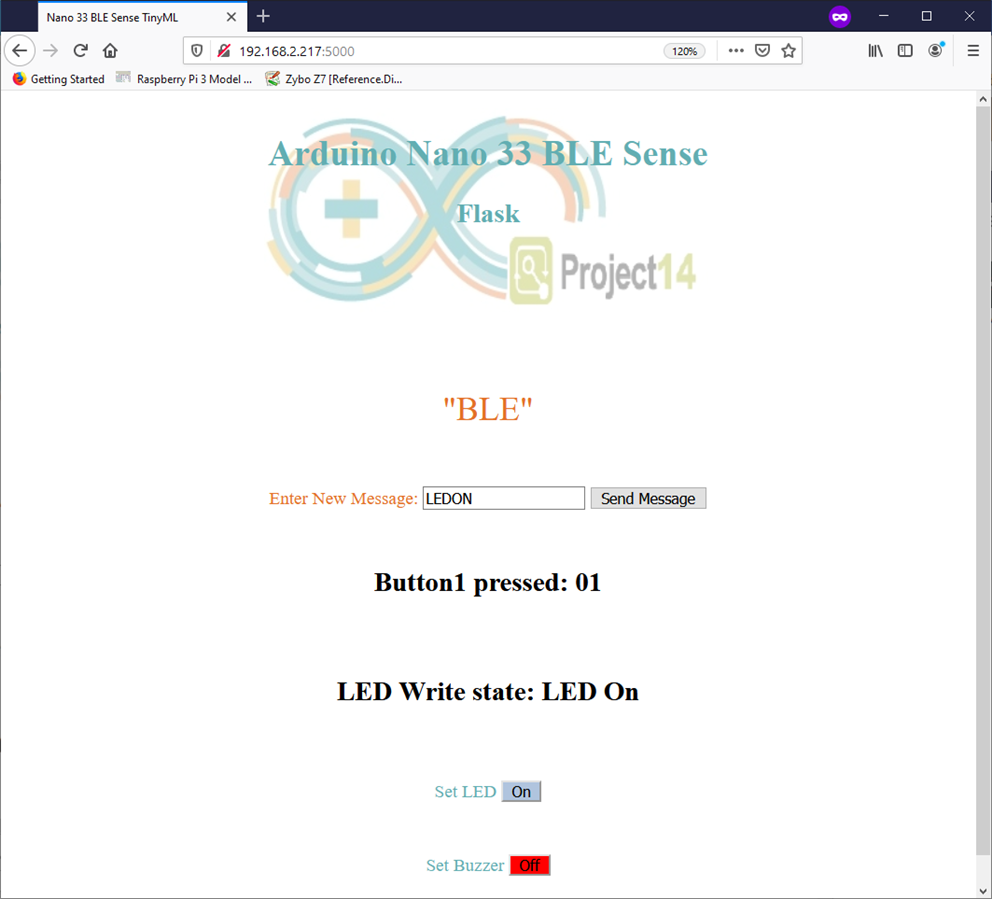
2. Initial page shows the Input Box and buttons to interact with the Nano 22.
NOTE: The Flask page can be reached using the Raspberry Pi IP address and Port 5000

3. Send a LEDON Message to the Nano 33
4. Message seen from Flask
Message received 'LEDON'
Sending command: sudo gatttool -i hci0 -b D8:4C:FD:36:96:EB --char-write-req --handle=0x0013 --value=4c45444f4e
192.168.2.220 - - [23/Apr/2020 23:13:03] "POST /nanoMsg HTTP/1.1" 204 -
5. Message reported in the Arduino IDE Serial Monitor
String value:LEDON
6. Set Led Off via the Set LED Button
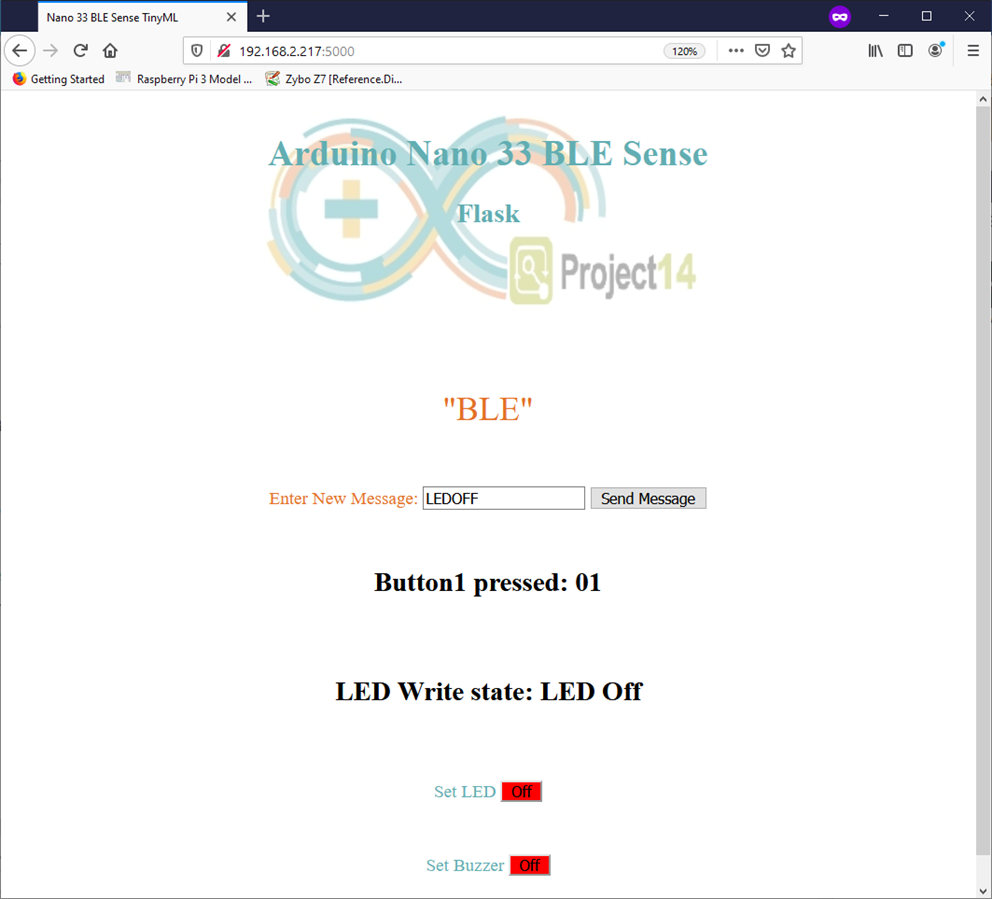
7. Button press reported by Flask:
LED OFF
Value returned: 00
Sending command: sudo gatttool -i hci0 -b D8:4C:FD:36:96:EB --char-write-req --handle=0x000b --value=00
192.168.2.220 - - [23/Apr/2020 23:17:38] "POST /ledBtn HTTP/1.1" 204 -
2020-04-23 23:17
8. Button press seen from Arduino IDE Serial Monitor
LED off
LED on
Conclusion
That is pretty much the idea of using a Flask HTML interface to interact with the Nano 33 BLE Sense.
Next Step
Integrate the ArduinoBLE API with the TinyML code.