element14 Community
element14 Community
    Register Log In
  • Site
  • Search
  • Log In Register
  • About Us
  • Community Hub
    Community Hub
    • What's New on element14
    • Feedback and Support
    • Benefits of Membership
    • Personal Blogs
    • Members Area
    • Achievement Levels
  • Learn
    Learn
    • Ask an Expert
    • eBooks
    • element14 presents
    • Learning Center
    • Tech Spotlight
    • STEM Academy
    • Webinars, Training and Events
    • Learning Groups
  • Technologies
    Technologies
    • 3D Printing
    • FPGA
    • Industrial Automation
    • Internet of Things
    • Power & Energy
    • Sensors
    • Technology Groups
  • Challenges & Projects
    Challenges & Projects
    • Design Challenges
    • element14 presents Projects
    • Project14
    • Arduino Projects
    • Raspberry Pi Projects
    • Project Groups
  • Products
    Products
    • Arduino
    • Avnet Boards Community
    • Dev Tools
    • Manufacturers
    • Multicomp Pro
    • Product Groups
    • Raspberry Pi
    • RoadTests & Reviews
  • Store
    Store
    • Visit Your Store
    • Choose another store...
      • Europe
      •  Austria (German)
      •  Belgium (Dutch, French)
      •  Bulgaria (Bulgarian)
      •  Czech Republic (Czech)
      •  Denmark (Danish)
      •  Estonia (Estonian)
      •  Finland (Finnish)
      •  France (French)
      •  Germany (German)
      •  Hungary (Hungarian)
      •  Ireland
      •  Israel
      •  Italy (Italian)
      •  Latvia (Latvian)
      •  
      •  Lithuania (Lithuanian)
      •  Netherlands (Dutch)
      •  Norway (Norwegian)
      •  Poland (Polish)
      •  Portugal (Portuguese)
      •  Romania (Romanian)
      •  Russia (Russian)
      •  Slovakia (Slovak)
      •  Slovenia (Slovenian)
      •  Spain (Spanish)
      •  Sweden (Swedish)
      •  Switzerland(German, French)
      •  Turkey (Turkish)
      •  United Kingdom
      • Asia Pacific
      •  Australia
      •  China
      •  Hong Kong
      •  India
      •  Korea (Korean)
      •  Malaysia
      •  New Zealand
      •  Philippines
      •  Singapore
      •  Taiwan
      •  Thailand (Thai)
      • Americas
      •  Brazil (Portuguese)
      •  Canada
      •  Mexico (Spanish)
      •  United States
      Can't find the country/region you're looking for? Visit our export site or find a local distributor.
  • Translate
  • Profile
  • Settings
NanoRama
  • Challenges & Projects
  • Project14
  • NanoRama
  • More
  • Cancel
NanoRama
Blog DMX diagnostics tool - running out of time
  • Blog
  • Forum
  • Documents
  • Events
  • Polls
  • Files
  • Members
  • Mentions
  • Sub-Groups
  • Tags
  • More
  • Cancel
  • New
Join NanoRama to participate - click to join for free!
  • Share
  • More
  • Cancel
Group Actions
  • Group RSS
  • More
  • Cancel
Engagement
  • Author Author: genebren
  • Date Created: 14 May 2020 8:43 PM Date Created
  • Views 2204 views
  • Likes 12 likes
  • Comments 8 comments
  • nanorama
  • nanoramach
Related
Recommended

DMX diagnostics tool - running out of time

genebren
genebren
14 May 2020

This has been a fun and crazy ride.  Unfortunately time is ticking away faster than progress is being made on this project.  So, I thought that I should wrap this one up.


Here are a list of the previous posts:

DMX diagnostic tool - Getting started

DMX diagnostic tool - Sending and Receiving Data

DMX diagnostics tool - Hardware, Software and Mechanical updates

DMX diagnostics tool - And the wheels come off the bus!


Given the state of things from the last update, there seemed like no where to go but up.  Well, unfortunately that was not the case.  My next step forward on the project was to integrate the power pack (Walky the Biped Robot - Power pack ) with the Arduino.  My plan was to used the +5 volt output of the Arduino when it was USB powered to feed the charger circuit on the power pack.  Oops, that did not go too well.  The +5 output on the Nano Classic is less the 4.5V with no load and with a load it drops down to 4.2V or less.  This is not enough voltage to properly charge a Li-Ion battery.  With a nearly fully charged battery (4.0V), the charger would not start the charging sequence due to as the Under Voltage Lock Out (UVLO) triggered and shutdown the device.  I then decided that I would need to have a USB jack (bypassing the Arduino) in order to fully charge the Li-Ion power pack.


image

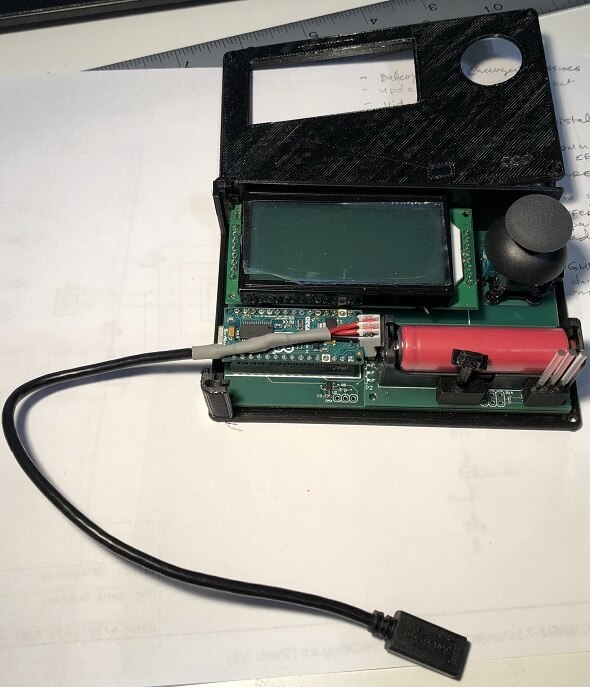
The attached charging cable is terminated with a female Micro-B USB jack.  I modified the PCB to remove the connection from the Arudino (lifted the in-line diode) and tacked a header to the pins attaching the power pack to the motherboard.


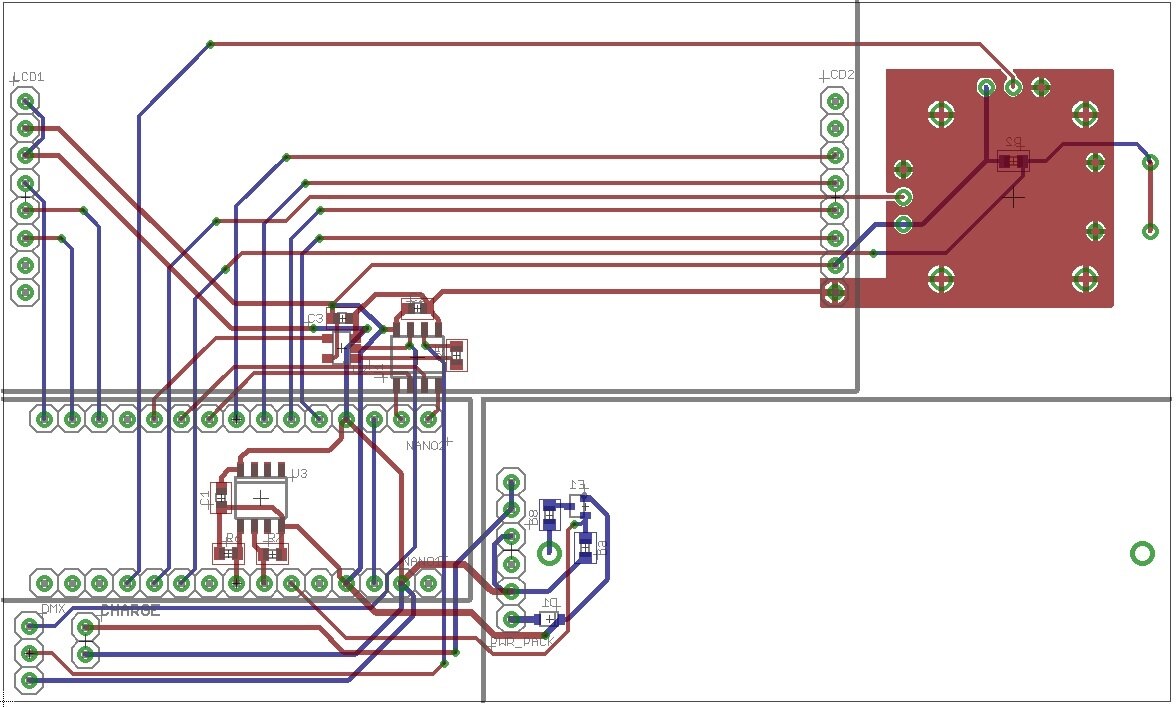
With all the changes on this relatively simple board, I decided that I should update the documentation.  This is how I should have built it:

imageimage

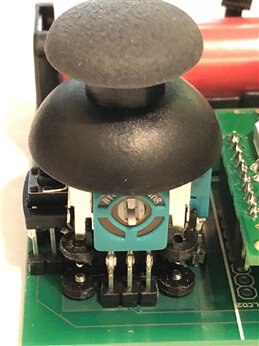
I had one additional part that I needed to fabricate, a riser for the joystick, positioning it at the proper height to be flush with the top panel.  As I went to find the Fusion360 drawing files today, I could not find any of my recent parts (I hope this is a temporary problem).  So I have included the *.STL file that I use to generate the gcode (in CURA).  Here is the CURA view of the joystick riser along with a picture of the built part:


imageimage

In between all of the issues that I was dealing with, I was continuing to work on the code (not complete yet), here are some of the new features I have added:


  else if (commPort)
  {
    // uart send/receive processing
    // serial command processing
    if (GetSerialInputCount())
    {
      serialChar = GetSerialByte();
      if (serialChar == 0x0A)
      {
          *iptr++ = 0;        // terminate string
          // command received - decode command
          if (decodeCommand())
          {
              PutSerialString(outBound);
              // clear outbound string
              outBound[0] = 0;
          }
          else
          {
              PutSerialString(unknownCommand);
          }
        }
        else if(serialChar == 0x0D)
        {
          // ignore CR
        }
        else
        {
          *iptr++ = serialChar;
        }
    }
  }


In side of the loop() function, I added a new mode that allowed me to use the UART as a USB communications port along side of using it as a DMX port.  The two modes are mutually exclusive as the device can not be remotely connected while the DMX is sending or receiving.  I could not use the Arduino standard fuctions of Serial, as this would create multiple definitions of the interrupt vectors of the UART.  Here are the low level functions in support of the comm port.


unsigned char decodeCommand(void)
{
  unsigned char retval = 0;
  unsigned char *params;
  unsigned char data[32];
  unsigned int Address;
  unsigned char numBytes;
  unsigned char ctemp;
  
  params = strchr(inBound, ',');
  if (params)
  {
    *params++ = 0;      // terminate command string (params now points to data)
  }
  
  // look for a comma separator in the command, if found, terminate string and point to remaining data
  switch(inBound[0])
  {
    case 'D':
      if (strcmp(inBound, "DATA?") == 0)
      {
         // send reply
        itoa(data, outBound, 10);
        strcat( outBound, "\r\n");
        retval = 1; 
      }
    case 'H':
      if (strcmp(inBound, "HELLO?") == 0)
      {
        // send OK reply
        strcat( outBound, "OK\r\n");
        retval = 1; 
      }
      break;
    case 'R':
      if (strcmp(inBound, "READ") == 0)
      {
        // "READ,%d,%hhu", Address, count
        ctemp = sscanf( params, "%d, %hhu", &Address, &numBytes);
        if (ctemp == 2)
        {
          ctemp = readEEPROM(data, numBytes, Address);
        }
      }
      
      break;
  }
  iptr = inBound;
  *iptr = 0;
  return retval;
}


This is the function to decode commands (not complete)


static unsigned int DMXindex;
static unsigned char DMXBusy;
// USART Transmitter buffer
#define TX_BUFFER_SIZE 32
char tx_buffer[TX_BUFFER_SIZE];

unsigned char tx_wr_index = 0;
unsigned char tx_rd_index = 0;
unsigned char tx_counter = 0;

// USART0 Transmitter interrupt service routine
ISR(USART_TX_vect)
{
  if (commPort)
  {
    if (tx_counter)
    {
        --tx_counter;
        UDR0 = tx_buffer[tx_rd_index++];
        if (tx_rd_index == TX_BUFFER_SIZE)
        {
            tx_rd_index = 0;
        }
    }
  }
  else
  {
    DMXindex++;
    if (DMXindex < 513)
    {
      if (DMXindex == DMXAddress)       // ToDo: extend logic to allow multiple active DMX addresses
      {
          UDR0 = DMXdata;
      }
      else
      {
          UDR0 = 0;
      }
    }
    else
    {
      // disable xmitter - not sending another character
      DMXBusy = 0;
    }
  }
}

// Get a character from the USART Receiver buffer
void PutSerialByte(unsigned char data)
{
    if (tx_counter == TX_BUFFER_SIZE)
        return;
    if (tx_counter || ((UCSR0A & (1<<UDRE0)) == 0))
    {
        //#asm("cli")
        noInterrupts();
        tx_buffer[tx_wr_index++] = data;
        if (tx_wr_index == TX_BUFFER_SIZE)
        {
            tx_wr_index = 0;
        }
        tx_counter++;
        // #asm("sei")
        interrupts();
    }
    else
    {
        UDR0 = data;
    }
}

void PutSerialString(unsigned char *data)
{
    while (*data)
    {
        PutSerialByte(*data);
        data++;
    }
}


This is the transmit side of the UART (including the DMX code), along with the supporting routines to 'put' data.


static unsigned char status;
#define FRAMING_ERROR (1<<FE0)
#define PARITY_ERROR (1<<UPE0)
#define DATA_OVERRUN (1<<DOR0)
#define RX_BUFFER_SIZE 32
char rx_buffer[RX_BUFFER_SIZE];

unsigned char rx_wr_index = 0;
unsigned char rx_rd_index = 0;
unsigned char rx_counter = 0;

// This flag is set on USART Receiver buffer overflow
unsigned char rx_buffer_overflow;


ISR(USART_RX_vect)
{
  char data;
  char done = 0;
  status = UCSR0A;
  data = UDR0;
  if ((status & ((1<<FE0) | (1<<UPE0) | (1<<DOR0))) == 0)
  {
    if (commPort)
    {
      rx_buffer[rx_wr_index++] = data;
      if (rx_wr_index == RX_BUFFER_SIZE)
      {
        rx_wr_index = 0;
      }
      if (++rx_counter == RX_BUFFER_SIZE)
      {
        rx_counter = 0;
        rx_buffer_overflow = 1;
      }
    }
    else
    {
      if (DMX_byte_count == 0)
      {
        if (data == 0)
        {
          PORTB |= 0x02;
          // setup packet decoder for normal packet
  //        pDMXAddressess = DMX_AddrMap;
  //        pDMXData = DMX_DataVals;
        }
      }
  //    else if (DMX_byte_count == *pDMXAddressess)
  //    {
  //        *pDMXData = data;
  //        pDMXAddressess++;
  //        pDMXData++;
  //    }
  //    else
  //    {
  //    }
      // monitor DMX byte count
      if (DMX_byte_count >= 512)
      {
        done = 1;
        DMXdataReady = 1;
      }
      else
      {
        DMX_byte_count++;
      }      
    }
  }
  else
  {
    if (commPort)
    {
      
    }
    else
    {
      // insert code to flag/log errors
      PORTB &= 0xFC;
      done = 1;
    }
  }
  if (done)
  {
//  disableSerialRecv();
    UCSR0B = (0<<RXCIE0) | (1<<TXCIE0) | (0<<UDRIE0) | (0<<RXEN0) | (0<<TXEN0) | (0<<UCSZ02) | (0<<RXB80) | (0<<TXB80);
    // clear Timer1 TOV flag (all flags)
    TIFR1 = 0x27;
    TCNT1 = 0;
    // enable Interrupt on any change on pins PCINT16
    PCICR = (1<<PCIE2) | (0<<PCIE1) | (0<<PCIE0);
    PCMSK2 = (0<<PCINT23) | (0<<PCINT22) | (0<<PCINT21) | (0<<PCINT20) | (0<<PCINT19) | (0<<PCINT18) | (0<<PCINT17) | (1<<PCINT16);
    PCIFR = (1<<PCIF2) | (0<<PCIF1) | (0<<PCIF0);
    DMX_state = 0;
    PORTB &= 0xFC;
  }
}

// Get a character from the USART Receiver buffer
unsigned char GetSerialByte(void)
{
    char data;
    
    if (rx_counter == 0)
        return 0;
    data = rx_buffer[rx_rd_index++];
    if (rx_rd_index == RX_BUFFER_SIZE)
    {
        rx_rd_index = 0;
    }
    //#asm("cli")
    noInterrupts();
    --rx_counter;
    // #asm("sei")
    interrupts();
    return data;
}

unsigned char GetSerialInputCount(void)
{
    return rx_counter;
}

unsigned char GetSerialStatus(void)
{
  return (status & ((1<<FE0) | (1<<UPE0) | (1<<DOR0)));
}


This is the receive side of the UART along with the functions to 'get' data.


Another area of code were block read and write functions for the serial EEPROM.  Here is that code:


unsigned char writeEEPROM(byte *buffer, unsigned char count, unsigned int address)
{
  unsigned char bytesLeftInPage;
  unsigned char byteCount;
  unsigned char loopCount;
  unsigned char needStop;

  byteCount = 0;
  needStop = 0;
  bytesLeftInPage = 0x20 - (lowByte(address) & 0x1F);

  if (count == 0)
  {
    return 0;
  }

  // start writing with the preample
  Wire.beginTransmission(EEPROM_ID);
  Wire.write((int)highByte(address));
  Wire.write((int)lowByte(address));

  for (loopCount = 0; loopCount < count; loopCount++)
  {
    Wire.write((int) *buffer++);
    needStop = 1;
    if (--bytesLeftInPage == 0)
    {
      // page boundary, end block
      Wire.endTransmission();
      delay(5);

      if (loopCount > (count-1))      // is there more data?
      {
        bytesLeftInPage = 0x20;                 // set in page bytes to full page
        address = (address & 0x3fc0) + 0x20;    // point to the beginning of the next block
        // begin new block by writing the preample
        Wire.beginTransmission(EEPROM_ID);
        Wire.write((int)highByte(address));
        Wire.write((int)lowByte(address));
      }
      else
      {
        needStop = 0;
      }
    }
  }
  if (needStop)
  {
    // page boundary, end block
    Wire.endTransmission();
    delay(5);
  }
  return count;
}

unsigned char readEEPROM(byte *buffer, unsigned char count, unsigned int address)
{
  unsigned char loopCount;
  
  loopCount = 0;
  // start writing with the preample
  Wire.beginTransmission(EEPROM_ID);
  Wire.write((int)highByte(address));
  Wire.write((int)lowByte(address));
  Wire.endTransmission();
  // request the appropriate number of bytes
  Wire.requestFrom(EEPROM_ID, (byte)count);
  
  while(Wire.available())    // slave may send less than requested
  {
    if (loopCount < count)
    {
      *buffer++ = Wire.read();    // receive a byte as character
      loopCount++;
    }
  }
  return loopCount;
}


The full Ardunio code will be attached as a zip file at the end of this blog.


Lessons learned in the Project


As with all good projects, there is some learning going on along side of the creating.  Even with more the 40 years of experience, I am still learning (albeit at a slower rate than earlier portions of my career).  Here is some of what I learned on this project:


  1. I learned my way around the Arduino development tools and process flow.  This was both a joy and at times a curse.  I am so used to being able to see everything (assembly listing, maps, etc.) that help me understand how the low level pieces work (I know, not everybody's cup of tea, but for me this is were I am most comfortable, understanding how everything works).  I liken my experience with Arduino with that of Visual Basic, the framework allows you to make tons of progress on the front side of the project, but then gets in the way as the complexity rises.  I ran into some many things that did not seem to work as described (like using PROGMEM).
  2. I was surprised to find that the CONST keyword actually created variables that eat up the precious RAM on these tiny processors.  Further the documentation admits to this but warns you against using #defines.  Not sure that I understand that piece of wisdom.  All of which brings me to the next lesson.
  3. My menuing system used way too much memory (I started getting "Low memory available, stability problems may occur." messages during compiles).  As I pick up the pieces and move forward, I need to rethink the embedding of strings into the structure/union elements of the menuing system.  I could instead embed an index into the elements, pointing to a string array, thus allowing me to share common strings and lessen the penalty of short or null strings inside the elements.
  4. On the hardware side of things, and this is not really a new lesson, but a reminder.... prior to ordering boards, double check everything.  I can not believe how many mistakes that I made on this super simple PCB.


Here is a short proof video, showing the simple operation of my project.


You don't have permission to edit metadata of this video.
Edit media
x
image
Upload Preview
image


Many thanks to the element14 crew for continuing to hosts interesting project competitions!


Note: Updated 5/15/2020 to add BOM information to the Zip file.

Attachments:
DMX diag tool.zip
  • Sign in to reply

Top Comments

  • Andrew J
    Andrew J over 5 years ago in reply to genebren +3
    Hi Gene, Here's some EEPROM code - simple as this really: ... #include <EEPROM.h> ... /* ************************************************************************** EEPROM Functions *****************…
  • genebren
    genebren over 5 years ago in reply to davedarko +2
    Thanks! I really find that annoying too, hence the extra effort to hide the metal casing.
  • Andrew J
    Andrew J over 5 years ago +2
    This has been some great work Gene. Apologies if you know the following already, but two things you could do with the strings is Store them in the Nano's EEPROM rather than memory and read them out when…
  • genebren
    genebren over 5 years ago in reply to Andrew J

    Andrew,


    I had totally confused the problem.  What I was attempting to do (and failed at) was to use the 'PROGMEM' type to store constants in FLASH (not EEPROM) then to used the 'prg_read_word_near' function to read from the FLASH memory to used the constant.  This is what would give me the compile time error.


    I guess I had thought of using the EEPROM for other storage, but this might be a better approach.  I have used EEPROM on other programs in the past, so maybe I really ought to do that instead.   Funny how, thinking FLASH total blocked me from trying something easier (like EEPROM), plus this is something that I have experience with.


    Thanks!

    Gene

    • Cancel
    • Vote Up +2 Vote Down
    • Sign in to reply
    • More
    • Cancel
  • Andrew J
    Andrew J over 5 years ago in reply to genebren

    Hi Gene,


    Here's some EEPROM code - simple as this really:

    ...
    #include <EEPROM.h>
    ...
    /*  **************************************************************************
        EEPROM Functions
        **************************************************************************
    */
    void readPreferences() {
      startMode = EEPROM.read(0);
      powerAtStart = EEPROM.read(1);
      EEPROM.get(3, maxPowerLimit);
      if (startMode == 255)
        startMode = DEFAULTSTARTMODE;
      if (powerAtStart == 255)
        powerAtStart = DEFAULTPOWERSTATE;
      if (maxPowerLimit == 255)
        maxPowerLimit = DEFAULTMAXPOWER;
    }
    
    void savePreferences() {
      EEPROM.update(0, startMode);
      EEPROM.update(1, powerAtStart);
      EEPROM.put(3, maxPowerLimit);
    }

    All data is stored as bytes so you index at the correct byte offset.  In the code above, startMode is a single byte stored at address 0; powerAtStart is a single byte stored at address 1; and maxPowerLimit is one or more bytes stored starting at address 3 converted to the type of maxPowerLimit.  You don't need to use contiguous addresses.  read() gets an unsigned char; get() gets enough bytes to satisfy the type of the passed variable - basically, it's an easy way to retrieve Integers, Floats, Doubles etc.  update() and put() are the writing equivalent.  The library returns 255 if there is an error.


    You could just write a simple function that takes a pointer to your char array, an address and populate the array when needed.  Sorry, I'm not a great C programmer and I get confused over pointers and the like but something like the following:


    void pullString(char * strArray, uint_8 address) { // I think the nano has 255 bytes of EEPROM but if not, then just change the type of address
         for (int i = 0; i++ ; i < strArray.length) { // I don't think this syntax is right for pointers but you get the gist
          &strArray + i = EEPROM.read(address + i); // Basically, load the right (memory address) offset of the char array with the byte in EEPROM memory at an offset from 
    
       }
    }


    I would normally have to play around with code like that to get it working for pointers and arrays but I'm sure you get the idea!  You're clearly trading off memory against speed of execution but you could of course keep frequent data in memory and occasional data in EEPROM.


    I believe there are tools that allow you to look at the compiled code but I can't remember how to use them.  When the arduino compiler (which is only a wrapper for GCC or GNU or some such compiler) runs it copies the files to compile to a scratch directory first; that scratch directory persists so you can run memory tools and all sorts over it.  Best get your GoogleFu working because I know little more than that unfortunately.


    As for rationalising functions, I mean rather than create many functions that have a lot of code the same but slight differences in some parts, as you would in a good object-oriented manner, do the nasty and combine them into one but use if...else..., case, etc to execute the different parts of the code based on a passed parameter.  You'll have to fight your instincts but you'll claw quite a few bytes back!  I was trying to find a simple example that would show it but, as you can imagine, the act of combining makes the code non-simple and not clear out of context.  I think you should only worry about this when memory gets really tight!


    The IDE is really quite simplistic for coding but good for programming beginners.  I'd prefer to use something else - for example, Microsoft's Visual Studio has a plug-in available to handle Arduino programming but it's a paid plugin from a 3rd party.  Because the Arduino compiler is really a 'wrapper' that provides the bootstrap loader for uploading to the Arduino board, I suspect you could use a separate IDE/compiler and then when ready just open the source code in the Arduino IDE for a final compile and upload.  However, that sounds like a bit of a faff to me so not something I'd bother with.  I had intended to look a bit further into this though when I had some more time. 

    • Cancel
    • Vote Up +3 Vote Down
    • Sign in to reply
    • More
    • Cancel
  • genebren
    genebren over 5 years ago in reply to Andrew J

    Thanks Andrew!  I did figure most of using the EEPROM variables out, but I kept getting strange compile/link error about improper addressing of the variables.  I will have to retry this approach again when I free up the time.  I also did use the char arrays (not String).  I am so confused about the differences (or lack there of) in memory usage between #defines and CONST.  There is something strange going on there.


    This whole Arudino IDE is new to me.  With other compilers/IDE I will resort to gnererating assembly listings so I can verify how a particular statement(s) are compiled into machine language.  I will have to look again (I tried a few times) to see if I can find a way to do this, so I can see what differences there are between #define/CONST and maybe solve my issues in using the EEPROM variables.


    Wow, you really lost me on the 'Rationalising of functions', I will have to have to look into that.


    Thanks,

    Gene

    • Cancel
    • Vote Up +1 Vote Down
    • Sign in to reply
    • More
    • Cancel
  • Andrew J
    Andrew J over 5 years ago

    This has been some great work Gene. 


    Apologies if you know the following already, but two things you could do with the strings is

    1. Store them in the Nano's EEPROM rather than memory and read them out when needed (data in the EEPROM is indexed in line with your idea of indexing them in an array) - depends on the speed of operation required whether this would be useful or not; and/or
    2. Use char arrays instead of String (or String arrays) which uses less memory and helps prevent heap fragmentation.


    A little while ago, I tried to see what the compile difference between #defines and CONST and couldn't find any, at least not in terms of memory consumption.  I actually spent some time jotting down compile sizes, making changes, recompiling and checking sizes again in order to try and get memory consumption down.  Char arrays made a big difference; being strict with other types also made a big difference (i.e. don't use an Int type when a uint_8 would do.)  Rationalising functions helped as well, even if it required a bit of shonky code to do it which you would normally make you throw up if you saw it, e.g. passing in a flag to the function and using if-then-else to drive the bit of code in the function was executed. 

    • Cancel
    • Vote Up +2 Vote Down
    • Sign in to reply
    • More
    • Cancel
  • genebren
    genebren over 5 years ago in reply to davedarko

    Thanks!  I really find that annoying too, hence the extra effort to hide the metal casing.

    • Cancel
    • Vote Up +2 Vote Down
    • Sign in to reply
    • More
    • Cancel
>
element14 Community

element14 is the first online community specifically for engineers. Connect with your peers and get expert answers to your questions.

  • Members
  • Learn
  • Technologies
  • Challenges & Projects
  • Products
  • Store
  • About Us
  • Feedback & Support
  • FAQs
  • Terms of Use
  • Privacy Policy
  • Legal and Copyright Notices
  • Sitemap
  • Cookies

An Avnet Company © 2025 Premier Farnell Limited. All Rights Reserved.

Premier Farnell Ltd, registered in England and Wales (no 00876412), registered office: Farnell House, Forge Lane, Leeds LS12 2NE.

ICP 备案号 10220084.

Follow element14

  • X
  • Facebook
  • linkedin
  • YouTube