


Star Wars MSE-6 (Mouse Droid) INDEX:
|
So, I was debating of whether or not to use an UNO or a M Zero Plus for the Motor control and Navigation sensor, but I discovered I could run FreeRTOS with the UNO so I an sticking with that for now. Thus far I was able to create 4 Tasks that control a Seed Motor Shield, Parallax Ping sensor and a Servo To sweep the area as well as a Task to blink an LED. The sweep may not be used, and was used to proof out the FreeRTOS usage with the UNO. One interesting item I ran into was that the Windows version of the Arduino IDE seems to compile more compact code than the Linux version. When I used the Linux version, after just 3 tasks it reported the binary was too large to load into the Uno. The Windows version of the same code reported about 21% of Uno memory usage and I was able to increase the task count up to 4 without issue.
Another issue I did run into was that if I tried to run the Arduino Servo library with the Seeed Studio Motor Shield MotorDriver library, neither the Servo nor the Motor Shield would work properly. Apparently both libraries manipulate the PWM Timer at the AVR level and one will over write the other if both are used. This seems to be a common issue with no posted resolution that I could find thus far. My solution was to create my own basic MotorShield code based on some examples I had seen and not use the Seeed studio code. I am not controlling the speed via PWM at this time, but will look into as time permits.
My code is based on the 'Blink_AnalogRead' FreeRTOS example from the IDE. I did have to update the IDE to the latest, 1.8.5 as of this writing, and ensure at least FreeRTOS version v10.0.0-10 which can be updated from the IDE itself.
To get started, it is best to download the latest Arduino IDE from the Arduino site:
https://www.arduino.cc/en/Main/Software

Once the Arduino IDE is installed, it is wise to update the Board packages as well as the Libraries in the IDE.
To update the Board code in the IDE, click on Tools -> Board: "Arduino/.."->Boards Manager.
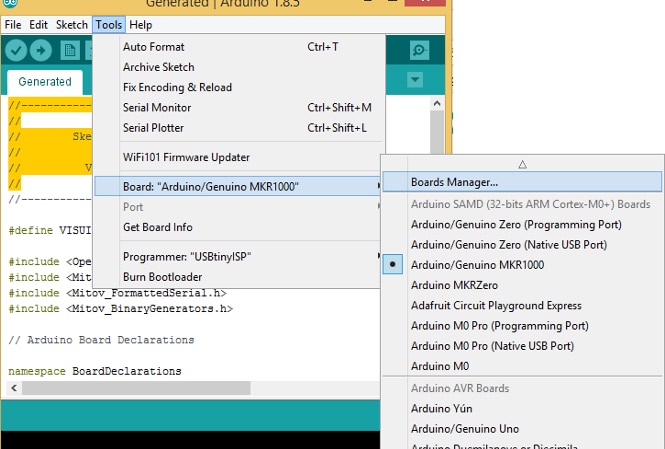
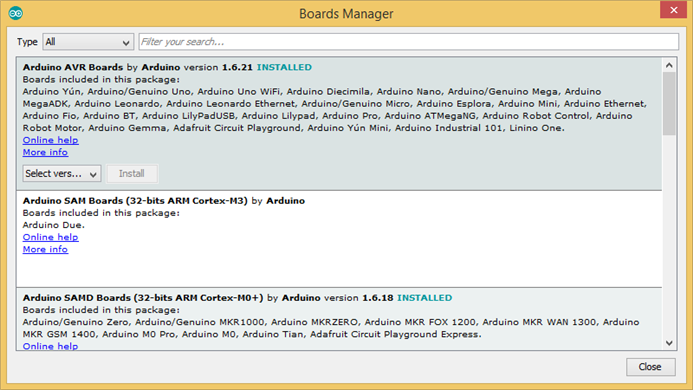
Then, in the Boards Manager window, select the Board or Board grouping for the board being used and either Install it or Update it it it already installed.
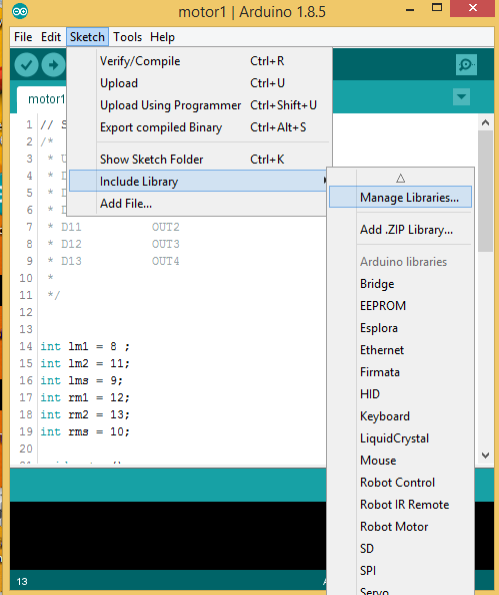
To update the Arduino IDE Libraries, Click on Sketch->Include Library->Manage Libraries. This will present a screen where the various supported libraries are listed and can be installed.
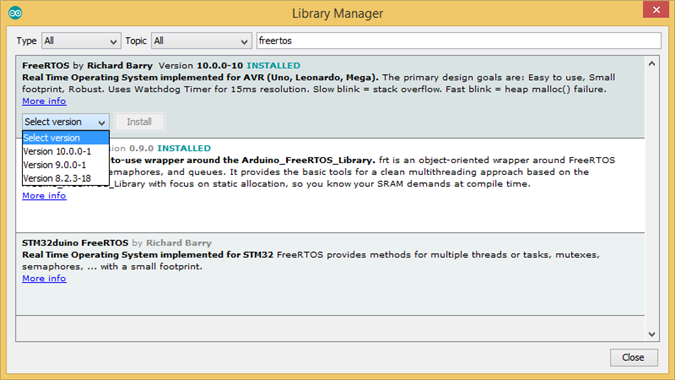
The Library Manager window should appear. To locate the FreeRTOS listing, type in freertos in the find textbox at the top of the window.

The version of FreeRTOS should be seen in the listing for FreeRTOS as:
Version: 10.0.0-10 INSTALLED
If the version is not 10.0.0-10 or newer, click on the Select Version drop down list box and select the 10.0.0-10 version and then the 'Install' button.
I also installed 'frt' as well for S&Gs.
Once FreeRTOS is updated, shutdown the IDE and reopen it to ensure the libraries are update properly.
When the IDE is up again, click on File->Examples->FreeRTOS->Blink_AnalogRead as a test.
NOTE: This requires a switch connected to pin A0 and the use of the BuiltIn LED.

This will bring up a 2 Task example using FreeRTOS that takes input from a switch connected to A0 to control the Blink of the LED connected to Pin13.

This FreeRTOS Sketch will blink the on board LED (PIN 13) and pint the Switch (A0) value to the console output seemingly not interrupting either task. That is, the LED should continue to blink when the switch is pressed.
This example was used to create my Ping Sensor and Motor Control code.
In the code I came up with, I have the 4 Tasks that control the on board LED, Ping Sensor Servo, Ping Sensor, and Motor Control.
- TaskBlink - Blink the on board LED (PIN13)
- TaskPingServo - Ping sensor servo sweep control
- TaskMotor - Motor control task
- TaskPingRead - Ping Sensor Task
/**@file PWHBotNavigation.ino
 * @author Jon Morss
 * @date 15 Apr 2018
 * @brief  This code controls the navigation of the PWHBot.\n
 *         The Blink_AnalogRead example was used as a model for this code.\n
 */


#include <arduino_freertos.h>
#include "src\MotorShield.h"
#include


Servo myservo;  // create servo object to control a servo
MotorShield mShield;  // Create Motor Shield object


bool BLINK_STATE = true;


// define two tasks for Blink & AnalogRead
void TaskBlink( void *pvParameters );
void TaskPingServo( void *pvParameters );
void TaskPingRead( void *pvParameters );
void TaskMotor( void *pvParameters );
long microsecondsToCentimeters(long microseconds);
long microsecondsToCentimeters(long microseconds);


// this constant won't change. It's the pin number of the sensor's output:
const int servoPin = 4;
const int BOARDLED = 13;


// the setup function runs once when you press reset or power the board
void setup() {


   //pinMode(servoPin, OUTPUT);


   mShield.motorShieldInit();
   myservo.attach(servoPin);  // attaches the servo on pin 9 to the servo object


  // Task declarations.


  xTaskCreate(
    TaskBlink
    ,  (const portCHAR *)"Blink"   // A name just for humans
    ,  128  // Stack size
    ,  NULL
    ,  2 // priority
    ,  NULL );


  xTaskCreate(
    TaskPingServo
    ,  (const portCHAR *) "PingServo"
    ,  128 // This stack size can be checked & adjusted by reading Highwater
    ,  NULL
    ,  1 // priority
    ,  NULL );


  xTaskCreate(
    TaskPingRead
    ,  (const portCHAR *) "PingRead"
    ,  128 // This stack size can be checked & adjusted by reading Highwater
    ,  NULL
    ,  1 // priority
    ,  NULL );


  xTaskCreate(
    TaskMotor
    ,  (const portCHAR *) "MotorControl"
    ,  128 // This stack size can be checked & adjusted by reading Highwater
    ,  NULL
    ,  1 // priority
    ,  NULL );


  // Now the task scheduler, which takes over control of scheduling individual tasks, is automatically started.
}


void loop()
{
  // Empty. Things are done in Tasks.
}


/*--------------------------------------------------*/
/*---------------------- Tasks ---------------------*/
/*--------------------------------------------------*/


/**
 * @brief LED Blink Task
 */
void TaskBlink(void *pvParameters)  // This is a task.
{
  (void) pvParameters;


  // initialize digital pin 13 as an output.
  pinMode(13, OUTPUT);


  for (;;) // A Task shall never return or exit.
  {

    if(BLINK_STATE)
    {
    digitalWrite(13, HIGH);   // turn the LED on (HIGH is the voltage level)
    vTaskDelay( 1000 / portTICK_PERIOD_MS ); // wait for one second
    digitalWrite(13, LOW);    // turn the LED off by making the voltage LOW
    vTaskDelay( 1000 / portTICK_PERIOD_MS ); // wait for one second
    }
    vTaskDelay(1);  // one tick delay (15ms) in between reads for stability
  }
}


/**
 * @brief Ping Servo Sweep Task
 */
void TaskPingServo(void *pvParameters)  // This is a task.
{
  (void) pvParameters;


  // initialize serial communication at 9600 bits per second:
  Serial.begin(9600);
  int pingServoPos = 0;
  bool LEFT = true;
  bool RIGHT = false;


  for (;;)
  {

    Serial.println(pingServoPos);

    //  Check if LEFT direction is true and increment position value
    // If LEFt is false, decrement pos until 0
    if (LEFT == true)
    {
      pingServoPos += 1;
      if(pingServoPos == 180)
      {
        LEFT = false;
      }
    }
    else if(LEFT == false)
    {
      pingServoPos -= 1;
      if(pingServoPos == 0)
      {
        LEFT = true;
      }
    }
    myservo.write(pingServoPos);     // tell servo to go to position in variable 'pos'


    //delay(15);                       // waits 15ms for the servo to reach the position

    vTaskDelay(1);  // one tick delay (15ms) in between reads for stability
  }
}


/**
 * @brief Read Ping Task
 */
void TaskPingRead(void *pvParameters)  // This is a task.
{
  (void) pvParameters;
  long duration, inches, cm;
  const int pingPin = 7;
   // initialize serial communication at 9600 bits per second:
  Serial.begin(9600);


  // Loop for Ping sensor
  for(;;)
  {
    // Code borrowed from Parallax
    // http://www.parallax.com/dl/docs/prod/acc/28015-PING-v1.3.pdf
    // The PING))) is triggered by a HIGH pulse of 2 or more microseconds.
    // Give a short LOW pulse beforehand to ensure a clean HIGH pulse:
    pinMode(pingPin, OUTPUT);
    digitalWrite(pingPin, LOW);
    delayMicroseconds(2);
    digitalWrite(pingPin, HIGH);
    delayMicroseconds(5);
    digitalWrite(pingPin, LOW);

    // The same pin is used to read the signal from the PING))): a HIGH pulse
    // whose duration is the time (in microseconds) from the sending of the ping
    // to the reception of its echo off of an object.
    pinMode(pingPin, INPUT);
    duration = pulseIn(pingPin, HIGH);

    // convert the time into a distance
    inches = microsecondsToInches(duration);
    cm = microsecondsToCentimeters(duration);

    Serial.print(inches);
    Serial.print("in, ");
    Serial.print(cm);
    Serial.print("cm");
    Serial.println();


    if(cm < 20)
    {
      //xSemaphoreTake(xLEDSem, 0);
      BLINK_STATE = false;
    }
    else
    {
      //xSemaphoreGive(xLEDSem);
      BLINK_STATE = true;
    }
    delay(100);
    vTaskDelay(1);  // one tick delay (15ms) in between reads for stability
  }
}


/**
 * @brief Motor Control Task
 */
void TaskMotor( void *pvParameters )
{
  (void) pvParameters;

  // Loop for Ping sensor
  for(;;)
  {
    if(BLINK_STATE)
    {
      // Go forward
      mShield.motorShieldForward(0, 255);
      delay(1000);
    }
    else
    {
      mShield.motorShieldStop(0);
      delay(500);
      mShield.motorShieldBackward(0, 255);
      delay(1000);
    }
      vTaskDelay(1);  // one tick delay (15ms) in between reads for stability
  }
}


long microsecondsToInches(long microseconds) {
  // According to Parallax's datasheet for the PING))), there are 73.746
  // microseconds per inch (i.e. sound travels at 1130 feet per second).
  // This gives the distance travelled by the ping, outbound and return,
  // so we divide by 2 to get the distance of the obstacle.
  // See: http://www.parallax.com/dl/docs/prod/acc/28015-PING-v1.3.pdf
  return microseconds / 74 / 2;
}


long microsecondsToCentimeters(long microseconds) {
  // The speed of sound is 340 m/s or 29 microseconds per centimeter.
  // The ping travels out and back, so to find the distance of the object we
  // take half of the distance travelled.
  return microseconds / 29 / 2;
}
For the motor control, I had to dump the Seeed Studio Motor Shield v2.2 since it was interfering with the Servo code causing both to not run.
MotorShield.h
/**@file MotorShield.h
 * @author Jon Morss
 * @date 15 Apr 2018
 * @brief This file contains functions to initialize Seeed Motor Shield v2.2 functions\n
    The Seeed Studio Motor Shield v2.2 code was used as a model for this code.
 *
 */

#ifndef  __MOTORSHIELD_H__
#define  __MOTORSHIELD_H__


#include


/**
 * @brief Defines for motor funtions\n
 * Uno        Motor Shield\n
 * D8           OUT1\n
 * D9           Enable of Channel0\n
 * D10          Enable of Channel1\n
 * D11          OUT2\n
 * D12          OUT3\n
 * D13          OUT4\n
 *
 */


enum motorshield_t{ LEFTMOTOR_IN1 = 8,
                LEFTMOTOR_IN2 = 11,
                LEFTMOTOR_SPEED = 9,
                RIGHTMOTOR_IN1 = 12,
                RIGHTMOTOR_IN2 = 13,
                RIGHTMOTOR_SPEED = 10
            };


/**
 * @brief Motor IDs\n
 */

enum motorid_t { LEFT_MOTOR , RIGHT_MOTOR };


/**
 * @brief Motor Shield Class
 */
class MotorShield
{
private:
    bool mState;
    int  mSpeed0;
    int  mSpeed1;


public:
    void motorShieldInit();
    void motorShieldForward(unsigned char motorID, int speed);
    void motorShieldBackward(unsigned char motorID, int speed);
    void motorShieldStop(unsigned char motorID);
};
#endif
MotorShield.cpp
/**@file MotorShield.cpp
 * @author Jon Morss
 * @date 15 Apr 2018
 * @brief This file contains functions to initialize Seeed Motor Shield v2.2 functions\n
    The Seeed Studio Motor Shield v2.2 code was used as a model for this code.
 *
 */


#include "MotorShield.h"


void MotorShield::motorShieldInit()
{
    mSpeed0 = 0;
    mSpeed0 = 1;


    pinMode(LEFTMOTOR_IN1, OUTPUT);
    pinMode(LEFTMOTOR_IN2, OUTPUT);
    pinMode(LEFTMOTOR_SPEED, OUTPUT);
    pinMode(RIGHTMOTOR_IN1, OUTPUT);
    pinMode(RIGHTMOTOR_IN2, OUTPUT);
    pinMode(RIGHTMOTOR_SPEED, OUTPUT);
    digitalWrite(LEFTMOTOR_IN1, LOW);
    digitalWrite(LEFTMOTOR_IN2, LOW);
    digitalWrite(LEFTMOTOR_SPEED, LOW);
    digitalWrite(RIGHTMOTOR_IN1, LOW);
    digitalWrite(RIGHTMOTOR_IN2, LOW);
    digitalWrite(RIGHTMOTOR_SPEED, LOW);


}


void MotorShield::motorShieldForward(unsigned char motorID, int speed)
{
switch(motorID)
    {
    case 0:
        analogWrite(LEFTMOTOR_SPEED, speed);
        digitalWrite(LEFTMOTOR_IN1, HIGH);
        digitalWrite(LEFTMOTOR_IN2, LOW);
        break;
    case 1:
        analogWrite(RIGHTMOTOR_SPEED, speed);
        digitalWrite(RIGHTMOTOR_IN1, HIGH);
        digitalWrite(RIGHTMOTOR_IN2, LOW);
        break;
    default:;
    }
}


void MotorShield::motorShieldBackward(unsigned char motorID, int speed)
{
  switch(motorID)
  {
    case 0:
        analogWrite(LEFTMOTOR_SPEED, speed);
        digitalWrite(LEFTMOTOR_IN1, LOW);
        digitalWrite(LEFTMOTOR_IN2, HIGH);
        break;
    case 1:
        analogWrite(RIGHTMOTOR_SPEED, speed);
        digitalWrite(RIGHTMOTOR_IN1, LOW);
        digitalWrite(RIGHTMOTOR_IN2, HIGH);
        break;
    default:;
  }
}


void MotorShield::motorShieldStop(unsigned char motorID)
{
  switch(motorID)
  {
    case 0:
        //analogWrite(LEFTMOTOR_SPEED, 100);
        digitalWrite(LEFTMOTOR_IN1, HIGH);
        digitalWrite(LEFTMOTOR_IN2, HIGH);
        break;
    case 1:
        //analogWrite(RIGHTMOTOR_SPEED, 100);
        digitalWrite(RIGHTMOTOR_IN1, HIGH);
        digitalWrite(RIGHTMOTOR_IN2, HIGH);
        break;
    default:;
  }
}
Video showing all 4 FreeRTOS Tasks running on an Arduino UNO.
Top Comments