


Just a bit of history about my love of Mr. Machine. As a child, I was very lucky to have owned the original Mr. Machine, 60's era, which you constructed and could disassemble. My older brother had one too, which ended up getting broken (he was much harder on his toys than I), so I had spare/extra parts for mine. I don't know what happened to him over the years (we had a large and chaotic household). Many years later, my mother found one of these 70's version ones in an antique shop and bought it for me as a gift (birthday/christmas?). He is in good shape and I did not want to damage/modify it, so I have recently bought one off of eBay to be a stunt double and to be the donor for the upcycle project.
The donor Mr. Machine arrived and during the disassembly process I noticed a problem, one of his arms was badly damaged. Double checking the eBay post, sure enough a crack is visible (barely), so at least I was sure that I did not cause the damage. Still I had already turned my donor into a box full of parts, so I was not likely to be able to return it. I did not want to enter the contest with a broken arm, nor did I want to re-print an arm (to much trouble and muddying the waters between recycle and new construction), so back to eBay to find another reasonably inexpensive donor. This time I found a Mr. Machine that had damage to it's other arm. Hopefully I will now have enough of original parts to build a single Mr. Machine.


Here are all of the parts. In the two donor images the damaged arms are circled in green.
With Mr. Machine disassembled, now I can start planning on how to put him back together again. Now would be a good time to go over some of the plans and/or goals of this project.
- Replace Mr. Machine's wind-up mechanism with a stepper motors and other electronics. This is a somewhat complex process due to the old gear mechanism. The wind-up spring has multiple functions:
- Drive the wheels/legs
- Pump the bellows for the slide whistle (the bellows pump for each beat in the measures).
- Turn the note wheel, which in turn moves the whistle slide
- Enable/Disable the whistle (create rests between notes by disabling the whistle).
- Allow Mr. Machine to turn left/right and go in circles (two drive motors)
- Provide a rechargeable battery pack (single Li-Ion battery with boost circuit)
- On/Off switch - Modify Mr. Machine's winding crack into an on/off switch
- Embellish the assembly with LEDs to give Mr. Machine a modern look.
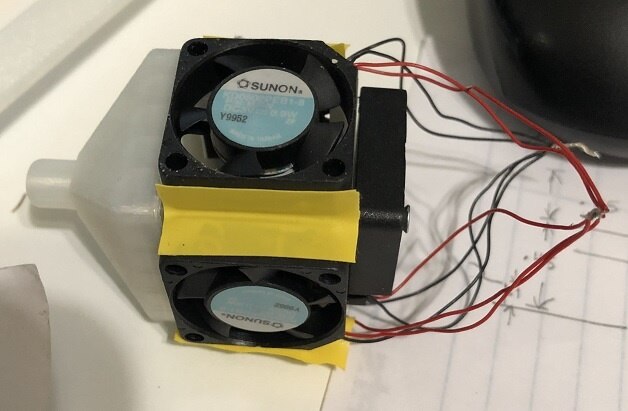
One of my first attempts in the Recycle & Retrofit process was to see how much of Mr. Machine's sound system I could keep while separating it from the winding mechanism. This process ended in more failures than successes. I was able to manage the whistle slide fairly easily with an R/C servo. I was able to calibrate the slide movements well enough to produce the necessary notes. (Note: this might be a good time to mention that I have nor musical abilities and I am completely unable to tell one note from another. I measured the frequency of the notes so I was reasonably sure that I produced the correct notes). I had initially tried to use an R/C servo to operate the bellows, hoping to eliminate the whistle disable. But in spite of my best efforts, I could not move the bellows quick enough to generate the air volume/pressure to generate a whistle. I then tried to use a similar cam approach to drive the bellows from a stepper motor, but again, I was unable to move the bellows fast enough to generate the proper are volume/pressure. My next attempt was to use a small fan to blow the whistle. I created a plenum to concentrate the airflow into a small section of tubing connected to the whistle, but again not enough air volume or pressure to blow the whistle. I then modified the plenum to allow for more fans, thus creating the 'fan cube', but no luck. This is about the time that I gave up on using the whistle.
I try to think outside of the box when it comes to mechanical and pneumatic, but I find that my weak skills/knowledge of physics keeps getting in the way. At this point I decided that I need to solve this problem in electronics, where I have a slightly better understand of the 'box'. To that end I am working on a tiny Midi player solution. I am only part way through this particular problem and I will present this solution in a later blog.
Mr. Machine was never intended to come apart, well, at least not easily. The body halves are held together with rivets. In drilling out the rivets, some of the plastic inside the bosses was drilled and/or melted out. I did not want to button up Mr. Machine with rivets, so I worked out a screw
based closure.
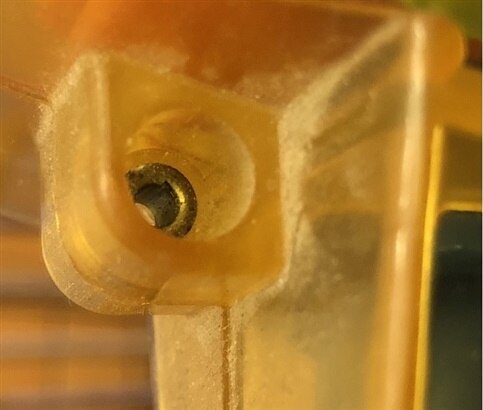


Now Mr. machine will be able to be assembled and disassembled as needed. There are a few more rivets that will need to be sorted out as I move forward, but I will get to those later.
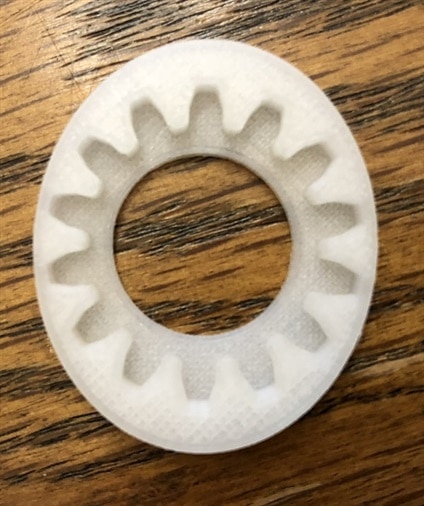
The next area that I started to work on was the motorized drive for Mr. Machine. I have been interested in using some stepper motors to build a robot with for some time, so I just need to search through my inventory (or junk collection) to find the right motors. I found some gear reduced stepper motors (~16:1), that seemed like a good fit for this build. Examining my working Mr. Machine, I found the wheel speed to be approximately 6 RPM (not exactly speedy). Using this as a baseline, I set my target speed for about 12 RPM, giving me some margin to have a bit faster overall speed, but also enough speed to handle turns and such where I will need to drive one wheel faster than the other. Here are my prototype motor drive parts:
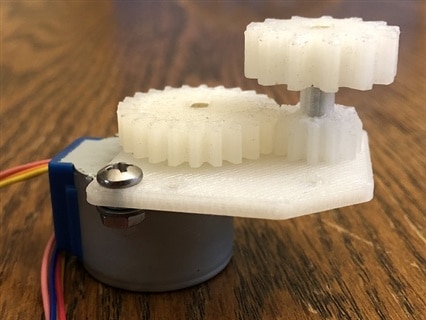


The gearing provides for a 1:2 drive, doubling the speed of the stepper motor. The upper gear engages the wheel drive gear on the outside of the body. Again my minimal skills in mechanical designs left me with some simple/crude gears. I basically copied the tooth profiles of the drive gears and replicated the teeth to produce the gears. So far, I have a wheel speed of ~ 15 RPM (unloaded). Here is a short video of the motor drive in action (the motor is being held by hand so the motion is a bit jerky as I slightly alter the alignment of the gears).
In working on reusing the winding key, I created a dual lob cam cap to attach to the existing key. This cam will activate a microswitch to turn on/off Mr. Machine. I am presently working on a semi ratcheting mechanism to help simulate the old winding sound and to provide some tension to hold the key position.


I have a lot more work to do, so that means a few more blogs to go as I bring Mr. Machine into the 2020's
Thanks for reading along.
Top Comments