


Hello everyone, I saw the Project14 theme of this month and i was really intrigued with sharing my work with the community. lately i have been working on robotic systems including robotic arms and unmanned vehicles and i would love to share the project with everyone.
INTRODUCTION:-
the post consists of the overview of what i did for getting an indoor mapping robot, note that the payload capacity of the unmanned vehicle is somewhere around 40KGs. It has a stainless steel body with a two wheel rear differential drive everything running on top of an Atmega328 controller with the arduino bootloader( i will share the program as well). The whole system then communicates with ROS running currently on a laptop system which would be further ported to a raspberry pi 3.
THE INITIAL PHASE:-
Once the mechanical structure was built and all the wheels were fixed i started by controlling it remotely using a Turnigy 9x remote controller and a 9 channel receiver for getting an idea of the movement of my robot.
I have attached the video for the same with a small load test that i performed with 14kg each boxes, i stacked three of these for testing purpose and the mechanical body really performed very well. I have also attached all the code for the same at the end of this blog with all other attachments( i am still working on the git client).

#include #include int pin1 = 7; int pin2 = 8; unsigned long number1; unsigned long number2; unsigned long number3; int distance1; int distance2; int distance3; void setup() { pinMode(pin1, INPUT); pinMode(pin2, INPUT); pinMode(5, OUTPUT); pinMode(6, OUTPUT); pinMode(10, OUTPUT); pinMode(11, OUTPUT); Serial.begin(9600); } void loop() { number1 = pulseIn(pin1, HIGH); number2 = pulseIn(pin2, HIGH); distance1 = (number1/2) / 29.1; distance2 = ((number2)/2) / 29.1; distance1=map(distance1,18,32,0,255); Serial.print(distance1); Serial.print("\t"); distance2=map(distance2,18,32,0,255); Serial.print(distance2); Serial.print("\t"); if (distance1 < 50) { left(); Serial.println("left"); } else if(distance1>200) { right(); Serial.println("right"); } else if(distance2 < 50) { backward(); Serial.println("back"); } else if(distance2 > 200) { forward(); Serial.println("forward"); } else{ brake(); } //else{forward();} } void forward() { digitalWrite(10,HIGH); digitalWrite(11,HIGH); for(int i=0;i<255;i++) { analogWrite(5,i); analogWrite(6,i); } } void backward() { digitalWrite(10,LOW); digitalWrite(11,LOW); for(int i=0;i<255;i++) { analogWrite(5,i); analogWrite(6,i); } } void brake() { analogWrite(5,0); analogWrite(6,0); } void left() { digitalWrite(10,HIGH); digitalWrite(11,LOW); for(int i=0;i<255;i++) { analogWrite(5,i); analogWrite(6,i); } } void right() { digitalWrite(10,LOW); digitalWrite(11,HIGH); for(int i=0;i<255;i++) { analogWrite(5,i); analogWrite(6,i); } }
Once the robot was working with all the wheels aligned and the arduino core set, the next step was to set up a line following mode.
THE LINE FOLLOWER:-
I attached two 5mm IR transmitter receiver pairs for the line following algorithm to work, both of these were passed by an LM358 for getting a pulse for feeding it to the arduino digital to do the magic, for the security purpose i also added an ultrasonic sensor at the front and two more at 45 degree for getting the left and right obstacles in order to obtain a collision free motion for the best of both the machine and man . Below is the code for the same:-
#include
#include

boolean left_sensor=false;
boolean right_sensor=false;

long duration, distance, RightSensorUS,FrontSensorUS,LeftSensorUS;
#define front_us_trig 12
#define front_us_echo 13
#define left_us_trig 2
#define left_us_echo 9
#define right_us_trig 7
#define right_us_echo 8

#define left_IR 3
#define right_IR 4

#define M1_PWR 5
#define M2_PWR 6
#define M1_DIR 11
#define M2_DIR 10

#define MAX_DISTANCE_FRONT 20
#define MAX_DISTANCE_RIGHT 40
#define MAX_DISTANCE_LEFT 40

void setup()
{
pinMode(front_us_trig,OUTPUT);
pinMode(front_us_echo,INPUT);
pinMode(left_us_trig,OUTPUT);
pinMode(left_us_echo,INPUT);
pinMode(right_us_trig,OUTPUT);
pinMode(right_us_echo,INPUT);
pinMode(M1_PWR, OUTPUT);
pinMode(M2_PWR, OUTPUT);
pinMode(M1_DIR, OUTPUT);
pinMode(M2_DIR, OUTPUT);
pinMode(left_IR, INPUT);
pinMode(right_IR, INPUT);
Serial.begin(9600);
}

void SonarSensor(int trigPin,int echoPin)
{
digitalWrite(trigPin, LOW);
delayMicroseconds(2);
digitalWrite(trigPin, HIGH);
delayMicroseconds(10);
digitalWrite(trigPin, LOW);
duration = pulseIn(echoPin, HIGH);
distance = (duration/2) / 29.1;
}

void loop()
{
left_sensor=digitalRead(left_IR);
right_sensor=digitalRead(right_IR);

SonarSensor(right_us_trig, right_us_echo);
RightSensorUS = distance;

SonarSensor(left_us_trig, left_us_echo);
LeftSensorUS = distance;

SonarSensor(front_us_trig, front_us_echo);
FrontSensorUS = distance;

if(FrontSensorUS>MAX_DISTANCE_FRONT)
{

if (((!left_sensor)&&(right_sensor))||((LeftSensorUS>MAX_DISTANCE_LEFT)&&(RightSensorUS<max_distance_right)))
{
left();
delay(200);
Serial.println("left");
}
else if(((left_sensor)&&(!right_sensor))||((LeftSensorUS<max_distance_left)&&(rightsensorus>MAX_DISTANCE_RIGHT)))
{
right();
delay(200);
Serial.println("right");
}

else if((!left_sensor)&&(!right_sensor))
{
  brake();
delay(200);
Serial.println("brake");
}
else if((left_sensor)&&(right_sensor))
{
  forward();
delay(200);
Serial.println("fwd");
}


else{
  brake();
  delay(200);
Serial.println("ir brake");
}

}//front_us if
else{
brake();
delay(200);
Serial.println("us brake");
}

}//loop


void forward()
{
digitalWrite(10,HIGH);
digitalWrite(11,HIGH);
for(int i=0;i<150;i++)
{
analogWrite(5,i);
analogWrite(6,i);
}
}

void backward()
{
digitalWrite(10,LOW);
digitalWrite(11,LOW);
for(int i=0;i<150;i++)
{
analogWrite(5,i);
analogWrite(6,i);
}
}

void brake()
{
analogWrite(5,0);
analogWrite(6,0);

}

void left()
{
digitalWrite(10,HIGH);
digitalWrite(11,LOW);
for(int i=0;i<150;i++)
{
analogWrite(5,i);
analogWrite(6,i);
}
}

void right()
{
digitalWrite(10,LOW);
digitalWrite(11,HIGH);
for(int i=0;i<150;i++)
{
analogWrite(5,i);
analogWrite(6,i);
}
}
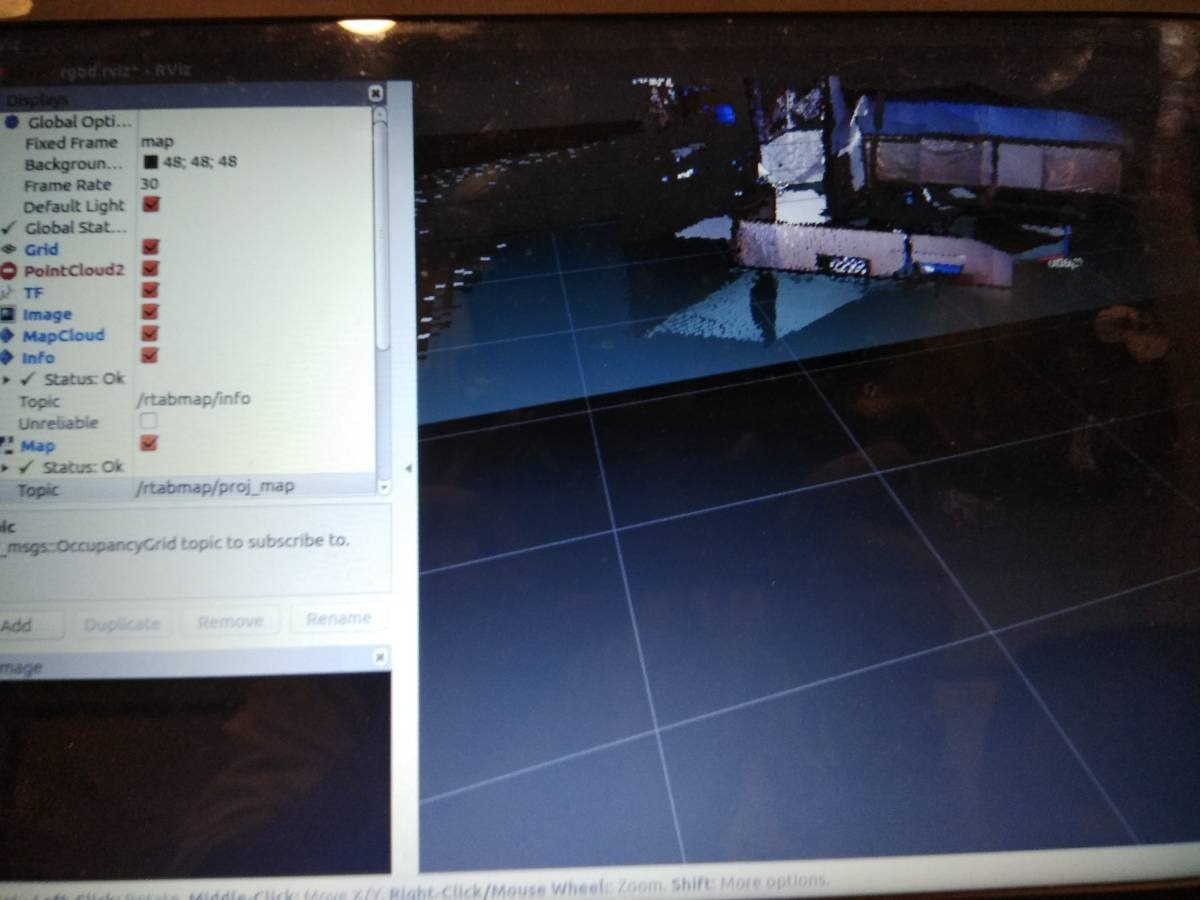
these were just to get started with the environment, however in the mean time i was working on robot operating system(ROS) for the mapping and localization problem statement, i used a kinect360 for a 3D mapping and a pseudo 2D map that was created while navigating the robot throughout the lab area. The project is yet in the research phase only but i was able to pull out some really interesting maps and localize it and navigate using the RVIZ navigation stack.
ROS and Mapping( SLAM):-
So while working on the simultaneous localization and mapping problem statement, i started exploring the ROS environment and the easy installation and huge community support played a really big role in getting everything working, i started with designing the robot using the URDF( unified robot description format) for using the robot for the simmulation purpose, the RVIZ and GAZEBO plugins were really easy to use, with a bit of programming and making a few custom launch files i was able to get the simmulation started and then use the data for moving the real robot based on the atmega328p with an arduino bootloader. The serial library however had some glitches and serious issues with its reliability.
some of the images of map obtained using the kinect360 sensor are as follows:

I will be adding more informations about the exact procedure to access all the files for getting started to make your own robot moving and mapping all around, currently i am eagerly waiting for my encoder motors which can be used for getting the encoder ticks for perfect localization, i would hopefully make a robot that can work on the same grounds as the ROOMBA cleaner(high hopes ). Apart from the GUI i am more concerned with getting the bot to work and somehow perform suitably sufficient for the SLAM problem.
I am actually also trying to replace the laptop with a raspberry pi 3B in order to save the space since the heavy batteries and the kinect module already made it bulkier. I am also looking to salvage the sensors of kinect360 to maybe replicate a custom board that can interact with the raspberry pi.
Attached are the files required for getting everything working with a small robot, an arduino UNO, a laptop system( or raspberry pi) and a kinect360.
This project is still under a lot of research phase and i am really open to all the suggestions and honest opinions both positive and negative which can be added or eleminated.
I am not able to attach any files i.e. the urdf and the launch files but i will add the github client link once i am done with making the repository for the same.
thank you.
Top Comments
-

three-phase
-
Cancel
-
Vote Up
+2
Vote Down
-
-
Sign in to reply
-
More
-
Cancel
-

shwetankv007
in reply to three-phase
-
Cancel
-
Vote Up
+1
Vote Down
-
-
Sign in to reply
-
More
-
Cancel
-

three-phase
in reply to shwetankv007
-
Cancel
-
Vote Up
+1
Vote Down
-
-
Sign in to reply
-
More
-
Cancel
Comment-

three-phase
in reply to shwetankv007
-
Cancel
-
Vote Up
+1
Vote Down
-
-
Sign in to reply
-
More
-
Cancel
Children