


This project idea was inspired by a need to measure the speed of random - no nameplate DC motors salvaged from printers, cars, toys, and experimenter’s kits.
- In the spirit of Rube Goldberg, I’d use as much workshop junk as possible to build this test instrument.
- Clunkiness and awkwardness is encouraged in this build. The older the part the better, old technology is quaint.
- Raspberry Pi Pico was selected as a controller based on its low cost, nice clock speeds and the easy way python programs with PWM.
- More Rube-ness – My workdesk (ping pong table) has a Raspberry Pi dedicated to programming Raspberry Pi Picos in Thonny. A windows PC is used to VCN into the Raspberry Pi for control and WinSCP for the W10 PC to fetch the python code from the Raspberry Pi to the W10 PC.
A video of the strobe tach working:
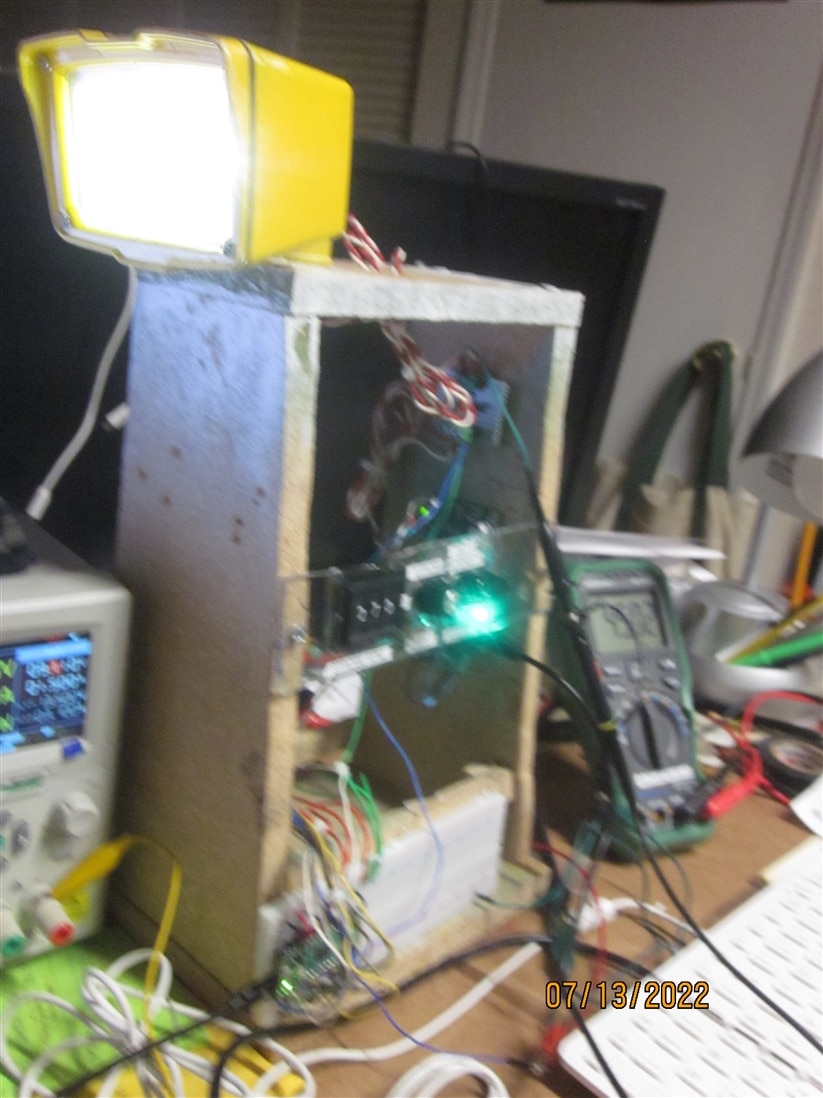
photo of 1st version of prototype


Key Points of Learning by Doing:
1. I can’t believe it worked as well as it did. This project was really fun, very hard to put down.
2. In the Python libraries I found, PWM frequency is commanded using an integer --- which means pulse reference is in one Hz increments i.e. 1 Pulse per second. If measuring in rpm, the best rpm setpoint resolution achievable using pwm libraries is 60 rpm L
3.The micropython PWM frequency integer setpoint has a low limit of 8 Hz. Values below 8 causes the python program to error.
4. In the spirit of Rube, the motor speed was synchronized best as possible using the strobe thumbwheel rpm speed setpoint, then the DC motor voltage was adjusted up or down to get strobe synchronization.
5. My design included a Duty cycle/intensity adjustment pot. I’d thought 50% duty might be too long to get a good synchronization with a rotating marker, and maybe too bright. I was unexpectedly learned that not only 50% duty was way too much, best results were seen at duty cycles of .01% - . 1%.
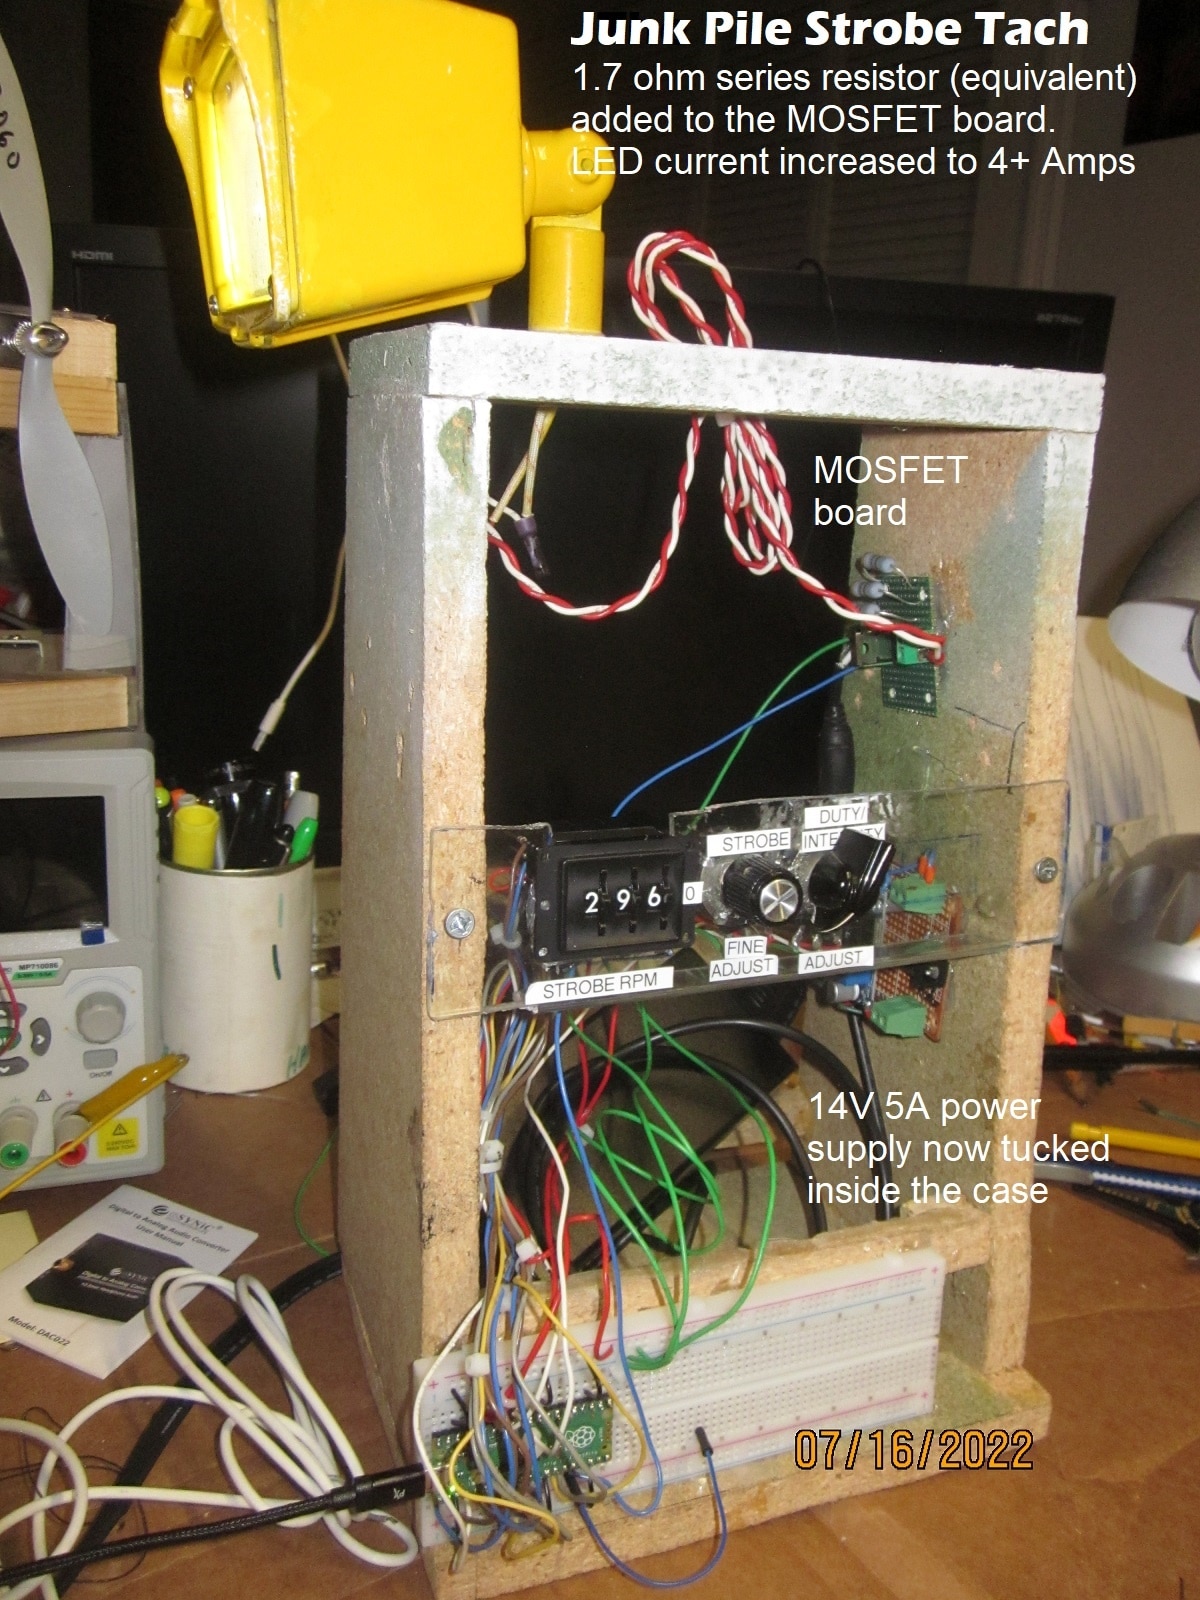
6. With a PWM duty cycle set so narrow, the pulse intensity needed to be increased. Just like with small LED being strobed at peak current 3X nominal, significant improvement was seen after driving the LED floodlight at nearly 2X rated current, 3.5X the current I was driving them for steady state lighting. The original power supply feeding the project was 2 amps. To get higher current, the LED power was changed to feed from a 14Vdc 4.5A laptop supply, with a 2 ohm 70W resistor in series. After proving out the 2 ohm resistor solution was a good direction and analyzing the duty cycle range, the series resistor only needed to be a couple watts ( in spite of the fact the RMS watts are very low, the resistor needs to be mechanically able to take a 4A slug of current).
I just happened to find 3.8 ohm 2W resistors in my eclectic resistor junk drawer. Qty 3 in parallel decreases the resistor ohms value allowing more Floodlight LED current and the watts loss & peak current can be shared by the 3 resistors effectively. The 2W resistors are easily added to the MOSFET card. In further running, the resistors are cool to touch.


Now to the other surprising awesomeness details:
- The LED floodlights were salvaged from my driveway floodlights that had failed the integral motion sensor.
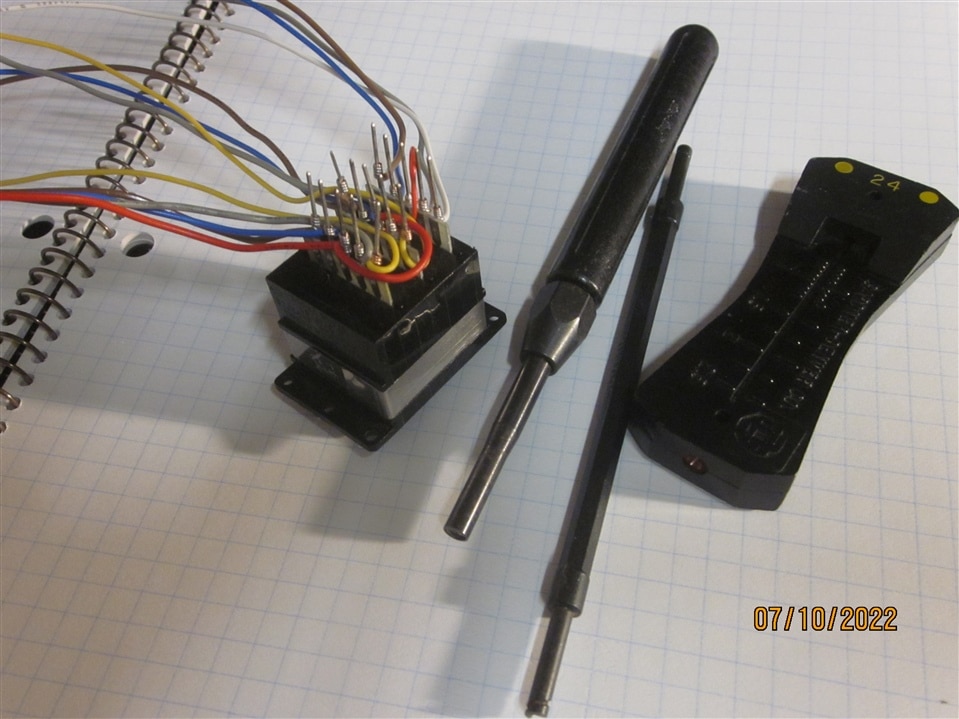
- The BCD thumbwheel switches were rescued from a dumpster. Wirewrap was used to attach the leads to the thumbwheels. I hadn’t used my wirewrap tools in about 35 years, but in all modesty, I still got the touch ( yes, just like the Peter Gabriel song. When Petey sings about wanting contact, he is referring to a low ohmic, tight and layered wire wrap).

- Analog pots were used for trim on frequency and duty cycle, not realizing how important the Duty cycle adjust would be and how insignificant the frequency adjust pot would be.
- The motor rpm was checked using an industrial calibrated strobe tach. Amazingly the rpm values are within the 60 rpm accuracy window of the rpms seen with the Junk Pile Strobe Tach.
The conceptual one line

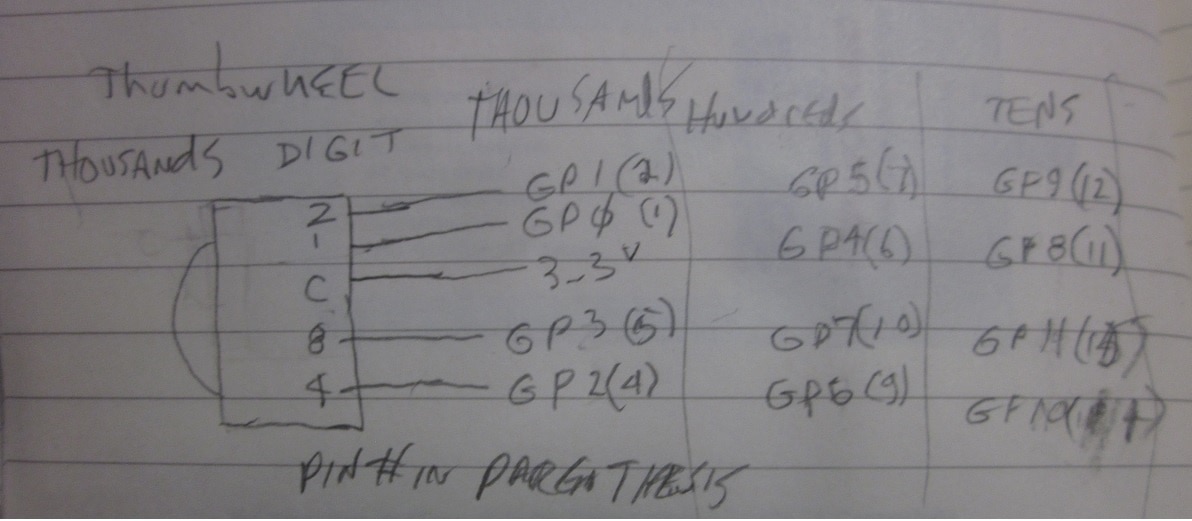
Thumbwheel wiring to Raspberry Pi Pico
The rest of the schematic wiring

Now for the RPi Pico code
from machine import Pin, PWM, ADC
# Pin uses the GPIO value , not the actual pin number
import utime

AliveLED = Pin(25,machine.Pin.OUT)
AliveLED.value(0)

Rpm_Adjust_Pot=ADC(Pin(28)) #GP28 is physical pin 34
DutyAdjustPot=ADC(Pin(27)) #GP27 is physical pin 32

# servo = PWM(Pin(10))# physical pin14
strobe = PWM(Pin(12))# physical pin 16
rpm=0
rps=0
rps_int=0
Finalrpm=0
#servo.freq(rps) # 50 Hz is 20 msec period
# 100% duty of PWM is 65535 counts
# 2 ms of 20 ms is 10% for full spd FWD 6553
# ( 1.5 ms / 20 ms ) * 65535 = 4875 for zero degrees
# 1 ms of 20 ms is full neg 3251 counts

#AliveLED.value(1)
count=0

Thousands_1 = Pin(0, machine.Pin.IN,machine.Pin.PULL_DOWN)#GP0 is physical pin 1
Thousands_2 = Pin(1, machine.Pin.IN,machine.Pin.PULL_DOWN)#GP1 is physical pin 2
Thousands_4 = Pin(2, machine.Pin.IN,machine.Pin.PULL_DOWN)#GP2 is physical pin 4
Thousands_8 = Pin(3, machine.Pin.IN,machine.Pin.PULL_DOWN)#GP3 is physical pin 5

Hundreds_1 = Pin(4, machine.Pin.IN,machine.Pin.PULL_DOWN)#GP4 is physical pin 6
Hundreds_2 = Pin(5, machine.Pin.IN,machine.Pin.PULL_DOWN)#GP5 is physical pin 7
Hundreds_4 = Pin(6, machine.Pin.IN,machine.Pin.PULL_DOWN)#GP6 is physical pin 9
Hundreds_8 = Pin(7, machine.Pin.IN,machine.Pin.PULL_DOWN)#GP7 is physical pin 10

Tens_1 = Pin(8, machine.Pin.IN,machine.Pin.PULL_DOWN)#GP8 is physical pin 11
Tens_2 = Pin(9, machine.Pin.IN,machine.Pin.PULL_DOWN)#GP9 is physical pin 12
Tens_4 = Pin(10, machine.Pin.IN,machine.Pin.PULL_DOWN)#GP10 is physical pin 14
Tens_8 = Pin(11, machine.Pin.IN,machine.Pin.PULL_DOWN)#GP11 is physical pin 15


def Read_Thumbwheels():
rpm=0
if Thousands_1.value() ==1:
rpm=1000

if Thousands_2.value() ==1:
rpm=rpm+2000

if Thousands_4.value() ==1:
rpm=rpm+4000

if Thousands_8.value() ==1:
rpm=rpm+8000

if Hundreds_1.value() ==1:
rpm=rpm+100

if Hundreds_2.value() ==1:
rpm=rpm+200

if Hundreds_4.value() ==1:
rpm=rpm+400

if Hundreds_8.value() ==1:
rpm=rpm+800

if Tens_1.value() ==1:
rpm=rpm+10

if Tens_2.value() ==1:
rpm=rpm+20

if Tens_4.value() ==1:
rpm=rpm+40

if Tens_8.value() ==1:
rpm=rpm+80
print (rpm)
Rpm_Adjust_Pot_Counts=0.0010*(Rpm_Adjust_Pot.read_u16())# converts U16 to float
if (rpm>1000):
Rpm_Adjust_Pot_Counts=0.005*(Rpm_Adjust_Pot.read_u16())# converts U16 to float
if (rpm>5000):
Rpm_Adjust_Pot_Counts=0.010*(Rpm_Adjust_Pot.read_u16())# converts U16 to float
print (Rpm_Adjust_Pot_Counts)
Finalrpm=(rpm+Rpm_Adjust_Pot_Counts)
# print (Finalrpm)
# rps=rpm/(60) #revs per sec defines PWM frequency
# rps_int=int(rps)
# strobe.freq(rps_int) # 50 Hz is 20 msec period revs per second is the same as freq
# strobe.duty_u16(32000)
# print(rps)
return Finalrpm

while True:
# ServoDutyCounts=3250
AliveLED.toggle()
# Read_Thumbwheels()
rpm=0
if Thousands_1.value() ==1:
rpm=1000

if Thousands_2.value() ==1:
rpm=rpm+2000

if Thousands_4.value() ==1:
rpm=rpm+4000

if Thousands_8.value() ==1:
rpm=rpm+8000

if Hundreds_1.value() ==1:
rpm=rpm+100

if Hundreds_2.value() ==1:
rpm=rpm+200

if Hundreds_4.value() ==1:
rpm=rpm+400

if Hundreds_8.value() ==1:
rpm=rpm+800

if Tens_1.value() ==1:
rpm=rpm+10

if Tens_2.value() ==1:
rpm=rpm+20

if Tens_4.value() ==1:
rpm=rpm+40

if Tens_8.value() ==1:
rpm=rpm+80
# print (rpm)
Rpm_Adjust_Pot_Counts=0.0010*(Rpm_Adjust_Pot.read_u16())# converts U16 to float
if (rpm>1000):
Rpm_Adjust_Pot_Counts=0.005*(Rpm_Adjust_Pot.read_u16())# converts U16 to float
if (rpm>5000):
Rpm_Adjust_Pot_Counts=0.010*(Rpm_Adjust_Pot.read_u16())# converts U16 to float
# print (Rpm_Adjust_Pot_Counts)
Finalrpm=(rpm+Rpm_Adjust_Pot_Counts)
# print (Finalrpm)
rps=rpm/(60) #revs per sec defines PWM frequency
if (rps<8):
print ("RPM Clamped to Low Limit Value")
rps =8 # low limit clamp
rps_int=int(rps)
print ("PPS=", rps_int)
strobeDuty=(DutyAdjustPot.read_u16())# converts U16 to float
if (strobeDuty<600):
strobeDuty=600 ## low clmap of 10%
if (strobeDuty>32768):
strobeDuty=32768 ## max clmap of 50%
#print ("Strobe Duty = ", strobeDuty)
strobe.freq(rps_int) # 50 Hz is 20 msec period revs per second is the same as freq FREQ WILL NOT ALLOW BELOW 8 Hz
strobe.duty_u16(strobeDuty)
# print(rps)
# return Finalrpm
# utime.sleep(1) # slow down for print statements
if Finalrpm==0:
break


