


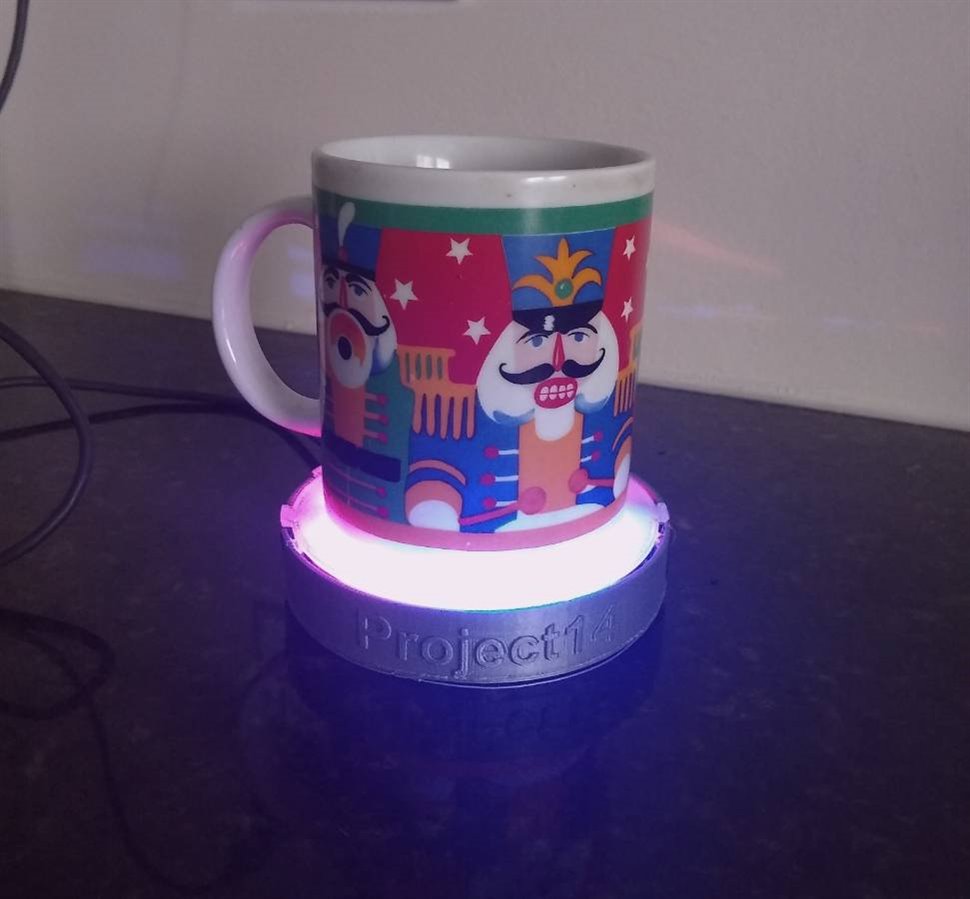
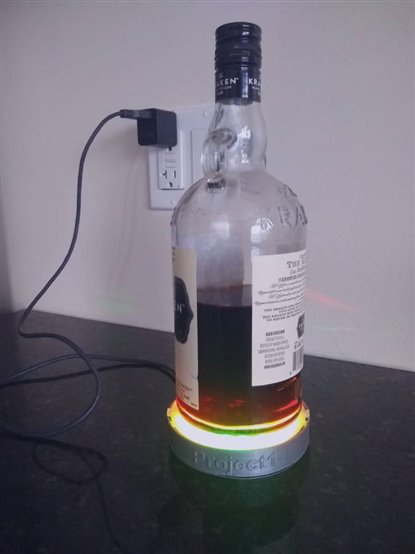
Continuing on the theme of my previous blog post Light up Coaster using sound sensor , this version of the Light up coaster includes a touch sensor based on the MPR121 capacitive touch, and 3D printed conductive pads all around the coaster which can be touched to change the colour of the LED strip inside the coaster as you see in the pictures and video below. Compared to the previous version of coaster this is an advance version. And, in addition to an Arduino Nano/Micro and MPR121 touch sensor breakout you will need conductive PLA for 3D printing. And, also a 3D Pen to melt conductive PLA so that you can connect the pad to the MPR121 breakout.
Here are the steps to follow, to complete the build
Download and 3D print the STL files attached
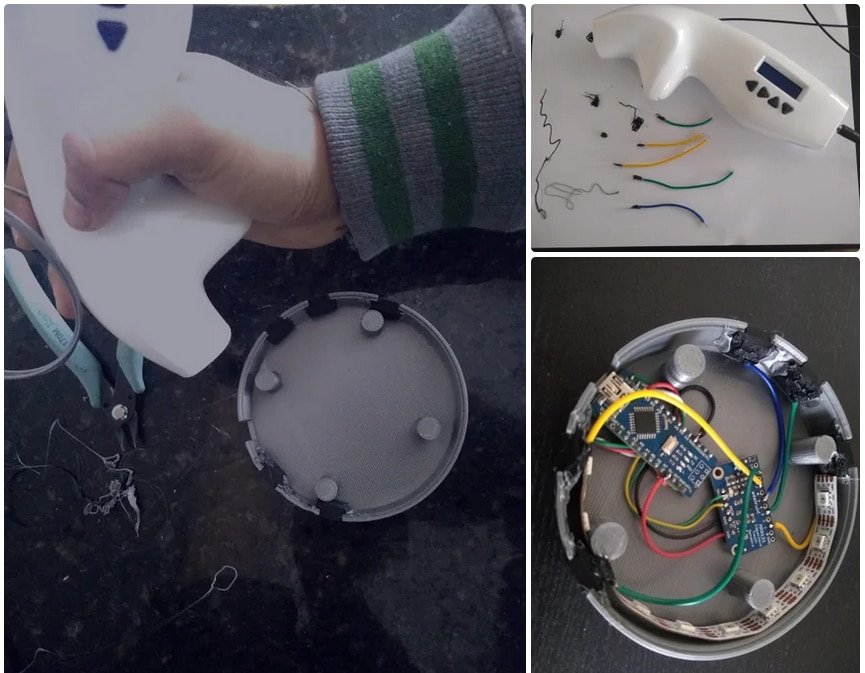
There are 4 STL files attached in the zip file below, You can print this coasterP14Bottom.stl, coasterBottom.stl file using a coloured filament, in my case I used Grey PLA, and the coasterTop.stl using a transparent filament to help with the diffusion of the APA102 LED strip. In addition you will also have to print the conductivePad.stl using Conductive PLA, you will need 5 of these, in my case I am using Protopasta's conductive 1.75 mm PLA


Soldering the circuit together
Now for the circuit we will need an Arduino Nano, LED strip APA102 and a Adafruit 12-Key Capacitive Touch Sensor Breakout based on MPR121. Here are the connections to the Arduino Nano
- apa102 led strip Data connected to Arduino Nano pin# 11
- apa102 clock connected to Arduino pin# 12
- and the SCLK(clock) of the MPR121 breakout to pin# A5 on the Arduino
- and the SDA(data) of the MPR121 breakout to pin# A4 on the Arduino

Here is some more info on the Adafruit 12-Key Capacitive Touch Sensor Breakout based on MPR121. The MPR121 has support for only I2C, which can be implemented with nearly any micro-controller. You can select one of 4 addresses with the ADDR pin, for a total of 48 capacitive touch pads on one I2C 2-wire bus, but this breakout has 12 pins at the bottom which can be wired to anything conductive like Aluminium foil, wire pads etc..
Once done soldering the circuit together as shown in the picture above, you are now ready for fire-up the 3D pen and load it with the same coloured PLA that you used to print the bottom part of the coaster, which in my case is grey. And, melt the filament around the conductive pads so that they are secured to the base 3D printed part. Now, load the 3D pen with conductive PLA, to prep the wires that will connect to MPR121 breakout .Here's a Tip - before you solder the wires to the MPR121 breakout, strip one end of the wire and don't twist it, instead lay it flat an use you 3D pen and a piece of paper to add conductive filament around the wire to form a blob..
And, finally you are ready to solder the other end of the wire to the MPR121 breakout, and then use the 3D pen to attach the wire to the conductive pads. In my case, I have connected the pad to pin#1, 3, 5, 7, and 9 on the breakout.
Upload the Arduino code
Now download latest Arduino IDE, and upload the sketch below to the Arduino IDE. Before uploading the sketch you will also need the -
APA102 Arduino library from https://github.com/pololu/apa102-arduino
And the library for the Adafruit 12-Key Capacitive Touch Sensor Breakout based on MPR121 from - https://github.com/adafruit/Adafruit_MPR121
//Created for Project14 Coaster using APA102 and Touch Sensor MPR121
//To download the MPR121 libary go through https://learn.adafruit.com/adafruit-mpr121-12-key-capacitive-touch-sensor-breakout-tutorial?view=all
//Download the APA102 libary from - https://github.com/pololu/apa102-arduino
#include <APA102.h>
#include <Wire.h>
#include "Adafruit_MPR121.h"


#ifndef _BV
#define _BV(bit) (1 << (bit))
#endif
const uint8_t dataPin = 11;
const uint8_t clockPin = 12;
APA102<dataPin, clockPin> ledStrip;

// Set the number of LEDs to control, this will depend on how many you want to add to the coaster
const uint16_t ledCount = 10;
//Create a buffer for holding the colors (3 bytes per color).
rgb_color colors[ledCount];
// Set the brightness to use (the maximum is 31).
const uint8_t brightness = 20;
const uint8_t delayTimes = 20;
uint8_t i=0;
// You can have up to 4 on one i2c bus but one is enough for testing!
Adafruit_MPR121 cap = Adafruit_MPR121();


// Keeps track of the last pins touched
// so we know when buttons are 'released'
uint16_t lasttouched = 0;
uint16_t currtouched = 0;
uint16_t valsTouched =0;


void setup() {
  Serial.begin(9600);


  while (!Serial) { // needed to keep leonardo/micro from starting too fast!
    delay(10);
  }

  Serial.println("Adafruit MPR121 Capacitive Touch sensor test");

  // Default address is 0x5A, if tied to 3.3V its 0x5B
  // If tied to SDA its 0x5C and if SCL then 0x5D
  if (!cap.begin(0x5A)) {
    Serial.println("MPR121 not found, check wiring?");
    while (1);
  }
  Serial.println("MPR121 found!");
}


void loop() {
  // Get the currently touched pads
  currtouched = cap.touched();

  for (i=0; i<12; i++) {
    // it if *is* touched and *wasnt* touched before, alert!
    if ((currtouched & _BV(i)) && !(lasttouched & _BV(i)) ) {
      Serial.print(i); Serial.println(" touched");
      valsTouched = i;
    }
    // if it *was* touched and now *isnt*, alert!
    if (!(currtouched & _BV(i)) && (lasttouched & _BV(i)) ) {
      Serial.print(i); Serial.println(" released");
    }


      if(valsTouched==1) {
     for(uint16_t j = 0; j < ledCount; j++)
      {  //All LEDs Red
        colors[j] = rgb_color(255, 0, 0);
        ledStrip.write(colors, ledCount, brightness);
      }
      }
      else if(valsTouched==3){
                 for(uint16_t j = 0; j < ledCount; j++)
          {  //All LEDs Red
            colors[j] = rgb_color(0, 0, 255);
            ledStrip.write(colors, ledCount, brightness);
          }
      }
      else if(valsTouched==5){
        //First 4 LEDs Red
        colors[0] = rgb_color(255, 0, 0);
        colors[1] = rgb_color(255, 0, 0);
        colors[2] = rgb_color(255, 0, 0);
        colors[3] = rgb_color(255, 0, 0);
        ledStrip.write(colors, ledCount, brightness);
      }
       else if(valsTouched==7)
       {//Next 4 LEDs Green
        colors[4] = rgb_color(0, 255, 0);
        colors[5] = rgb_color(0, 255, 0);
        colors[6] = rgb_color(0, 255, 0);
        colors[7] = rgb_color(0, 255, 0);
        ledStrip.write(colors, ledCount, brightness);
       }
       else if(valsTouched==9)
       { // rainbow
        uint8_t time = millis() >> 4;

        for(uint16_t j = 0; j < ledCount; j++)
        {
          uint8_t p = time - j * 8;
          colors[j] = hsvToRgb((uint32_t)p * 359 / 256, 255, 255);
        }

        ledStrip.write(colors, ledCount, brightness);
       }


      else {
        for(uint16_t j = 0; j < ledCount; j++)
          {
            colors[j] = rgb_color(255, 100, 150);
            ledStrip.write(colors, ledCount, brightness);
          }
      }
  }
  //Serial.print(valsTouched);
  delay(delayTimes);


  // reset our state
  lasttouched = currtouched;


  // comment out this line for detailed data from the sensor!
  return;

  // debugging info, what
  Serial.print("\t\t\t\t\t\t\t\t\t\t\t\t\t 0x"); Serial.println(cap.touched(), HEX);
  Serial.print("Filt: ");
  for (uint8_t l=0; l<12; l++) {
    Serial.print(cap.filteredData(i)); Serial.print("\t");
  }
  Serial.println();
  Serial.print("Base: ");
  for (uint8_t l=0; l<12; l++) {
    Serial.print(cap.baselineData(i)); Serial.print("\t");
  }
  Serial.println();

  // put a delay so it isn't overwhelming
  delay(100);
}


/* Converts a color from HSV to RGB.
 * h is hue, as a number between 0 and 360.
 * s is the saturation, as a number between 0 and 255.
 * v is the value, as a number between 0 and 255. */
rgb_color hsvToRgb(uint16_t h, uint8_t s, uint8_t v)
{
    uint8_t f = (h % 60) * 255 / 60;
    uint8_t p = (255 - s) * (uint16_t)v / 255;
    uint8_t q = (255 - f * (uint16_t)s / 255) * (uint16_t)v / 255;
    uint8_t t = (255 - (255 - f) * (uint16_t)s / 255) * (uint16_t)v / 255;
    uint8_t r = 0, g = 0, b = 0;
    switch((h / 60) % 6){
        case 0: r = v; g = t; b = p; break;
        case 1: r = q; g = v; b = p; break;
        case 2: r = p; g = v; b = t; break;
        case 3: r = p; g = q; b = v; break;
        case 4: r = t; g = p; b = v; break;
        case 5: r = v; g = p; b = q; break;
    }
    return rgb_color(r, g, b);
}
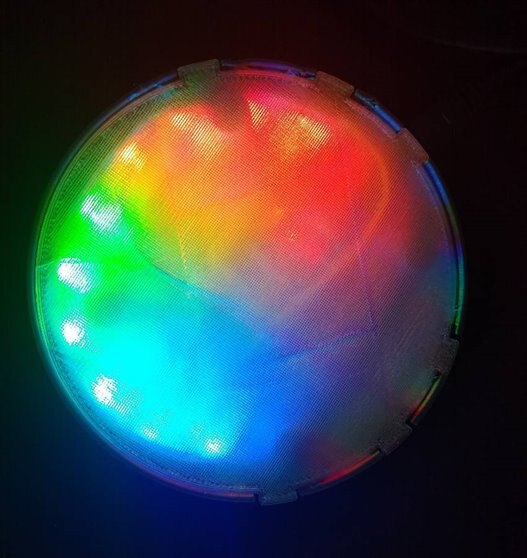
Here is a quick test of the circuit, which various colour changing options, when the pad at the sides are touched.

Once done the top should snap fit to the bottom 3D printed part, but if you need to secure it a suggestion would be to use some hot glue..
Video Demo
References
https://www.proto-pasta.com/pages/conductive-pla
https://github.com/pololu/apa102-arduino
https://github.com/adafruit/Adafruit_MPR121
https://cdn-shop.adafruit.com/datasheets/MPR121.pdf
https://learn.adafruit.com/adafruit-mpr121-12-key-capacitive-touch-sensor-breakout-tutorial?view=all