element14 Community
element14 Community
    Register Log In
  • Site
  • Search
  • Log In Register
  • About Us
  • Community Hub
    Community Hub
    • What's New on element14
    • Feedback and Support
    • Benefits of Membership
    • Personal Blogs
    • Members Area
    • Achievement Levels
  • Learn
    Learn
    • Ask an Expert
    • eBooks
    • element14 presents
    • Learning Center
    • Tech Spotlight
    • STEM Academy
    • Webinars, Training and Events
    • Learning Groups
  • Technologies
    Technologies
    • 3D Printing
    • FPGA
    • Industrial Automation
    • Internet of Things
    • Power & Energy
    • Sensors
    • Technology Groups
  • Challenges & Projects
    Challenges & Projects
    • Design Challenges
    • element14 presents Projects
    • Project14
    • Arduino Projects
    • Raspberry Pi Projects
    • Project Groups
  • Products
    Products
    • Arduino
    • Avnet Boards Community
    • Dev Tools
    • Manufacturers
    • Multicomp Pro
    • Product Groups
    • Raspberry Pi
    • RoadTests & Reviews
  • Store
    Store
    • Visit Your Store
    • Choose another store...
      • Europe
      •  Austria (German)
      •  Belgium (Dutch, French)
      •  Bulgaria (Bulgarian)
      •  Czech Republic (Czech)
      •  Denmark (Danish)
      •  Estonia (Estonian)
      •  Finland (Finnish)
      •  France (French)
      •  Germany (German)
      •  Hungary (Hungarian)
      •  Ireland
      •  Israel
      •  Italy (Italian)
      •  Latvia (Latvian)
      •  
      •  Lithuania (Lithuanian)
      •  Netherlands (Dutch)
      •  Norway (Norwegian)
      •  Poland (Polish)
      •  Portugal (Portuguese)
      •  Romania (Romanian)
      •  Russia (Russian)
      •  Slovakia (Slovak)
      •  Slovenia (Slovenian)
      •  Spain (Spanish)
      •  Sweden (Swedish)
      •  Switzerland(German, French)
      •  Turkey (Turkish)
      •  United Kingdom
      • Asia Pacific
      •  Australia
      •  China
      •  Hong Kong
      •  India
      •  Korea (Korean)
      •  Malaysia
      •  New Zealand
      •  Philippines
      •  Singapore
      •  Taiwan
      •  Thailand (Thai)
      • Americas
      •  Brazil (Portuguese)
      •  Canada
      •  Mexico (Spanish)
      •  United States
      Can't find the country/region you're looking for? Visit our export site or find a local distributor.
  • Translate
  • Profile
  • Settings
Simple Electronic Repairs
  • Challenges & Projects
  • Project14
  • Simple Electronic Repairs
  • More
  • Cancel
Simple Electronic Repairs
Blog Potentiometer Repair
  • Blog
  • Documents
  • Files
  • Members
  • Mentions
  • Sub-Groups
  • Tags
  • More
  • Cancel
  • New
Join Simple Electronic Repairs to participate - click to join for free!
  • Share
  • More
  • Cancel
Group Actions
  • Group RSS
  • More
  • Cancel
Engagement
  • Author Author: rsc
  • Date Created: 24 Oct 2017 7:39 PM Date Created
  • Views 25411 views
  • Likes 6 likes
  • Comments 5 comments
  • simpleelectronicch
Related
Recommended

Potentiometer Repair

rsc
rsc
24 Oct 2017

I published this on Instructables.com a while ago, but it's a good one.

How to Clean the Controls on Your Amplifier: 10 Steps (with Pictures)


Is that crackling and popping when you turn the controls on your amp driving you crazy? 

Here's how to clean them and get back to the music.

image

There are spray "contact cleaners" available for this purpose, but in most cases just mixes the dirt and grime already inside with more dirt and assembly grease and may make the control operate worse than it is already.

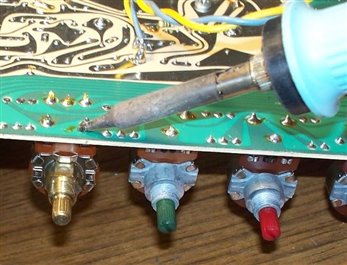
Step 1: Remove Mounting Knobs and Nuts

The first step is to remove the knobs and nuts mounting the controls to the front panel to the amplifier. 

Remember to keep all the parts sorted so you can find them later.

image

Step 2: Unsolder the Controls

image

After the circuit board is removed from the amplifier box, each control is removed and cleaned one part at a time. 

Do not take them all off at the same time, because you may mix them up.

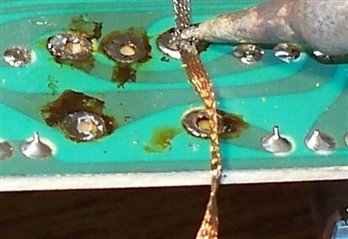
Step 3: Remove Old Solder

Remove old solder and inspect the pads for any burnt or broken traces.

image

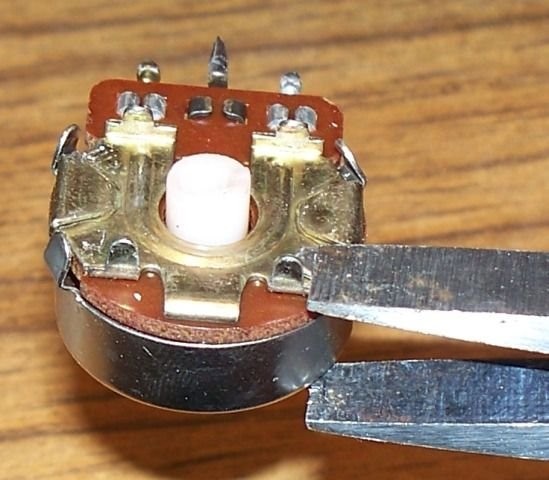
Step 4: Open the Control

Open the control (potentiometer or "pot") by lifting the mounting tabs slightly. 

Remember that these tabs will not handle being bent more than a few times before they break off. 

If a tab breaks off, you may be able to solder it back on later.

image

Step 5: Inspect Dirty Contacts

image

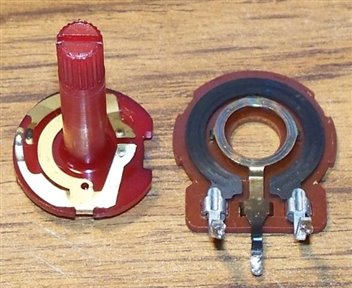
The control is made up of two main parts.  The contacts and the carbon resistor. 

Each side must be cleaned without damaging them further. 

If the carbon looks burnt or has broken areas, the entire control may need to be replaced. 

If the contacts are worn too much or broken, the entire control may need to be replaced.

Step 6: Cleaning

image

Carefully, clean the contacts and carbon with a pencil eraser. 

Do not push too hard, and clean the eraser on a piece of paper when it gets too dirty. 

Do not use any cleaner or solvent except rubbing alcohol or cleaner designated for this type of control. 

Make sure to blow off any eraser particles left on the control before assembling the part.

Step 7: Cleaning Continued

If you are cleaning a dual control, the method will be the same, however it will take twice as long,

and you must align both controls so they go back together correctly.

image

Step 8: After Cleaning - Reassemble the Control

image

Being careful not to forget any parts, recrimp the case making sure not to bend the case or trap any parts between the case and the parts inside. 

Turn the control and check for a nice smooth motion from the 0 to 10 locations.  The control should move approx. 120 degrees without any binding or bumps.


If you think you assembled one incorrectly, set it aside, and open the next one to look at how it should be assembled to fix the last one. 

If you need to, take pictures of each phase to help you reassemble the parts later.


Try not to get any grease or oil on the contacts while assembling the part.  There may be some grease on other areas of the control, but it is not intended to be on the contacts. 

There is a special conductive grease that can be used on the contacts, but is not necessary for proper operation.

Step 9: Resolder and Continue Cleaning the Rest of the Controls

image

Use new solder to assemble the clean control back onto the PCB. 

Clean the solder flux off with some rubbing alcohol or flux remover.


Step 10: Finish and Test

Put the PCB back into the cabinet, and test the amplifier.  Turn each control and make sure it works as it should.

That's all folks, enjoy your "good-as-new" amp.

It took me about 2 hour to clean this Peavy, so at a tech rate of $60 per hour, I saved a bunch of cash doing it myself.


I had many comments from DIY "experts" telling me they just spray this or that or air or WD40 and all is well, but in my experience you

must take them apart to truly get the corrosion and oxidation off the carbon and the contact points.  I'll quote myself:

Once again I say, there's no magic spray that will turn grease, scratches and dirt into pure gold and silver. Spraying a bad solder joint will not make it conductive again, spraying a cracked PCB trace will not fix it.

If you read through the comments, you'll see how frustrated I was with some of the responses.

image

  • Sign in to reply

Top Comments

  • rsc
    rsc over 7 years ago in reply to jw0752 +4
    I'm not sure when we first figured out the pencil eraser method for cleaning electrical contacts, I think it was back in the '70s when we were trying to clean HO guage train tracks, slot car tracks, distributor…
  • jw0752
    jw0752 over 7 years ago +3
    Hi R. Scott, Last night I worked on an Alesis Sumo 300 with crackly controls. These were Bourns PTV142B controls see this data sheet: http://www.bourns.com/data/global/pdfs/PTV142B_obsolete.pdf While I…
  • DAB
    DAB over 7 years ago +3
    Reminds me of the time when we used to burnish relay contacts to make them work better. DAB
Parents
  • mcb1
    mcb1 over 7 years ago

    rsc

    Nice guide, but not sure about pulling the pots apart ...


    Contact cleaner certainly does clean the contacts, but it leaves a very dry surface, and provides no lubrication of the wiper across the surface.

    There are other products designed to clean and lubricate, which in most cases provide the necessary reduction.

    WD40 is certainly not one of these products.


    You are quite right that corrosion from lack of use is not magically wisked away by a spray.


    It's interesting that the pot you're demonstrating is different from the others, and I wonder if it's suffering from the quality issues that have crept up on us due to rising costs.


    Cheers

    Mark

    • Cancel
    • Vote Up 0 Vote Down
    • Sign in to reply
    • More
    • Cancel
Comment
  • mcb1
    mcb1 over 7 years ago

    rsc

    Nice guide, but not sure about pulling the pots apart ...


    Contact cleaner certainly does clean the contacts, but it leaves a very dry surface, and provides no lubrication of the wiper across the surface.

    There are other products designed to clean and lubricate, which in most cases provide the necessary reduction.

    WD40 is certainly not one of these products.


    You are quite right that corrosion from lack of use is not magically wisked away by a spray.


    It's interesting that the pot you're demonstrating is different from the others, and I wonder if it's suffering from the quality issues that have crept up on us due to rising costs.


    Cheers

    Mark

    • Cancel
    • Vote Up 0 Vote Down
    • Sign in to reply
    • More
    • Cancel
Children
No Data
element14 Community

element14 is the first online community specifically for engineers. Connect with your peers and get expert answers to your questions.

  • Members
  • Learn
  • Technologies
  • Challenges & Projects
  • Products
  • Store
  • About Us
  • Feedback & Support
  • FAQs
  • Terms of Use
  • Privacy Policy
  • Legal and Copyright Notices
  • Sitemap
  • Cookies

An Avnet Company © 2025 Premier Farnell Limited. All Rights Reserved.

Premier Farnell Ltd, registered in England and Wales (no 00876412), registered office: Farnell House, Forge Lane, Leeds LS12 2NE.

ICP 备案号 10220084.

Follow element14

  • X
  • Facebook
  • linkedin
  • YouTube