element14 Community
element14 Community
    Register Log In
  • Site
  • Search
  • Log In Register
  • Community Hub
    Community Hub
    • What's New on element14
    • Feedback and Support
    • Benefits of Membership
    • Personal Blogs
    • Members Area
    • Achievement Levels
  • Learn
    Learn
    • Ask an Expert
    • eBooks
    • element14 presents
    • Learning Center
    • Tech Spotlight
    • STEM Academy
    • Webinars, Training and Events
    • Learning Groups
  • Technologies
    Technologies
    • 3D Printing
    • FPGA
    • Industrial Automation
    • Internet of Things
    • Power & Energy
    • Sensors
    • Technology Groups
  • Challenges & Projects
    Challenges & Projects
    • Design Challenges
    • element14 presents Projects
    • Project14
    • Arduino Projects
    • Raspberry Pi Projects
    • Project Groups
  • Products
    Products
    • Arduino
    • Avnet & Tria Boards Community
    • Dev Tools
    • Manufacturers
    • Multicomp Pro
    • Product Groups
    • Raspberry Pi
    • RoadTests & Reviews
  • About Us
  • Store
    Store
    • Visit Your Store
    • Choose another store...
      • Europe
      •  Austria (German)
      •  Belgium (Dutch, French)
      •  Bulgaria (Bulgarian)
      •  Czech Republic (Czech)
      •  Denmark (Danish)
      •  Estonia (Estonian)
      •  Finland (Finnish)
      •  France (French)
      •  Germany (German)
      •  Hungary (Hungarian)
      •  Ireland
      •  Israel
      •  Italy (Italian)
      •  Latvia (Latvian)
      •  
      •  Lithuania (Lithuanian)
      •  Netherlands (Dutch)
      •  Norway (Norwegian)
      •  Poland (Polish)
      •  Portugal (Portuguese)
      •  Romania (Romanian)
      •  Russia (Russian)
      •  Slovakia (Slovak)
      •  Slovenia (Slovenian)
      •  Spain (Spanish)
      •  Sweden (Swedish)
      •  Switzerland(German, French)
      •  Turkey (Turkish)
      •  United Kingdom
      • Asia Pacific
      •  Australia
      •  China
      •  Hong Kong
      •  India
      • Japan
      •  Korea (Korean)
      •  Malaysia
      •  New Zealand
      •  Philippines
      •  Singapore
      •  Taiwan
      •  Thailand (Thai)
      • Vietnam
      • Americas
      •  Brazil (Portuguese)
      •  Canada
      •  Mexico (Spanish)
      •  United States
      Can't find the country/region you're looking for? Visit our export site or find a local distributor.
  • Translate
  • Profile
  • Settings
Simple Electronic Repairs
  • Challenges & Projects
  • Project14
  • Simple Electronic Repairs
  • More
  • Cancel
Simple Electronic Repairs
Documents Project14 | Earn a $100 Shopping Cart for Your Simple Electronic Repairs!
  • Blog
  • Documents
  • Files
  • Members
  • Mentions
  • Sub-Groups
  • Tags
  • More
  • Cancel
  • New
Join Simple Electronic Repairs to participate - click to join for free!
Actions
  • Share
  • More
  • Cancel
Engagement
  • Author Author: tariq.ahmad
  • Date Created: 11 Oct 2017 8:06 PM Date Created
  • Last Updated Last Updated: 13 Nov 2017 7:45 PM
  • Views 3616 views
  • Likes 6 likes
  • Comments 23 comments
Related
Recommended

Project14 | Earn a $100 Shopping Cart for Your Simple Electronic Repairs!

image

Simple Electronic Repairs

Monthly project competitions, chances to earn prizes, you decide project themes, your ideas, your projects, turn ideas into projects.

Back to The Project14 homepage image

Project14 Home
Monthly Themes
Monthly Theme Poll


Three First Place Winners Earn a Shopping Cart of $100 (from element14 sites)!

    • How to Win
    • Your Project Examples
    • Your Project, Your Ideas!

This month's theme is Simple Electronic Repairs and comes from fvan .  The idea is to repair a device that is malfunctioning instead of throwing it away or buying a replacement. Simple electronic repairs is good first step before tackling a full blown electronic projects on your own.  This is a good opportunity to start tinkering with an electronic gadget you love but might be missing because its no longer working.For example, want to make that discontinued ipod classic that stopped working more than just a collectors item?  You could not only repair it but give it a larger storage capacity, maybe even replace the spinning hard drive with solid state drive. Another discontinued you could repair is the Pebble watch.  The front of the glass isn't fused to the display and it includes a replaceable battery.image


You can also give new life to laptops, smartphones, or tablets that are sitting there collecting dust but you've never gotten around to getting rid of.  Many old Dell laptops, for instance,  label their screws and connectors for easy assembly with end user self-repair in mind.  Even when its a little trickier, such as with Apple products, many people have saved themselves a lot of money, not to mention long waits in line, by replacing batteries, screens, or hard drives that Apple would have you believe you couldn't fix yourself.


As fvan points out simple electronic repairs doesn't need to be complicated, such as repairing a faulty switch and will give you insights into some troubleshooting techniques.  He uses a malfunctioning Xbox guitar (pictured right) as an example. One of the buttons would only allow you to go up instead of up or down, seriously limiting your options of what you could rock to. Rather then throwing the guitar away and getting a new one he opened it up to discover a reed switch was used for each position. One of these switches was constantly "ON", even in idle position, due to the magnet and switch being too close to each other. By gently bending the legs of the reed switch a little further away, it created enough distance to move set it as "OFF" in the idle position.  image


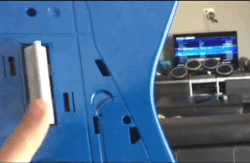
Perhaps you picked up a really cool piece of vintage tech from a garage that needs a little work before its restored to its former glory. A lot of older tech has a larger and more modular design which allows defective modules or subassemblies to be quickly identified and easily replaced. This is in stark comparison to a lot of modern electronics, with a smaller footprint and necessitating more compact, specialized components and package assembly, it can be difficult to fix anything yourself without special desoldering equipment, tweezers, magnifying glass, or dealing with the manufacturer.


Simple electronic repairs is an opportunity learn about how your favorite electronic devices work. In the process you can bring to life amplifiers, video devices, game consoles, musical instruments, music players, speakers, cameras, phones, computers, laptops, tablets, and more.


How to Win

Come Up With a Clever Name
Stick to the Theme
  • A clever name can make your project memorable.
  • The right name can distinguish your project from others and help create buzz around your project.
  • This project is your baby! Part of the fun of bringing something new into the world is coming up with a name.
  • If you have an idea for a project that doesn't fit the current theme then submit your idea in the comments section of the monthly poll.
Be Original
Submit Video Proof
  • Providing the steps you took to complete your project (text, video, or images) and providing video proof should be sufficient in most cases.
  • If your project introduces something new or something that is not commercially available or affordable then that counts!
  • If it doesn't work that's fine, this program is more about the journey than the end product.
  • A short video is all that is required but you can shoot as much video as you like.
  • You are encouraged to be creative and have as much fun as possible!

Your Project Examples

Monthly Theme: Simple Electronic Repairs

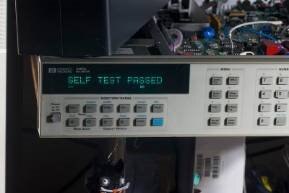
Worklog : Repair of 20-year old precision multimeter, HP 3458A

imageimage
You don't have permission to edit metadata of this video.
Edit media
x
image
Upload Preview
image
You don't have permission to edit metadata of this video.
Edit media
x
image
Upload Preview
image


The Monthly Theme You Voted for: Simple Electronic Repairs

You don't have permission to edit metadata of this video.
Edit media
x
image
Upload Preview
image

You don't have permission to edit metadata of this video.
Edit media
x
image
Upload Preview
image


Roboguy
Ben Heck's Xbox Laptop Repair
You don't have permission to edit metadata of this video.
Edit media
x
image
Upload Preview
image
You don't have permission to edit metadata of this video.
Edit media
x
image
Upload Preview
image


Your Project, Your Ideas!

About Project14
Directions

Every month you'll have a new poll where you'll get to decide an upcoming project competition, based on your interests, that will take place a couple of months in advance. Themes are broad in scope so that everyone can participate regardless of skill set.


What are Monthly Themes?

  • Every month (around the 14th of each month) a new theme will be posted on Project14.
  • Submit your ideas (proposals) for your projects to get feedback from the rest of the community.
  • Submit a project entry in the Theme space once you start working on it.


What are Monthly Theme Polls?

  • Every month (around the 14th of each month) there is a project theme poll.
  • Vote on which project competition you want to see for the following upcoming theme.
    • The themes voted on during the previous poll decided the upcoming theme.
    • If you submit an idea for a theme that is not used then it can still be used in a future poll.
  • Themes comments and ideas from the comments section of the project theme poll.

Step 1: Log in or register on element14, it's easy and free.

Step 2: Post in the comments section below to begin a discussion on your idea. Videos, pictures and text are all welcomed forms of submission.

Step 3: Submit a blog post of your progress on your project by the end of the month.  You are free to submit as many blog entries as you like until the beginning of the next theme.


Be sure to include video proof of your project!


Visit: Simple Electronic Repairs


You have until December 14th, 12:00 AM CDT to submit your completed project!


A jury consisting of your peers will judge project submissions!


Let us know your ideas for a Simple Electronic Repair Project in the comments below!


You have until December 14th, 12:00 AM CDT to submit your completed project!

Attachments:
imageTerms_and_Conditions_Simple_Electronic_Repairs.pdf
  • electronic repairs
  • simpleelectronicch
  • project14
  • diy repair
  • Share
  • History
  • More
  • Cancel
  • Sign in to reply

Top Comments

  • pettitda
    pettitda over 8 years ago in reply to jw0752 +3
    I was able to clean up the board enough to sketch out the following schematic for this section. The board was very badly burned underneath the part, so not much chance of soldering another part on there…
  • pettitda
    pettitda over 8 years ago in reply to jw0752 +1
    I’m guessing that the manufacturer is not interested in sending out their schematic but I haven’t asked. The model I have is discontinued and they have a newer model they’re selling now. The power input…
  • jw0752
    jw0752 over 8 years ago in reply to pettitda +1
    Hi David, Great job of figuring out the schematic. Sad to see that the conflagration did so much damage to the traces and the board. If you can determine the voltages needed for operation of the board…
  • jw0752
    jw0752 over 8 years ago in reply to pettitda

    Hi David,

    Post what you find out as you have me curious now/

    John

    • Cancel
    • Vote Up 0 Vote Down
    • Sign in to reply
    • More
    • Cancel
  • pettitda
    pettitda over 8 years ago in reply to jw0752

    I’m guessing that the manufacturer is not interested in sending out their schematic but I haven’t asked.  The model I have is discontinued and they have a newer model they’re selling now. 


    The power input is ~6 - 8.4V from a dual LiPo battery pack.  It looks like from the silk that the output is 5V.  So, it’s probably a buck converter. 


    The board is a motor controller board for a MeBo robot.  The vertical part on the heat sink is a L298 motor driver. 


    David Pettit

    • Cancel
    • Vote Up +1 Vote Down
    • Sign in to reply
    • More
    • Cancel
  • pettitda
    pettitda over 8 years ago in reply to michaelwylie

    Good point.  I’m thinking about just pulling off the part and running out wires to a power supply.  At least then I can limit the current and see if it still works. 


    David Pettit

    • Cancel
    • Vote Up 0 Vote Down
    • Sign in to reply
    • More
    • Cancel
  • jw0752
    jw0752 over 8 years ago in reply to michaelwylie

    Hi Michael,


    Sometimes I will measure the resistance of the power line leading from the disaster to see if there is any indication of a short or low resistance. If you are going to do this make sure you know the polarity of the ohm meter probes. It is quite common for the black lead to have positive potential and the red to be the negative. This is important or you will get false readings through protection diodes and other semiconductors. Put the negative lead on the ground and probe down the chain. Sometimes it is necessary to cut traces to isolate different segments of the circuit. Hopefully you can eventually locate the culprit. Then the cut traces need to be bridged and the bad components replaced. It is good that you mentioned this to David as you are very right. Replacing the component without checking the rest of the circuit will likely just result in another failure.


    John

    • Cancel
    • Vote Up 0 Vote Down
    • Sign in to reply
    • More
    • Cancel
  • michaelwylie
    michaelwylie over 8 years ago in reply to pettitda

    Even if you do find the part, the more important question is why did it fry to begin with. Any time I've tried a repair like this and I replace the part, once I turn the unit on the same part dies again.

    • Cancel
    • Vote Up 0 Vote Down
    • Sign in to reply
    • More
    • Cancel
  • jw0752
    jw0752 over 8 years ago in reply to jw0752

    Turns out it is probably a FAN5358 but the pin outs do not seem to match yours.


    https://www.fairchildsemi.com/datasheets/FA/FAN5358.pdf

    • Cancel
    • Vote Up 0 Vote Down
    • Sign in to reply
    • More
    • Cancel
  • jw0752
    jw0752 over 8 years ago in reply to pettitda

    Here is another board with a similar chip. I did my best to read the numbers and my best guess is S358A8.


    https://www.ebay.com/itm/5X-DC-DC-Digital-Display-Step-up-Boost-Buck-Board-Converter-Power-Module/192250734540?epid=14005591125&hash=item2cc30967cc:g:EgAAAOSweNxZkJ1q


    John

    • Cancel
    • Vote Up 0 Vote Down
    • Sign in to reply
    • More
    • Cancel
  • jw0752
    jw0752 over 8 years ago in reply to pettitda

    One more thing that you might try is to use some circuit cleaner or flux remover to get a better idea of the pin connections on the chip. At least in the picture the blast pattern makes it difficult to view the connections.

    John

    • Cancel
    • Vote Up 0 Vote Down
    • Sign in to reply
    • More
    • Cancel
  • jw0752
    jw0752 over 8 years ago in reply to pettitda

    Hi David,

    I found this little SMPS Boost board with a type of 2149 chip on it that looks similar to your circuit layout. The power, and inductor seem to be on the correct pins. This one has a larger terminal for the lead going to the coil as a heat sink. This board converts 5 volts to 12 volts at a couple Amps. I am not saying that it is a replacement for yours but I feel that we are on the right track. Here is a picture:


    image

    Is your board from a Mebo Robot?


    John

    • Cancel
    • Vote Up 0 Vote Down
    • Sign in to reply
    • More
    • Cancel
  • jw0752
    jw0752 over 8 years ago in reply to pettitda

    Hi David,

    Thanks for asking. Is there any way to get a schematic from the manufacturer? I see that the power goes directly to the chip, either pin 3 or pin 6 and it looks like the ground is either pin 6 or pin 3. The 4.7 uH inductor also makes me think that it is a small Switching circuit. You might look to see what is available in a six pin circuit with this foot print that is a switch driver. Many times the data sheets will have typical circuits which you could compare to your circuit to see if the resistors and caps are on the correct pins. Make sure that it is designed to work with the power supply voltage that comes in the power jack. I am honored that you asked me but most of the other guys are smarter than me so they will likely give us better information.

    John

    • Cancel
    • Vote Up 0 Vote Down
    • Sign in to reply
    • More
    • Cancel
<>
element14 Community

element14 is the first online community specifically for engineers. Connect with your peers and get expert answers to your questions.

  • Members
  • Learn
  • Technologies
  • Challenges & Projects
  • Products
  • Store
  • About Us
  • Feedback & Support
  • FAQs
  • Terms of Use
  • Privacy Policy
  • Legal and Copyright Notices
  • Sitemap
  • Cookies

An Avnet Company © 2026 Premier Farnell Limited. All Rights Reserved.

Premier Farnell Ltd, registered in England and Wales (no 00876412), registered office: Farnell House, Forge Lane, Leeds LS12 2NE.

ICP 备案号 10220084.

Follow element14

  • X
  • Facebook
  • linkedin
  • YouTube