


 | Enter Your Project for a chance to win $100 Shopping Carts, Gifts to Give, and a 3D Printer Prize! | Project14 Home |
| Monthly Themes | ||
| Monthly Theme Poll |

For the Holiday Special Challenge, I decided to make a Clausometer, as seen in the movie Elf.
As you may recall, Santa's sleigh had trouble flying due to a lack of Christmas spirit. The sleigh was equipped with a Clausometer that indicated the level of Christmas spirit around.

So I decided to make my own version of a Clausometer that really measures Christmas spirit, because really everybody's house needs one of those.
My wife was kind enough to create the artsy graphics for me 

This gauge measures Christmas Spirit based on Twitter feeds containing Christmas related keywords.
Each tweet increases the spirit level, with time slowly eroding the level. I chose to simply increment by 1 with each tweet, and decrement by 1 for each second.
This was fine for my prototype, but it could be fine-tuned if your mode of transportation depends on it.
The Hardware:
1. A large gauge with an indicator needle that moves with a servo.
2. A Raspberry Pi to move the needle
3. 3 wires to hook up the servo to the Pi.
The Software:
1. Python on the Raspberry Pi
2. TwythonStreamer add-on to access Twitter
3. Custom software (shared on Github)
Construction:
I started with some woodworking to create the gauge.


I started by cutting a circular piece of plywood for the dial face. The size was determined by the size of the leftover bits I had in my workshop 
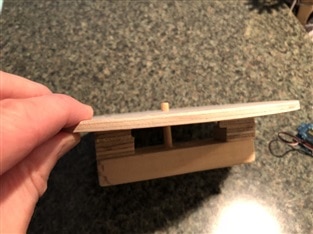
To hold the servo, I added a few pieces of wood to the bottom of it. The longer piece has a slot to hold the servo, and there are some plywood spacers to allow the top of the servo to remain below the plywood circle.
The spindle is a short piece of hardwood dowel. I drilled a hole through the dial face that was about 1/16" larger then the dowel diameter. I also sanded the dowel to allow it to rotate freely. in the bottom longer piece of wood I also drilled a hole to hold the bottom of the dowel in place.
One issue I noticed early on in the build was that a normal speedometer type gauge has about a 300 degree sweep, while my cheap little servo didn't even make it to 180. That meant I needed a little gearing to give it the extra range.
To get that gearing, I glued a small plastic pulley onto the servo (on top of the circle thingy that comes with the servo), and I used a wooden dowel for the main spindle that holds the needle. I had a little rubber band to connect the two.
My plan was to have a bigger than required ratio, so that I could then in software use only a smaller part of the possible range. As luck had it, my very first mostly random choice of range was exactly perfect for this gauge! That's some Christmas magic right there, kids!
The dowel itself was a bit slippery so during my first tests the needle would often lose the position over time, and there seemed to be a particularly smooth spot near the 70% mark where it would then stop moving. The easy fix was to just wrap the spindle with some double-sided sticky tape. Worked like a charm!

To make it look like a real Clausometer, my wife drew out the graphics for me, and for the center she cut a snowflake design which I think she said came out of an old Christmas card. The needle is cut out of a business card. I later used a permanent marker to colour it black. It pushes into the top of the wood dowel spindle with a thumbtack. I predrilled for that because the dowel is such hard wood, but then I had to fill the hole with glue because it was too big.

To wire it up, simply connect the servo data/control line to GPIO18 (pin 12), and connect power and ground. (The image shows a few extra wires that I didn't end up using.)
Building the Software:
For me the software was the quick and easy part.
Using a basic Raspbian Jesse installation, I simply used Python and a few online examples to get me started on the basics. The code is shared on Github, and you will also find links in the comments in those source files.
At the most basic level there are really only two parts to the software:
a) Something to read the Twitter feed
b) Something to set the Servo
I found an example of the Twitter feed on Sparkfun, and an example of the Servo handling on Adafruit. They show how to install the different libraries that get used in their examples. I think the Servo example does more work than is required for this project because they use WiringPi where I chose to just use GPIO directly.
I then changed things in both examples to suit my project.
You can find all the files on Github: https://github.com/ntewinkel/electronics/tree/master/Clausometer
To connect to Twitter, I had to go to developer.twitter.com and sign up to get an API key. The Sparkfun example shows how to do that, but I think Twitter has changed since that tutorial was written. In my case I went to developer.twitter.com and apps.twitter.com to get what I needed.
Unfortunately Twitter says it's a bad idea for me to share my secret keys so to run the example you'll have to sign up for your own set. I've xxxx'd them out in my code.
You can look at my sample Twitter_monitor.py how the Twitter component of the project works. You can un-comment some of the print statements to see the actual tweets people are making with the Christmassy hashtags.
One thing I didn't like about using straight servo control is how fast the servo moves to the new spot, so I added some code to make it move more slowly. Look for setServoPercent in the attached clausometer.py code. It's also in a separate testing file named slow_servo.py.
You might also notice in my code that I don't use the full sweep of the servo - it goes from 3 to 10, with possible range being 2.5 to 12.5. As I mentioned earlier, this actually gave me the perfect amount of sweep for the gauge.
As you see, I usually test the major components of my software in separate test files. I find it saves me a lot of debugging time to get the pieces working well separately first. That way you know which piece is misbehaving or needs tweaking.
Bringing the parts together
Once I had the separate pieces working, I simply had to combine them into a single project. Turns out it wasn't as simple as I had hoped - the Twitter monitor is done in a call that does not return - ie, it blocks execution and stops any following code from running. To get around this I started the Twitter code in a separate thread. I also started the spirit fader in a separate thread as that made the process a lot easier to time correctly.
After both those parts are started, with one increasing spirit and the other decreasing it, all that was left to do was to run a never-ending loop to print out the current spirit level and update the servo accordingly. Notice that the main loop does not contain any "sleep", which in many cases could cause updates to happen far too often. In this case, the setServoPercent call takes care of that detail, as that function takes about 2 seconds to complete (I was actually aiming for 1 second, but didn't notice that til now, haha oops. Changing the line that says time.sleep(0.02) to use 0.01 instead might actually make the Clausometer operate a little more smoothly.
The Result
As it turns out, Christmas spirit in the Twitterverse is quite high at Christmas time
Interestingly I've had a few occasions where Twitter was a bit slow to respond, and because I start my Clausometer at 50%, I could see the spirit level slowly dropping until eventually the tweets started coming in.
Here are a few videos of the Clausometer in action.
First, we can see the Christmas spirit rising as the tweets start coming in
After a while, Christmas spirit is pinning the needle at 100%, occasionally dropping to 99%.
It will be interesting to see what happens with the Clausometer as we get into the new year.
Maybe I need to add a "New Year Spirit" face for the dial, and change the hashtags it's looking for
In that sense, it could easily be converted to track team spirit during playoffs, or any other event or celebration.
Notice there's one tiny detail missing - negative comments are still counted as positive spirit! I'll call that a feature 
Merry Christmas everyone!
-Nico
Top Comments